Important
You are browsing the documentation for version 1.6 of OroCommerce, OroCRM and OroPlatform, which is no longer maintained. Read version 5.1 (the latest LTS version) of the Oro documentation to get up-to-date information.
See our Release Process documentation for more information on the currently supported and upcoming releases.
Create a User
Before you proceed, consider checking out user-related video tutorials in the Oro media library:
How to set up user profiles
How to create and manage users
Create Users in Oro
To create a new user in the Oro application:
Navigate to System > User Management > Users in the main menu.
On the All Users page, click Create User on the top right.

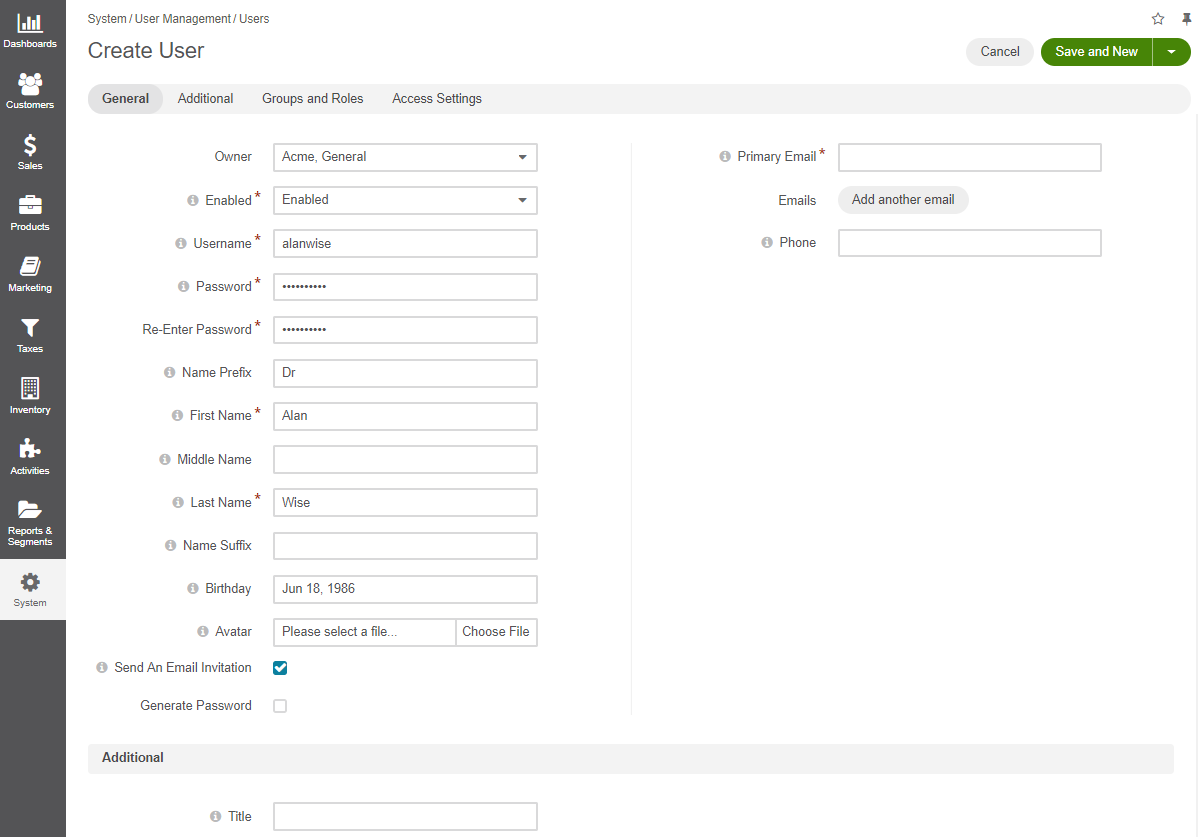
In the General section, provide the following information:
Note
Fields with a red asterisk are mandatory.
- Owner — Select a business unit from the list. The owner of the user record represents a business unit whose members can manage the record subject to the access and permission settings.
- Enabled — Select a user status from the list.
- Enabled — The user can log into the system, do their work within it, and be the owner of entity records.
- Disabled — The user cannot log into the system or be the owner of entity records.
- Username — The name that the user will use to log into the system.
- Password — The password that the user will use to log into the system. Password requirements are configured in the system settings. If the password you entered is not accepted, a notification is displayed in the password field.
- Re-enter Password — Provide the password again to confirm it.
- Name Prefix — A name prefix used in front of the user’s name.
- First Name — The first name of the user displayed on the interface when the user logs in.
- Middle Name — The middle name of the user.
- Last Name — The last name of the user. Together with the user’s first name, the last name is displayed on the interface when the user logs in.
- Name Suffix — A name suffix of the user. A name suffix is used after the user’s name and provides additional information about the user.
- Birthday — Click this field and select the user’s date of birth using a pop-up calendar. Alternatively, type the date in the format defined by your current locale.
- Avatar – Click Choose File to upload a photo of the user you are creating.
- Send An Email Invitation — Select this check box to send an email invitation to the user once the profile is created. The invitation is sent to the email address specified in the Primary Email field.
- Primary Email — The main email address of the user.
- Emails — Click Add Another Email and type an additional email address in the field that appears. You can add as many email addresses as required. To delete an email address, click x next to the email field that you want to delete.
- Phone — The user’s phone number.
In the Additional section provide more information about the user (e.g. the job title). When visible custom fields are added to the User entity, they appear in this section.
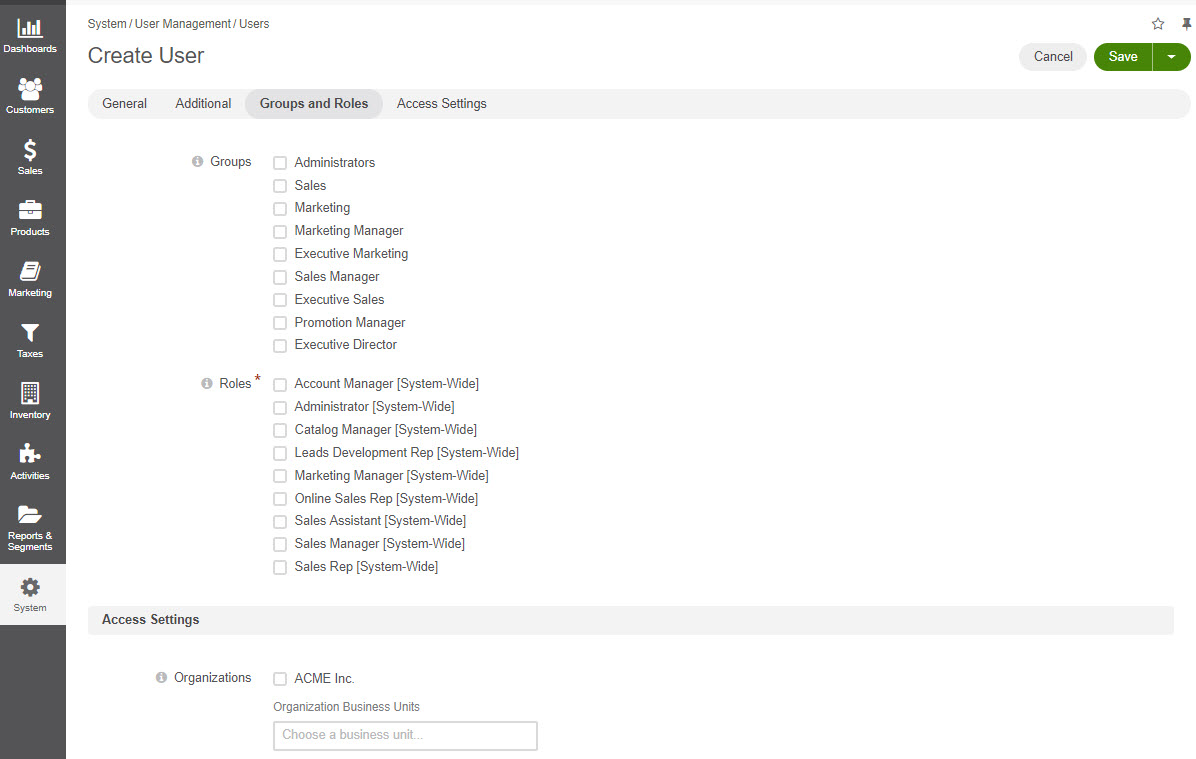
In the Groups and Roles section, select the required system-wide group and role for the user you are creating.
Important
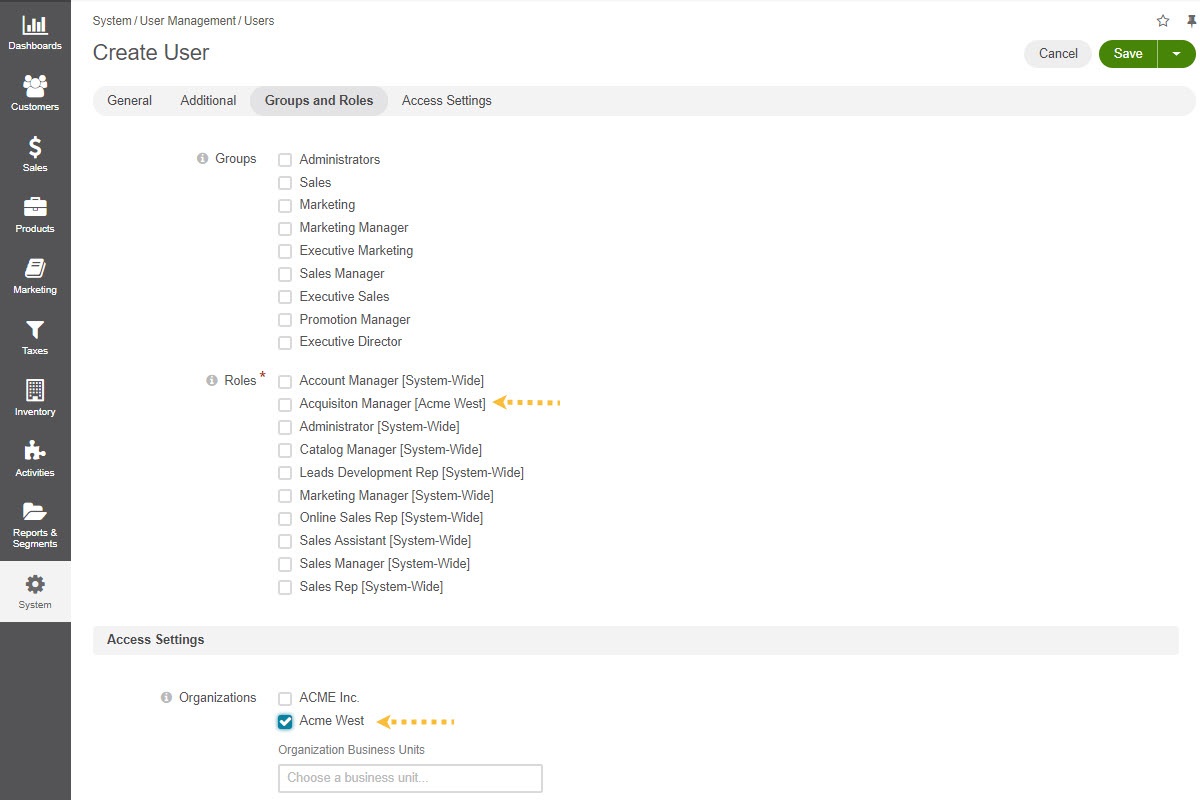
If you have the Enterprise edition of the Oro application, and you wish to limit access of the user you are creating to a specific organization, select it in the Access Settings section. If the organization has organization-specific roles, these will appear on the list in the Group and Roles section once you select the required organization in Access Settings.
The following screenshot illustrates system-wide roles with no organization selected in Access Settings:

The following screenshot illustrates the organization-specific role added to the list once the organization is selected in Access Settings:

In Access Settings select the check boxes in front of the organization(s) you want the user to have access to.
Caution
Note that the user will not be able to log into the system if no organization is selected for them. In addition, at least one role must be selected. Otherwise, you will not be able to save the user.
- In the Organization Business Units field, provide the business unit name, or select it from the list. On the list, you can see business units of the organizations selected in the Organizations subsection.
- You can select one or more business unit. In this case, the data owned by the user will be considered as belonging to all these business units and users that have access to these business units and corresponding permissions will be able to access it.
- When the user’s role includes division level permissions, the user will be able to access data of each business unit specified in these sections, as well as the data of the whole chain of business units subordinated to those selected in this section.
Click Save.
Note
To create another user straight away, click Save and New.
Once the user is created, it becomes available in the table of all users under System > User Management > Users:
To view details of a specific user, click once on the user name in the table to open their page.

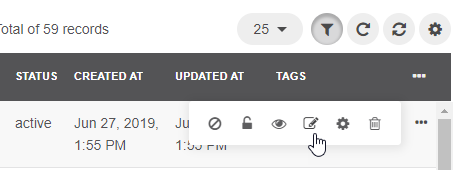
To edit details of a specific user, click in the ellipsis menu at the end of the row of the selected user. Alternatively, open the page of the user and click Edit on the top right.

For information on the activities you can perform from the user profile page (such as send an email, or assign a calendar event), check out the Activities topic.
Create Users via LDAP
The Enterprise edition of the Oro application supports integration with LDAP (Lightweight Directory Access Protocol) server which enables you to import existing user information (including role identifiers) from the LDAP server into the application.
To enable import of LDAP records, you first need to set up integration with LDAP. Once the integration is established, user profiles are imported to the application and users can use their usual credentials to log into the application.
Using LDAP integration does not prevent you from creating user records in the Oro application manually. Manually created user records are not imported back to your LDAP server.
System administrators can tell if a user has been added via the LDAP integration. The LDAP Distinguished Names field in the profile of these users contains integration-specific values.

For more information on the integration with LDAP, please see the topic on LDAP integration.

