Important
You are browsing the documentation for version 3.1 of OroCommerce, OroCRM and OroPlatform, which is no longer maintained. Read version 5.1 (the latest LTS version) of the Oro documentation to get up-to-date information.
See our Release Process documentation for more information on the currently supported and upcoming releases.
Manage Warehouses in the Back-Office
Hint
This section is a part of the Inventory and Warehouse Management topic that provides the general understanding of the inventory and warehouse concepts.
Create a Warehouse
Note
Creating multiple warehouses is an Enterprise edition feature.
To create a new warehouse:
Navigate to Inventory > Warehouses using the main menu.

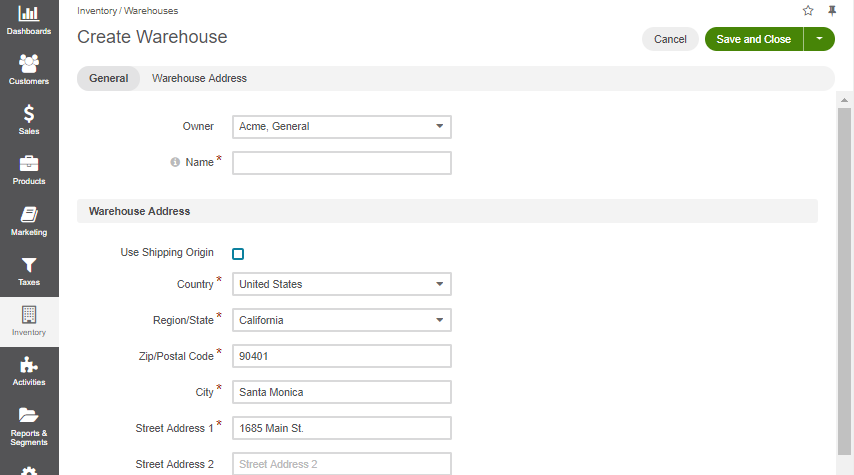
Click Create Warehouses. The following page opens:

Enter the warehouse name.
Fill in the address:
To use the default warehouse address from shipping system configuration, set the Use Shipping Origin box.
To use custom warehouse address, enter the Country, Region/State, Zip/Postal code, City, and street address.
Click Save.
View and Filter All Warehouses
To view all warehouses, navigate to Inventory > Warehouses in the main menu.

You can perform the following actions here:
Create a warehouse: Click the button on the top right.
View Warehouse details: Click on the warehouse to open its details page.
Edit Warehouse details: Click at the end of the row to start editing the selected warehouse details. You might need to click the More Options menu at the end of the row to reach the icon.
Delete a Warehouse: Click the More Options menu at the end of the row, and then click the Delete icon.
Note
If the warehouse has been enabled in the global system configuration with no other warehouses enabled, you cannot delete it.
Related Topics