Important
You are browsing the documentation for version 3.1 of OroCommerce, OroCRM and OroPlatform, which is no longer maintained. Read version 5.1 (the latest LTS version) of the Oro documentation to get up-to-date information.
See our Release Process documentation for more information on the currently supported and upcoming releases.
Configure UPS Shipping Integration in the Back-Office
Hint
This section is a part of the Shipping Configuration topic that provides a general understanding of the shipping concept in OroCommerce.
UPS shipping integration section describes the steps that are necessary to expose UPS as a shipping method in OroCommerce orders and quotes.
Note
See a short demo on how to set up a shipping integration in OroCommerce or keep reading the step-by-step guidance below.
Prepare for Integration
First, ensure you have registered with UPS.com and have opened a UPS Account with the necessary shipping services level.
Next:
Log in to the ups.com.
Navigate to the UPS Developer Kit in the Support > Technology Support section.
Request an access key (e.g., 5F235F292A54F51F).
Please, ensure that you have requested separate access keys for your test and production environments.
Configure a UPS Integration in OroCommerce
To enable communication with UPS in order to request the shipping cost estimate and/or request the shipping services, establish a connection with UPS API:
Navigate to the Manage Integrations page by clicking System > Integrations > Manage Integrations in the main menu.
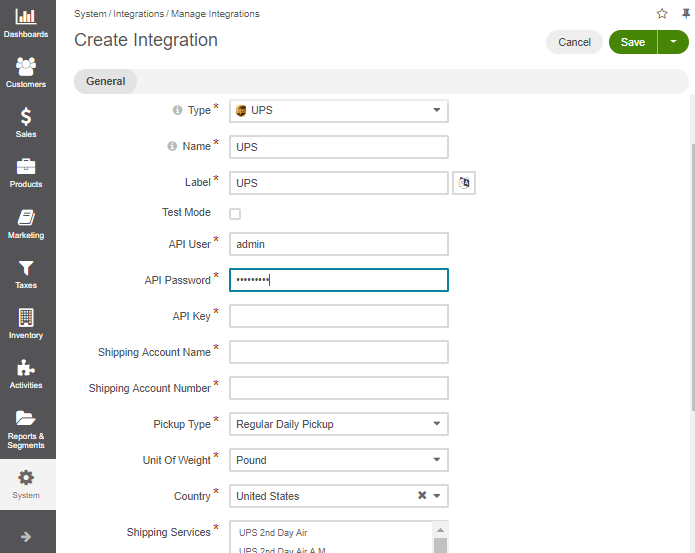
Click Create Integration and select UPS as integration type:

Type in the Common Integration Details:
Name – the shipping method name that is shown as an option for shipping configuration in the OroCommerce back-office.
Label – the shipping method name/label that is shown as a shipping option for the buyer in the OroCommerce storefront on the checkout.
Short label – the shipping method name/label that is shown in the order details in the OroCommerce back-office and storefront after the order is submitted.
Status - set the status to Active to enable the integration.
Set the Test Mode into the necessary state. Enable it if you are using the test UPS access key and disable for production access.
Note
For security reasons, it is critically important to use the mode that matches your environment and the UPS access key type.
Warning
Never use the UPS access key that is dedicated for the production environment in your sandbox/test OroCommerce environment.
Never enable the Test Mode for the UPS integration on your production instance of OroCommerce.
Provide the UPS connection details: API user, password, and API key to connect. Click Check UPS Connection to ensure UPS API is accessible.
Provide the UPS service account details:
Shipping account name
Shipping account number
Select the pickup type that shall apply to the deliveries for the shipping methods via this integration. Available options are:
Regular Daily Pickup
Customer Counter
One Time Pickup
On Call Air
Letter Center
Select unit of weight to use for the shipping price calculation.
Note
The unit of weight should be in sync with the options that are supported by your UPS account.
Select the destination country. To support shipping globally, create a dedicated UPS integration (e.g., UPS USA, UPS UK, UPS Germany, etc) for every country you would like to cover with UPS shipping services.
Once you select the destination, the list of shipping services appears.
Select the UPS shipping services that should be supported in the OroCommerce shipping options. Use Ctrl/Shift to select multiple options.
Set status to Active to enable the integration.
Click Save.
Next, set up a shipping rule via the Shipping Rules Configuration page to enable this shipping method for all or some customer orders.
Once the shipping method is added to the shipping rule, provide the information that configures the shipping fee components and the method to calculate it following the Configure a Shipping Method in a Shipping Rule topic.
Related Topics