Important
You are browsing upcoming documentation for version 7.0 of OroCommerce, scheduled for release in 2026. Read the documentation for the latest LTS version to get up-to-date information.
See our Release Process documentation for more information on the currently supported and upcoming releases.
Sidebar Panel
The sidebar panel is a host for a number of widgets that provide fast and convenient access to frequently needed information, such as recent emails or the task list.
By default, the sidebar panel is located on the right side of the page. However, subject to the configuration settings of your organization, there can be a sidebar on the left, two sidebars (on the left and the right), or no sidebar at all. The system administrator defines the location of the sidebar for the whole organization.
Add a Widget to the Sidebar
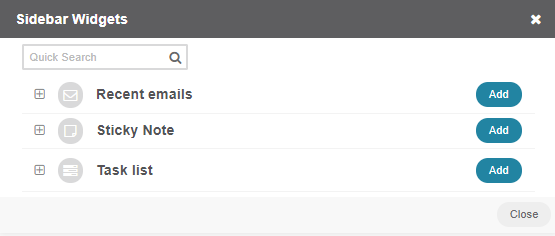
Out of the box, any sidebar can contain widgets of three types:
Recent Emails widget: Set up the widget to get access to your emails in one or several of the synchronized mailboxes, or to all the emails in your Oro mailbox.
Sticky Notes: Place free-text notes and reminders.
Task List: See the most recent tasks assigned to you.
To add a new widget, use +, select the widget type and click the OK button.

The newly added widget will appear on the sidebar, below the existing widgets. To reorder widgets on the sidebar, drag and drop them with your mouse.
You can add more than one widget of any type if necessary. For example, you can stick any amount of notes or follow several different email folders or mailboxes synchronized to your account in the Oro application.
Expand/Collapse the Sidebar
Initially, the sidebar panel is minimized. Hover over the icon to see the widget header.
To expand the sidebar panel, click the arrow at its bottom.
To collapse the panel back, click the arrow again.
Expand/Collapse a Widget
To see the widget content:
Click the icon on a minimized bar.
Click next to the header on the expanded bar.
Click to fold the widget.
To reorder widgets on the sidebar, drag and drop them with your mouse. This works in both the collapsed and expanded states.
This way, you can keep some of the content visible at all times and keep fewer used widgets minimized.
Manage the Widgets
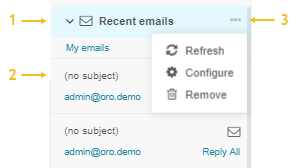
As shown below, each widget contains a header (1), content (2), and icons (3).

You can:
Refresh the content (e.g., load the most current emails or tasks).
Configure the widget settings.
x close the widget (appears when the panel is minimized).
Hint
You can add several widgets of the same type and define different settings for them. For example, you can keep notes with different content or email widgets for different folders.
Default Sidebar Widgets
This section describes three sidebar widgets available in the Oro application out-of-the-box.
Note
You can find more information on dashboard widgets in the corresponding Dashboard Widgets topic.
Recent Emails Sidebar Widget
The widget informs you about new and unread emails and gives you a convenient way to access them.

From the widget, you can:
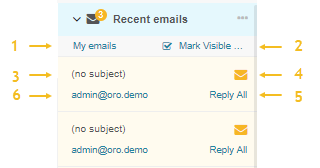
Access the All Emails page and see all your emails in the Oro application (1).
Mark all the visible emails as read (2).
Access any of the displayed emails (3).
Mark any of the displayed emails as read (4).
Reply, reply to all, or forward the emails (5).
Get to the view page of the user who sent you the email (6).
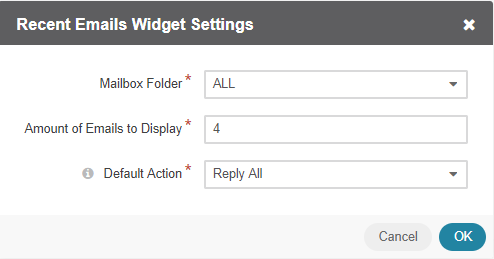
Click the icon to configure the widget.

Configure the widget to display all the emails from your Oro mailbox, any specific folder, or the mailbox that has been synchronized.
Change the number of emails displayed.
Define the default action shown when the sidebar panel is expanded.
Sticky Note Sidebar Widget
Sticky notes are a great way to keep reminders and memos. You can keep them organized in your Oro sidebar panel.
Click the to change the content of a note.
You can keep any number of sticky notes in the panel. If the panel is expanded, you can minimize some notes and keep others visible (such as those due today). You can quickly delete the note when you don’t need it anymore.
Task List Sidebar Widget
This widget displays tasks assigned to you. Tasks are ordered by their due dates in ascending order—the earlier the due date, the higher on the list a task is displayed. Overdue tasks appear in red.
You can perform the following actions with the task list sidebar widget:
Expand the widget by clicking on the minimized sidebar and on the maximized sidebar.
Collapse the widget by clicking on the minimized sidebar and on the maximized sidebar.
Refresh the list of tasks by clicking .
Configure the parameters for a widget by clicking .
Change a number of displayed tasks by entering the required value into the Number of tasks to show field. Click OK.