Important
You are browsing upcoming documentation for version 7.0 of OroCommerce, scheduled for release in 2026. Read the documentation for the latest LTS version to get up-to-date information.
See our Release Process documentation for more information on the currently supported and upcoming releases.
Basic Quote Lifecycle Management (When Workflows Are Disabled)
Available options depend on the current status of the quote and your permissions. These actions appear only when all the quote-related workflows are disabled and the default (basic) quote management applies.
Edit a Quote
Important
This option is available only when:
Quote Management Flow / Backoffice Quote Flow with Approvals are inactive.
One of the workflows is active, and the current workflow step allows editing the quote.
To edit a quote:
Navigate to Sales > Quotes in the main menu.
Hover over the More Options menu to the right of the item and click the Edit icon to start editing its details.
Important
The icon that starts a workflow looks like the Edit icon. Please check the hint that appears when you hover over the icon to make sure that you select the desired action.
Update the Quote General Information, Line Items, Shipping Address, Shipping Information sections, or add any relevant documents under Customer Documents. See Create a Quote topic for detailed information on the available options.
Click Save on the top right of the page.
The quote is updated.
Learn more ways to edit a quote.
Notify a Customer About the Quote
Important
You can send notification to the customer in this way only when the Quote Management Flow / Backoffice Quote Flow with Approvals are inactive.
To notify a customer that their quote is prepared:
In the main menu, navigate to Sales > Quotes.
Choose the quote in the list and click it. The quote details page opens.
Click next to Notify Customer on the top right of the page, and then click Notify By Email.
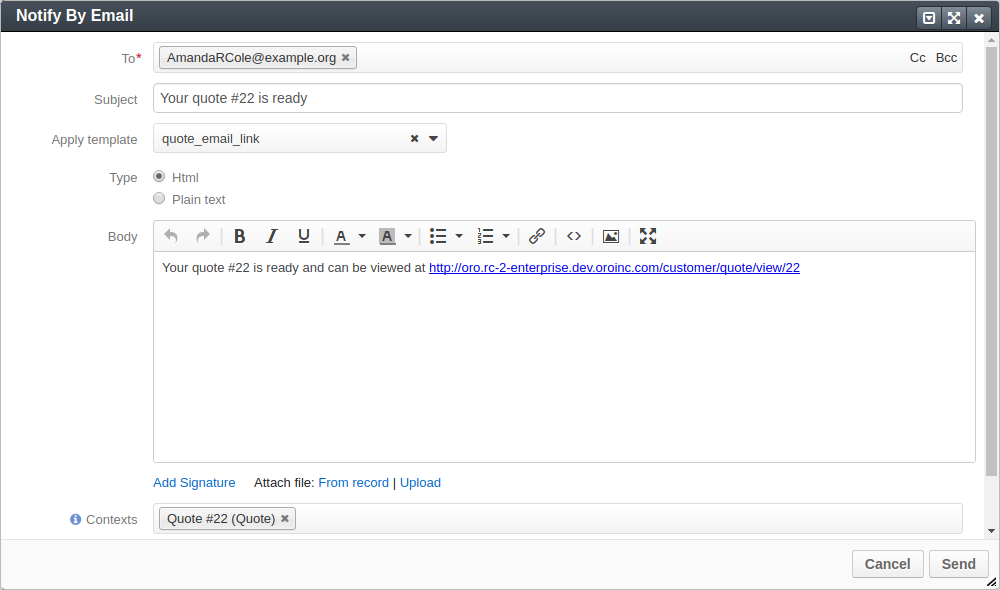
In the Notify By Email dialog that appears, review the email draft. If required, add additional recipients to the To, CC, or BCC fields, or make other changes. The email body may be adjusted to be more personalized.

Click Send.
Hint
By default, the quote_email_link email template is used for this type of notifications. You can select another one or, if you have corresponding permissions, you can adjust the email template. If you do not have permissions to modify templates, ask your administrator for help.
The quote internal status becomes Sent to Customer.
Mark a Quote as Expired
Expire a Quote From the Grid
Important
You can expire a quote in this way only when the Quote Management Flow / Backoffice Quote Flow with Approvals are inactive.

To indicate that the quote’s validity period is over from the quote list:
In the main menu, navigate to Sales > Quotes. The quote list opens.
Choose the quote that you need to expire, click the More Options menu at the end of the row, and then click the Expire Quote icon.
In the confirmation dialog, click Mark as Expired.
The quote’s Expired field in the list is now set to Yes.
Expire a Quote From the Quote View Page
Important
You can expire a quote in this way only when the Quote Management Flow / Backoffice Quote Flow with Approvals are inactive.
To indicate that the quote’s validity period is over from the quote details page:
In the main menu, navigate to Sales > Quotes.
Choose the quote in the list and click it. The quote details page opens.
Click the Expire Quote button on the top right of the page.
In the confirmation dialog, click Mark as Expired.
The quote is now marked as Expired:

Expire a Quote From the Quote Edit Page
Important
You can expire a quote in this way only when the Quote Management Flow / Backoffice Quote Flow with Approvals are inactive. Otherwise, use the Edit transition defined within the active workflow:

To indicate that the quote’s validity period is over from the quote details page:
In the main menu, navigate to Sales > Quotes.
Choose the quote in the list and click it. The quote details page opens.
Click Edit on the top right of the page:

Update the Quote General Information, Line Items, Shipping Address, or Shipping Information sections. See Create a Quote section for detailed information on the available options.
Click Save on the top right of the page.
The quote is updated.
Learn more ways to expire a quote.
Delete a Quote
Important
This option is available only when:
Quote Management Flow / Backoffice Quote Flow with Approvals are inactive.
One of the workflows is active, and the current workflow step allows editing the quote.
To edit a quote:
Navigate to Sales > Quotes in the main menu.
Hover over the More Options menu to the right of the item and click the Edit icon to start editing its details.
Important
The icon that starts a workflow looks like the Edit icon. Please check the hint that appears when you hover over the icon to make sure that you select the desired action.
Update the Quote General Information, Line Items, Shipping Address, Shipping Information sections, or add any relevant documents under Customer Documents. See Create a Quote topic for detailed information on the available options.
Click Save on the top right of the page.
The quote is updated.
Learn more ways to delete a quote.