Important
You are browsing upcoming documentation for version 7.0 of OroCommerce, scheduled for release in 2026. Read the documentation for the latest LTS version to get up-to-date information.
See our Release Process documentation for more information on the currently supported and upcoming releases.
Configure Stripe Payment Element Integration in the Back-Office
Hint
This section is part of the Payment Configuration topic that provides a general understanding of the payment concept in OroCommerce.
Stripe is a payment service provider that helps accept online payments from customers in the OroCommerce storefront. The Stripe Payment Element integration allows customers to pay both invoices and orders directly at checkout, offering a wide range of payment options in a single, unified UI. This includes credit and debit cards, local payment methods in international markets, payment wallets, and buy-now-pay-later options. The integration also supports order splitting, enabling you to capture, cancel, or refund (fully or partially) payments for each sub-order separately, while providing tools to detect potential fraudulent activity and prevent fraudulent orders.
Note
See a short demo on how to configure integration with Stripe or keep reading the step-by-step guidance below.
Note
Stripe Integration comes as a separate OroCommerce package and requires installation of the Stripe Integration package.
To start using Stripe Payment Element with the OroCommerce application:
Register with Stripe to receive the test credentials.
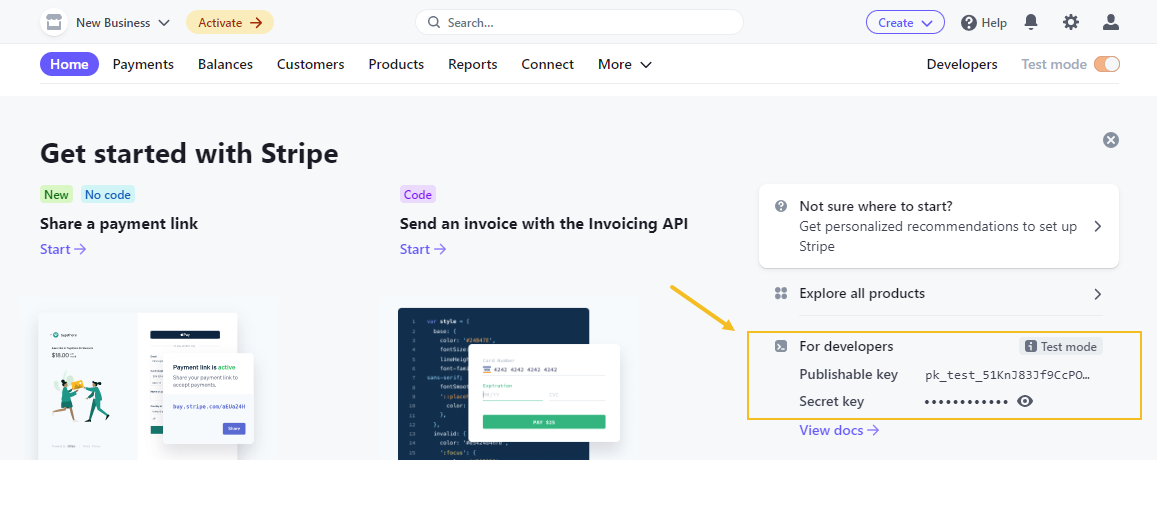
To get the live credentials and start accepting payments, add your business details to view live keys.
In the main menu of the OroCommerce back-office, navigate to System > Integrations > Manage Integrations.
Click Create Integration on the top right.
Provide the following information in the form:
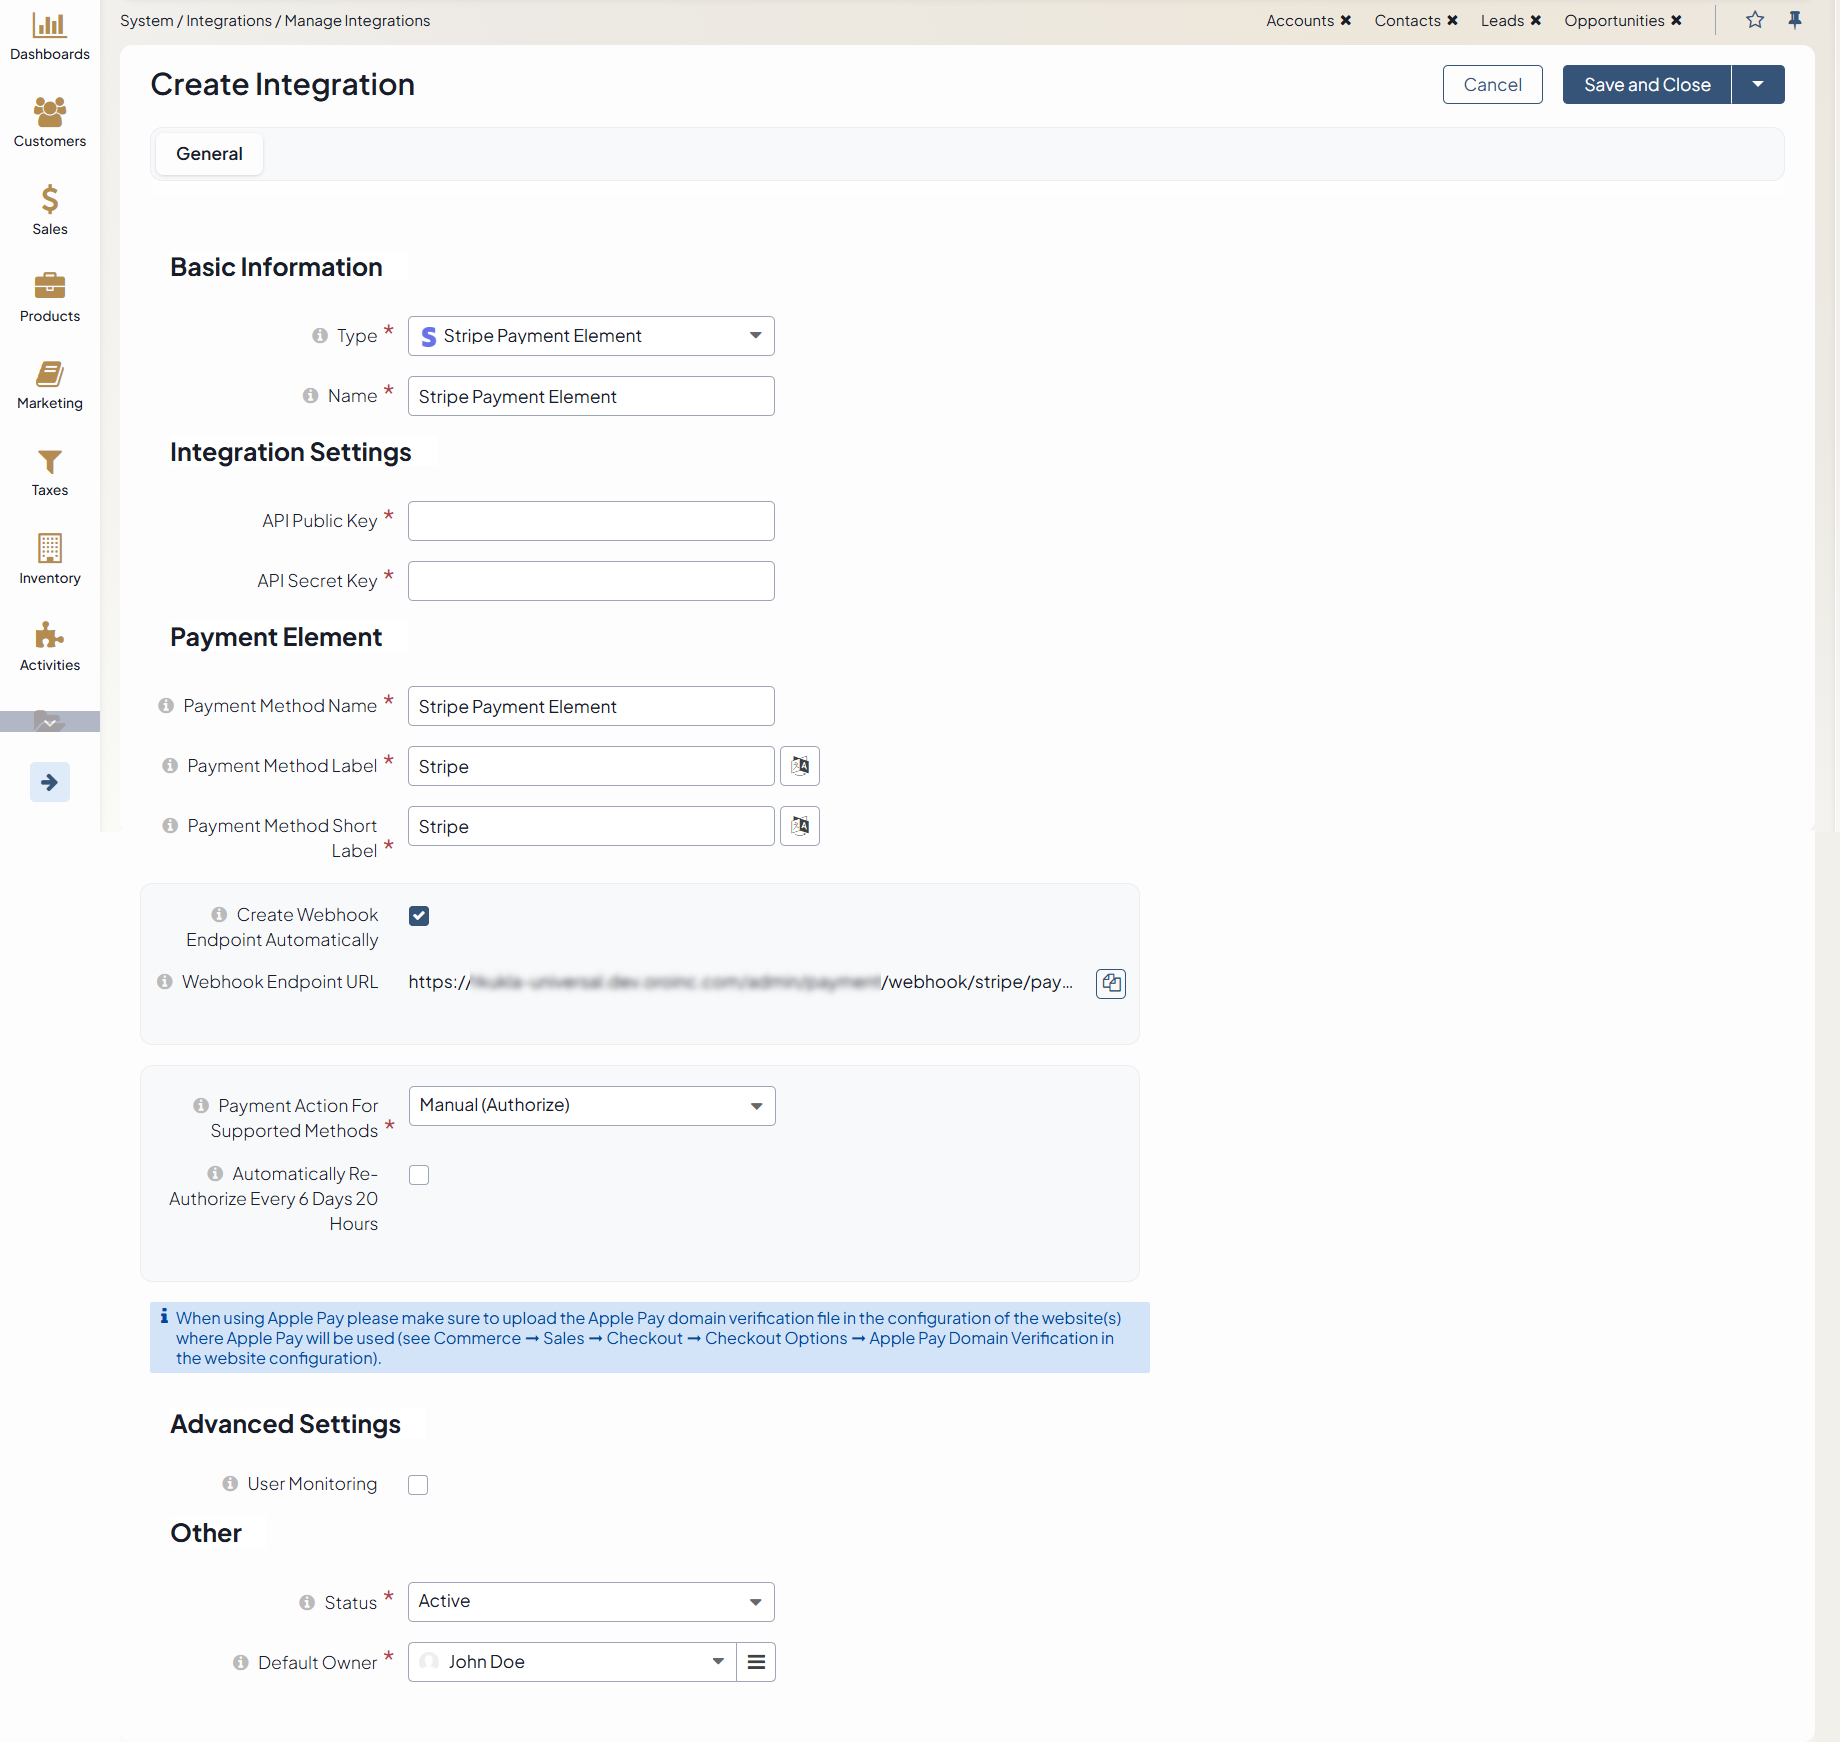
Type - Select Stripe Payment Element from the drop-down list.
Name - Provide the payment method name that is shown as an option for payment configuration in the OroCommerce back-office.
API Public Key - An identifier that helps authenticate your account. It refers to Publishable key on the Stripe side. You must use separate keys for the test and production environments.
API Secret Key - A pre-shared key used to cipher payment information. It refers to Secret key on the Stripe side. You must use separate keys for the test and production environments.
Payment Method Name - The name for the payment method in back-office, e.g., Stripe Payment Element.
Payment Method Label - The label for the payment method in storefront, e.g., Stripe Payment.
Payment Method Short Label - The short variant of the label for payment method in storefront, e.g., Stripe.
Create Webhook Endpoint Automatically - If enabled, the system automatically creates and configures a Stripe webhook endpoint. This ensures real-time payment events (e.g., successful charges, refunds, or failures) are sent to your application. If you choose to create webhook manually, please provide Webhook Signing Secret.
Hint
To obtain the Signing secret:
Navigate to Developers > Webhooks in the Stripe dashboard and click Add an endpoint. Endpoint is a unique URL of your Oro application that is created to receive and process data from Stripe in real-time. URL format should be:
https://my_website_domain.com/stripe/handle-events. You can use one endpoint to handle several different event types at once, or set up individual endpoints for specific events.
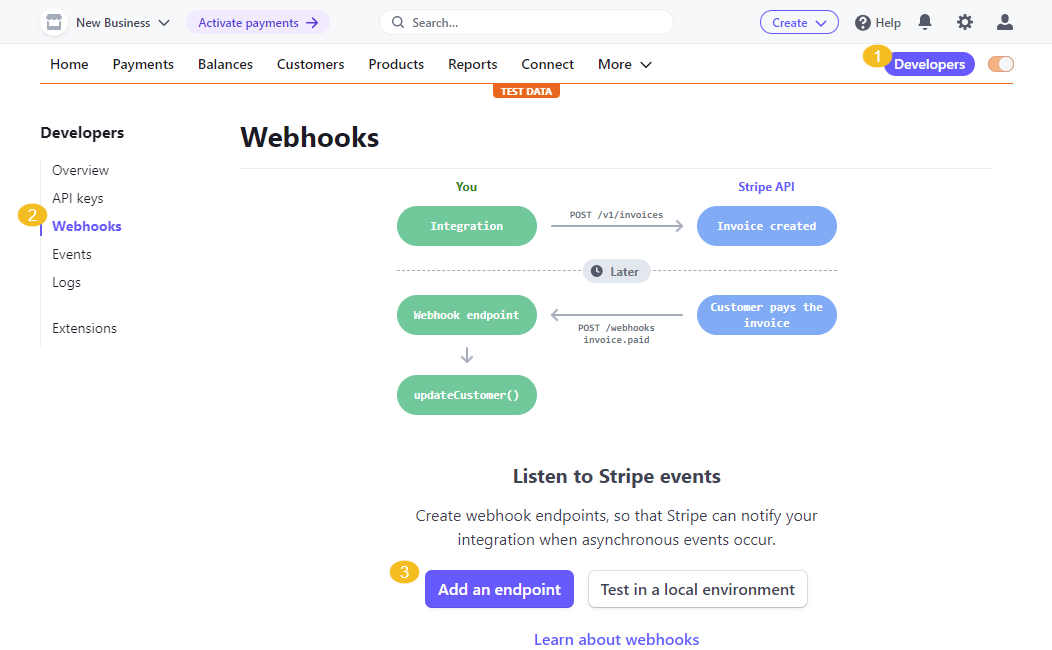
Provide the endpoint URL and select the three events to listen to, charge.refunded, payment_intent.canceled, and payment_intent.succeeded. Keep in mind that Oro supports only these three events. Click Add events.

Click Add endpoint and copy the generated Signing secret to your Stripe integration creation field.

Payment Actions for Supported Methods — Select one of the options for credit cards:
Manual (Authorize) — The payment gateway checks with the cardholder’s issuing bank that the submitted card is valid and that there are sufficient funds to cover the transaction. The required amount is placed on hold on the card for 7 days but not yet charged. When you click Capture in the order details (Sales > Orders), the customer is charged the given amount. Payment status changes from Payment Authorized to Paid in Full. If you do not capture the funds within 7 days, the funds are returned to the customer, and the payment status changes to Canceled.
Automatic (Capture) — The payment gateway checks the card with the cardholder’s issuing bank and, if everything is OK, initiates a money transfer from the card to your account. The customer is charged the given amount in full automatically.
User Monitoring - Select the option to enable Stripe to fight fraud by detecting suspicious behavior. When enabled, the Stripe.js script is loaded on all storefront pages to provide real-time fraud protection.
Status - Select whether the integration is active or inactive.
Default Owner - A user responsible for this integration and its management.
Note
In the Synchronization Settings section, select the Log Warnings checkbox if you want all synchronization errors to be written into the application log.
Click Save and Close
Once the integration is saved, you can connect it as a payment method in the configuration settings for Invoices or create payment rules to enable it for order payments in the storefront checkout.
Connect Stripe as Payment Method for Invoice Payments
Stripe Payment Element can be used to pay invoices in the OroCommerce storefront. To set it up, first create a Stripe Payment Element integration under System > Integrations > Manage Integrations, as described above. Then, add this integration as a Payment Method in the Invoices configuration settings under System > Commerce > Sales > Invoices at the level you want it to be available (global, per organization, or per website).
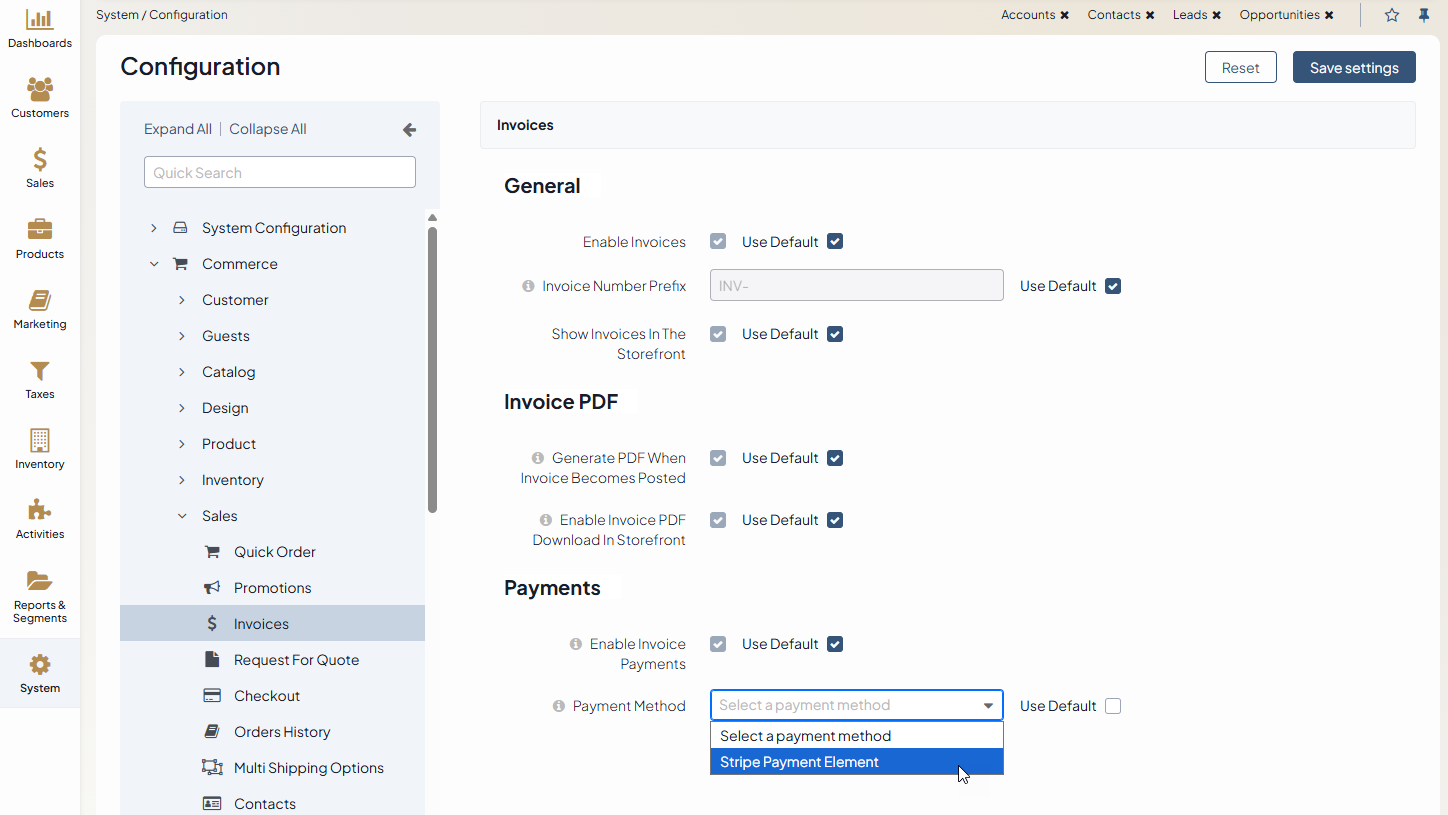
Once configured, customers will see Stripe as a payment option when paying invoices.
Connect Stripe as Payment Method for Storefront Checkout
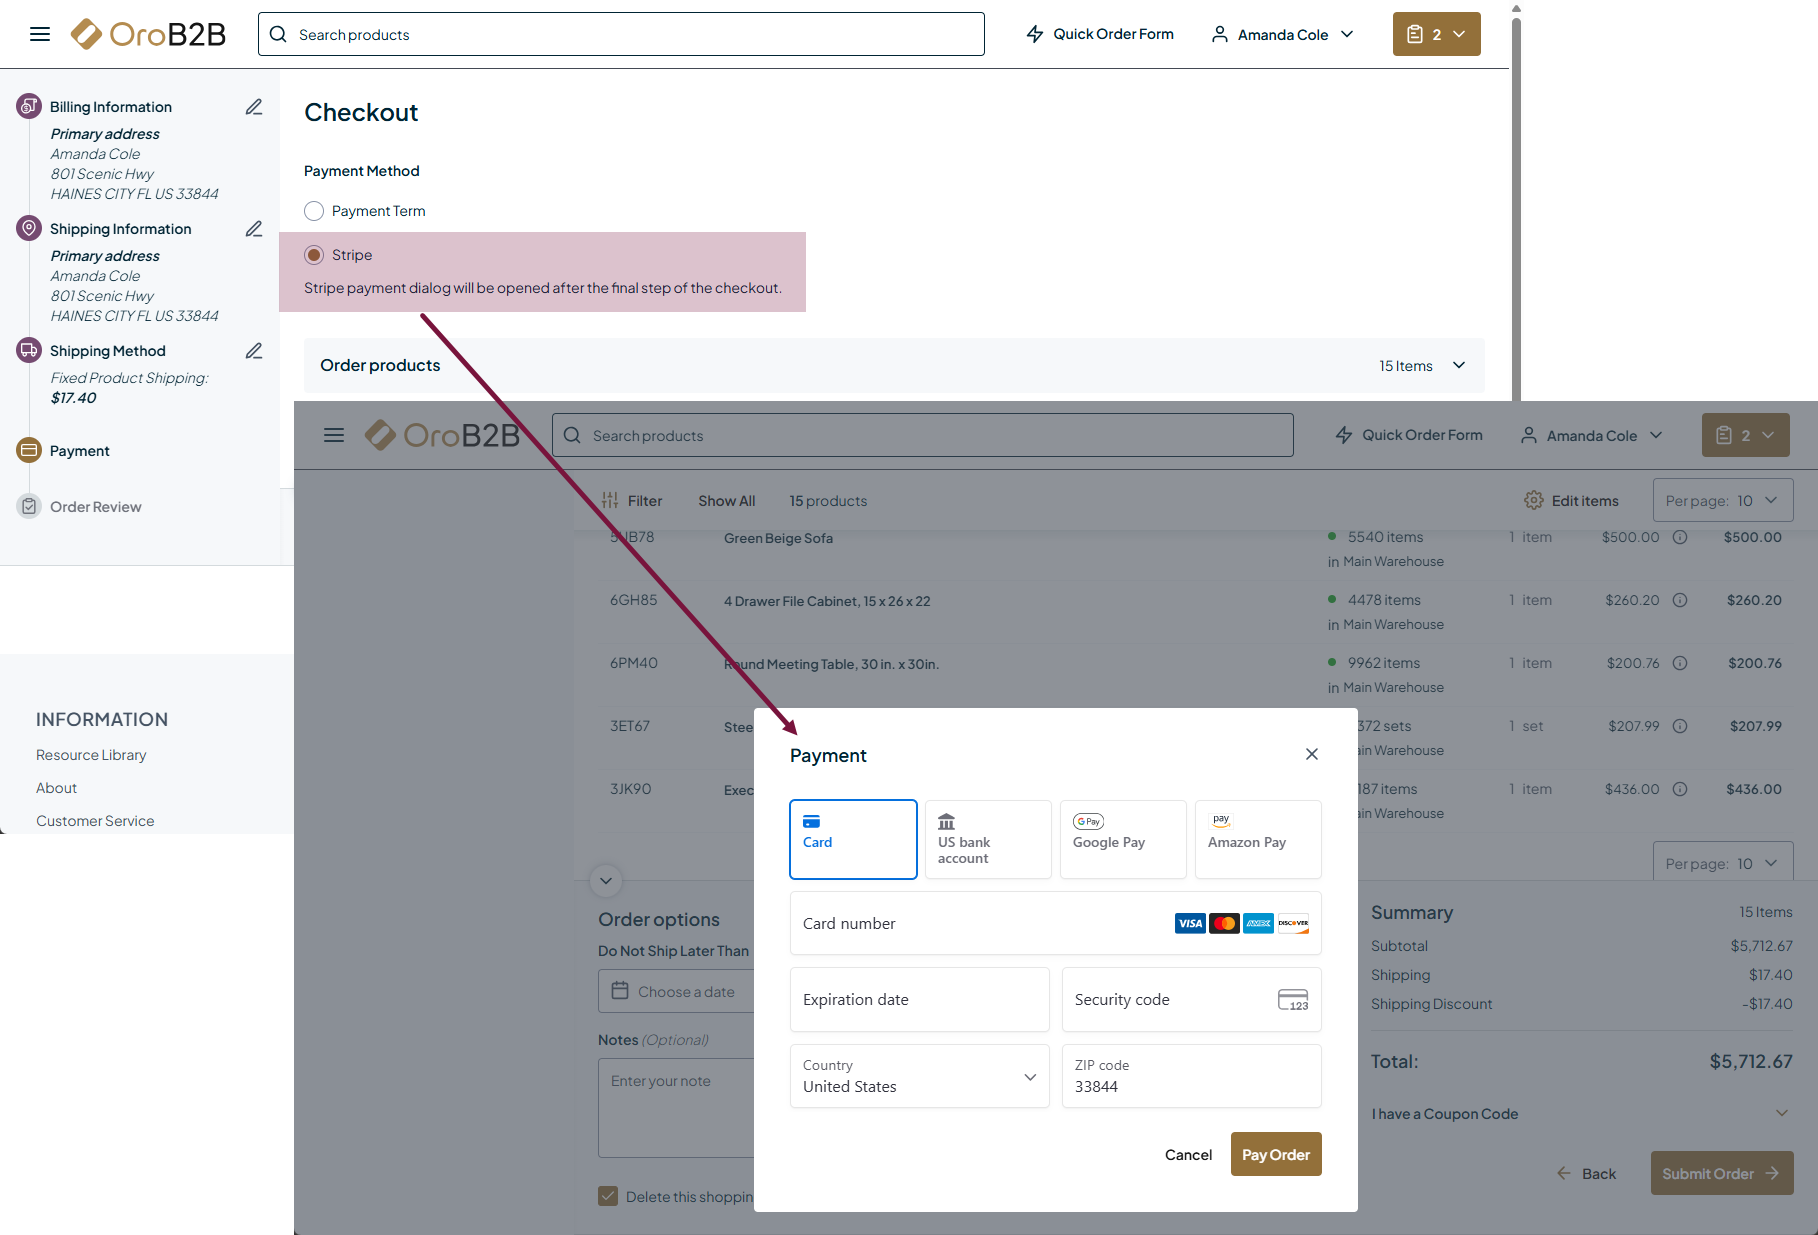
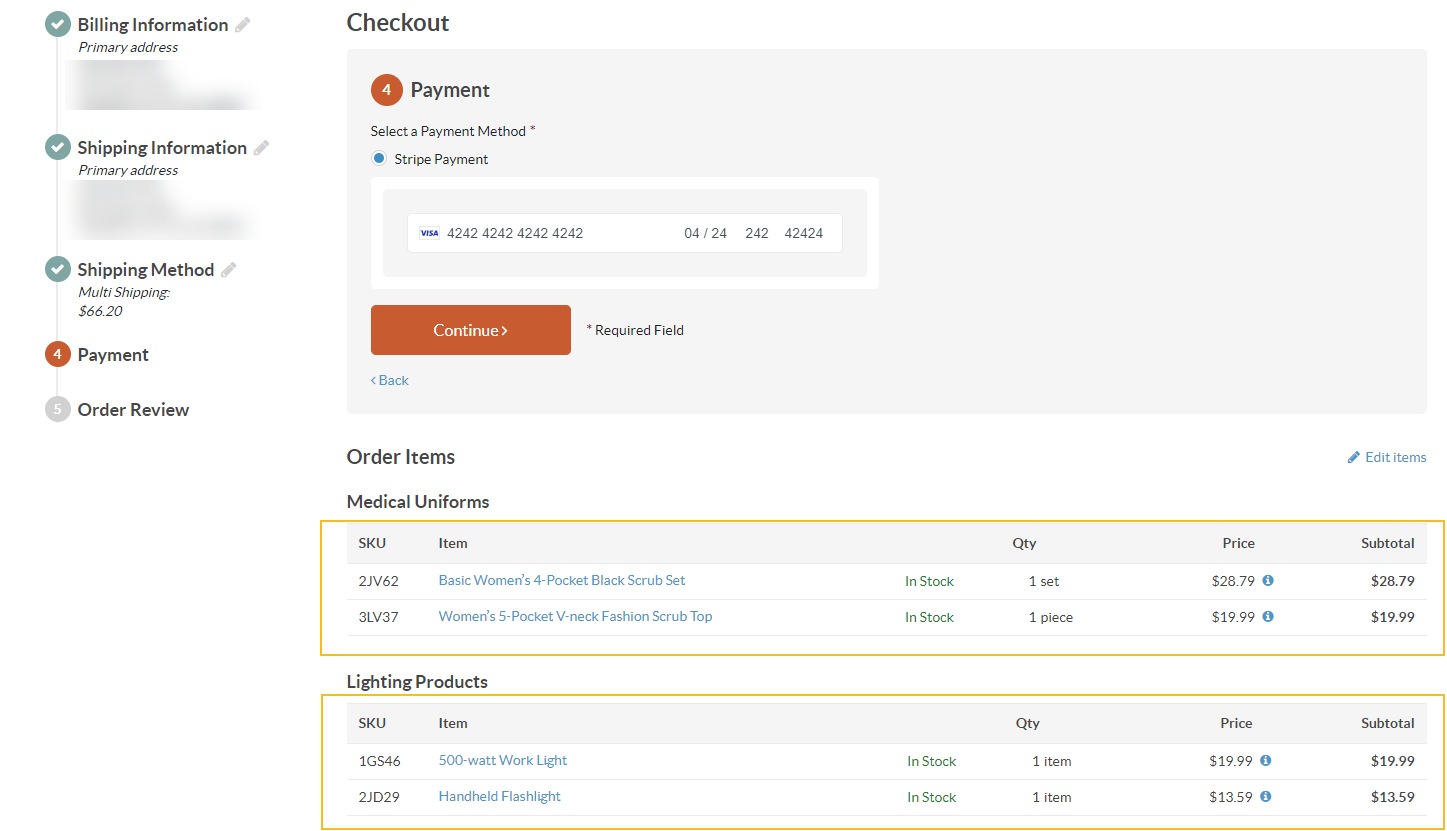
Once the payment method is added to a payment rule, it becomes available at checkout in the OroCommerce storefront. When a customer picks Stripe Payment Element, a modal pops up with the Stripe widget after the final step of the checkout, showing the most relevant payment options—credit and debit cards, wallets, local methods, and even buy-now-pay-later—based on their location, currency, and order total. When they click Pay Order, the payment goes through securely, with 3DS and SCA handled automatically.
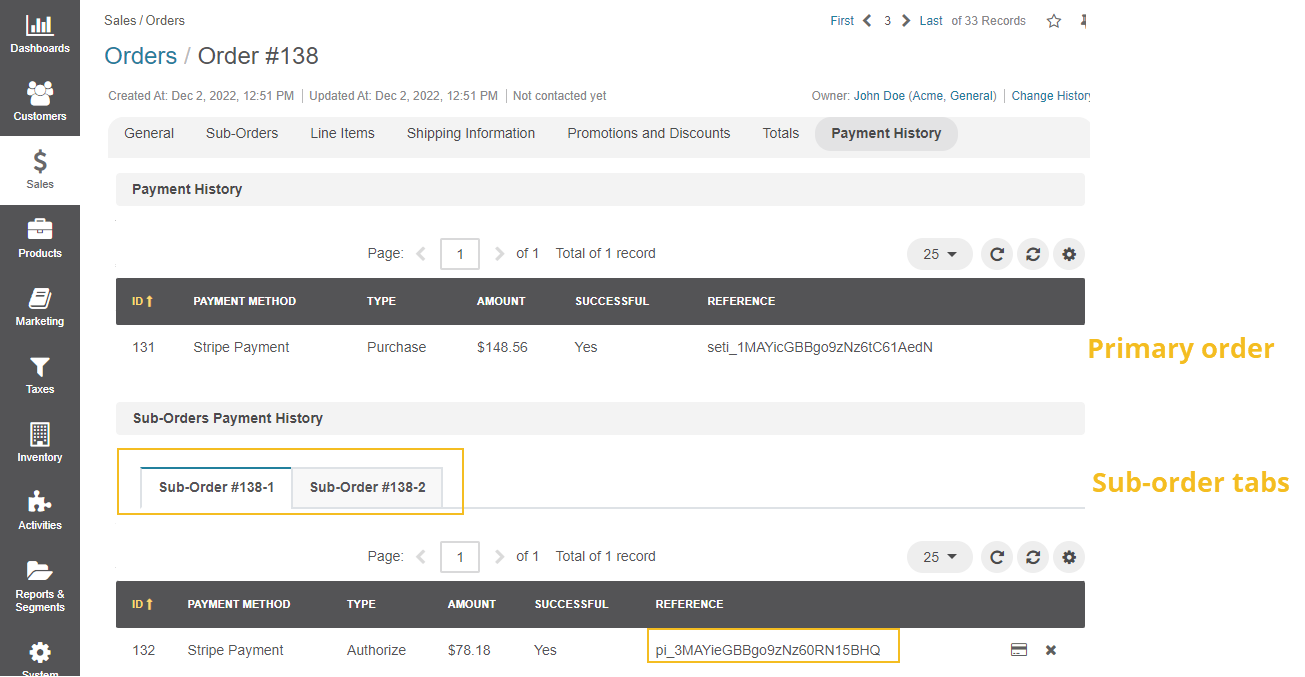
Sub-Order Checkout with Stripe Payment Element
If the order split is enabled for the application, then each sub-order is processed separately by Stripe Payment Element.
Once submitted, the system splits the order to the respective sub-orders, assigning them the corresponding reference codes. The codes are used to identify the order on the Stripe side. You can find the details on the primary or sub-order details page, under the Payments section.
To capture an authorized payment:
From the primary order details page — Select the sub-order tab under the Sub-Orders Payment History menu and click .
From the sub-order details page — Click at the end of the row under the Payments section.
To cancel an authorized payment:
From the primary order details page — Select the sub-order tab under the Sub-Orders Payment History menu and click X.
From the sub-order details page — Click X at the end of the row under the Payments section.
To refund (partially or fully) any successful payment:
Find the payment that you want to refund.
Click at the end of the row to open the refund dialog.
By default, you’ll issue a full refund. For a partial refund, enter a different refund amount.
Provide an internal note with the reason for the refund under the Notes section.
Select another refund reason from the dropdown. It will be recorded on the Stripe side.
Click Yes. Refund Payment.
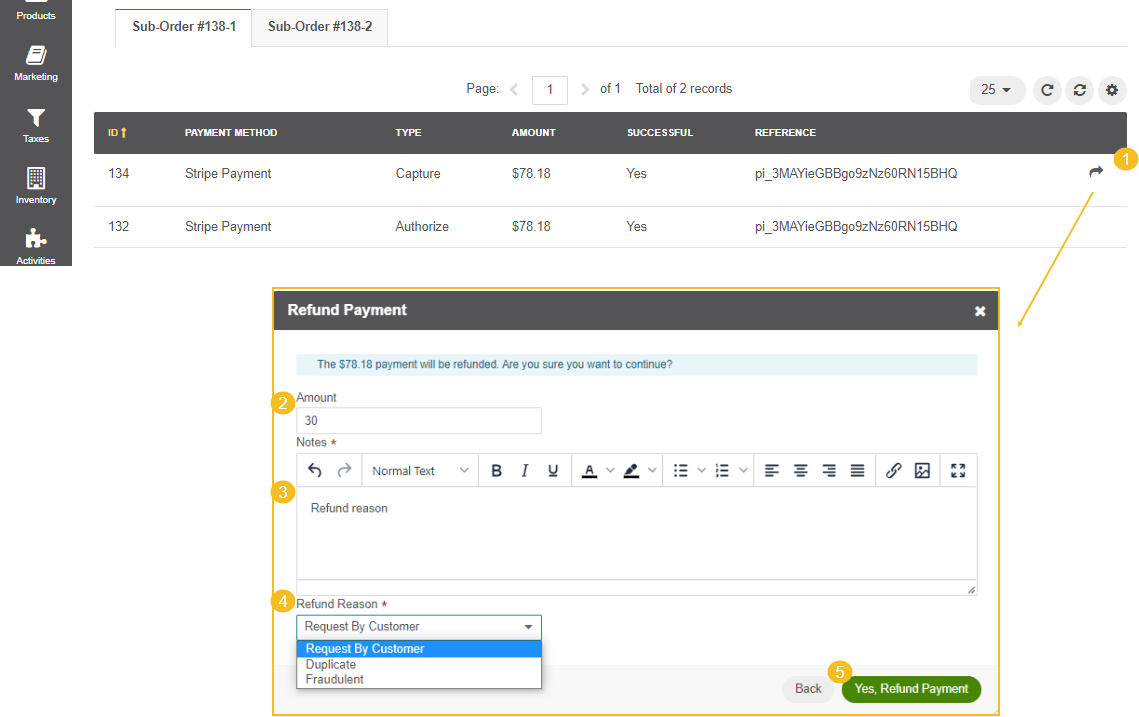
You can issue more than one refund, but you cannot refund a total greater than the original charge amount.
Related Topics