Important
You are browsing documentation for version 6.1 of OroCommerce, supported until 2029. Read the documentation for the latest LTS version to get up-to-date information.
See our Release Process documentation for more information on the currently supported and upcoming releases.
Configure Webhooks in the Back-Office
Note
Webhook notification functionality is available as of OroCommerce version 6.1.9.
OroCommerce supports webhook notifications, allowing automatic transmission of information about specific events to external systems as soon as those events occur.
For example, when an order is created, updated, or deleted, the system can send a notification to a connected third-party application without requiring manual actions or scheduled data synchronization.
Webhook notifications help keep external systems synchronized with the latest changes in OroCommerce by providing near real-time event updates.
The webhook functionality supports:
Sending notifications from OroCommerce to external systems.
Receiving incoming webhook requests from third-party applications through a unified endpoint.
Secure communication using webhook secrets and payload signatures.
Independent processing through the message queue, which prevents webhook delivery from affecting application performance.
Prerequisites
Before creating a webhook, you must enable webhook support for the entity whose events you want to track.
To enable webhook access for an entity:
Navigate to System > Entities > Entity Management in the main menu.
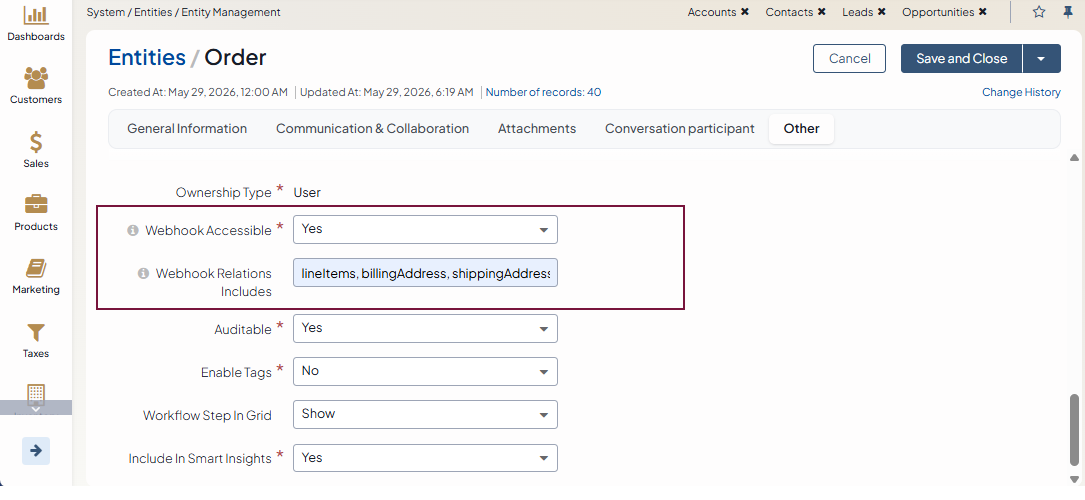
Select the required entity (for example, Order) and click Edit.
In the Other section:
Set Webhook Accessible to Yes. Once enabled, the entity becomes available for webhook notifications. When set to Yes, the entity becomes available for webhook integration. The system generates webhook topics for the entity’s supported events (such as create, update, and delete), allowing administrators or external systems to subscribe to those events and receive notifications when they occur. When set to No, the entity is excluded from webhook processing, and no webhook topics are generated for it.
In the Webhook Relations Includes field, specify which related data should be included in the webhook payload. The field accepts relation paths in JSON:API includes format, which is a comma-separated list of relation paths. A relation path is a dot-separated list of relation names (e.g.,
organization,owner.groups,lineItems,shippingAddress). When a webhook event occurs, the system serializes the entity and the specified related data into a JSON:API payload before sending the notification.
Hint
For more information on available entity fields, see the Manage Entity topic.
Configure Webhook Integration
After enabling webhook access for the required entity, create a webhook notification. Webhooks can be created either through the API by third-party systems or manually from the back-office.
To create a webhook from the back-office:
Navigate to System > Integrations > Webhooks in the main menu.
Click Create Webhook at the top right and provide the required information.
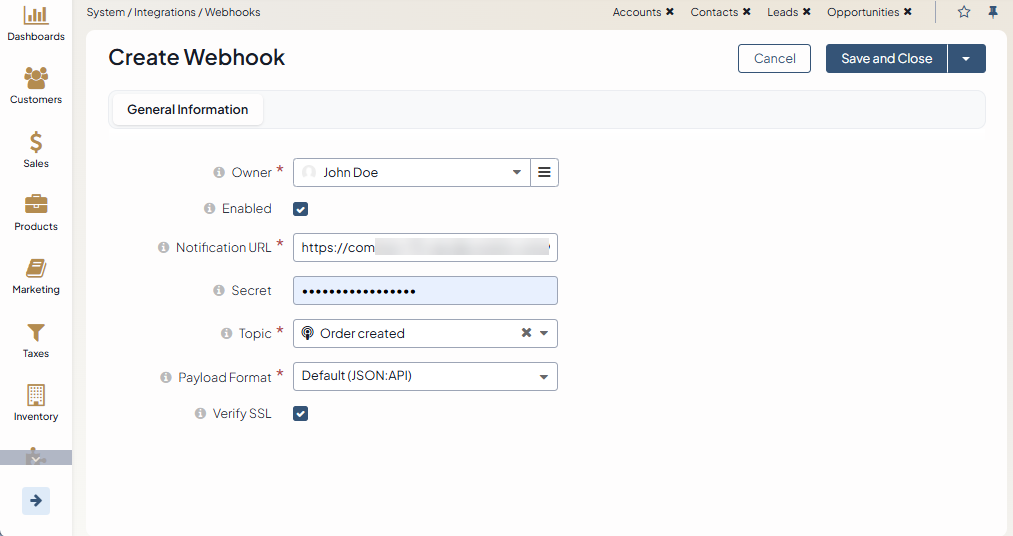
Owner — A user who created the webhook.
Enabled — Indicates whether the webhook is active.
Notification URL — Enter the endpoint URL provided by the external system that will receive webhook notifications. OroCommerce sends webhook requests to this URL whenever the selected event occurs.
Secret — Provide a secret key used to sign webhook payloads. The receiving system can use this secret to verify that the notification originated from OroCommerce and that the payload was not modified during transmission.
Topic — Select the webhook event that triggers the notification. The list contains topics generated from entities with Webhook Accessible enabled (for example, for the Order entity, the topics are:
order.created,order.updated,order.deleted). A notification is sent only when the selected event occurs.Payload Format — Select the payload format used for this webhook. Available formats: Default JSON:API that sends a complete payload following the JSON:API specification, and Thin Payload that sends a simplified payload containing less data. Choose the format that matches the requirements of the receiving system.
Verify SSL — Determines whether the application validates the SSL certificate of the notification URL. When enabled, the SSL certificate is verified before the notification is sent. Recommended for production environments. When disabled, SSL verification is skipped. This option may be useful during development or testing when a valid certificate is not available.
Click Save and Close. The webhook becomes active immediately and starts sending notifications whenever the selected event occurs.
Related Articles