Upgrade the Source Code to v6.1
This guide covers the complete process of upgrading your codebase to OroCommerce v6.1, including dependency updates and code migration.
Tip
If you are looking for instructions on upgrading the entire OroCommerce application rather than just the source code, please refer to our guide on Upgrading the Application to the Next Version.
Upgrade Sequence for Earlier Versions
For users operating on versions of OroCommerce earlier than 5.1, it is recommended to bypass upgrading to 5.1 and instead upgrade directly to version 6.1.
Preserve Old Custom Theme
If you are upgrading from version 5.0 or 5.1 and wish to save time and resources by reusing the existing theme,
you can dump it before the upgrade. First, you need to require the oro/theme-migration package:
composer require --dev oro/theme-migration --no-scripts
Please ensure that a theme package is created for the current (old) version you are upgrading from, not the target version.
Warning
The oro/theme-migration bundle requires the oro/platform version of at least 5.0.18 or 5.1.6. If you encounter the error below, it may be due to having older versions of the oro/platform:
Your requirements could not be resolved to an installable set of packages.
To resolve this, consider upgrading related dependencies by re-running the command
with the --with-all-dependencies option.
composer require --dev oro/theme-migration --no-scripts --with-all-dependencies
Note
Please note that oro/platform 5.0.18 is available only for Enterprise customers and partners.
Next, run the following commands:
rm -rf var/cache/*
rm -rf public/bundles/*
php bin/console assets:install
php bin/console oro:theme:migrate
The last command generates a new bundle with the old theme dump in the src/ folder called OroThemeDefaultXXBundle.
Hint
Here and below, XX is the alias of the version you are upgrading. For 5.0, it is 50; for 5.1, it is 51.
You can now add the newly generated bundle to VCS. It will be used later as the base theme for all your custom themes:
git add src/Oro/Bundle/ThemeDefault*
git commit -m "Generated OroThemeDefaultXXBundle"
git push
Update the theme.yml file of the custom theme.
...
parent: default_XX
...
resolve_extra_paths:
    - /bundles/orothemedefaultXX
...
The resolve_extra_paths option in the generated code requires the “@oroinc/oro-webpack-config-builder” node module upgrade to version “6.0.0-dev002” or later. Therefore, this code is not currently compatible with the old version but will work after upgrading the project to v6.
As a final step of the old custom theme preservation, use the following command to update dumped yaml files automatically:
php bin/upgrade-toolkit yml:fix --source=Path/To/Preserved/Theme/Resources
Tip
The command is a part of the oro/upgrade-toolkit package.
composer require oro/upgrade-toolkit:dev-master --dev
Upgrade Application Level Assets (without the src/ folder)
Create backups of your Database and Code.
Get changes.
Pull changes from the Oro application GitHub repository.
Add the corresponding ORO application repository as an additional remote by running one of commands below. In the example below, a new remote name is oro.
# OroCommerce Community Edition
git remote add oro git@github.com:oroinc/orocommerce-application.git
# OroCommerce Enterprise Edition
git remote add oro git@github.com:oroinc/orocommerce-enterprise-application.git
# OroCRM Community Edition
git remote add oro git@github.com:oroinc/crm-application.git
# OroCRM Enterprise Edition
git remote add oro git@github.com:oroinc/crm-enterprise-application.git
# OroPlatform Community Edition
git remote add oro git@github.com:oroinc/platform-application.git
# OroCommerce Community Edition for Germany
git remote add oro git@github.com:oroinc/orocommerce-application-de.git
# OroCommerce Enterprise Edition for Germany
git remote add oro git@github.com:oroinc/orocommerce-enterprise-application-de.git
# OroCommerce Enterprise Edition (without CRM)
git remote add oro git@github.com:oroinc/orocommerce-enterprise-nocrm-application.git
Fetch tags from the corresponding ORO application repository
git fetch oro --tags
Checkout the new branch that will contain the code of the upgraded application to the next version
git checkout -b feature/upgrade
Merge changes from the corresponding ORO application repository to the new branch
git merge 5.0.7 --allow-unrelated-histories
Replace
5.0.7with the version you upgrade the application to.Resolve conflicts if needed and commit changes
Note
- If you have any customization or third-party extensions installed, make sure that:
your changes to the
src/AppKernel.phpfile are merged into the new file.your changes to the
src/folder are merged, and it contains the custom files.your changes to the
composer.jsonfile are merged into the new file.your changes to the
packages.jsonfile are merged into the new file.your changes to configuration files in the
config/folder are merged into the new files.
git commit
Remove old caches.
rm -rf var/cache/prod/
Set up your project source code with Composer.
composer install --prefer-dist --no-dev
5. Refer to the UPGRADE.md and CHANGELOG.md files in the application repository for a list of changes
in the code that may affect the upgrade of some customizations.
Upgrade Application Level Assets (with the src/ folder)
Overview & Estimates
You can use the oro/upgrade-toolkit package to automatically migrate a significant portion of the PHP code.
It is important to note that the tool handles most PHP changes but does not upgrade Twig, JS, or SCSS. However, you can skip the frontend assets upgrade if you’ve used the theme dump as described earlier. Back-office customization and changes to YAML files should be processed manually.
The major update to the YAML configuration involves moving the datagrids configuration to the theme level. Another significant change that requires manual intervention is the upgrade of the symfony/security component architecture . For a comprehensive list of changes, please refer to the relevant guides corresponding to the base application you are using.
https://github.com/oroinc/platform-application/blob/master/UPGRADE.md
https://github.com/oroinc/crm-application/blob/master/UPGRADE.md
https://github.com/oroinc/crm-enterprise-application/blob/master/UPGRADE.md
https://github.com/oroinc/orocommerce-application/blob/master/UPGRADE.md
https://github.com/oroinc/orocommerce-enterprise-application/blob/master/UPGRADE.md
Automatic Code Migration
First, install the Oro Source Code Upgrade Toolkit:
composer require oro/upgrade-toolkit:dev-master --dev
Next, run the automatic migrations with the following command:
php bin/upgrade-toolkit
To verify the results without making any changes, you can add --dry-run to the bin/upgrade-toolkit command.
Hint
Once the changes are verified, run the following command to apply them:
bin/upgrade-toolkit --clear-cache
(The --clear-cache option will reset the unchanged files cache).
Regular Expressions in PhpStorm
Regular expression replacements may process some changes not covered by the oro/upgrade toolkit. The most convenient tool for running them is PhpStorm. It is advisable to use them in case-sensitive mode.
Below is the list of regular expressions you can use during the upgrade from 5.1 to 6.1:
Short bundle alias references are not working after the Doctrine upgrade |
|
Replace from |
Replace to |
(getManagerForClass|getRepository|Join|join|from|update) ((s*)'Oro(.+)Bundle:(w+)' |
$1($2\Oro\Bundle\$3Bundle\Entity\$4::class) |
Oro(.+)Bundle:(w+) |
Oro\Bundle\$1Bundle\Entity\$2 |
Magecore(.+)Bundle:(w+) |
Magecore\$1Bundle\Entity\$2 |
OroCRM(.+)Bundle:(w+) |
OroCRM\$1Bundle\Entity\$2 |
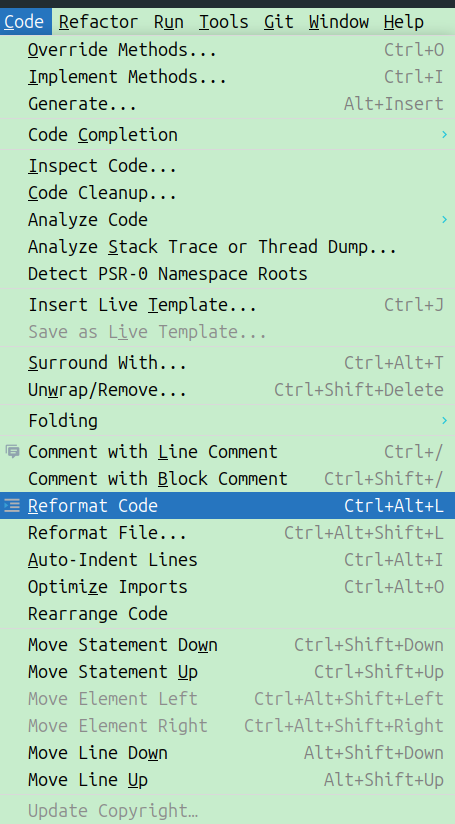
Fix Code Style After Automatic Code Migration
Please be aware that the tool may break the code style of the changed files. You may need to make some manual adjustments to ensure they meet the project’s coding standards. We recommend using PhpStorm’s built-in Code > Reformat Code feature for the changed files:
Run Our Php-CS-Fixer by running the following commands:
php bin/php-cs-fixer fix src --verbose --config=vendor/oro/platform/build/.php-cs-fixer.php
You can enforce PHP_CodeSniffer rules by running the phpcbf script to automatically correct coding standard violations:
php bin/phpcbf src/ -p --encoding=utf-8 --extensions=php --standard=vendor/oro/platform/build/Oro/phpcs.xml
Testing
Run required automated tests to ensure that the upgraded code still works properly.
Next Steps
Once the source code is upgraded, the next step is to upgrade the Oro application to v6.1 For comprehensive instructions on this process, please refer to the Upgrading the Application to the Next Version documentation.