Configure Warehouse Settings per Website
Note
The ability to configure warehouses is only available in the Enterprise edition.
You can configure warehouse settings on the global, organization, website, customer group, and customer levels.
To enable and prioritize warehouses per website:
Navigate to System > Websites in the main menu.
For the necessary website, hover over the More Options menu to the right of the necessary website and click to start editing the configuration.
Select Commerce > Inventory > Warehouses in the menu to the left.
Note
For faster navigation between the configuration menu sections, use Quick Search.
In the Enabled Warehouses, add as many warehouse as you require to enable them:
If necessary, click +Add Warehouse.
Select the warehouse name in the Choose a Warehouse dropdown.
Drag and drop the warehouses using the vertical arrows icon. Products will be ordered and shipped from the higher priority warehouses first.
Note
You can manage the list of enabled warehouses using the following actions:
To disable a warehouse, click x to the right of the priority.
To clear the selected warehouse, click x to the right of the warehouse name.
To select different warehouse from the list, click v to the right of the warehouse name, and select a new warehouse to enable.
To see the complete list of the warehouses in a table view, click bars sign to the right of the warehouse name. The list of warehouses opens in a popup window.
Clear the Use Organization checkbox next to the required setting to enable or disable customers in the storefront to view inventory levels on the following pages:
Product Listing and Search Results — Enabling this option will trigger a full product search reindex.
Product View Page
Shopping List
Checkout
Quick Order Page
Related Products — To display inventory levels in the Related Products listing, ensure to enable the Display Inventory Levels in Content Widget setting in the corresponding product segment content widget.
Up-sell Products — To display inventory levels in the Up-sell Products listing, ensure to enable the Display Inventory Levels in Content Widget setting in the corresponding product segment content widget.
Similar Products on Product View Page — To display inventory levels in the Similar Products listing on Product View Page, ensure to enable the Display Inventory Levels in Content Widget setting in the corresponding product segment content widget.
Similar Products on Shopping List Page — To display inventory levels in the Similar Products listing on Shopping List Page, ensure to enable the Display Inventory Levels in Content Widget setting in the corresponding product segment content widget.
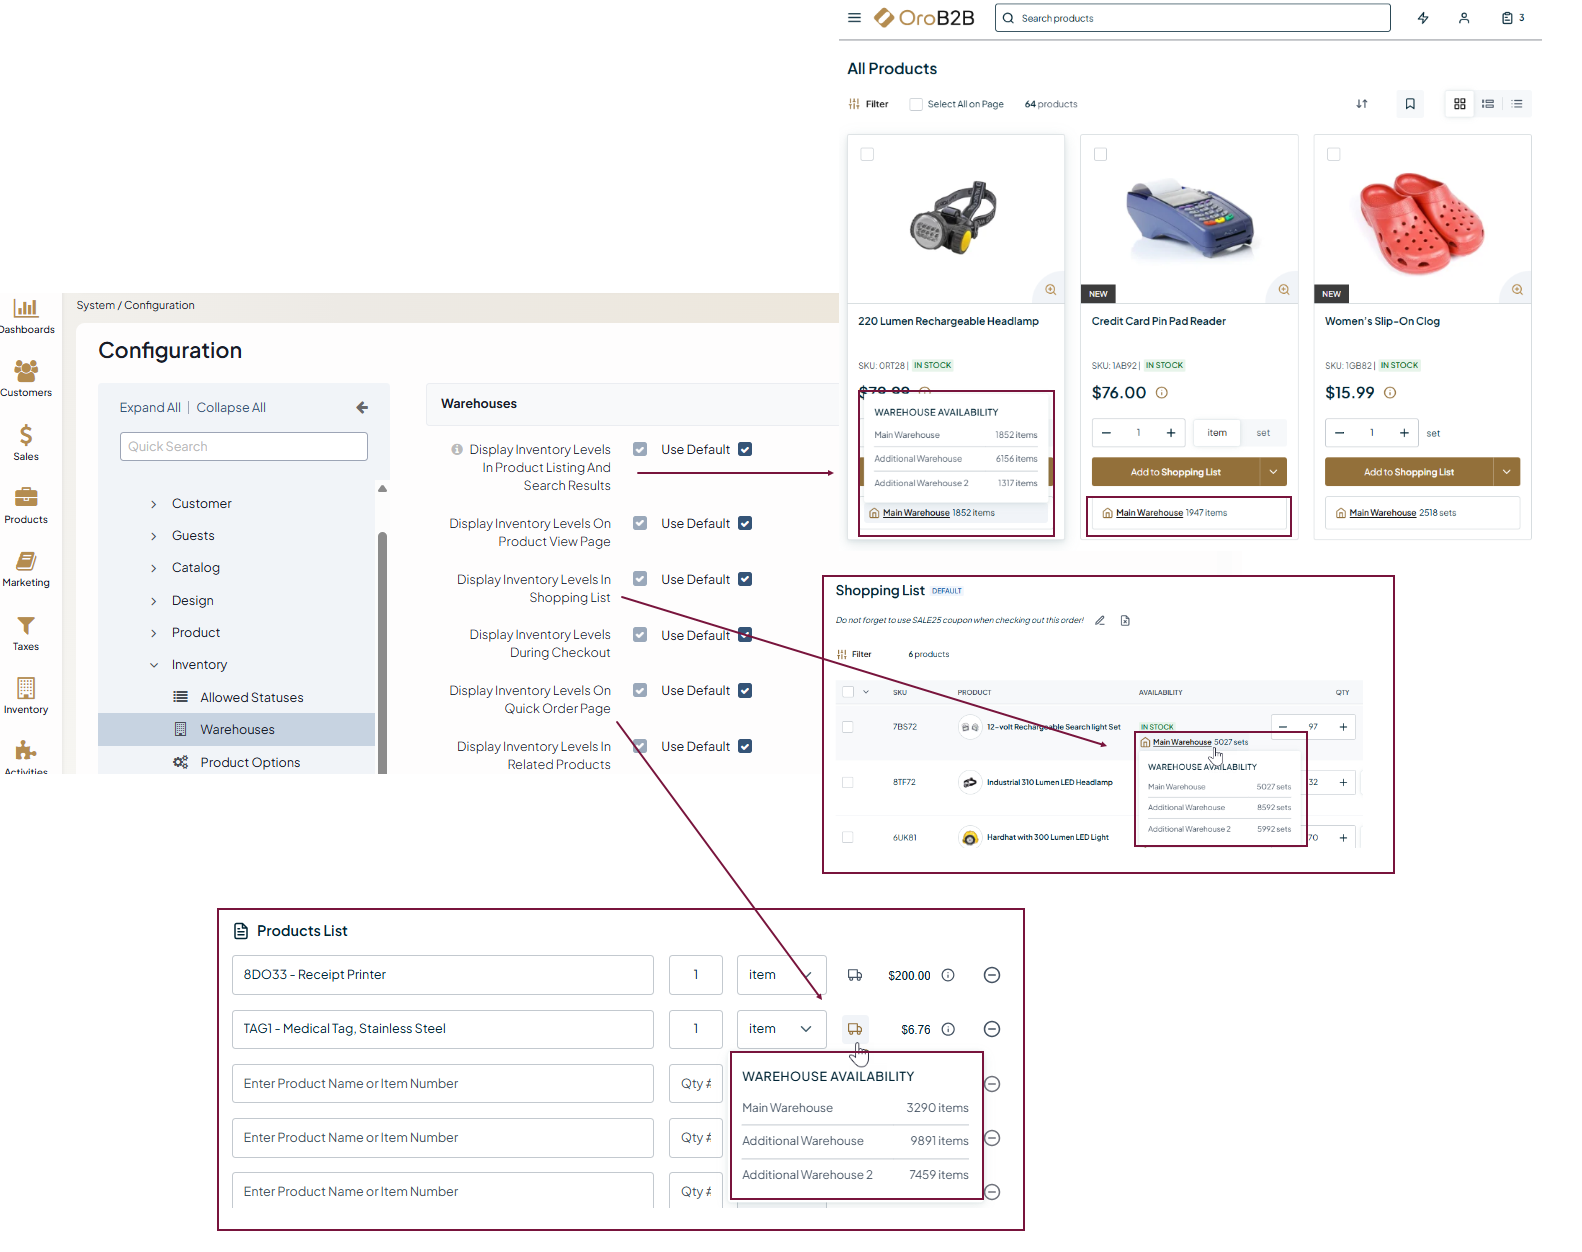
In the Displayed Warehouses, select the warehouse(s) to be displayed in the storefront. Available options are:
All enabled warehouses (regardless of available quantity): Inventory levels are shown for each enabled warehouse, in the order specified in the configuration. Customers can view a breakdown per warehouse (e.g., via a popup or expandable table). For example,
Warehouse A: 10 units, Warehouse B: 5 units.All enabled warehouses with non-zero quantities: Inventory levels are shown for each enabled warehouse that has a non-zero quantity, in the order specified in the configuration. For example, if Warehouse A has 0 units and Warehouse B has 5 units, only Warehouse B will be shown:
Warehouse B: 5 units.Sum (of all quantities) across all enabled warehouses: The storefront displays the total available quantity for each product, summed across all enabled warehouses. For example, if SKU1 has 10 units in Warehouse A and 5 in Warehouse B, the storefront will show
15 units available.Only the first enabled warehouse with a non-zero quantity: Only the first enabled warehouse (by order) with a non-zero quantity is shown for each product. For example, if Warehouse A (first) has 0 units and Warehouse B (second) has 5 units, the storefront will show
5 units available from Warehouse B.
Note
On the product listing page the inventory levels will be shown only for simple products (not for kits or configurable products).
Click Save Settings.