Important
You are browsing documentation for version 6.1 of OroCommerce, supported until 2029. Read the documentation for the latest LTS version to get up-to-date information.
See our Release Process documentation for more information on the currently supported and upcoming releases.
Customize CRUD Pages
OroCommerce provides powerful UIs for managing both simple and complex data entities, including all entity attributes (fields) and relations. As a developer, you can enable standard CRUD pages for a new entity, and just as easily add more fields to entities you created earlier: add new entity properties, create a migration script, and modify the templates if necessary.
But what if you need to add a few more fields to one of the OroCommerce built-in entities or to an entity that somebody else’s extension has created?
Editing the OroCommerce source code or third-party extension code is never a good idea. This article shows how to customize the CRUD pages of existing entities with custom code in your own bundle.
Note
CRUD stands for Create, Read, Update and Delete operations. They are commonly accompanied by some listing or navigation that allows retrieving, sorting, and filtering multiple records at once. In the context of OroCommerce, the data management UIs for the above operations are represented by the following pages:
List – represented by the data grids (for example, select Products → Products in the main navigation menu). For more information on customization of the data grids, see the Customizing Data Grids in OroCommerce section.
Create – an entity creation screen (for example, go to Products → Products and click on the Create Product button above the product data grid). In most cases, the entity creation screen and entity editing screen look and work the same, although there may be exceptions to this rule.
Read – an entity view page (for example, go to Products → Products and click on any product in the grid).
Update – an entity editing page (for example, go to Products → Products and select Edit in the action column, or click on the Edit button on the product view page).
Delete – there is no special screen for entity deletion other than the confirmation popup window (go to Products → Products select Delete in the action column, or click on the Delete button on the product view or edit page).
For example, let’s add a new text field to the product edit and view screens from our custom bundle.
Prerequisites
Before writing code, create a new bundle in your application. If you are not familiar with the bundle creation process yet, check how to create a new bundle in your Oro application. If you already created a bundle for your app customizations, reuse it here and in other tutorials.
Custom Data Entity
First, create a new entity to store custom data. You can still create new product entity fields from your custom bundle, but here we show how to add data stored elsewhere (it can also be calculated on the fly or submitted to an external web service for storage).
Note
See the How to Create Entities article to learn more.
Let’s also make the entity compliant with the ProductHolderInterface, so you can reuse it elsewhere (for example, in reports). Besides the product reference, our entity has only one text field to store our data. You can add multiple fields and use other data types as needed:
<?php

namespace Oro\Bundle\BlogPostExampleBundle\Entity;

use Doctrine\ORM\Mapping as ORM;
use Oro\Bundle\ProductBundle\Entity\Product;
use Oro\Bundle\ProductBundle\Model\ProductHolderInterface;

/**
 * Entity to product options value
 */
#[ORM\Entity]
#[ORM\Table(name: 'oro_bpe_prod_opts')]
class ProductOptions implements ProductHolderInterface
{
    /**
     * @var integer
     */
    #[ORM\Id]
    #[ORM\Column(type: 'integer')]
    #[ORM\GeneratedValue(strategy: 'AUTO')]
    protected $id;

    /**
     * @var string
     */
    #[ORM\Column(name: 'value', type: 'text')]
    protected $value;

    // ..... Getters & Setters implementations .....
}
Installation And Migrations
Create the installation and migration scripts if you plan to distribute your custom bundle or deploy it later to another application or machine. The installation script creates the required database structures during application installation, and the migration scripts update your module to a specific version.
Note
More information about migrations is available in the OroMigrationBundle documentation.
This blog post has only one version of our custom bundle, so the installation and migration code look similar.
Installation:
<?php

namespace Oro\Bundle\BlogPostExampleBundle\Migrations\Schema;

use Doctrine\DBAL\Schema\Schema;
use Oro\Bundle\MigrationBundle\Migration\Installation;
use Oro\Bundle\MigrationBundle\Migration\QueryBag;

class OroBlogPostExampleBundleInstaller implements Installation
{
    #[\Override]
    public function getMigrationVersion()
    {
        return 'v1_0';
    }

    #[\Override]
    public function up(Schema $schema, QueryBag $queries)
    {
        /** Tables generation **/
        $this->createOroBpeProdOptsTable($schema);

        /** Foreign keys generation **/
        $this->addOroBpeProdOptsForeignKeys($schema);
    }

    /**
     * Create oro_bpe_prod_opts table
     */
    protected function createOroBpeProdOptsTable(Schema $schema)
    {
        $table = $schema->createTable('oro_bpe_prod_opts');
        $table->addColumn('id', 'integer', ['autoincrement' => true]);
        $table->addColumn('product_id', 'integer', []);
        $table->addColumn('value', 'text', []);
        $table->setPrimaryKey(['id']);
        $table->addIndex(['product_id']);
    }

    /**
     * Add oro_bpe_prod_opts foreign keys.
     */
    protected function addOroBpeProdOptsForeignKeys(Schema $schema)
    {
        $table = $schema->getTable('oro_bpe_prod_opts');
        $table->addForeignKeyConstraint(
            $schema->getTable('oro_product'),
            ['product_id'],
            ['id'],
            ['onDelete' => 'CASCADE', 'onUpdate' => null]
        );
    }
}
Migration:
<?php

namespace Oro\Bundle\BlogPostExampleBundle\Migrations\Schema\v1_0;

use Doctrine\DBAL\Schema\Schema;
use Oro\Bundle\MigrationBundle\Migration\Migration;
use Oro\Bundle\MigrationBundle\Migration\QueryBag;

class OroBlogPostExampleBundle implements Migration
{
    #[\Override]
    public function up(Schema $schema, QueryBag $queries)
    {
        /** Tables generation **/
        $this->createOroBpeProdOptsTable($schema);

        /** Foreign keys generation **/
        $this->addOroBpeProdOptsForeignKeys($schema);
    }

    /**
     * Create oro_bpe_prod_opts table
     */
    protected function createOroBpeProdOptsTable(Schema $schema)
    {
        $table = $schema->createTable('oro_bpe_prod_opts');
        $table->addColumn('id', 'integer', ['autoincrement' => true]);
        $table->addColumn('product_id', 'integer', []);
        $table->addColumn('value', 'text', []);
        $table->setPrimaryKey(['id']);
        $table->addIndex(['product_id']);
    }

    /**
     * Add oro_bpe_prod_opts foreign keys.
     */
    protected function addOroBpeProdOptsForeignKeys(Schema $schema)
    {
        $table = $schema->getTable('oro_bpe_prod_opts');
        $table->addForeignKeyConstraint(
            $schema->getTable('oro_product'),
            ['product_id'],
            ['id'],
            ['onDelete' => 'CASCADE', 'onUpdate' => null]
        );
    }
}
Form Types
To customize the new product field, implement a corresponding form type for the main form on the product create and edit pages:
<?php

namespace Oro\Bundle\BlogPostExampleBundle\Form\Type;

use Oro\Bundle\BlogPostExampleBundle\Entity\ProductOptions;
use Symfony\Component\Form\AbstractType;
use Symfony\Component\Form\FormBuilderInterface;
use Symfony\Component\OptionsResolver\OptionsResolver;

class ProductOptionsType extends AbstractType
{
    const BLOCK_PREFIX = 'oro_blogpostexample_product_options';

    #[\Override]
    public function buildForm(FormBuilderInterface $builder, array $options)
    {
        $builder->add('value');
    }

    #[\Override]
    public function configureOptions(OptionsResolver $resolver)
    {
        $resolver->setDefaults(
            [
                'data_class' => ProductOptions::class
            ]
        );
    }

    #[\Override]
    public function getBlockPrefix()
    {
        return self::BLOCK_PREFIX;
    }
}
The setDataClass method adds flexibility and lets you reuse this form type. Using it this way is optional.
Once you have your new form type, register it in the service container so Symfony’s form factory can recognize it:
Form Type Extension
Integrations between different form types within OroCommerce can use a form type extension to tie the form types together. In our case, we listen for the following form events:
FormEvents::POST_SET_DATA – used to assign values to the form from our custom entity object;
FormEvents::POST_SUBMIT – used to convert, validate and persist our custom values.
<?php

namespace Oro\Bundle\BlogPostExampleBundle\Form\Extension;

use Doctrine\Persistence\ManagerRegistry;
use Doctrine\Persistence\ObjectManager;
use Doctrine\Persistence\ObjectRepository;
use Oro\Bundle\BlogPostExampleBundle\Entity\ProductOptions;
use Oro\Bundle\BlogPostExampleBundle\Form\Type\ProductOptionsType;
use Oro\Bundle\ProductBundle\Entity\Product;
use Oro\Bundle\ProductBundle\Form\Type\ProductType;
use Symfony\Component\Form\AbstractTypeExtension;
use Symfony\Component\Form\FormBuilderInterface;
use Symfony\Component\Form\FormEvent;
use Symfony\Component\Form\FormEvents;

abstract class ProductOptionsFormTypeExtension extends AbstractTypeExtension
{
    const PRODUCT_OPTIONS_FIELD_NAME = 'productOptions';

    /** @var ManagerRegistry */
    protected $registry;

    public function __construct(ManagerRegistry $registry)
    {
        $this->registry = $registry;
    }

    public function getExtendedType()
    {
        return ProductType::class;
    }

    #[\Override]
    public function buildForm(FormBuilderInterface $builder, array $options)
    {
        $builder->add(
            self::PRODUCT_OPTIONS_FIELD_NAME,
            ProductOptionsType::class,
            [
                'label' => 'oro.blogpostexample.product_options.entity_label',
                'required' => false,
                'mapped' => false,
            ]
        );

        $builder->addEventListener(FormEvents::POST_SET_DATA, [$this, 'onPostSetData']);
        $builder->addEventListener(FormEvents::POST_SUBMIT, [$this, 'onPostSubmit'], 10);
    }

    public function onPostSetData(FormEvent $event)
    {
        /** @var Product|null $product */
        $product = $event->getData();
        if (!$product || !$product->getId()) {
            return;
        }

        $options = $this->getProductOptionsRepository()
            ->findOneBy(['product' => $product]);

        $event->getForm()->get(self::PRODUCT_OPTIONS_FIELD_NAME)->setData($options);
    }

    public function onPostSubmit(FormEvent $event)
    {
        /** @var Product|null $product */
        $product = $event->getData();
        if (!$product) {
            return;
        }

        /** @var ProductOptionsType $form */
        $form = $event->getForm();

        /** @var ProductOptions $options */
        $options = $form->get(self::PRODUCT_OPTIONS_FIELD_NAME)->getData();
        $options->setProduct($product);

        if (!$form->isValid()) {
            return;
        }

        $this->getProductOptionsEntityManager()->persist($options);
    }

    /**
     * @return ObjectManager
     */
    protected function getProductOptionsEntityManager()
    {
        return $this->registry->getManagerForClass(ProductOptions::class);
    }

    /**
     * @return ObjectRepository
     */
    protected function getProductOptionsRepository()
    {
        return $this->getProductOptionsEntityManager()
            ->getRepository(ProductOptions::class);
    }
}
Register the new form type extension in the service container:
services:
    oro_blogpostexample.form.extension.product_type:
        class: Oro\Bundle\BlogPostExampleBundle\Form\Extension\ProductOptionsFormTypeExtension
        public: true
        arguments:
            - "@doctrine"
        tags:
            - { name: form.type_extension, extended_type: Oro\Bundle\ProductBundle\Form\Type\ProductType }
UI Data Targets and Listener
Once the entity, the form type, and the form type extension are created, you can start customizing the User Interface.
Note
See the Layout section for more information about the UI customization.
Add custom data to the product view and edit/create pages. Use the following dataTargets:
product-view - used to display our custom data on the product view page;
product-edit - used to show our custom data on the product edit page;
product-create-step-two - used to add our custom data to the product creation page.
services:
    oro_blogpostexample.event_listener.form_view.product:
        class: Oro\Bundle\BlogPostExampleBundle\EventListener\ProductFormListener
        arguments:
            - '@translator'
            - '@oro_entity.doctrine_helper'
            - '@request_stack'
        tags:
            - { name: kernel.event_listener, event: oro_ui.scroll_data.before.product-view, method: onProductView }
            - { name: kernel.event_listener, event: oro_ui.scroll_data.before.product-edit, method: onProductEdit }
            - { name: kernel.event_listener, event: oro_ui.scroll_data.before.product-create-step-two, method: onProductEdit }
You can implement the event listener this way:
<?php

namespace Oro\Bundle\BlogPostExampleBundle\EventListener;

use Oro\Bundle\BlogPostExampleBundle\Entity\ProductOptions;
use Oro\Bundle\EntityBundle\ORM\DoctrineHelper;
use Oro\Bundle\ProductBundle\Entity\Product;
use Oro\Bundle\UIBundle\Event\BeforeListRenderEvent;
use Symfony\Component\HttpFoundation\RequestStack;
use Symfony\Contracts\Translation\TranslatorInterface;

/**
{
    /** @var TranslatorInterface */
    protected $translator;

    /** @var DoctrineHelper */
    protected $doctrineHelper;

    /** @var RequestStack */
    protected $requestStack;

    public function __construct(
        TranslatorInterface $translator,
        DoctrineHelper $doctrineHelper,
        RequestStack $requestStack
    ) {
        $this->translator = $translator;
        $this->doctrineHelper = $doctrineHelper;
        $this->requestStack = $requestStack;
    }

    public function onProductView(BeforeListRenderEvent $event)
    {
        $request = $this->requestStack->getCurrentRequest();
        if (!$request) {
            return;
        }

        // Retrieving current Product Id from request
        $productId = (int)$request->get('id');
        if (!$productId) {
            return;
        }

        /** @var Product $product */
        $product = $this->doctrineHelper->getEntityReference(Product::class, $productId);
        if (!$product) {
            return;
        }

        /** @var ProductOptions $productOptions */
        $productOptions = $this->doctrineHelper
            ->getEntityRepository(ProductOptions::class)
            ->findOneBy(['product' => $product]);

        if (null === $productOptions) {
            return;
        }

        $template = $event->getEnvironment()->render(
            '@OroBlogPostExample/Product/product_options_view.html.twig',
            [
                'entity' => $product,
                'productOptions' => $productOptions
            ]
        );
        $this->addBlock($event->getScrollData(), $template, 'oro.blogpostexample.product.section.product_options');
    }

    public function onProductEdit(BeforeListRenderEvent $event)
    {
        $template = $event->getEnvironment()->render(
            '@OroBlogPostExample/Product/product_options_update.html.twig',
            ['form' => $event->getFormView()]
        );
        $this->addBlock($event->getScrollData(), $template, 'oro.blogpostexample.product.section.product_options');
    }

    /**
     * @param ScrollData $scrollData
     * @param string $html
     * @param string $label
     * @param int $priority
     */
    protected function addBlock(ScrollData $scrollData, $html, $label, $priority = 100)
    {
        $blockLabel = $this->translator->trans($label);
        $blockId    = $scrollData->addBlock($blockLabel, $priority);
        $subBlockId = $scrollData->addSubBlock($blockId);
        $scrollData->addSubBlockData($blockId, $subBlockId, $html);
    }
}
Templates
Finally, define the templates. One for the form:
{#Render entire child form#}
{{ form_widget(form.productOptions) }}
{#Display Errors#}
{{ form_errors(form.productOptions) }}
And one for the view:
{% import '@OroUI/macros.html.twig' as UI %}
{#Display our custom value#}
{{ UI.renderHtmlProperty('oro.blogpostexample.product_options.label'| trans, productOptions.value) }}
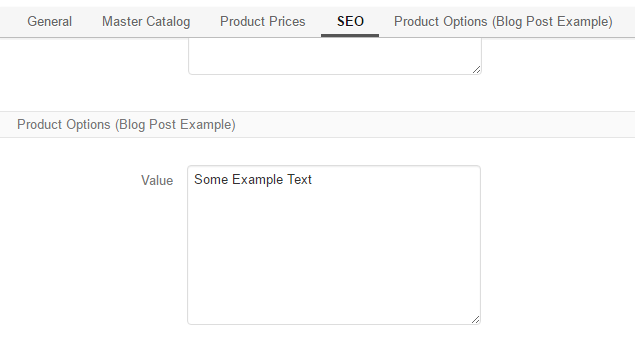
As a result, the following blocks will be displayed on the product edit and create pages:
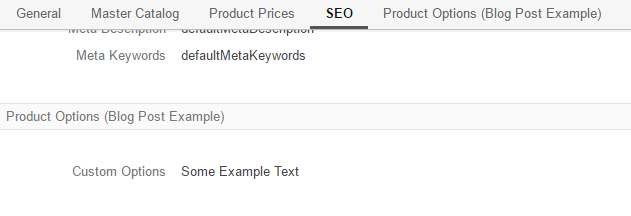
In view mode, the block looks as follows:
A fully working example, organized into a custom bundle, is available in the OroB2BBlogPostExampleBundle.
To add this bundle to your application:
Extract the content of the zip archive into a source code directory recognized by your composer autoload settings;
Clear the application cache with the following command:
`php bin/console cache:clear`
Run the migrations with the following command:
`app oro:migration:load --force --bundles=OroBlogPostExampleBundle`