Storefront and Back-Office Menu Management Concept Guide
Companies are now making huge efforts to attract visitors on their site, investing large sums of money in advertising and marketing. Once a customer lands on a page of your website, you must let them find the product on the fly with an easy and user-friendly navigation. Navigation is what welcomes your visitor once they arrive, providing an overview of what you offer, how to contact you, how to access the shopping cart, and make an order.
A navigation menu of an e-commerce website has a lot in common with the shelving in a physical store. When a customer enters your website, regardless of whether they come with a specific purpose or just to browse, they scan the content to find the information they are looking for. Whether they stay or leave highly depends on a responsive menu that helps customers identify the required location on the spot.
Catering to the needs of your business, OroCommerce offers a useful solution to build the menu of your choice. The application provides several pre-configured menu items out-of-the-box that you can customize to fit your criteria. With the storefront and back-office menu functionality, you can personalize and optimize your site navigation for the convenient usage by customers in the storefront and administrators in the back-office.
Note
Currently, Storefront Menus include menu items for both Refreshing Teal and version 5.1 and below to support all versions of OroCommerce.
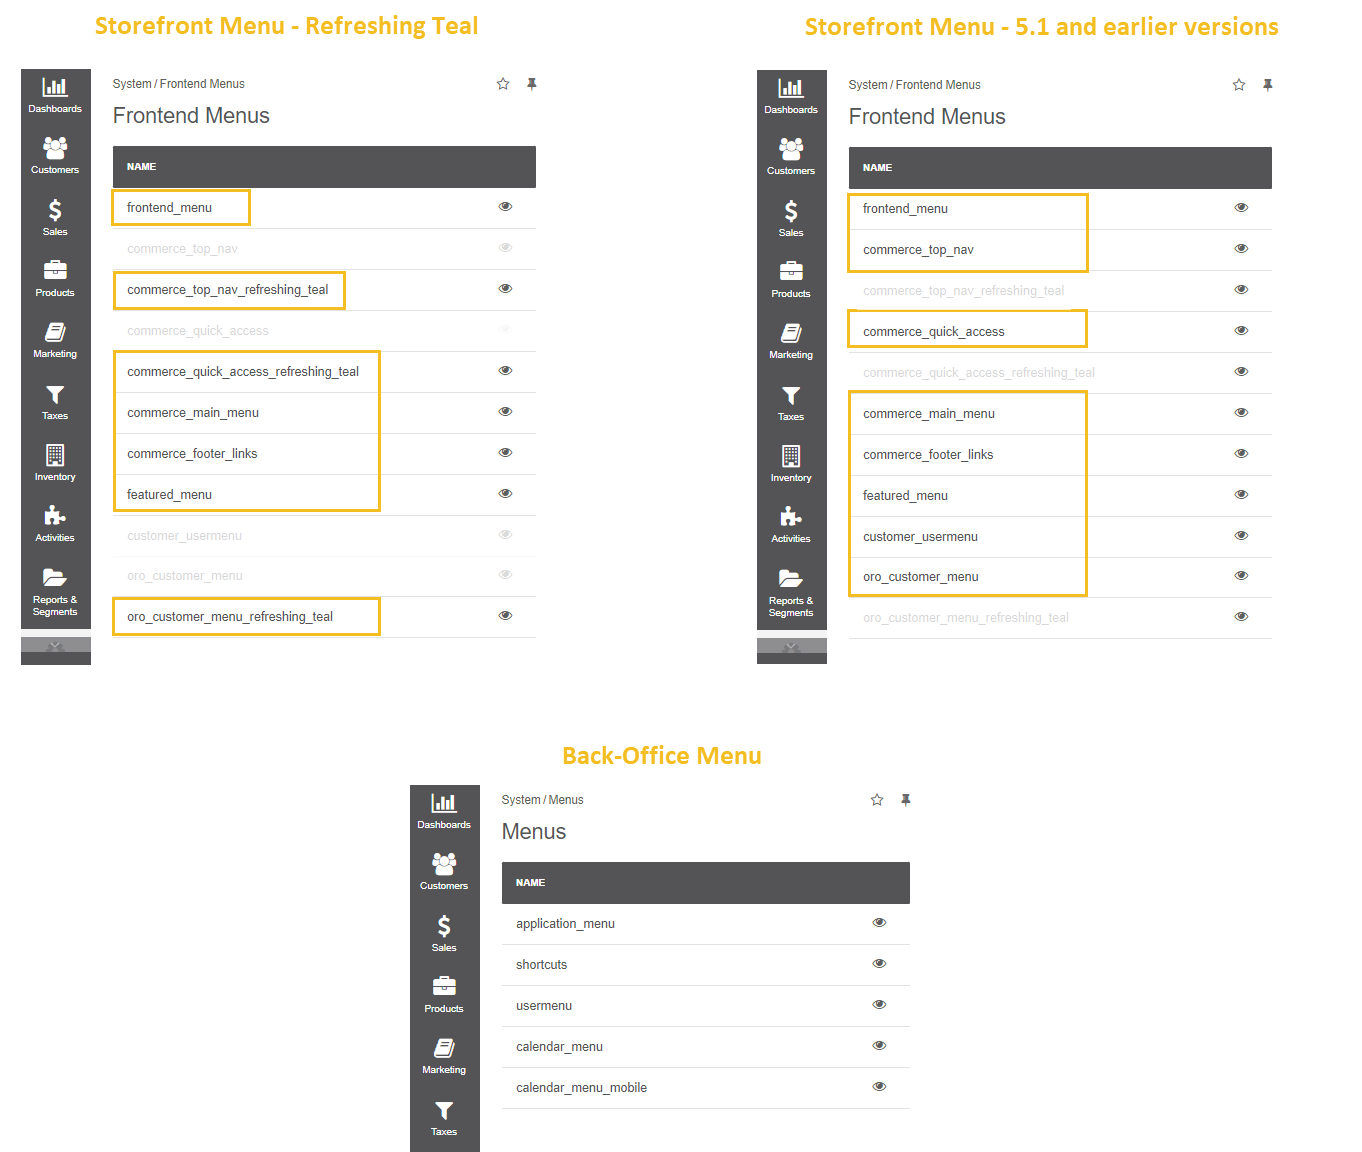
As a visual reference, we have used the Refreshing Teal theme to illustrate how the menu items can be represented.
in the back-office
The way the menu looks and behaves on your website depends on the customization and settings that you apply to the default configuration.
Let’s check each of the available menu items individually.
Storefront Menu Components
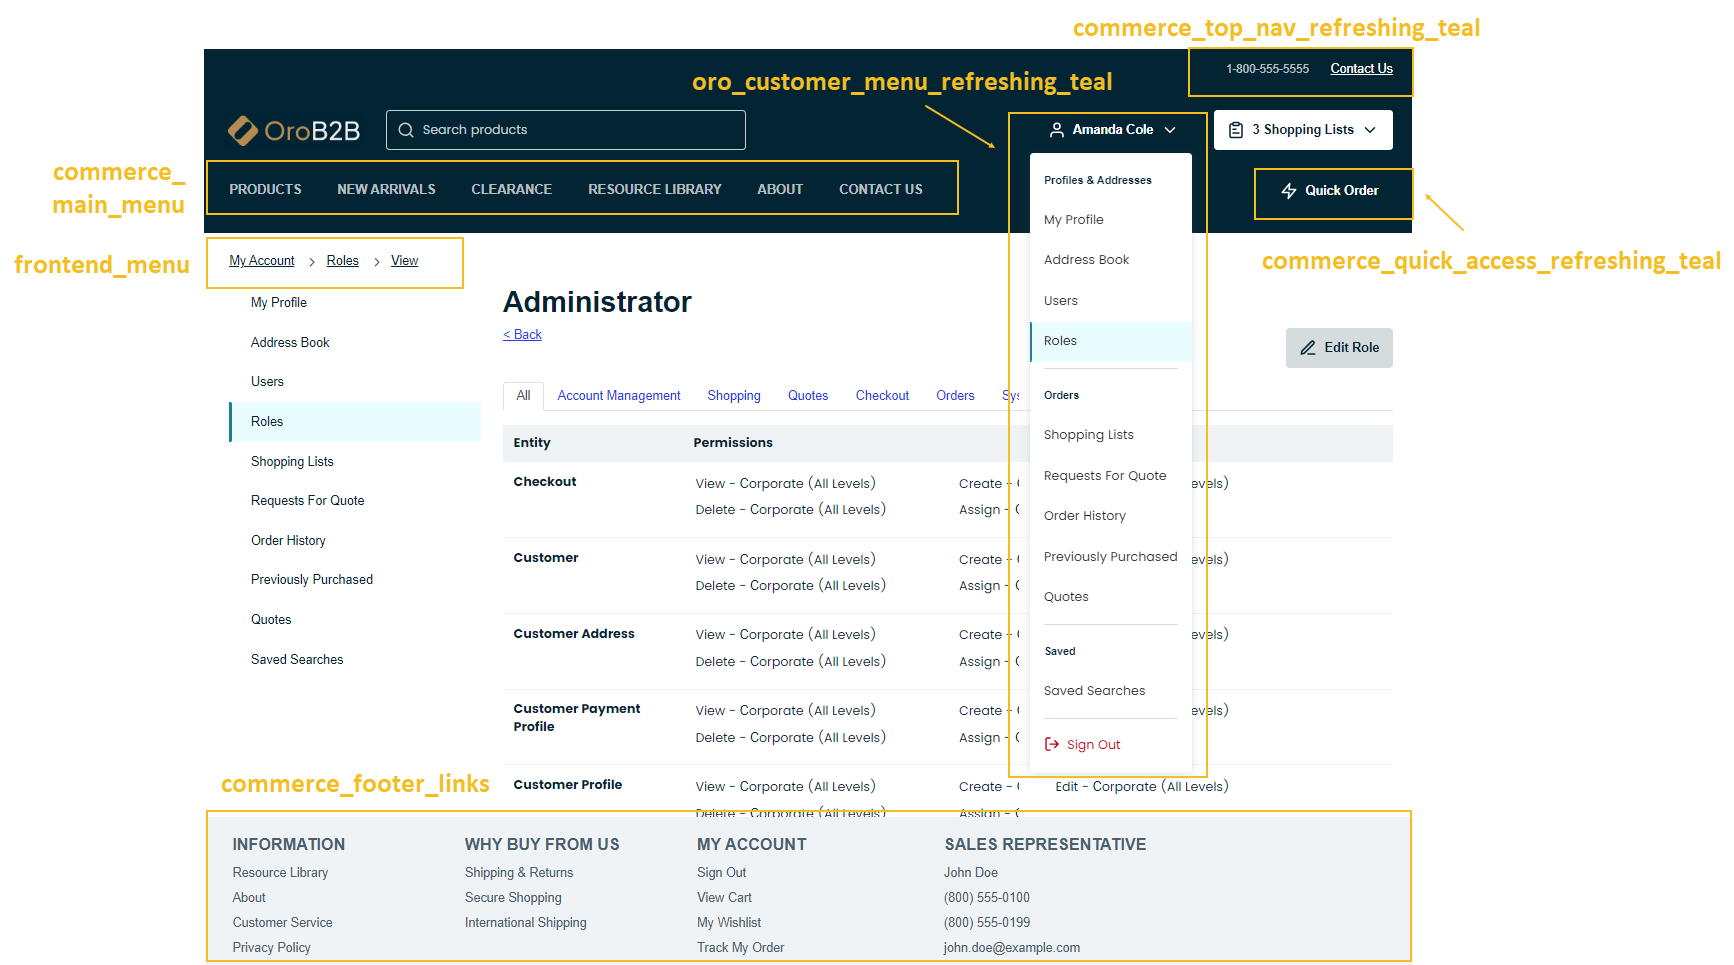
Storefront menu in OroCommerce allows users to orient themselves within your website and easily access their account, shopping cart, and other essential information through the links distributed in different places: next to the main menu, in the footer, in the featured menu, etc.
The storefront menu functionality consists of several components that are supplied with the necessary settings to make up the navigation of your website storefront and to enable visitors to know where they are, where they can go, and where they have already been. You can modify the default configuration to add new menu items, exclude some items from the specific devices, set visibility conditions to certain customer groups, or according to particular config values.
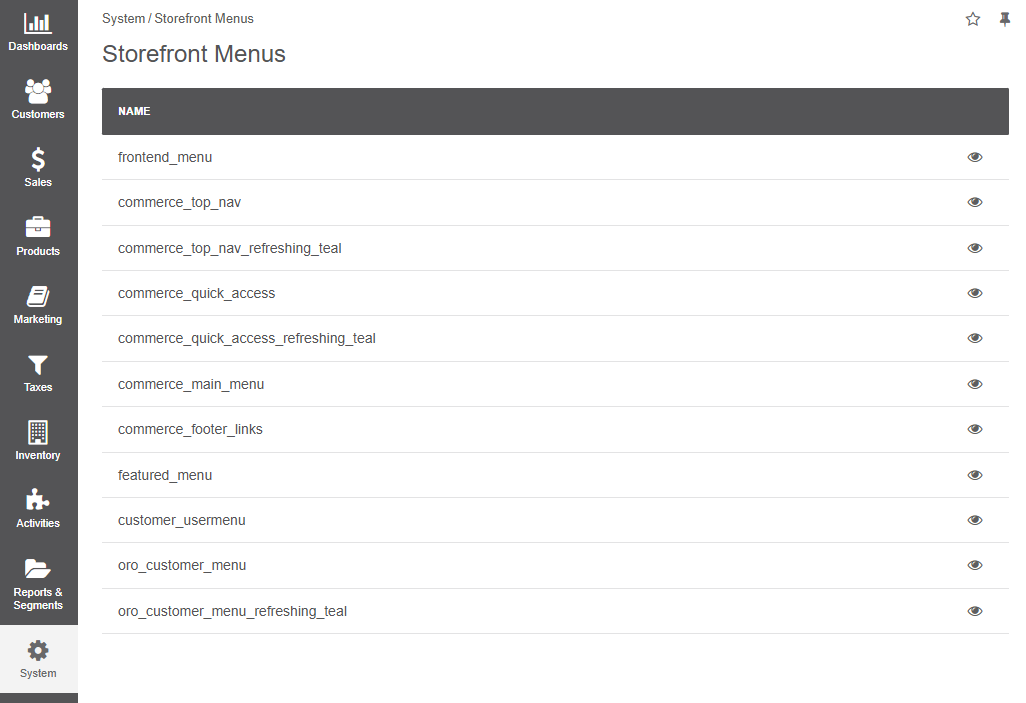
You can configure each of the following menu elements on five different levels: global, organization, website, customer group, and a customer. Always keep an eye on the fallback logic, which means that the values set on a lower level (e.g., customer level) would always prevail and override the configuration set on the higher level.

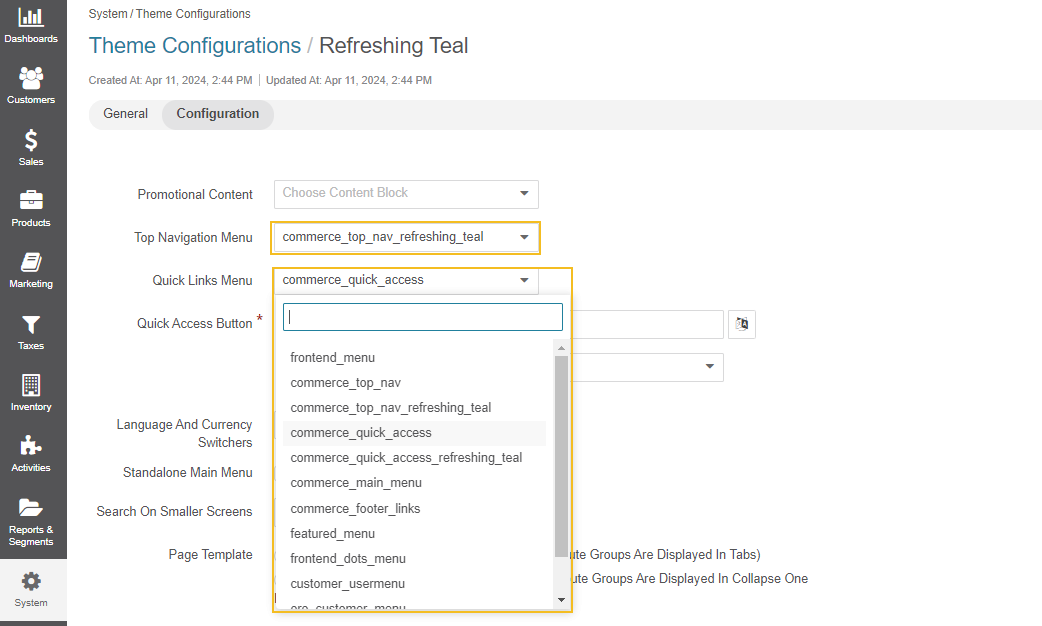
Once you have configured the menu items, you can add them to the selected theme configuration of your website, placing them anywhere in the storefront header.
Oro_customer_dashboard_quick_access_menu
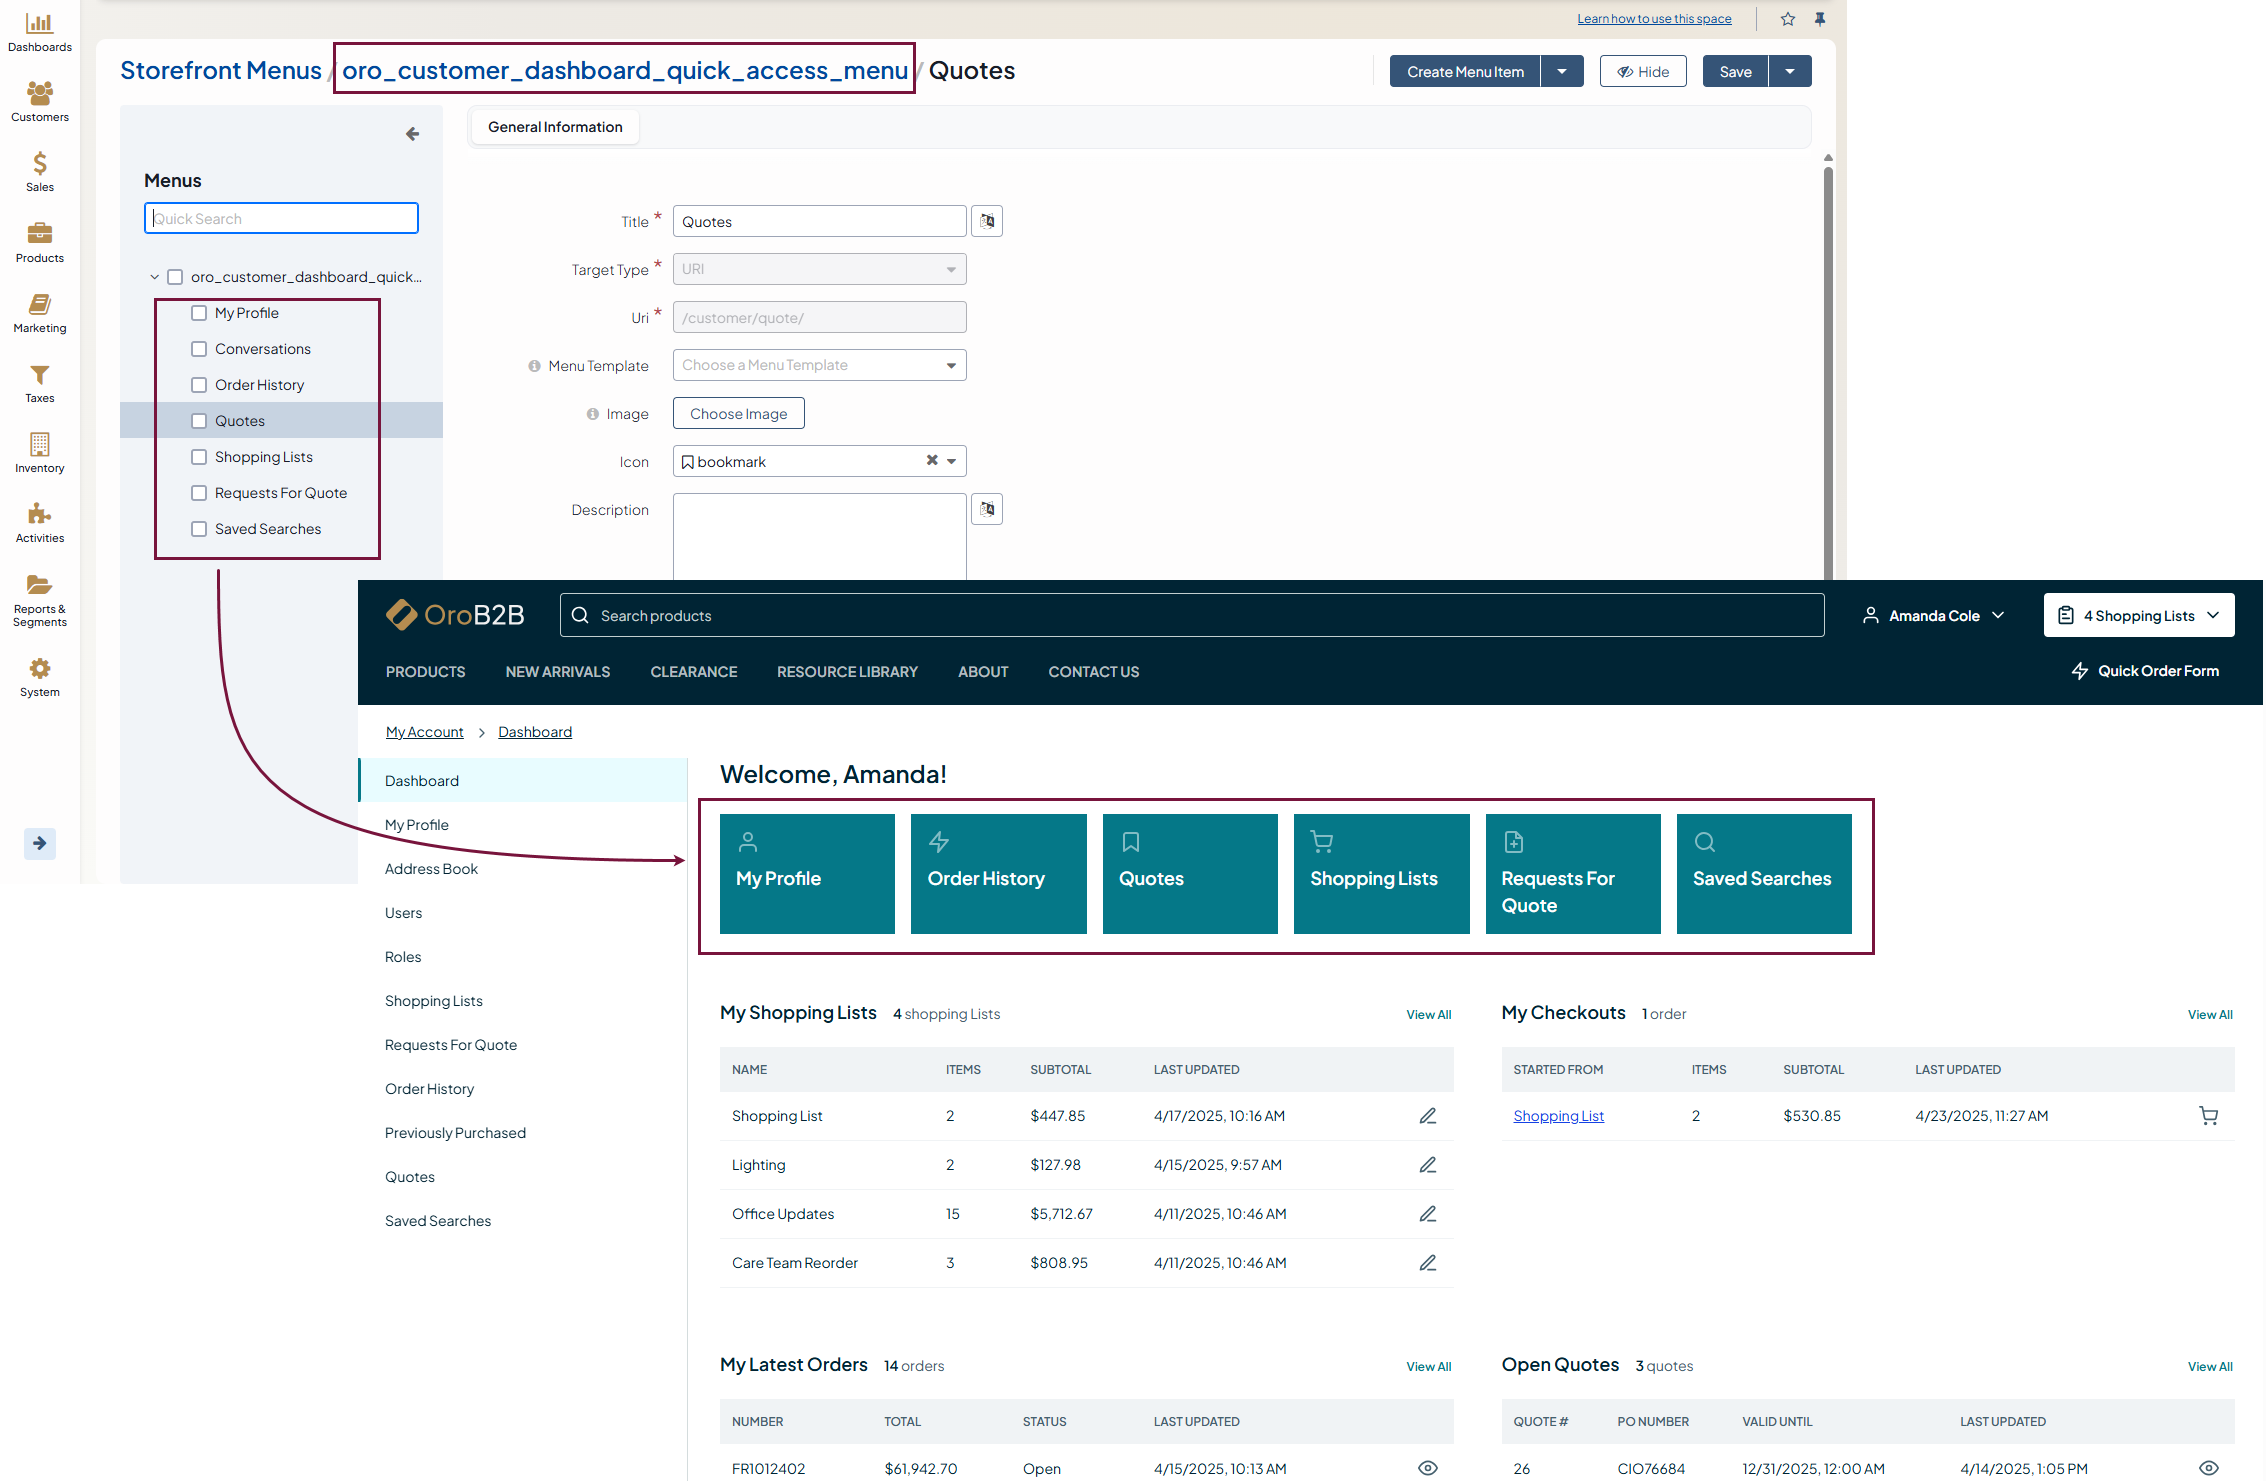
Oro_customer_dashboard_quick_access_menu refers to a customizable quick access menu that appears on the customer user’s Dashboard page in their My Account section. If enabled in the theme configuration, this menu provides customer users with shortcuts to key sections of their account, such as orders, shopping lists, RFQs, quotes, or other important pages. You can edit the menu to include the necessary links, helping customer users navigate their account more efficiently.
Frontend_menu
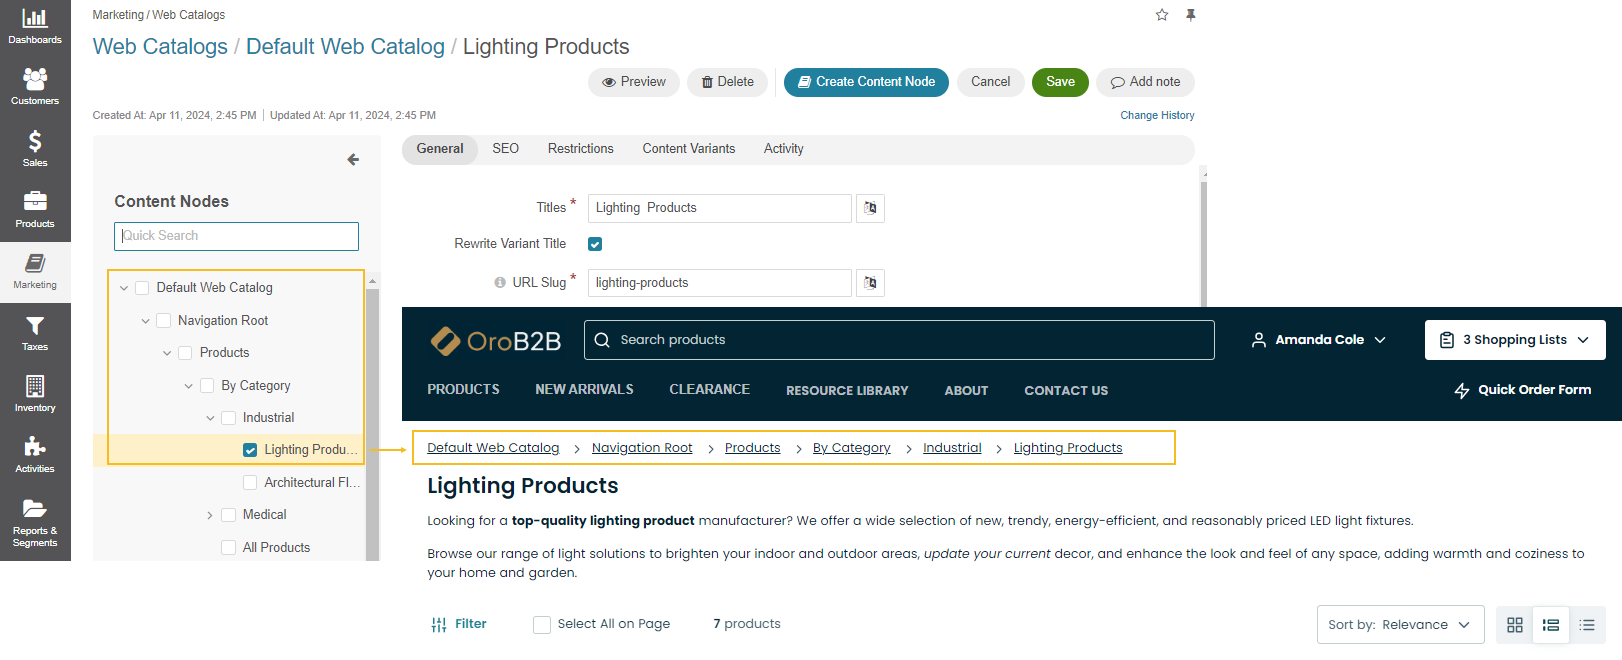
Frontend_menu serves to build the breadcrumbs based on the pages nesting. Breadcrumbs help identify the location of the user within your website’s hierarchy.
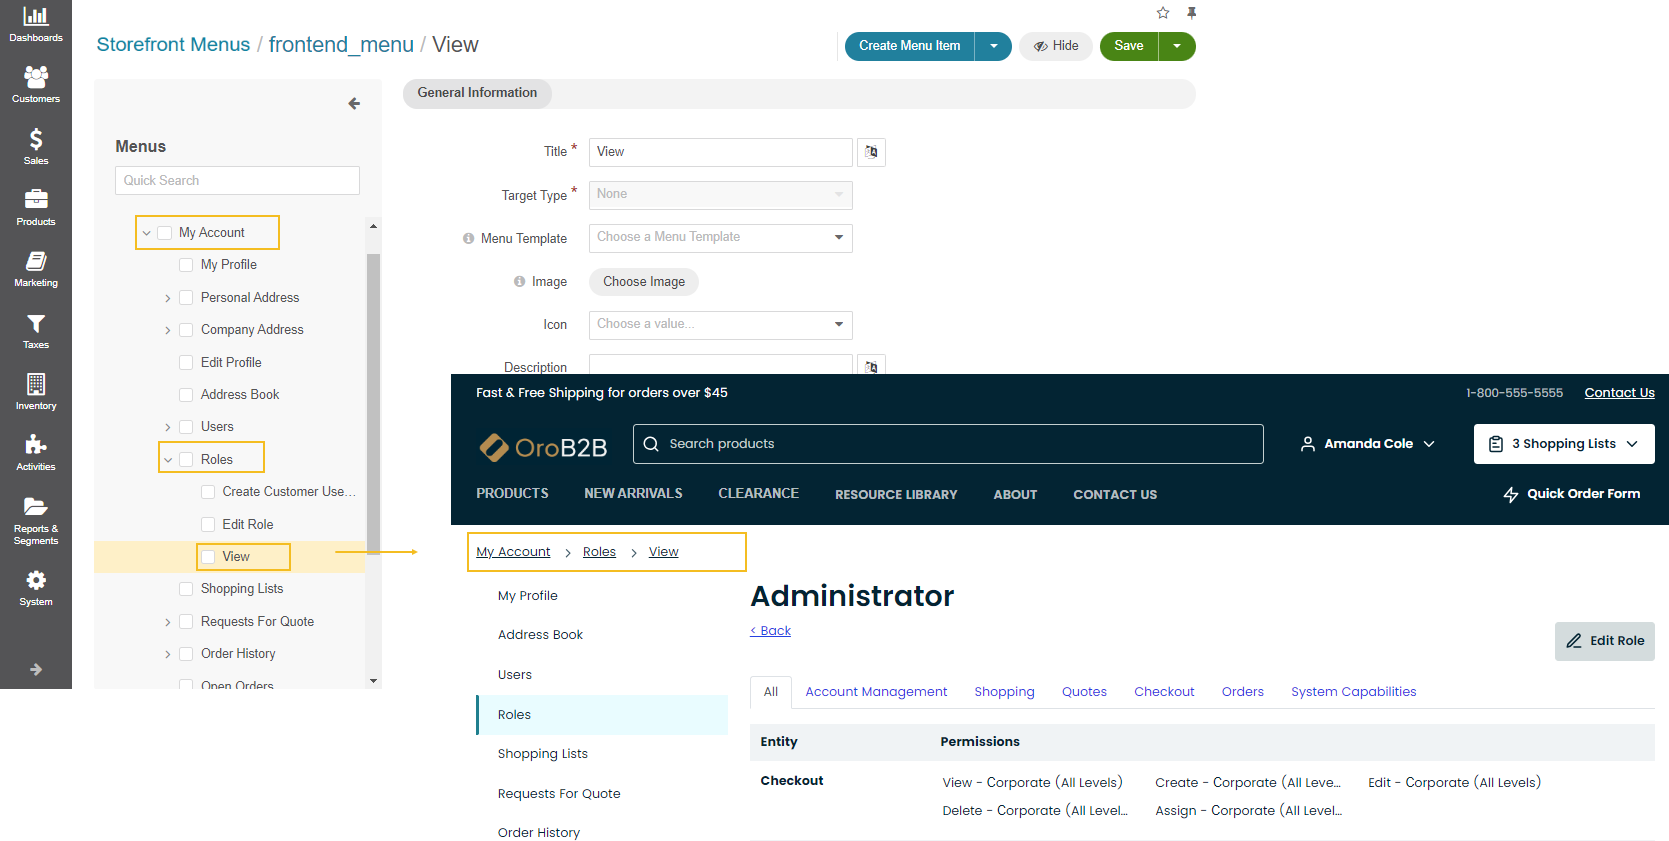
However, keep in mind that the breadcrumbs on the product listing page and the product details page are made up based on the structure of the enabled master catalog or web catalog nodes, but not through frontend_menu.
Commerce_top_nav
Important
Commerce_top_nav applies to OroCommerce version 5.1 and below and is retained in the current version only for legacy backward compatibility. For v6.0 and above, please use the commerce_top_nav_refreshing_teal menu to modify the links in the website’s page header.
The commerce_top_nav menu indicates the links that appear at the top right of your website’s page header. If your customers need to reach your business, add the links to live chat. If they are looking for your store locations, add that. Whatever is important to you can be added to the header. The menu visibility in the storefront for 5.1 and earlier versions of OroCommerce is configured by its Hide/Show button.
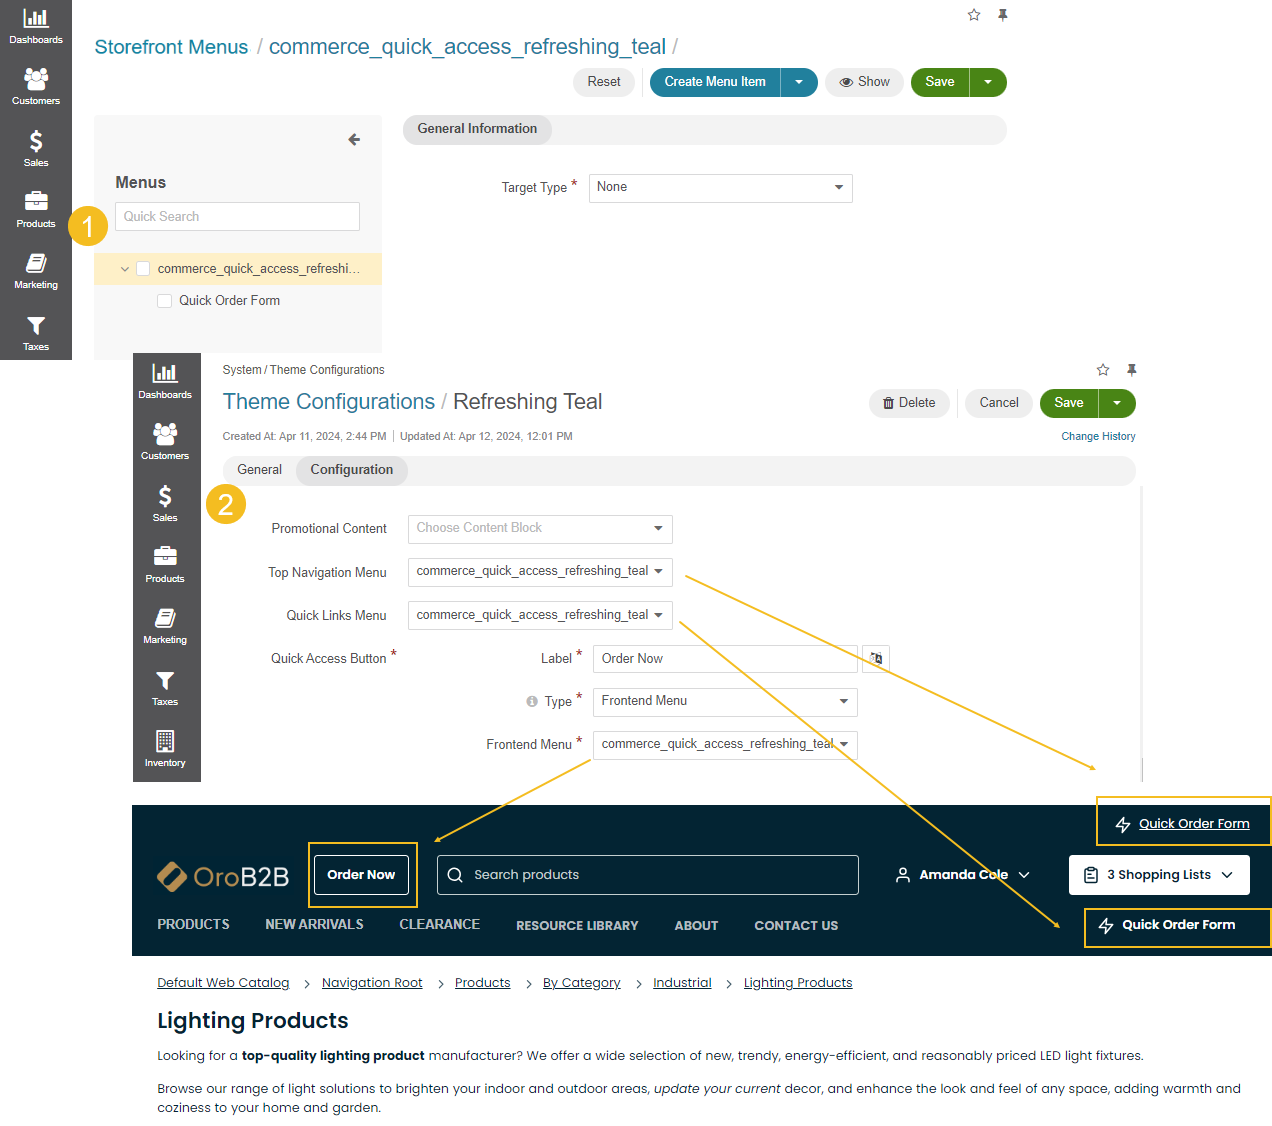
Commerce_top_nav_refreshing_teal
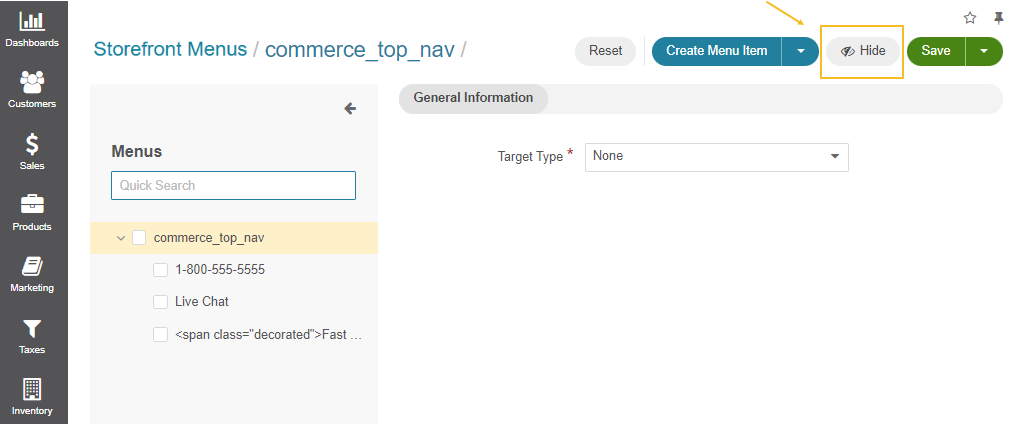
The commerce_top_nav_refreshing_teal menu indicates the links that appear in your website’s page header. If your customers need to reach your business, add the links to live chat. If they are looking for your store locations, add that. Whatever is important to you can be added to the header.
You can then choose the place in the header where to locate your menu under theme configuration.
Commerce_quick_access
Important
Commerce_quick_access applies to OroCommerce version 5.1 and below and is retained in the current version only for legacy backward compatibility. For v6.0 and above, please use the commerce_quick_access_refreshing_teal menu to modify the quick access links.
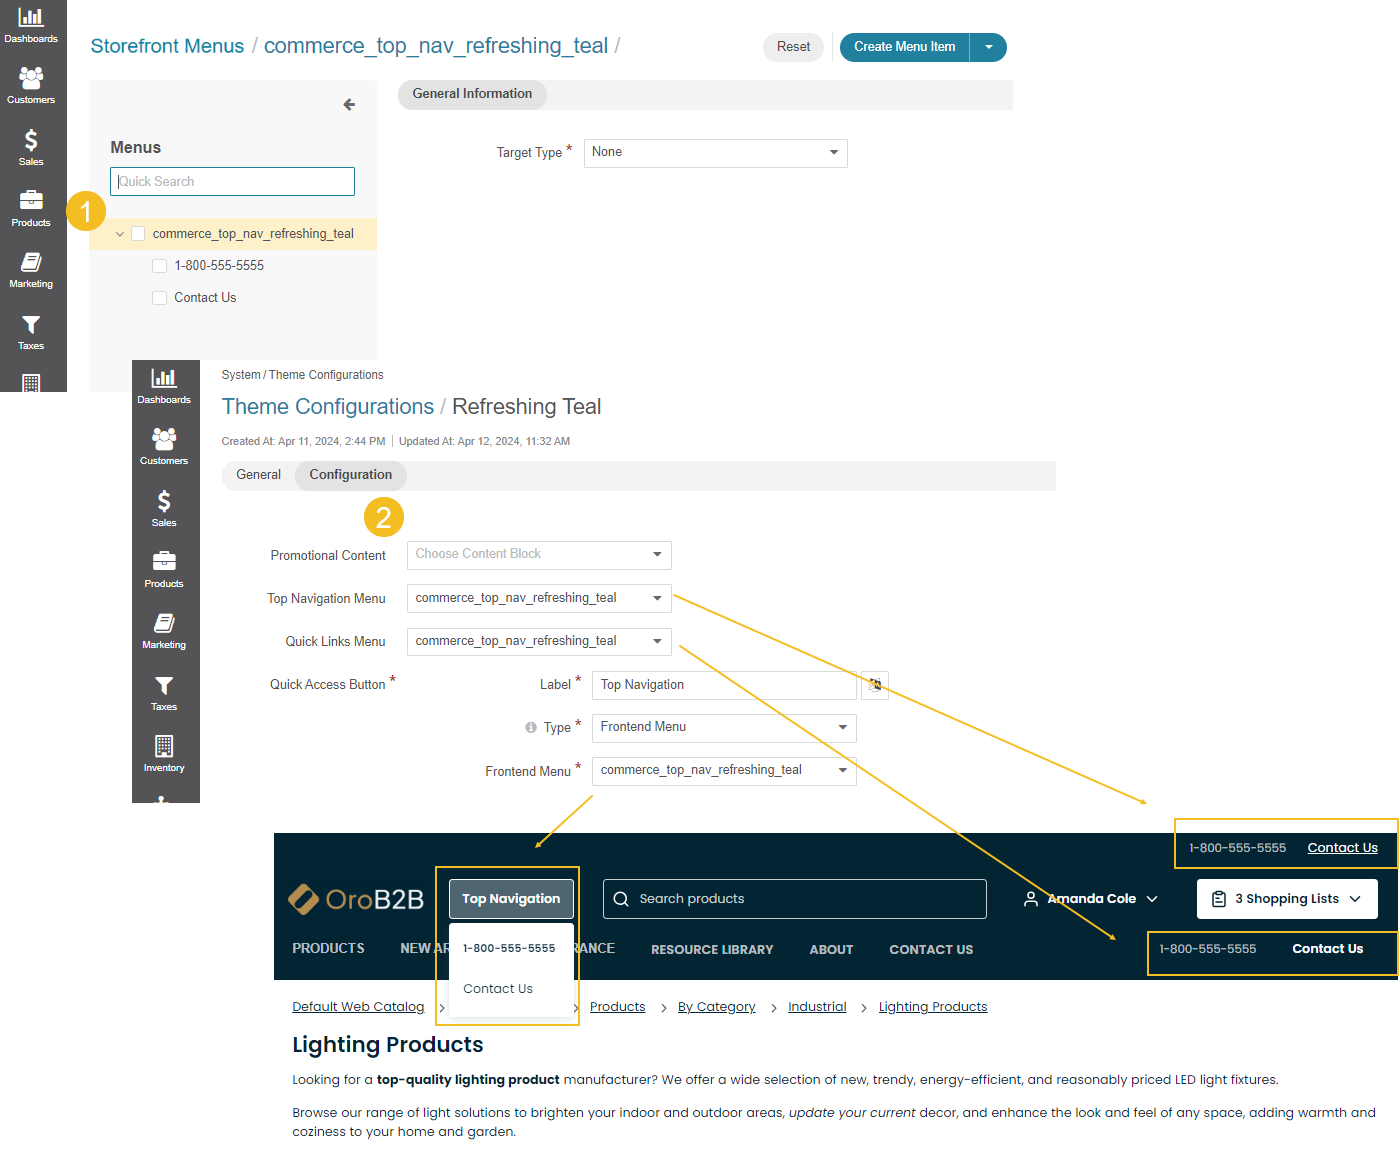
The commerce_quick_access menu provides links to the most frequently used pages or important actions for the customers to quickly locate them within your website.
Commerce_quick_access_refreshing_teal
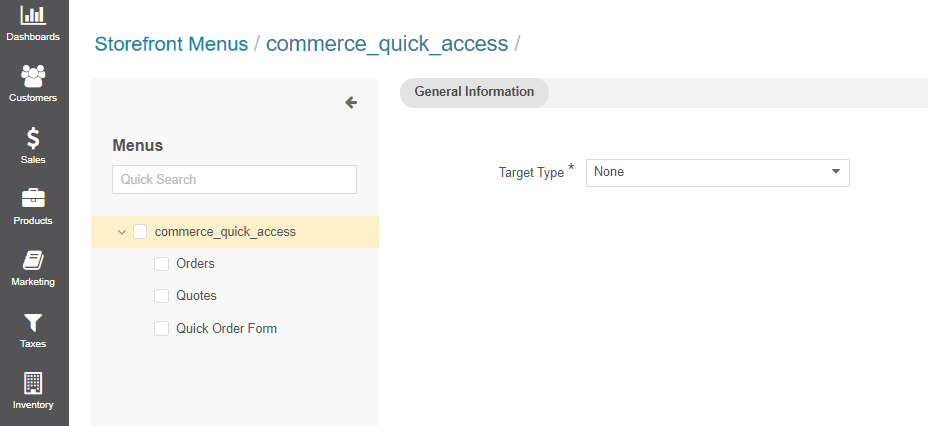
The commerce_quick_access_refreshing_teal menu provides links to the most frequently used pages or important actions for the customers to quickly locate them within your website.
You can choose the place in the header where to locate your menu under theme configuration.
Commerce_main_menu
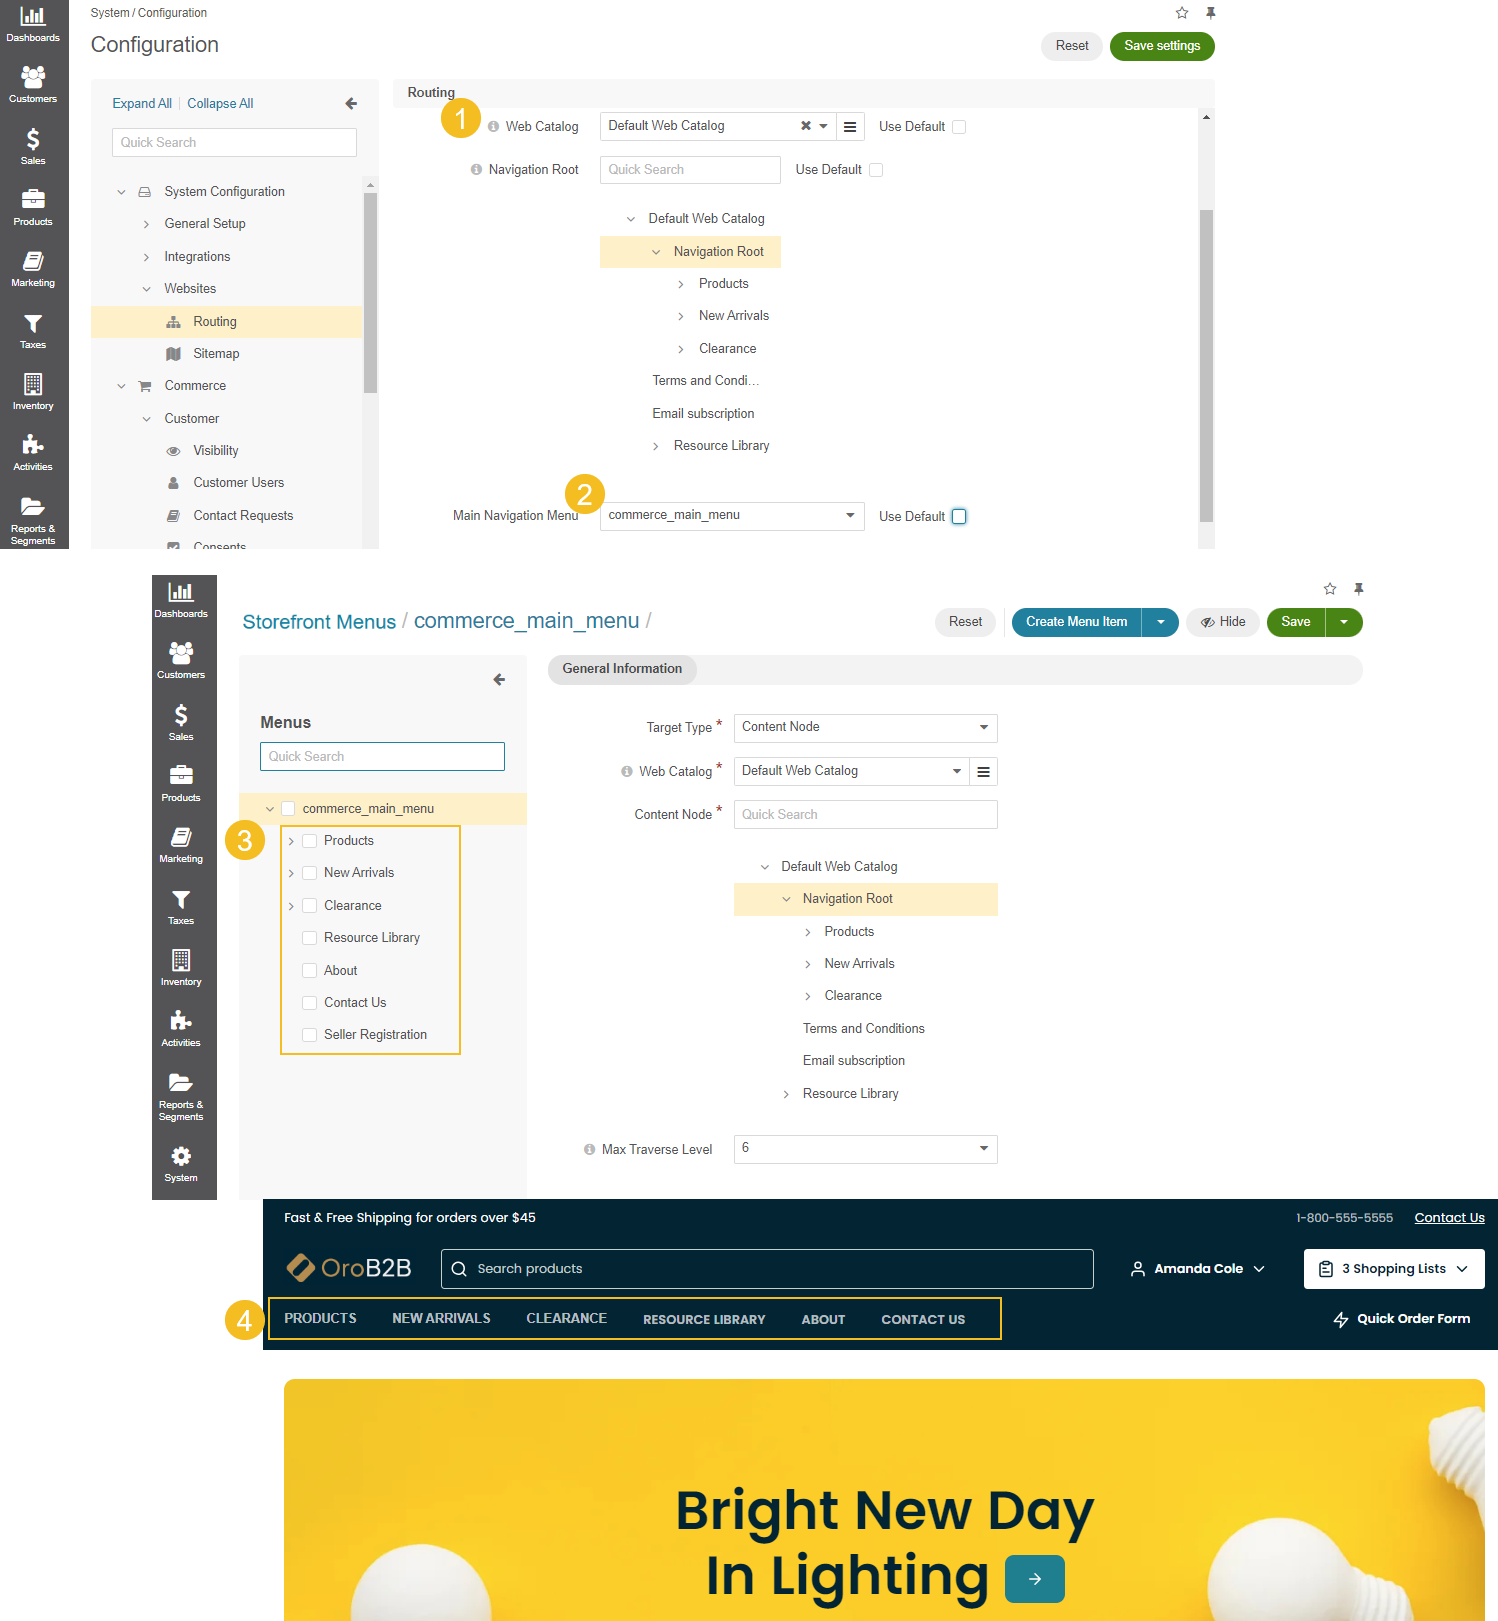
Commerce_main_menu is responsible for all items you see in main menu in your OroCommerce storefront. This menu mimics the structure of the web catalog or a master catalog (if web catalog is not connected) selected in the system configuration and enables you to make adjustments to the title, order or depths of the items. Here, you can update the menu items or add new ones without affecting the original master or web catalog.
Note
Keep in mind that, initially, the system takes the default values from the routing settings in the system configuration. However, once a user adjusts the values in the commerce_main_menu, the system starts adhering to these modified values, subsequently updating the storefront menu accordingly.
Commerce_footer_links
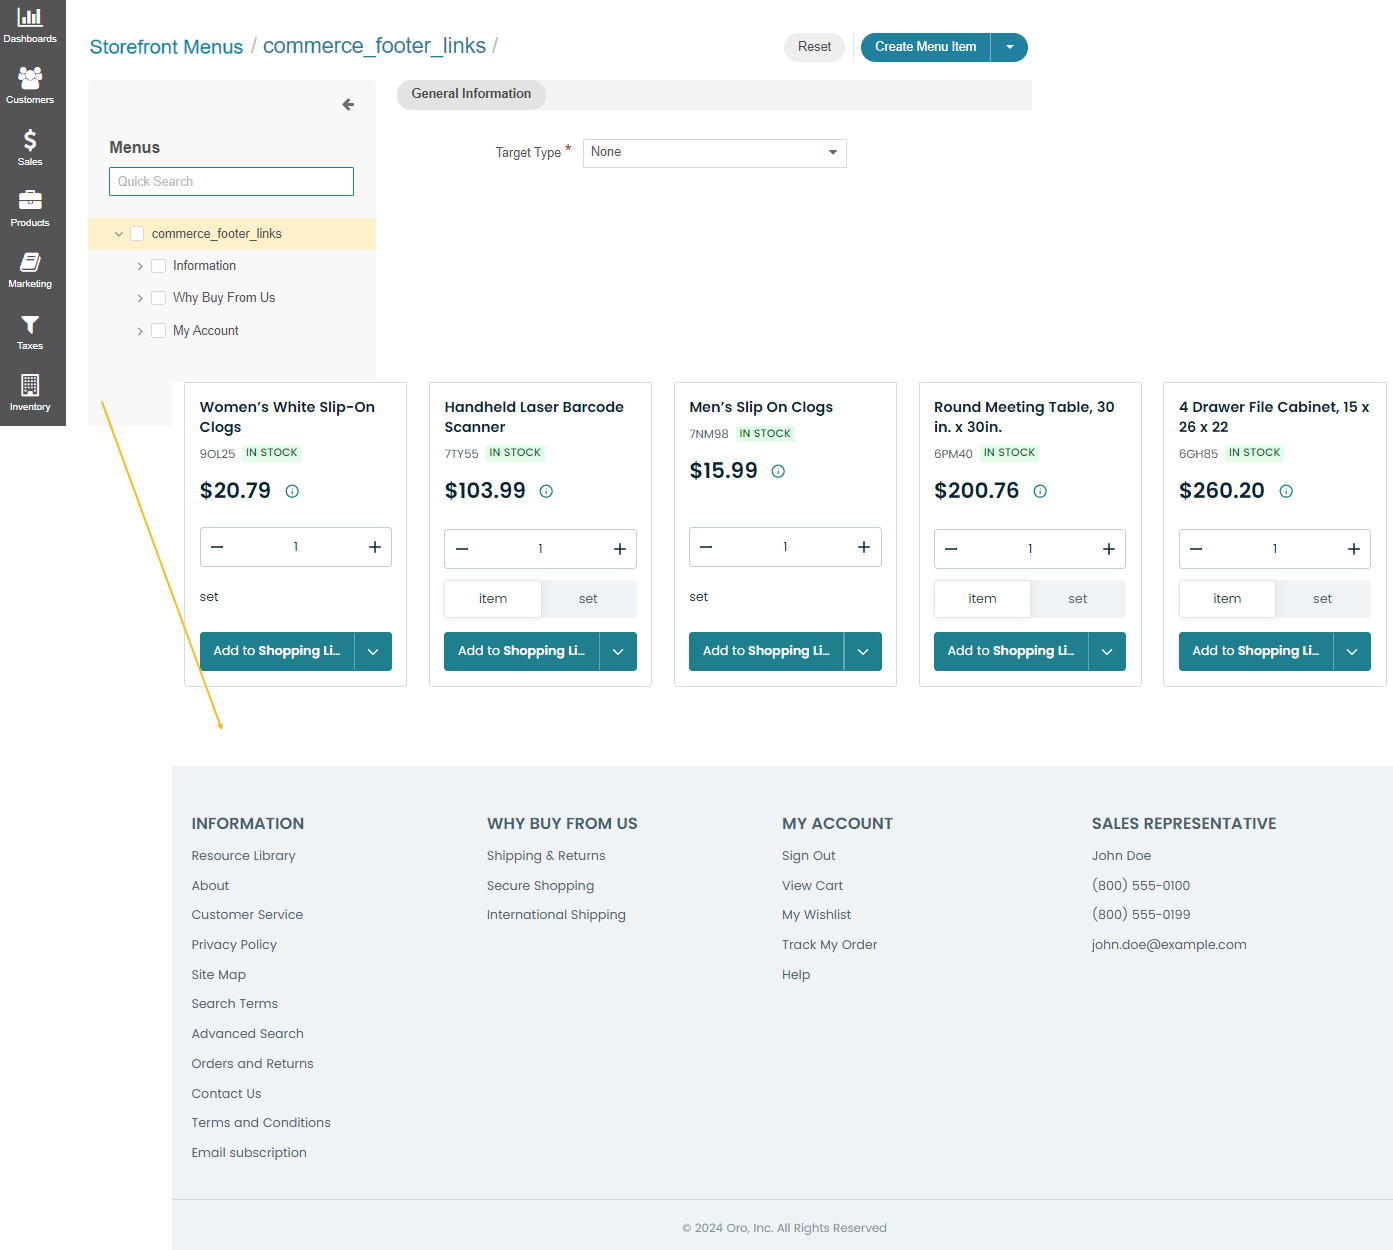
The commerce_footer_links menu defines the structure of the links located in the OroCommerce website page footer. Use the menu to provide a quick overview of your entire site or the most essential pages to your audience. You can also add the links to popular categories or products which otherwise are hard to find.
Featured_menu
Important
Featured_menu applies to all versions of OroCommerce. Users of OroCommerce v5.1 and earlier should configure the menu following the principles for those versions. While users of the Refreshing Teal theme can use the new configuration principles described in the section.
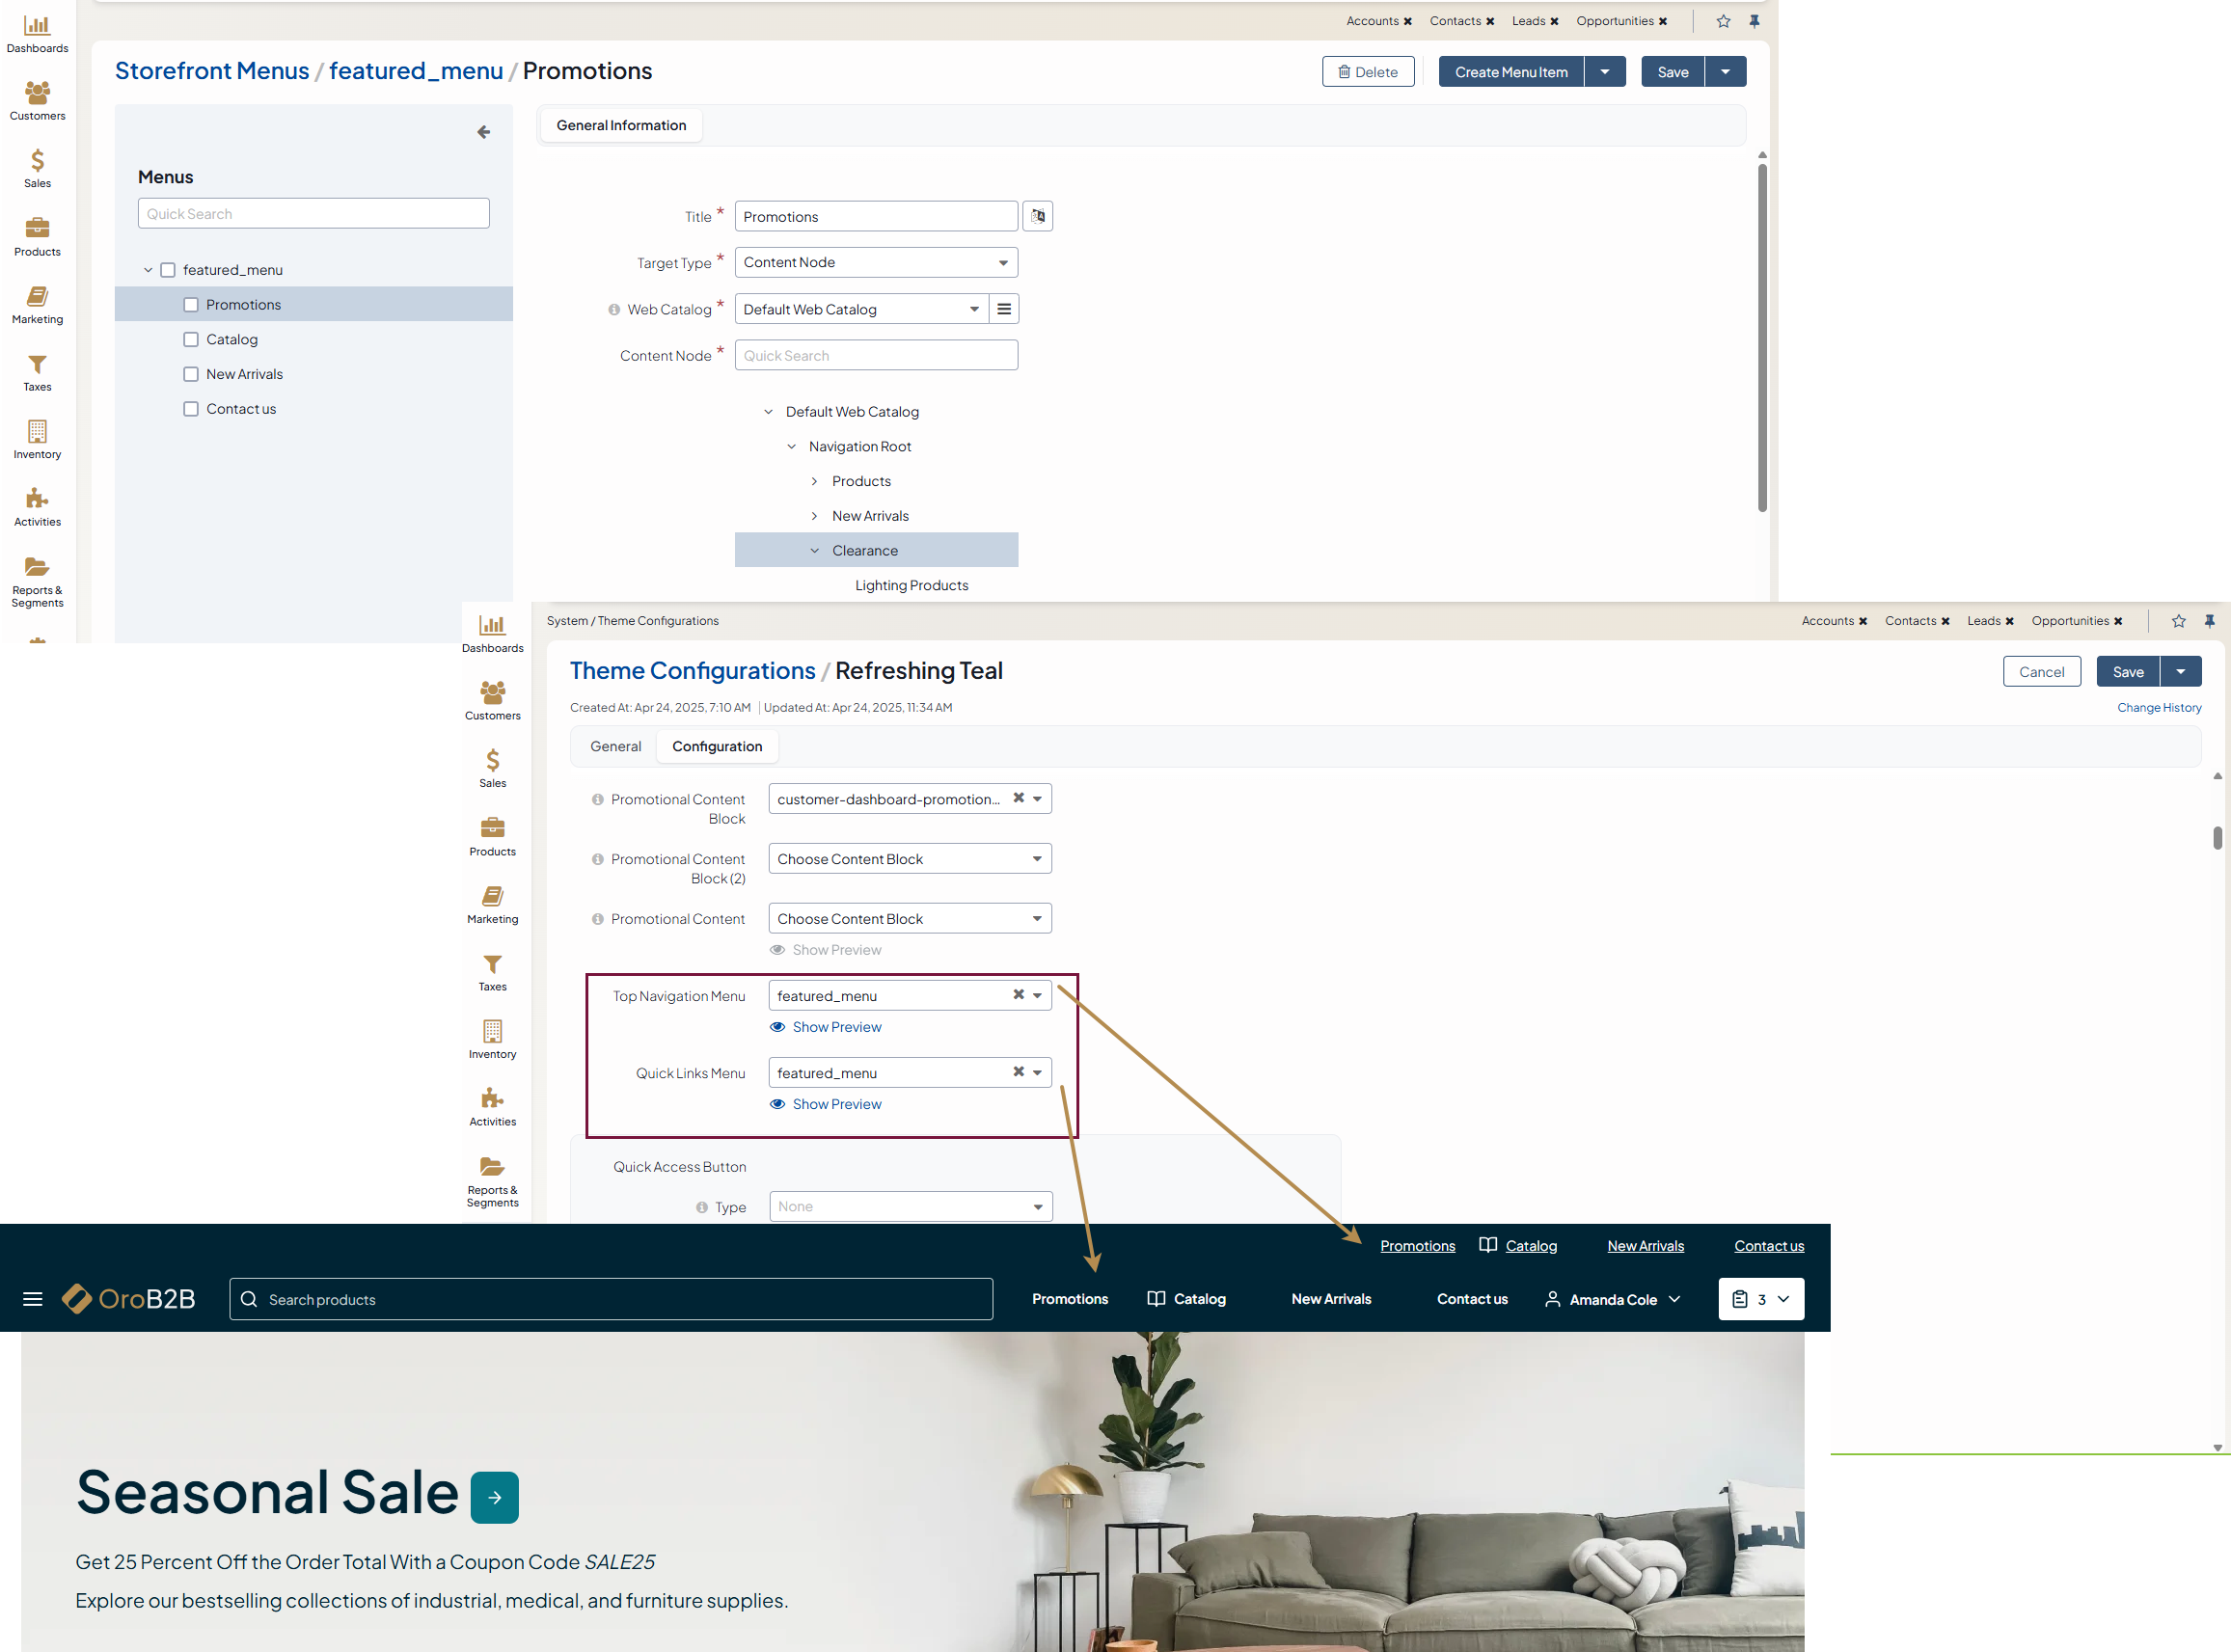
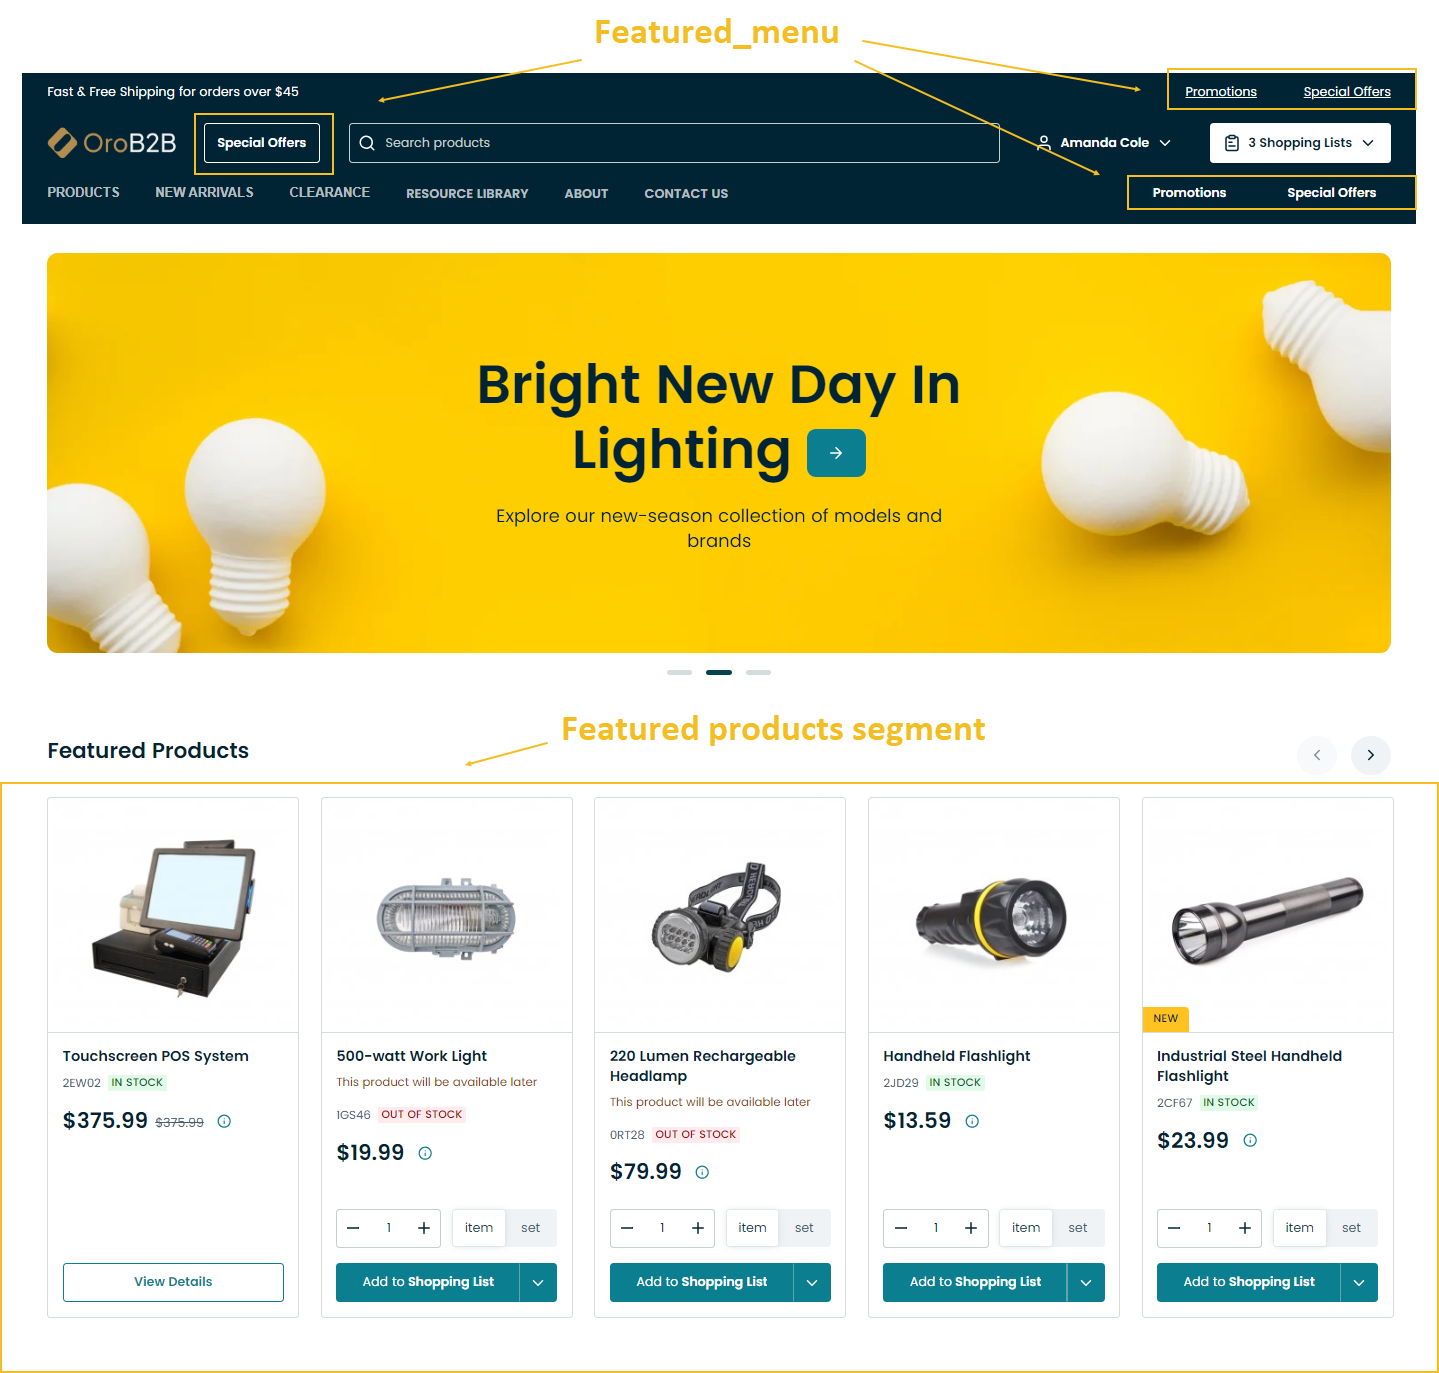
Featured_menu provides the possibility to include the necessary information as a separate featured block to the OroCommerce storefront header. Usually, the menu is used to highlight the latest promotions, featured categories, or items to attract the customers’ attention to the critical information.
You can use the nodes excluded from the main menu. For example, create a category or content node (e.g., Promotions) with a number of discounted items and with the product listing page not be part of the main menu. Then add it to featured menu and place it anywhere in the storefront header under the theme configuration.
Note
Keep in mind that featured_menu is different from the featured products segment. While the featured products segment is intended to store only the products and categories that are marked as featured, the featured menu is designed to offer any other information that you want to emphasize.
Customer_usermenu
Important
Customer_usermenu applies to OroCommerce version 5.1 and below and is retained in the current version only for legacy backward compatibility.
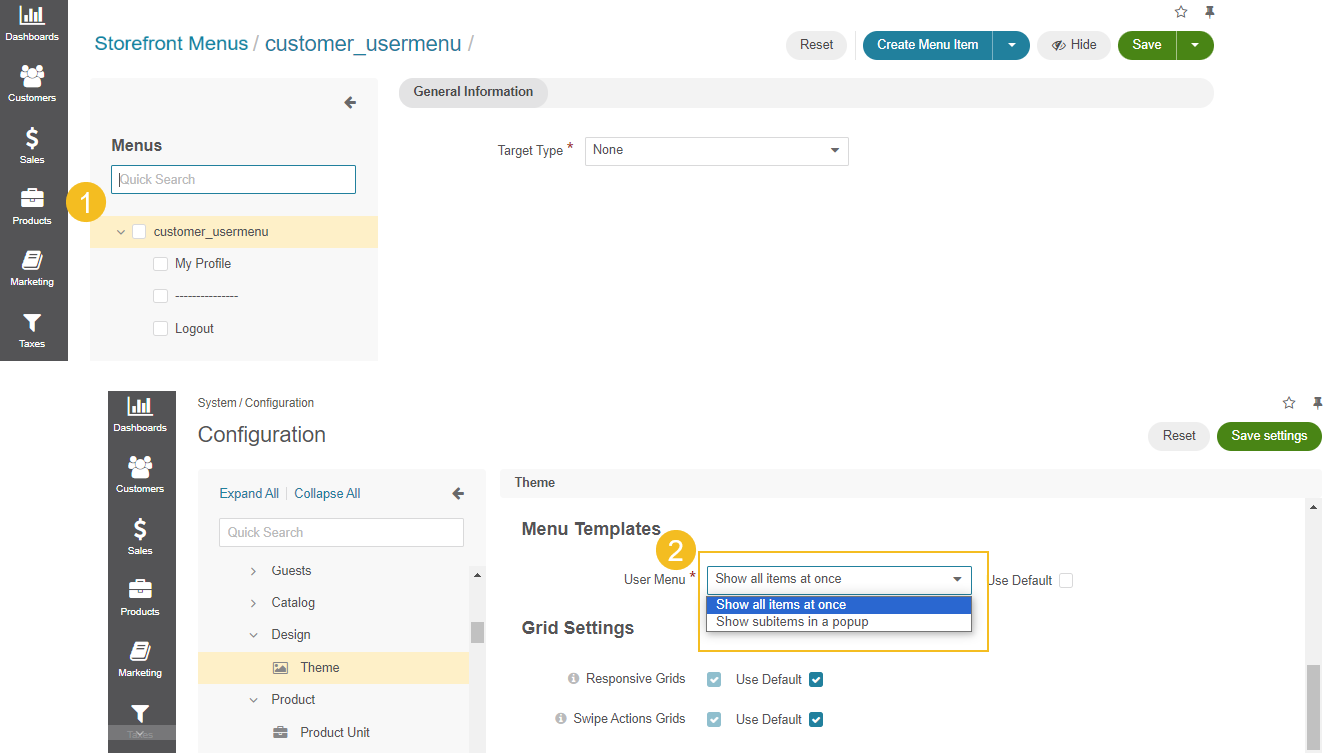
Customer_usermenu is a storefront user menu that appears at the top right of the website’s page header and defines what a customer will see within this menu. The menu look can either be concise (displaying all menu items in one raw) or expanded (displaying the full list of menu subitems in a popup). The way it is shown in the storefront can be customized under the Theme Settings configuration on the global, organization, and website levels.
Oro_customer_menu
Important
Oro_customer_menu applies to OroCommerce version 5.1 and below and is retained in the current version only for legacy backward compatibility. For v6.0 and above, please use the oro_customer_menu_refreshing_teal menu to modify the values in the Account section of the user menu.
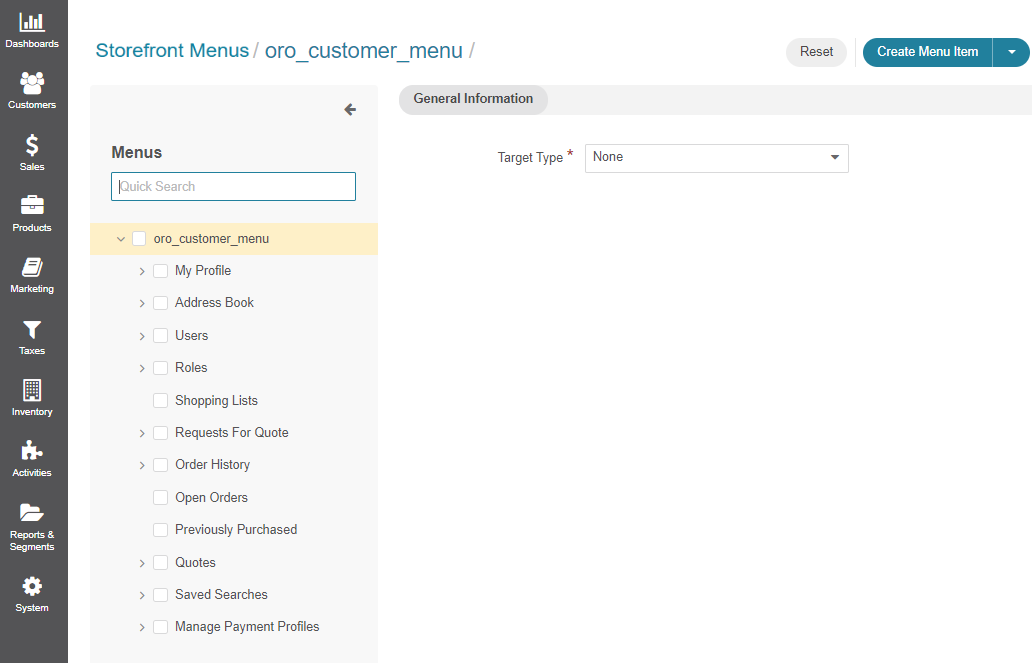
Oro_customer_menu defines the menu items that would populate the Account section of the user menu.
Oro_customer_menu_refreshing_teal
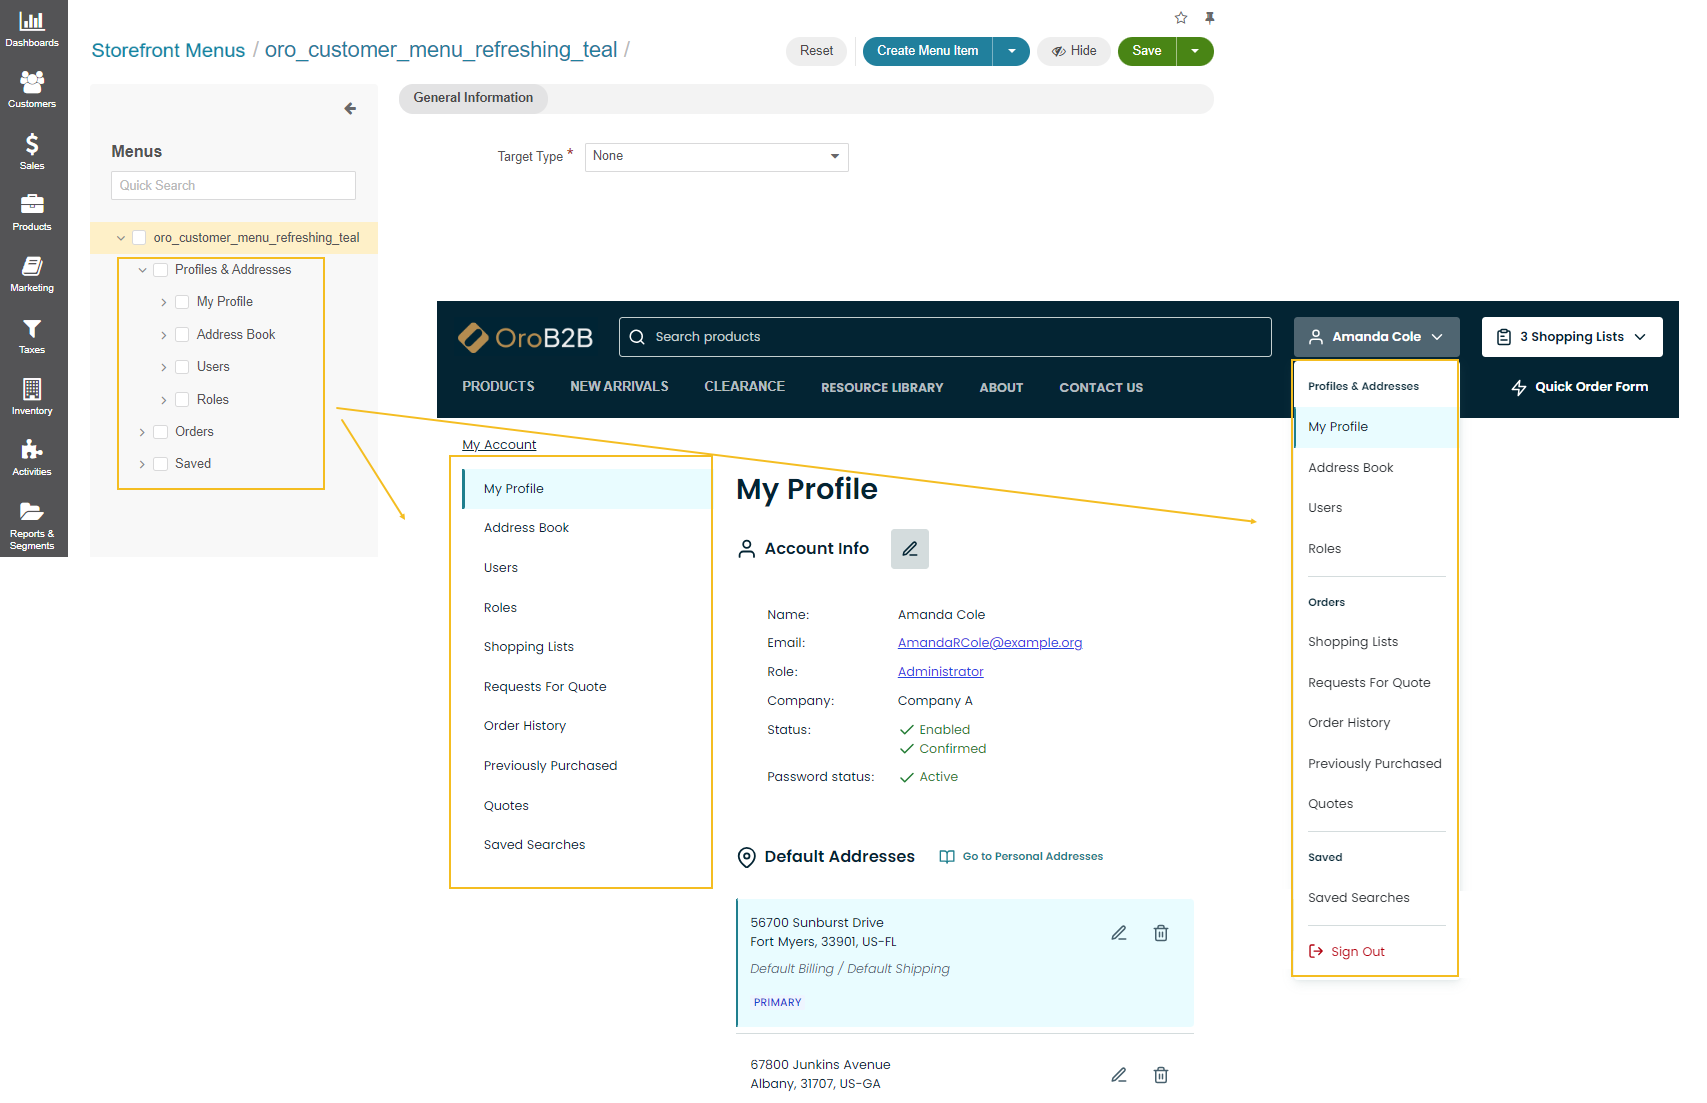
Oro_customer_menu_refreshing_teal defines the menu items that would populate the My Account section of the user menu.
Note
The ability to configure and manage Storefront Menus depends on the Manage Menus and Access system configuration capabilities. Make sure to enable them for the specific role to allow the user with this role to handle the menus functionality in the storefront.

Back-Office Menu Components
Back-office menu in OroCommerce allows you to navigate within menus of your website’s back-office, easily access your profile page, modify the existing menu items, adapt the default menus look and the elements they contain globally, per organization, and for your own use.
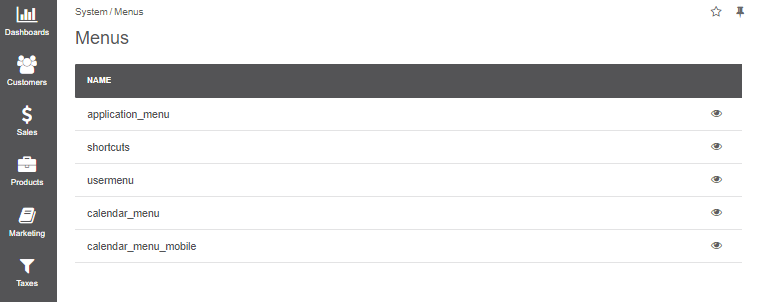
Application_menu
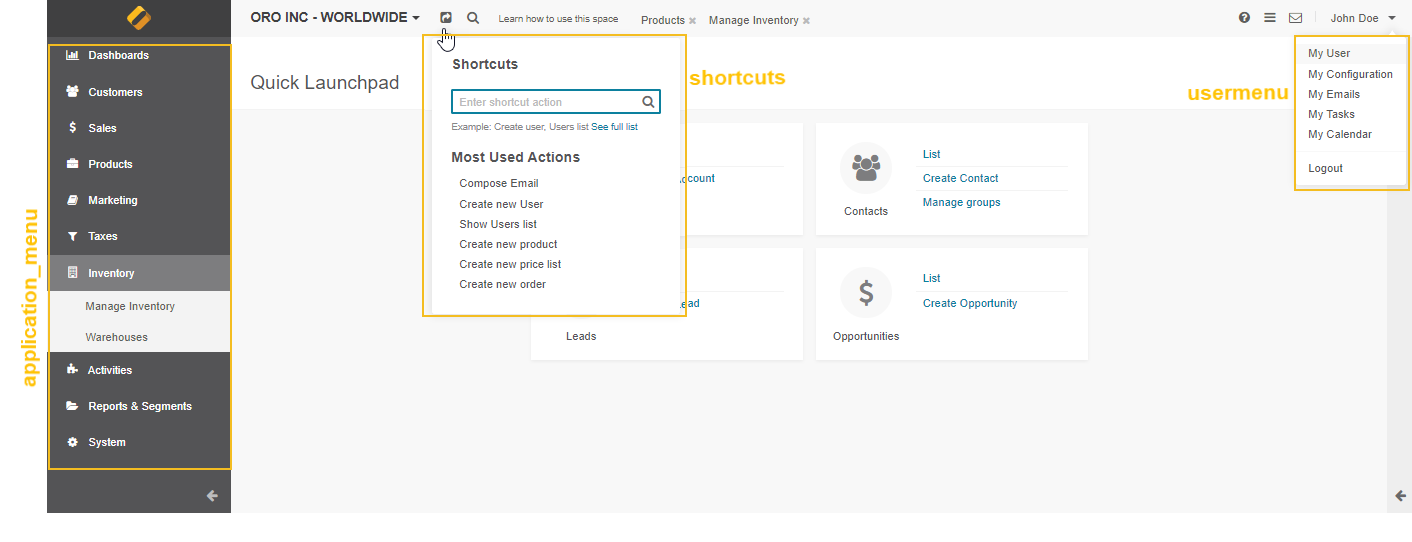
Application_menu (navigation bar) is the main menu of the back-office in the Oro application. It resides on the top of every application page, and you can use it to navigate through the Oro application. Subject to configuration, it may be displayed horizontally or vertically. The way it is displayed is customized in the system configuration in the Navigation Bar section of Display Settings and can be configured on four levels: globally, per organization, per website, and per user.
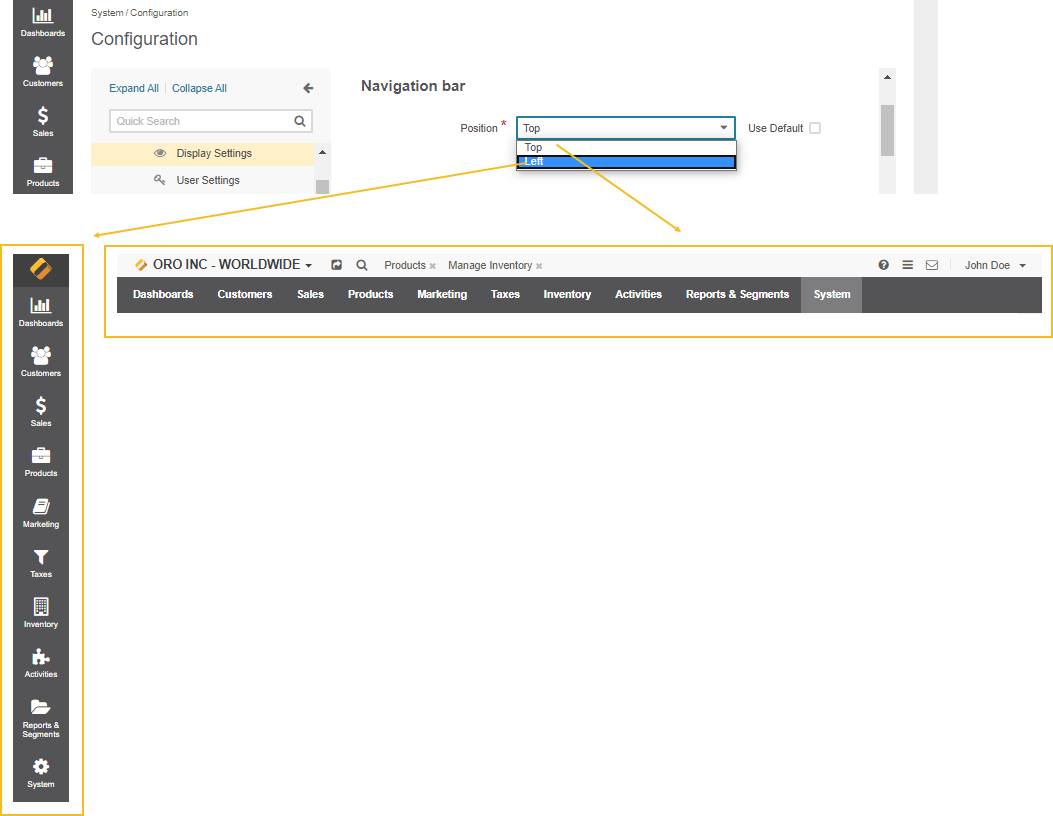
In a top position, the application menu (navigation bar) looks like a top menu with a drop-down sub-menus that expand once you hover over the parent item.
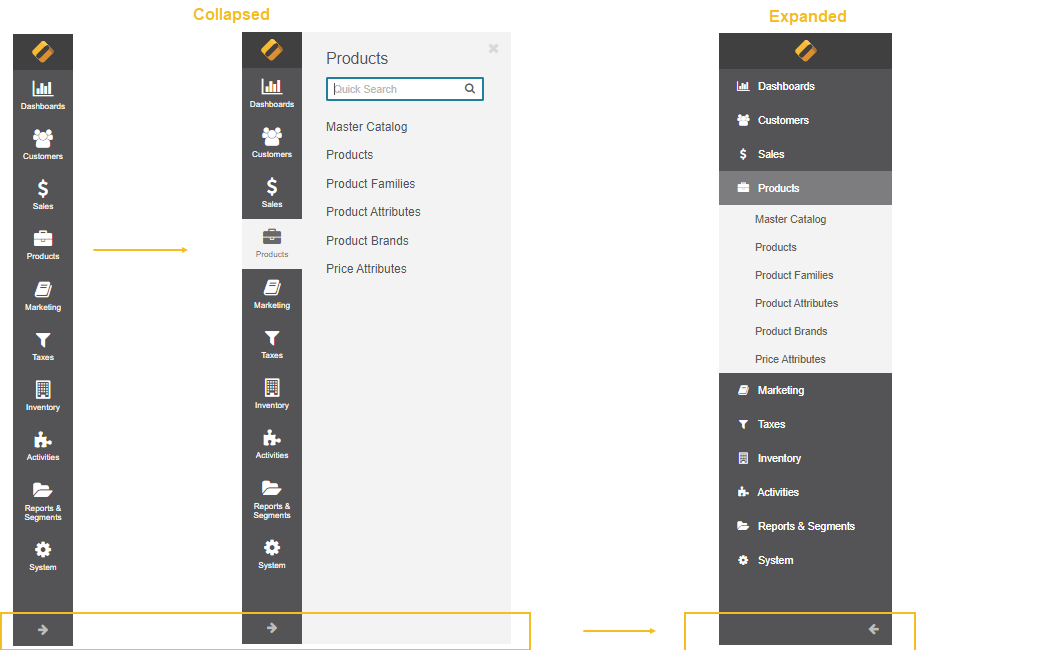
In a left position, the application menu (navigation bar) may be collapsed into the icon bar, or expanded for visible labels and sub-menu items:
Shortcuts
The shortcuts menu is displayed in the top panel of the application, next to the organization name.
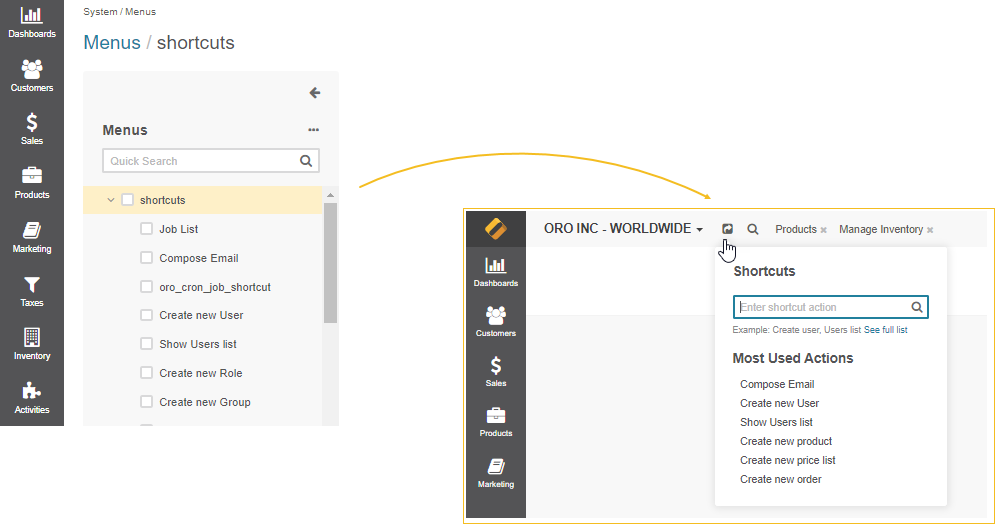
It helps you pin the frequently used actions and have them handy. You can launch an action by clicking it in the dynamically generated Most Used Actions list. This list is updated as you are using the system, and will initially contain the actions that you use the most.
To access other shortcuts, click See the full list to see a complete list of shortcut items or use search: start typing the name of a related entity or an action to choose from a list of matching items.
Usermenu
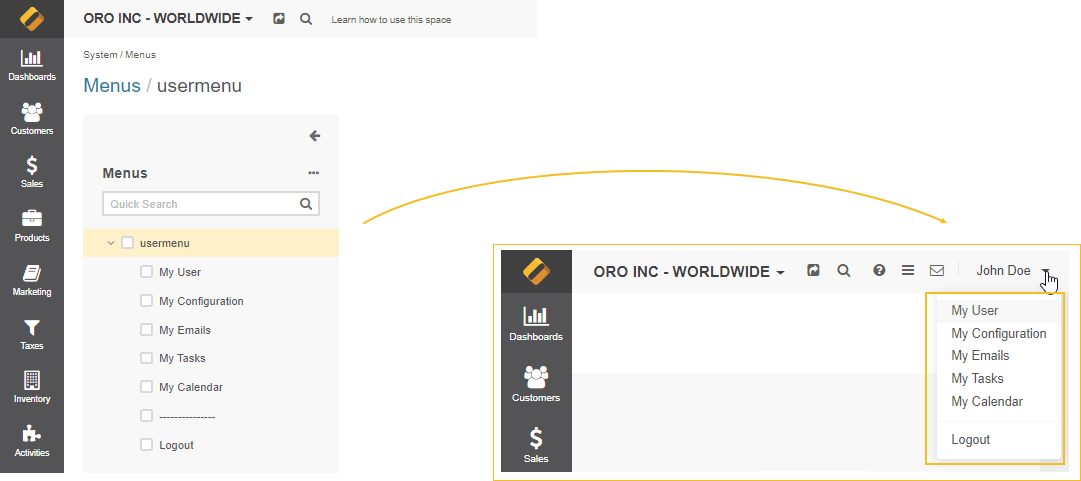
Usermenu is the personal menu of the logged-in user in the back-office. A user can access their profile configuration, emails, tasks, and events via usermenu by clicking on their name on the top right of the application.
Calendar_menu
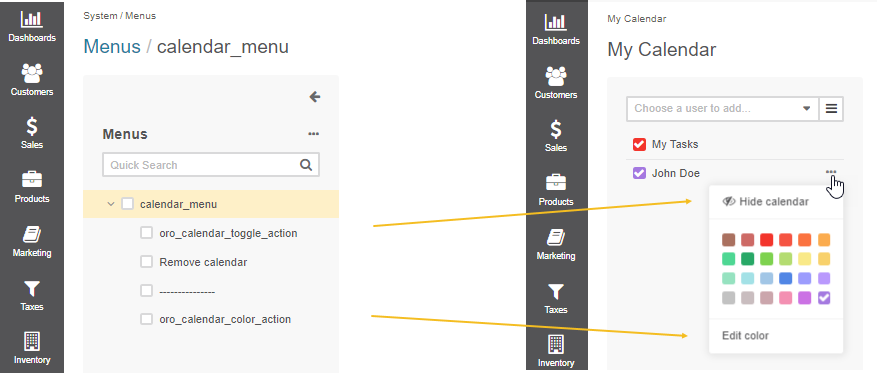
Calendar_menu is a service menu that is located on the My Calendar page under the ellipsis menu to the right from the calendar name. The actions in the menu help to change the displayed calendar color, hide or remove a calendar.
Calendar_menu_mobile
Calendar_menu_mobile is the mobile-adapted implementation of calendar_menu that allows you to manage your personal calendar from your mobile device anywhere and anytime without missing important events, calls, meetings, and schedules.
Note
The ability to configure and manage Menus in the back-office depends on the Manage Menus and Access system configuration capabilities. Make sure to enable them for the specific role to allow the user with this role to handle the menus functionality in the back-office.
Menus Localization
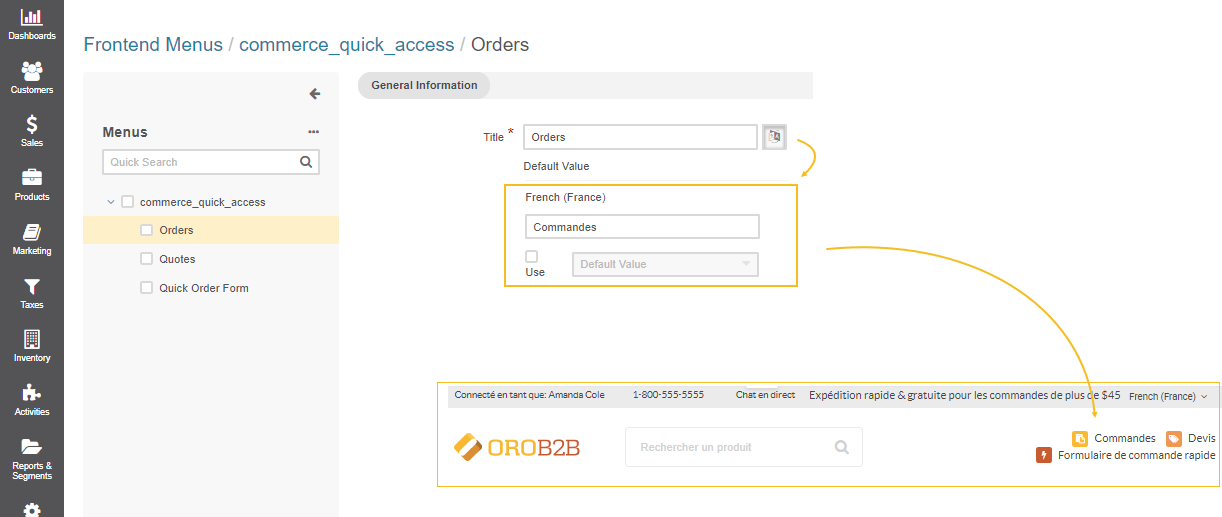
With OroCommerce, you can also make your website menu content multilingual by translating it to the target languages of your audience. The related translation is displayed once a user is switching the localization in the storefront. The language of the back-office menu content can be configured either individually per user, per specific website, per organization, or system-wide.
In a nutshell, when editing the content of the selected menu item, click the Translations icon next to the required menu element to provide spelling for different languages.
Hint
More on localizations and translations of content and UI system elements, read in the Localizations, Languages, and Translations topic.
Related Articles
