Important
You are browsing upcoming documentation for version 7.1 of OroCommerce, scheduled for release in 2027. Read the documentation for the latest LTS version to get up-to-date information.
See our Release Process documentation for more information on the currently supported and upcoming releases.
Integrate React
Make sure that you place all JS modules in the bundle’s public folder. If the bundle does not exist, create one following the instruction in the Create a Bundle topic.
Keep in mind that if you create a new bundle or fail to create symlinks when installing the application, you need to run the following command bin/console assets:install --symlink. For more information, please see OroAssetBundle documentation.
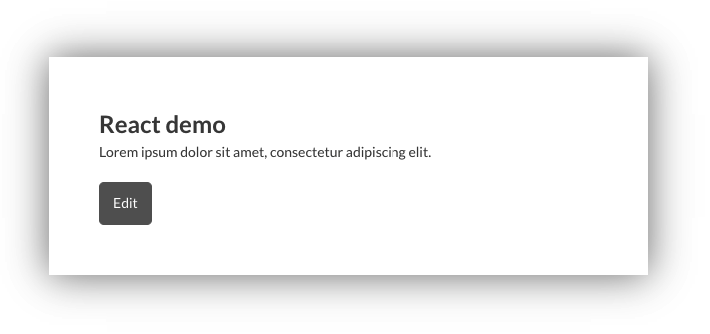
The example below illustrates creating a simple component, such as the one shown in the screenshot.
Install dependencies. Navigate to the root folder and modify the
composer.json(ordev.jsonif you use the developer mode) file with the code below. After updating the composer config file, execute thecomposer installcommand."extra": { "npm": { "prop-types": "^15.7.2", "react": "^17.0.2", "react-dom": "^17.0.2", } }
Note
To learn how to add dependencies to Composer, see Managing NPM dependencies with Composer.
Install a react preset for Babel using the
pnpm install @babel/preset-react --save-devcommand.Important
Since React uses JSX syntax, you must build with Babel. You can change the command parameters for building in
package.jsonin the project. Use"watch": "pnpm run webpack -- -w --progress --env withBabel"and"build": "pnpm run webpack -- --mode=production --env withBabel"commands with additionalwithBabeloption.Open your
webpack.config.jsand replace the existing code with the code below:const OroConfig = require('@oroinc/oro-webpack-config-builder'); OroConfig .enableLayoutThemes() .setPublicPath('public/') .setCachePath('var/cache') .setBabelConfig({ ...OroConfig._babelConfig, 'presets': [...OroConfig._babelConfig.presets, '@babel/preset-react'] }); module.exports = OroConfig.getWebpackConfig();
Create a React component and copy the code below:
import React, { Component } from 'react';
import PropTypes from 'prop-types';

class App extends Component {
    constructor(props) {
        super(props);
        this.state = {
            title: props.initialTitle,
            content: props.initialContent,
            editMode: false
        };

        this.enterEditMode = this.enterEditMode.bind(this);
        this.exitEditMode = this.exitEditMode.bind(this);
        this.handleChangeTitle = this.handleChangeTitle.bind(this);
        this.handleChangeContent = this.handleChangeContent.bind(this);
    }

    enterEditMode(event) {
        event.preventDefault();

        this.setState({
            editMode: true
        });
    }

    exitEditMode(event) {
        event.preventDefault();

        this.setState({
            editMode: false
        });
    }

    handleChangeTitle(event) {
        this.setState({title: event.target.value});
    }

    handleChangeContent(event) {
        this.setState({content: event.target.value});
    }

    render() {
        const {title, content, editMode} = this.state;
        let children;

        if (editMode) {
            children = <form className="grid">
                <div className="grid__row">
                    <label htmlFor="name">Title</label>
                    <input type="text" id="name" className="input" name="title" onChange={this.handleChangeTitle} defaultValue={title}/>
                </div>
                <div className="grid__row">
                    <label htmlFor="content">Content</label>
                    <textarea className="input" id="content" name="content" onChange={this.handleChangeContent} defaultValue={content}></textarea>
                </div>
                <div className="grid__row">
                    <button type="submit" className="btn btn-primary" onClick={this.exitEditMode}>Update</button>
                </div>
            </form>;
        } else {
            children = <>
                <h1>{title}</h1>
                <p>{content}</p>
                <button className="btn edit-mode" onClick={this.enterEditMode}>Edit</button>
            </>;
        }
        return (
            <>
                {children}
            </>
        );
    }
}

App.propTypes = {
    initialTitle: PropTypes.string.isRequired,
    initialContent: PropTypes.string.isRequired
}

export default App;
Important
In all code examples, the bundle’s name is set to
AcmeBundle. When copying, remember to correct the name of the bundle in the paths according to your bundle.Add page component to the
dynamic-imports:paths. Since React is not the base framework for Oro, enable Page Component to start the Vue application, which will ensure proper integration into the Oro application lifecycle. Create a file and insert the code below:To build the application after changes, run the
pnpm run buildcommand. To rebuild the application automatically, run thepnpm run watchcommand.Once the page component with Vue instance is created, declare it in the template of the required page. Copy and paste the code below:
{% block _react_app_block_widget %}
    {% set attr = layout_attr_defaults(attr, {
        'data-page-component-react-app': {
            reactApp: 'acmereactapp/js/react-app/App',
            initialTitle: 'React demo',
            initialContent: 'Lorem ipsum dolor sit amet, consectetur adipiscing elit.'
        }
    }) %}

    <div {{ block('block_attributes') }}>
        {{ block_widget(block) }}
    </div>
{% endblock %}
Register your new widget and append it to the page container in the layout. For this, create a file. For more on the layout update, see the Layout topic.