Important
You are browsing upcoming documentation for version 7.1 of OroCommerce, scheduled for release in 2027. Read the documentation for the latest LTS version to get up-to-date information.
See our Release Process documentation for more information on the currently supported and upcoming releases.
Layout
OroPlatform incorporates Oro Layout component and OroLayoutBundle to enable the layouts system in derivative applications for building the front public appearance.
Unlike traditional Symfony templating, the layout system has a number of advantages for building the front UI. These include the ability to make themeable UI and allow unlimited changes and extensions of the vendor themes by third-party additions.
A layout defines the visual structure of the user interface element, such as a page or a widget. In other words, a layout is a recursive system that knows how an element should be positioned and drawn.
Blocks
Content of any page of an application is separated by a set of blocks grouped by content or structure.
Have a look at the following page structure:
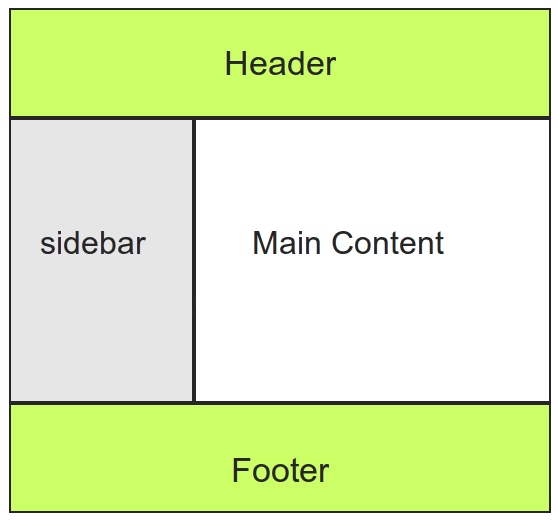
Here, we are splitting the page into the following blocks hierarchy:
- root
header
- body
sidebar
main content
footer
Each of these blocks has children in the final structure, so they represent a container.
A Container is a block type responsible for holding and rendering its children.
A Final block is a block type that renders content based on data, but it cannot have children.
The layout built by providing a set of actions called a layout update. Layout updates can be defined for a specific route and a specific theme.
Block Types
Each block has a block type that is responsible for passing options and data in the block theme.
To get a list of available block types, run the command:
bin/console oro:debug:layout
To get reference on a single block type with all the available options, run:
bin/console oro:debug:layout --type=BLOCK_TYPE_NAME
The following are the block types to build HTML layout structure:
Type name |
Default HTML output |
|---|---|
root |
<html> |
head |
<head> |
title |
<title> |
meta |
<meta> |
style |
<style> with content or <link> with external resource |
script |
<script> |
external_resource |
<link> |
body |
<body> |
form_start |
<form> |
form_end |
</form> |
form |
Creates three child blocks: form_start, form_fields, form_end |
form_fields |
Adds form fields based on the Symfony form |
form_field |
Block will be rendered differently depending on the field type of the Symfony form |
fieldset |
<fieldset> |
link |
<a> |
list |
<ul> |
ordered_list |
<ol> |
list_item |
<li>, this block type can be used if you want to control rendering of the li tag and its attributes |
text |
Text node |
input |
Input node |
button |
<button> or <input type=”submit/reset/button”> |
button_group |
No HTML output. It is used for logical grouping of buttons. You can define how to render the button group in your application |
The layout is defined and built in special configuration files called Layout Updates.
The Layout Update files provide instructions on what exactly blocks are contained on a particular page (based on the route) and how these blocks are structured on the page.
Besides the blocks and their structure, the layout update files define what data fills the certain block and what conditions must meet to show a particular block on the page.
The layout update files are grouped into themes. Oro applications can have an unlimited number of installed themes, but only one front theme can be active at the same time.
Layout Updates
A layout update is a set of actions that should be performed with the layout in order to customize the page look depending on your needs.
The layout update instructions are read from Yaml files which should be placed in the theme folder.
Where to Place Layout Updates
The execution of a layout update file depends on its location in the directory structure. The first nesting level (relative to layouts/) sets the theme for which this update is suitable (see directory option in theme config). The second level sets the route name for which it is suitable.
Considering our previous examples, we can see that for the oro-gold theme, update1.yml and update2.yml will be executed for every request, but route_dependent_update.yml will be executed only for a page that has the route name that equals oro_user_edit.
Note
Use Symfony Profiler to get suggestions on where to place layout updates.
Syntax of the Layout Updates
The layout update file
can have an arbitary name
should have layout as a root node
may consist of the Actions and Conditions nodes.
Actions
Actions is an array node with a set of actions to execute.
Note
Each action is usually compiled as a separate call to the corresponding method of the LayoutManipulatorInterface.
Here is the list of the available actions:
Action name |
Description |
|---|---|
add |
Add a new item to the layout |
addTree |
Add multiple items defined in the tree hierarchy. |
remove |
Remove the item from the layout. |
move |
Change the layout item position. Could be used to change the parent item or ordering position. |
addAlias |
Add an alias for the layout item. Could be used for backward compatibility. |
removeAlias |
Remove the alias previously defined for the layout item. |
setOption |
Set the option value for the layout item. |
appendOption |
Add a new value in addition to existing values of an option of the layout item. |
subtractOption |
Remove the existing value from an option of the layout item. |
replaceOption |
Replace one value with another value of an option of the layout item. |
removeOption |
Unset the option from the layout item. |
changeBlockType |
Change the block type of the layout item. |
setBlockTheme |
Define the theme file where the renderer should look for block templates. |
clear |
Clear the state of the manipulator. This can prevent execution of all the previously collected actions. |
Actions definition is processed as a multidimensional array where the key is the action name prefixed by the @ sign, and the value is a list of arguments that is passed directly to the proxied method call.
Arguments can be passed as a sequential list, or an associative array.
Example
layout:
    actions:
        - '@add': # Sequential list
            - block_id
            - parent_block_id
            - block_type
        - '@remove': # Named arguments
            id: content
Optional parameters can be skipped when named arguments are used. In the following example, we skip the optional argument parentId that will be set to the default value automatically.
Example
layout:
    actions:
        - '@move':
            id:        block_id
            siblingId: sibling_block_id
AddTree Action
You can add a set of blocks with the addTree action. It requires two nodes to be defined, items and tree.
In the Items node, specify the list of block definitions. Use the block id as the item key. This will result in the @add action for every specified block.
In the Tree node, arrange the items into the desired hierarchy. Use the existing parent block id as the first node of the tree. The items will be added as its children.
Example
layout:
    actions:
        - '@addTree':
            items:
                head:
                    blockType:   head
                meta_charset:
                    blockType:   meta
                    options:
                        charset: 'utf-8'
                content:
                    blockType: body
            tree:
                root:
                    head:
                        meta_charset: ~
                    content: ~
Note
The tree definition should refer only to the items that are declared in the same @addTree action, otherwise, a syntax error will occur.
Leaves of the tree can be defined as sequentially ordered array items. However, you should take into account the fact that YAML syntax does not allow mixing both approaches in the same array node. We, therefore, recommend using the associative array syntax.
Conditions
Conditions is an array node which contains conditions that must be satisfied for the layout update to be executed.
As an example, let us assume that a set of actions should be executed only for a page that is currently served to a mobile device.
The syntax of conditions declaration is very similar to actions, except that it should contain a single condition.
Special grouping conditions (such as or, and) can be used to combine multiple conditions.
Example
layout:
    actions:
        ....
    conditions: 'context["is_mobile"] == true or context["navbar_position"] == "top"'
Layout context could be accessed through the condition expressions by referencing to $context variable.
Please, refer to the Symfony expression syntax documentation for a more detailed explanation.
Use Layouts with the Controller
Add #[Layout] attribute to the controller:
use Symfony\Bundle\FrameworkBundle\Controller\AbstractController;
use Symfony\Component\Routing\Attribute\Route;
use Oro\Bundle\LayoutBundle\Attribute\Layout;

 class UserController extends AbstractController
 {
     #[Route(path: '/test', name: 'demo_layout_test', options: ['frontend' => true])]
     #[Layout]
     public function testAction()
     {
         return [];
     }
 }
To render the content on a new page, create layout update yml files for
the new route in Resources/views/layouts/{theme_name}/{route_name}.
Expressions to Access Data and Context in Layouts
In most cases, you need to use the same layout to show different data. For example, the same layout can be used to show different products. To achieve this, you need a way to get and bind data to the layout elements.
Data can flow to a layout from several sources:
From a Layout Context — the shared layouts data
From a Layout Data Provider — the data that is unique for every particular page, based on the same layout
The Symfony Expression Language is used to unify access of the Context and Data variables. The Expression Language syntax is similar to JavaScript, but in layouts, it is limited to the basic operations with no functions at all and only a few defined variables:
Variable name |
Description |
|---|---|
|
Refers to current layout context |
|
Used to access layout data providers |
Also, in order to reuse values, block options of the same block are available in expressions by the option name. |
|
NOTE: expression in block options must begin with the equals sign, for
example, url: '=data["backToUrl"]', unlike expressions in layout update conditions, for example, conditions: 'context["is_mobile"]'
Layout Context
The layout context is an object that holds data shared between the different components of the layout (such as layout updates, extensions, block types, etc.).
Keep in mind that data that you put in the layout context is configuration (or static) data. It means that two layouts built on the same context are the same, too.
As an example, let us assume that you need to build a layout for a Product Details page of the OroCommerce application. All product pages should be similar (e.g., have the same menu placement, form fields, etc.), except for the product name and description. Let us also assume that you have an option that specifies that a menu should be rendered either at the top or to the left of the page.
In this case, it would be reasonable to put the menu position option in the layout context. However, it is not recommended to put the product object in the layout context. The reason for it is that it will not be possible to reuse the same layout for different products, and you will have to build a new layout for each product.
Sharing dynamic data, like a product object, is described in the Layout Data Providers section.
If there are several types of products, and their details pages (e.g., groceries, stationary, and toys) are supposed to differ significantly, it would be reasonable to put the product type in the layout context.
Types of Data in the Context
The layout context can hold any types of data, including scalars, arrays and objects. But any object you want to put in the context must implement the ContextItemInterface.
Accessing Context
Context can be accessed using the Symfony Expression Language by providing an expression as an option for some block.
For example:
actions:
...
- '@add':
    id: blockId
    parent: parentId
    blockType: typeName
    options:
        optionName: '=context["valueKey"]'
Context Configurators
It might be required to configure the context based on the current application state, client setting, or to define the default values, etc. In order to prevent copypasting of the boilerplate code, context configurators have been introduced.
Each configurator should implement the ContextConfiguratorInterface, and be registered as a service in the DI container with the layout.context_configurator tag.
For debugging purposes, use the bin/console oro:debug:layout command. It helps monitor the way the context data-resolver will be configured by the context configurators.
Layout Data Providers
Types of Data Providers
You can provide data for layouts in two ways:
By adding them to the data collection of the layout context. This method can be used for page-specific data or the data retrieved from the HTTP request.
By creating a standalone data provider. This method is useful if data is used on many pages, and the data source is a database, HTTP session, external web service, etc.
Data Providers Reference
To get a list of available data providers, run the command:
bin/console oro:debug:layout
To get reference on a single data provider, run:
bin/console oro:debug:layout --provider=DATA_PROVIDER_NAME
Defining a Data Provider
As an example, consider a data provider that returns product details:
namespace Acme\Bundle\DemoBundle\Layout\Extension;

use Acme\Bundle\DemoBundle\Entity\Product;

class ProductDataProvider
{
    public function getCode(Product $product)
    {
        return $product->getId();
    }
}
You can also implement the AbstractFormProvider if you use forms.
Important
The DataProvider provider method should begin with get, has, or is.
To make the layout engine aware of your data provider, register it as a service in the DI container with the layout.data_provider tag:
acme_product.layout.data_provider.product:
    class: Acme\Bundle\DemoBundle\Layout\DataProvider\ProductProvider
    tags:
        - { name: layout.data_provider, alias: product }
The alias key of the tag is required and should be unique for each data provider. This alias is used to get the data provider from the registry.
Accessing Providers Data
Access data provider data with the Symfony Expression Language by providing the expression as an option for a block.
Example:
actions:
    ...
    - '@add':
        id: product_code
        parent: product_details
        blockType: text
        options:
            text: '=data["product"].getCode()'
The way you access the data does not depend on where the data is located, in the layout context or in the standalone data provider. But it is important to remember that standalone data providers have higher priority than the data from the layout context.
It means that if there is data with the same alias in both the layout context and a standalone data provider registry, the standalone data provider will be used.
Using the Layout Context as Data Provider
If you want to add some data to the layout context, you can use the data method of layout context. This method returns an instance of ContextDataCollection. Use the set method of this collection to add data:
$context->data()->set(
    'widget_id',
    $request->query->get('_wid')
);
The set method has the following arguments:
$name - A string which can be used to access the data.
$value - The actual data. The data can be any type, for example, an array, object, or some scalar type.
You can also create Context Configurators to set the default data:
$context->data()->setDefault(
    'widget_id',
    function () {
        if (!$this->request) {
            throw new \BadMethodCallException('The request expected.');
        }

        return $this->request->query->get('_wid');
    }
);
The setDefault method has the following arguments:
$name - A string which can be used to access the data.
$value - The data. The data can be of any type, for example, an array, object, or some scalar type. You can also use the callback method to get the data. The callback definition is as follows: function (array|ArrayAccess $options) : mixed, where the $options argument represents the context variables.
Reuse Layout Updates with Imports
In order to reuse layout updates, they can be organized to imports.
Use Imports
Import defined as a folder with layout updates in the Resources/views/layouts/{theme_name}/imports/. Import can be reused in different pages and even used multiple times on the same page.
To use existing import, use the following syntax:
layout:
    actions: []
    imports:
        -
            id: customer_user_role_form_actions
or just
layout:
    actions: []
    imports:
        - customer_user_role_form_actions
In this example, customer_user_role_form_actions is the name of the folder in the Resources/views/layouts/{theme_name}/imports and the unique import identifier.
This means that all layout updates will be loaded from the layouts/{theme_name}/imports/customer_user_role_form_actions folder on import statement.
As the result, all actions will be executed if the condition (if it exists) of the imported layout update is true. In this case, you do not need any special syntax in the layout updates.
Reuse Imports on the Same Page
To import the same layout update multiple times on the same page, provide unique ids for all layout blocks using the following special syntax:
# Layout Update in Imports Folder:

layout:
    actions:
        - '@setBlockTheme':
            themes: '@AcmeLayout/layouts/default/layout.html.twig'
        - '@addTree':
            items:
                __update:
blockType: button
                    options:
                        action: submit
                        text: 'Save label'
                __cancel:
blockType: link
                    options:
                        route_name: oro_route_index
                        text: 'Cancel label'
                        attr:
                            'class': btn
            tree:
                #'__root' reserved root import option
                __root:
__update: ~
                    __cancel: ~
Double underscore (__) means that the namespace can be provided for these blocks. The namespace should be passed to the import statement in the following way:
imports:
    -
        id: 'customer_user_role_form_actions'
        root: 'form_fields_container'
        namespace: 'form_fields'
A special root parameter will replace __root in the imported layout updates. As a result, we get the following tree:
tree:
    form_fields_container: #root option replaces “__root”
        form_fields_update: ~ #namespace option replaces all first underscore of “__”
        form_fields_cancel: ~
When you provide a block theme for the imported layout update, the end identifier is unknown. To state it, use a special syntax for the block name in the __{unique import identifier}{import block id before namespace added}_widget template.
{% block __customer_user_role_form_actions__update_widget %}
{% endblock %}

{% block __customer_user_role_form_actions__root_widget %}
{% endblock %}
Also, you can provide a template for the block by the layout block id in the layout update which has an import statement like:
{% block _form_fields_container_widget %}
{% endblock %}

{% block _form_fields_update_widget %}
{% endblock %}
Reference Imported Blocks
When you need the imported block to be rendered without a direct reference to its template name, you can use the TWIG variable block_type_widget_id which refers to the twig widget ID for current block type, like container_widget, menu_widget, etc.
For example, here is the customized toolbar element defined in the DataGridBundle on the product page (ProductBundle) in the OroCommerce application:
{% block _datagrid_toolbar_mass_actions_widget %}
    ...
    <div class="catalog__filter-controls__item">
        <div{{ block('block_attributes') }}>{{ block(block_type_widget_id) }}</div>
    </div>
{% endblock %}
Note
By default, the element contains the {{ block_widget(block) }} which renders the block as a template defined in imports. Replaced it with the block(block_type_widget_id) to avoid mentioning the template name.
Advanced Import Example
Have a look at how the toolbar element was imported in our example, and what the default way it rendered was.
First, the datagrid toolbar in DataGridBundle was imported with the following definitions:
ID in the layout.yml:
layout:
    actions:
    ...
    imports:
        -
            id: datagrid_toolbar
Item tree in imports/datagrid_toolbar/layout.yml (block element __datagrid_toolbar_mass_actions):
layout:
    actions:
        - '@setBlockTheme':
            themes: '@AcmeLayout/layouts/default/layout.html.twig'
        - '@addTree':
            items:
                __datagrid_toolbar:
blockType: container
                __datagrid_toolbar_actions_container:
blockType: container
                __datagrid_toolbar_mass_actions:
blockType: container
            ...
            tree:
                __root:
__datagrid_toolbar:
__datagrid_toolbar_sorting: ~
__datagrid_toolbar_actions_container:
__datagrid_toolbar_mass_actions: ~
...
In the imports/datagrid_toolbar/layout.html.twig, the block element __datagrid_toolbar_mass_actions looked the following way:
{% block __datagrid_toolbar__datagrid_toolbar_mass_actions_widget %}
    <div{{ block('block_attributes') }}>{{ block_widget(block) }}</div>
{% endblock %}
Next, we redefined the imports/datagrid_toolbar/layout.html.twig block in the ProductBundle which resulted in the following code:
{% block _datagrid_toolbar_mass_actions_widget %}
    ...
    <div class="catalog__filter-controls__item">
        <div{{ block('block_attributes') }}>{{ block_widget(block) }}</div>
    </div>
{% endblock %}
Then, we modified the code as follows:
{% block _datagrid_toolbar_mass_actions_widget %}
    ...
    <div class="catalog__filter-controls__item">
        <div{{ block('block_attributes') }}>{{ block(block_type_widget_id) }}</div>
    </div>
{% endblock %}
Related Topics