Important
You are browsing upcoming documentation for version 7.1 of OroCommerce, scheduled for release in 2027. Read the documentation for the latest LTS version to get up-to-date information.
See our Release Process documentation for more information on the currently supported and upcoming releases.
Quick Start Guide
There are several ways to implement custom logic in Oro applications. You can use AppModule, View, Component, or other entities, but each has a different purpose.
This section discusses correct approaches for implementing javascript components in your Oro application.
Before You Begin
Make sure that you place all JS modules in the bundle’s public folder. If there is no bundle yet, create one following the instruction in the Create a Bundle topic.
Next, open your work folder cd userFolder/project/commerce-crm-ee/ in the terminal. To build the application after changes, run the pnpm run build command. To rebuild the application automatically, run the pnpm run watch command.
Keep in mind that if you create a new bundle or fail to create symlinks when installing the application, you need to run the following command bin/console assets:install --symlink. For more information, please see OroAssetBundle documentation.
Note
Before starting work, run the webpack in watch mode in the terminal using the``pnpm run watch`` command.
Make sure you also follow the Naming Conventions for public files outlined in the JavaScript Architecture documentation.
View vs Component
Component. This is an invisible component that takes responsibility of the controller for certain functionality. It accepts the options’ object, performs initialization actions, and destroys initialized elements (views, models, collections, or even sub-components) when required. It provides the correct life cycle for various entities within itself.
Hint
For more information, see the Page Component topic.
View. It is essential to organize your interface into logical views (backed by models) that can be updated independently when the model changes, without redrawing the page. Instead of digging into the JSON object, looking up an element in the DOM, and updating the HTML by hand, you can bind your view’s render function to the model’s change event. This way, this model data are always immediately up-to-date wherever they are displayed in the UI.
Hint
For more information, see Backbone View documentation.
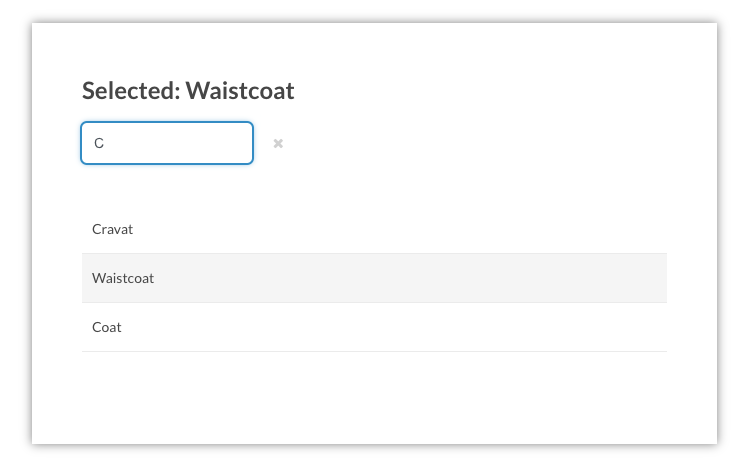
Create Interactive Markup with a Single View
A single view has the following capabilities:
It adds interactivity to an existing HTML,
It provides the ability to filter list items in real-time,
It hides list items that do not match the search string,
It enables you to select an active element whose label is displayed in the header,
It handles a click on the button to clear the search field.
To create interactive markup with a single view:
Create file and copy and paste the code below. Remember to replace
{YourBundleName}with your bundle name.import {escape} from 'underscore'; import BaseView from 'oroui/js/app/views/base/view'; const FilterView = BaseView.extend({ autoRender: true, // Define DOM event inside view element events: { 'click .list-item': 'selectActive', 'input .search': 'onInputSearch', 'click .clear-field': 'resetSearchFieldValue' }, /** * Named constructor * @param {Object} options */ constructor: function FilterView(options) { FilterView.__super__.constructor.call(this, options); }, /** * Handler for user typing text in field * @param {Event} event */ onInputSearch(event) { const searchText = event.target.value; // Check reset search button visibility this.toggleVisibilityClearFieldButton(!searchText.length); this.filterListItemToShow(escape(searchText)); }, /** * Reset search field value * @param {MouseEvent} event */ resetSearchFieldValue(event) { event.preventDefault(); this.$('.search') .val('') .trigger('input'); }, /** * Filter and change list item visibility depend of search text * @param {string} searchText */ filterListItemToShow(searchText) { if (!searchText.length) { this.$('.list-item.hide').removeClass('hide'); return; } this.$('.list-item').each((index, item) => { const $item = this.$(item); $item.toggleClass('hide', !$item.text().toLowerCase().includes(searchText.toLowerCase()) ); }); }, /** * Change reset search button visibility * @param {boolean} visible */ toggleVisibilityClearFieldButton(visible) { this.$('.clear-field').toggleClass('hide', visible); }, /** * Handling click on list items * When user click list, it should set as active * @param {MouseEvent} event */ selectActive(event) { event.preventDefault(); // Make list item an active this.$(event.target) .addClass('active') .siblings() .removeClass('active'); // Update header title this.$('.selected').text( escape(event.target.innerText) ); } }); export default FilterView;
Important
Call method of the
__super__prototype to invoke initial functionalityUse a named constructor like
constructor: function FooPageView(options)to simplify debugging in the featureIn components, do not declare event listeners directly in methods. Use a declarative approach, define a list of event listeners in
eventsandlisten.
Register a new module. If the file does not exist, create one, as described in the JS Modules topic. In addition, define
dynamic-importsbecause the view appends to the DOM element as attributedata-page-component-viewin a widget in the twig file. Remember to replace{yourbundlename}with your bundle name.
In the example above, paths to files (such as js, twig, yaml, and others) are for the storefront layout themes. For the back-office, place the same files into the config folder src/{YourBundleName}/Resources/config/. To create a storefront theme, see the Themes topic.
Important
If bundle name changes, update all paths to JS modules in twig and yml files depending on the bundle name.
Append the view module to the DOM element by defining the
data-page-component-moduleattribute and adding a path for the view module as options in thedata-page-component-optionsattribute. For more information, see Page Component. Next, create a file as illustrated below:{% block _custom_view_block_widget %} {% set attr = attr|merge({ 'data-page-component-view': '{yourbundlename}/js/app/views/filter-view' }) %} <div {{ block('block_attributes') }}> <h1 class="mb-3">Selected: <span class="selected">Belt</span></h1> <div class="search-container"> <input type="text" class="input search" placeholder="Search items..."> <button class="btn btn--text ml-3 clear-field hide"> <span class="fa-close" aria-hidden="true"></span> </button> </div> <div class="list mb-5 mt-5"> <div class="list-item active">Belt</div> <div class="list-item">Gloves</div> <div class="list-item">Top</div> <div class="list-item">Cravat</div> <div class="list-item">Waistcoat</div> <div class="list-item">Suit</div> <div class="list-item">Kilt</div> <div class="list-item">T-Shirt</div> <div class="list-item">Coat</div> </div> </div> {% endblock %}
ViewComponentextends fromBaseComponent, which helps dynamically initialize the view module from the path that passes from options.Note
Be aware that attribute
data-page-component-viewis s shortcut for callview-componentto initialize the view instance. For more information on shortcuts, see Component Shortcuts. For more information on using twig templates, see Templates (Twig).Register a new widget and append it to a page container in the layout. Next, create file. For more information on layout update, see Layout.
Executing Code Before Starting the Application
You can use the app module in the following cases:
Setting up a form validator
Loading a custom form validator
Creating a listener for viewport changes
Creating a listener for a custom page scroll
Removing unnecessary input widgets using the example of
numberandselect2
App Modules are atomic parts of the general application executed before initializing the application. Each time the page loads, the code is executed again. App modules export nothing. They make the whole application modular and the functionality distributed among the bundles ready to work. For more information, see the App Module topic.
Important
In the single page application, the app module is executed once when the page is loaded in the browser.
If it is a new bundle, or you install the application without symlinks, run command bin/console assets:install --symlink.
Register the new module. If the file does not exist, create one.
 app-modules:
     - {yourbundlename}/js/app/modules/validation-module
     - {yourbundlename}/js/app/modules/listeners-module
     - {yourbundlename}/js/app/modules/custom-input-widgets-module
Modifying form validator behavior is used to add or update the default validator settings or load custom validation rule modules. To modify form validator behavior, create file and copy and paste the code below:
import $ from 'jquery'; // Import jQuery library

// set default properties for validator
$.validator.setDefaults({
    errorClass: 'validation-message-failed',
});

// load custom validation rules, it not real module
$.validator.loadMethod('{yourbundlename}/js/validator/not-blank');
Adding global mediator listeners or listening to DOM events globally is used to listen to the change of the viewport state when a user resizes the browser window or scrolls through the page. To add global mediator listeners, create app module and copy and paste the code below:
 import $ from 'jquery'; // Import jQuery library
 import mediator from 'oroui/js/mediator'; // Import mediator instance

  // Add mediator listener
 mediator.on('viewport:change', event => {
     console.log(event);
 });

 // DOM events, listen page scroll
 $(window).on('scroll', event => {
     console.log('onScroll', event);
 });
The application contains a form input widget like select2, custom checkboxes, numbers, and others. Sometimes you need to disable some widgets for certain conditions, for example, when a user opens the application on a mobile device. You can also modify input widget options or change the widget constructor. For this, create an app module and copy and paste the code below:
 import InputWidgetManager from 'oroui/js/input-widget-manager'; // import inputWidgetManager
 import Select2InputWidget from 'oroui/js/app/views/input-widget/select2'; // import Select2InputWidget constructor
 import tools from 'oroui/js/tools'

 // remove number and checkbox widgets for mobile view
 if (tools.isMobile()) {
     InputWidgetManager.removeWidget('number');
     InputWidgetManager.removeWidget('checkbox');
 }

 // remove Select2 input widget
 InputWidgetManager.removeWidget('select2');

 // register Select2 input widget with new selector
 InputWidgetManager.addWidget('select2', {
     selector: 'select:not(.do-not-use-select2-widget)',
     Widget: Select2InputWidget
 });
For more information on input widgets, see Input Widgets.
Important
Be aware that global modules can affect the entire application.
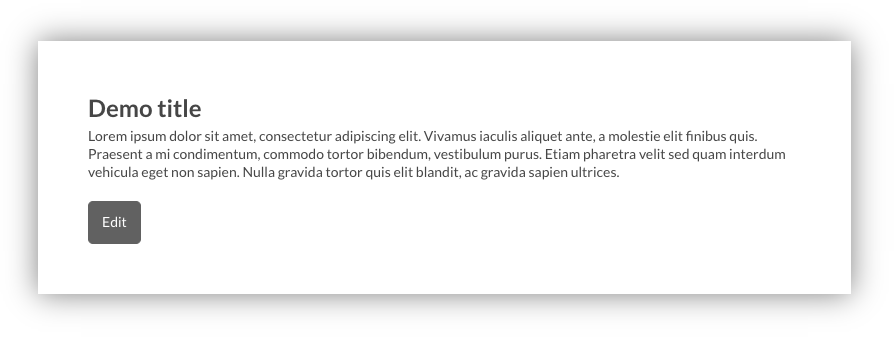
Create a Page Component with a Dynamic View and Two-Way Binding
You can create an interactive UI feature to edit your content by creating a Backbone model to control the data state. The view updates when the model changes its state. Initialization of Model and View happens in the page component. The Base Component provides the right life cycle for Model and View.
The main goal of the page component is to ensure the correct life cycle of the component itself and all of its properties. It has two different modes, view and edit.
To create a page component with a dynamic view and two-way binding:
Create a page component
content-component.jsand copy and paste the code below:import BaseComponent from 'oroui/js/app/components/base/component'; import ContentModel from '../models/content-model'; import ContentView from '../views/content-view'; import EditContentView from '../views/edit-content-view'; const ContentComponent = BaseComponent.extend({ constructor: function ContentComponent(options) { ContentComponent.__super__.constructor.call(this, options); }, /** * Initialize * @param {Object} initState * @param {HTMLElement} _sourceElement */ initialize({initState: data = {}, _sourceElement}) { this.initModel(data); this.initView(_sourceElement); this.initEditView(_sourceElement); }, /** * Create model for control data state * @param {Object} data */ initModel(data = {}) { this.model = new ContentModel(data); }, /** * Create content view * put `model` as options for view * * @param {HTMLElement} _sourceElement */ initView(_sourceElement) { this.view = new ContentView({ container: _sourceElement, model: this.model }); }, /** * Create edit content view * put `model` as options for view * * @param {HTMLElement} _sourceElement */ initEditView(_sourceElement) { this.editView = new EditContentView({ container: _sourceElement, model: this.model }); } }); export default ContentComponent;
Important
The component automatically disposes of all its assigned properties such as model, view, editView when required (depending on the component life cycle).
To ensure communication between the views, create a Model. It can store properties and, parameters and trigger events if a property has changed. Copy and paste the code below:
  import BaseModel from 'oroui/js/app/models/base/model';

  const ContentModel = BaseModel.extend({
      // Set default state for model
      defaults: {
          title: 'Demo title',
          content: '',
          editMode: false
      },

      constructor: function ContentModel(options) {
          ContentModel.__super__.constructor.call(this, options);
      },

      /**
      * Return `true` if edit mode on
      * @returns {boolean}
      */
      isEditMode() {
          return this.get('editMode');
      },

      /**
      * Return `true` if view mode on
      * @returns {boolean}
      */
      isViewMode() {
          return !this.get('editMode');
      }
  });

  export default ContentModel;
Create a view representation of content for the page component. Copy and paste the code below:
  import BaseView from 'oroui/js/app/views/base/view';
  import template from 'tpl-loader!../../../templates/content-view-template.html';

  const ContentView = BaseView.extend({
      // Set `true` for render view immediate
      autoRender: true,

      // Set class name for root view element
      className: 'content',

      // Set up view template
      template,

      // Declare DOM events listener
      events: {
          'click .edit-mode': 'changeEditMode'
      },

      // Declare model events listener
      listen: {
          'change model': 'onModelChange'
      },

      constructor: function ContentView(options) {
          ContentView.__super__.constructor.call(this, options);
      },

      /**
       * Modifying render method
       * Check view mode after render over
       */
      render() {
          ContentView.__super__.render.call(this);

          this.checkVisibility();
      },

      /**
       * Change view mode
       * Edit mode on
       */
      changeEditMode() {
          this.model.set('editMode', true);
      },

      /**
       * If is not view mode, add `hide` class
       */
      checkVisibility() {
          this.$el.toggleClass('hide', !this.model.isViewMode());
      },

      /**
       * Rerender view if model changed
       */
      onModelChange() {
          this.render();
      }
  });

  export default ContentView;
Important
Create templates in separate files and import them to the JS module only via
tpl-loader!.Create a template for the view. Copy and paste the code below:
  <h1><%- title %></h1>

  <p><%- content %></p>

  <button class="btn edit-mode">Edit</button>
Important
The most correct and safe method is to declare templates as separate modules and import them via a special loader.
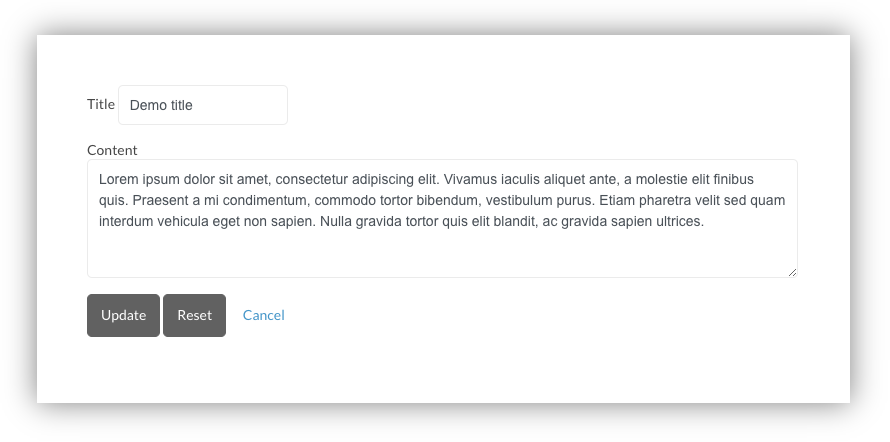
To implement editing mode, create an edit content view. Copy and paste the code below:
  import BaseView from 'oroui/js/app/views/base/view';
  import template from 'tpl-loader!../../../templates/content-edit-view-template.html';

  const EditContentView = BaseView.extend({
      // Set `true` for render view immediate
      autoRender: true,

      // Set class name for root view element
      className: 'content-edit hide',

      // Set up view template
      template,

      // Declare DOM events listener
      events: {
          'submit form': 'updateContent',
          'click .cancel': 'onClickCancel'
      },

      // Declare model events listener
      listen: {
          'change model': 'onModelChange'
      },

      constructor: function EditContentView(options) {
          EditContentView.__super__.constructor.call(this, options);
      },

      /**
       * Modifying render method
       * Check view mode after render over
       */
      render() {
          EditContentView.__super__.render.call(this);

          this.checkVisibility();
      },

      /**
       * If is not view mode, add `hide` class
       */
      checkVisibility() {
          this.$el.toggleClass('hide', !this.model.isEditMode());
      },

      /**
       * Update model on user submit form
       * @param {Event} event
       */
      updateContent(event) {
          event.preventDefault();

          this.model.set({
              title: this.$('[name="title"]').val(),
              content: this.$('[name="content"]').val(),
              editMode: false
          });
      },

      /**
       * Rerender view if model changed
       */
      onModelChange() {
          this.render();
      },

      /**
       * Cancel changes and exit edit mode
       * @param event
       */
      onClickCancel(event) {
          event.preventDefault();

          this.model.set('editMode', false);
      }
  });

  export default EditContentView;
Create a template for the edit mode. Copy and paste the code below:
  <form class="grid">
      <div class="grid__row">
          <label for="name">Title</label>
          <input type="text" id="name" class="input" name="title" value="<%- title %>">
      </div>
      <div class="grid__row">
          <label for="content">Content</label>
          <textarea class="input" id="content" name="content"><%- content %></textarea>
      </div>
      <div class="grid__row">
          <button type="submit" class="btn btn-primary">Update</button>
          <button type="reset" class="btn">Reset</button>
      </div>
  </form>
Once the page component is created, declare it in the template of the required page. Copy and paste the code below:
  {% block _custom_block_widget %}
      {% set attr = layout_attr_defaults(attr, {
          'data-page-component-module': '{yourbundlename}/js/app/components/content-component',
          'data-page-component-options': {
              'initState': {
                  'title': 'Initial title'
              }
          }
      }) %}

      <div {{ block('block_attributes') }}>
          {{ block_widget(block) }}
      </div>
  {% endblock %}
Register your new widget and append it to the page container in the layout. For this, create a file. For more information on the layout update, see the Layout topic.
Declare the page component in the yaml config
jsmodules.yml. Copy and paste the code below.
References: