Important
You are browsing upcoming documentation for version 7.1 of OroCommerce, scheduled for release in 2027. Read the documentation for the latest LTS version to get up-to-date information.
See our Release Process documentation for more information on the currently supported and upcoming releases.
Quick Start
This tutorial describes how to create OroCommerce storefront theme with basic styles and layout customizations. To create back-office themes, follow the Back-Office Theme Customization
Prerequisites
OroCommerce is a Symfony-based application where all codes are organized in bundles. To create a theme, you need to create a bundle first. We recommend to create a new empty bundle for the new theme, but you can also create a theme in one of the existing bundles.
Build a Custom Theme
Step 1: Create a New Theme Bundle
To start building a custom theme, first create a new theme bundle. This bundle will serve as the foundation for organizing your theme-related assets and configuration.
Create the bundle directory and main bundle class file:
mkdir -p src/Oro/Bundle/DemoThemeBundle && \
touch src/Oro/Bundle/DemoThemeBundle/OroDemoThemeBundle.php
Then, define the bundle class by adding the following code:
1<?php
2
3namespace Oro\Bundle\DemoThemeBundle;
4
5use Symfony\Component\HttpKernel\Bundle\Bundle;
6
7class OroDemoThemeBundle extends Bundle
8{
9}
This class registers your theme bundle within the Symfony application, allowing it to be recognized and integrated into the OroPlatform environment.
Step 2: Enable the New Theme Bundle
To make Symfony and OroPlatform aware of the new theme bundle, you need to register it in the application configuration. This is done by adding an entry to the bundles.yml file.
First, create the configuration file:
mkdir -p src/Oro/Bundle/DemoThemeBundle/Resources/config/oro && \
touch src/Oro/Bundle/DemoThemeBundle/Resources/config/oro/bundles.yml
Then, include the following content in the file to register the bundle:
Step 3: Create a New Demo Theme
Once the bundle is registered, define a new theme inside it. Themes in OroPlatform are described using a theme.yml file placed within a specific layout directory structure.
Start by creating the required directories and the theme configuration file:
mkdir -p src/Oro/Bundle/DemoThemeBundle/Resources/views/layouts/demo && \
touch src/Oro/Bundle/DemoThemeBundle/Resources/views/layouts/demo/theme.yml
Then, define the theme by adding the following content:
 1label: Demo Theme
 2description: 'Demo Theme description.'
 3groups: [ commerce ]
 4parent: default
 5icon: bundles/orofrontend/default/images/favicon.ico
 6favicons_path: bundles/orofrontend/default/favicons/
 7logo: bundles/orofrontend/default/images/logo/demob2b-logo.svg
 8logo_small: bundles/orofrontend/default/images/logo/demob2b-logo-small.svg
 9rtl_support: true
10svg_icons_support: true
Step 4: Enable the New Theme
To activate your custom theme in the application, you need to explicitly list it in the enabled_themes section of the config.yml file.
Open the configuration file and add the name of your theme (demo) alongside any other themes you want to enable:
# config/config.yml
oro_layout:
   enabled_themes:
      - default
      - demo  # ← our custom theme
Clear and warm cache:
php bin/console cache:clear --env=prod && bin/console cache:warmup --env=prod
To configure your new storefront theme in the back-office:
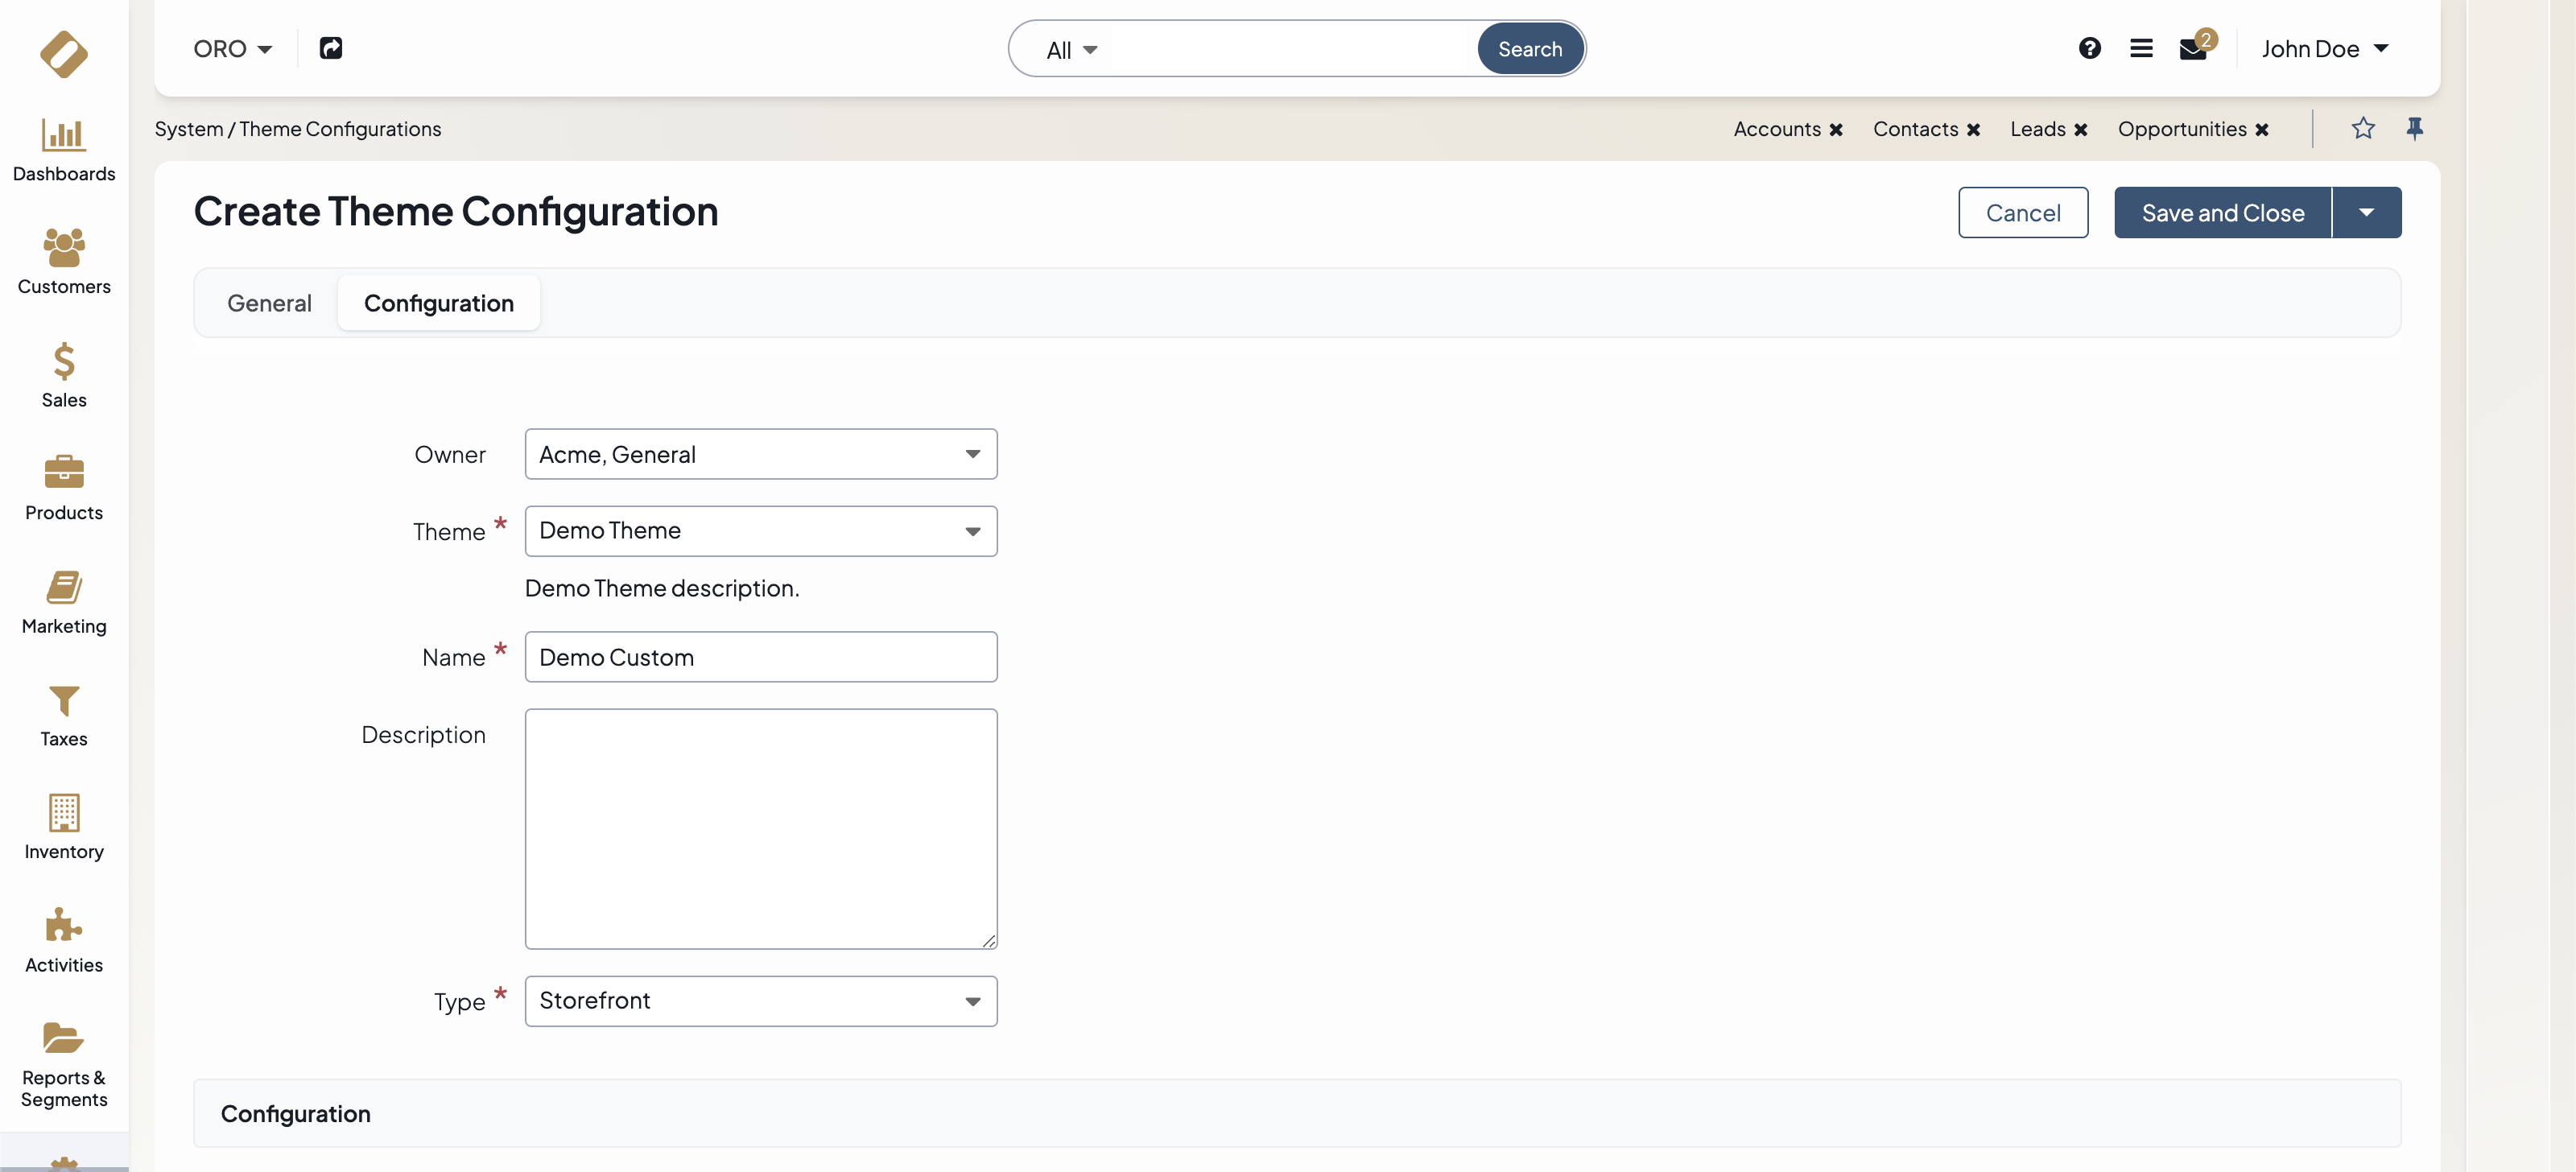
Navigate to System > Theme Configurations in the main menu.
You can create a new configuration of the existing theme by clicking Create Theme Configuration at the top right.
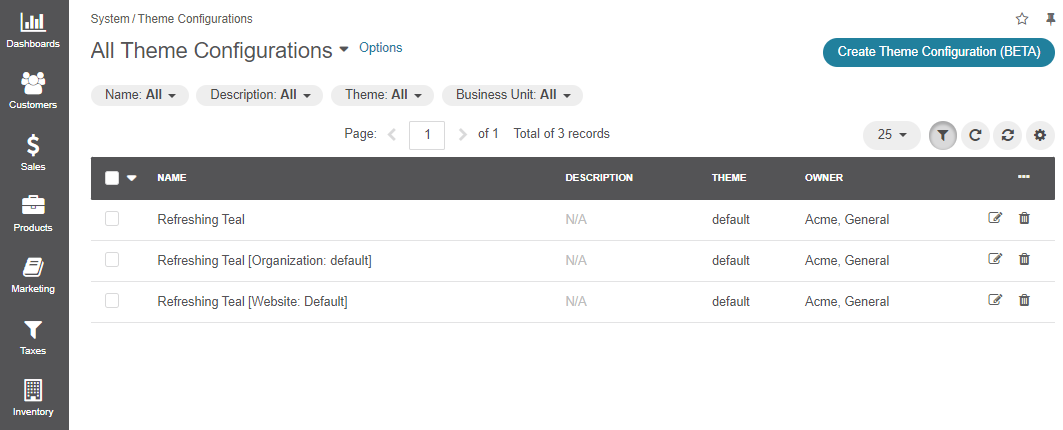
Set up and save a theme configuration for your new theme.
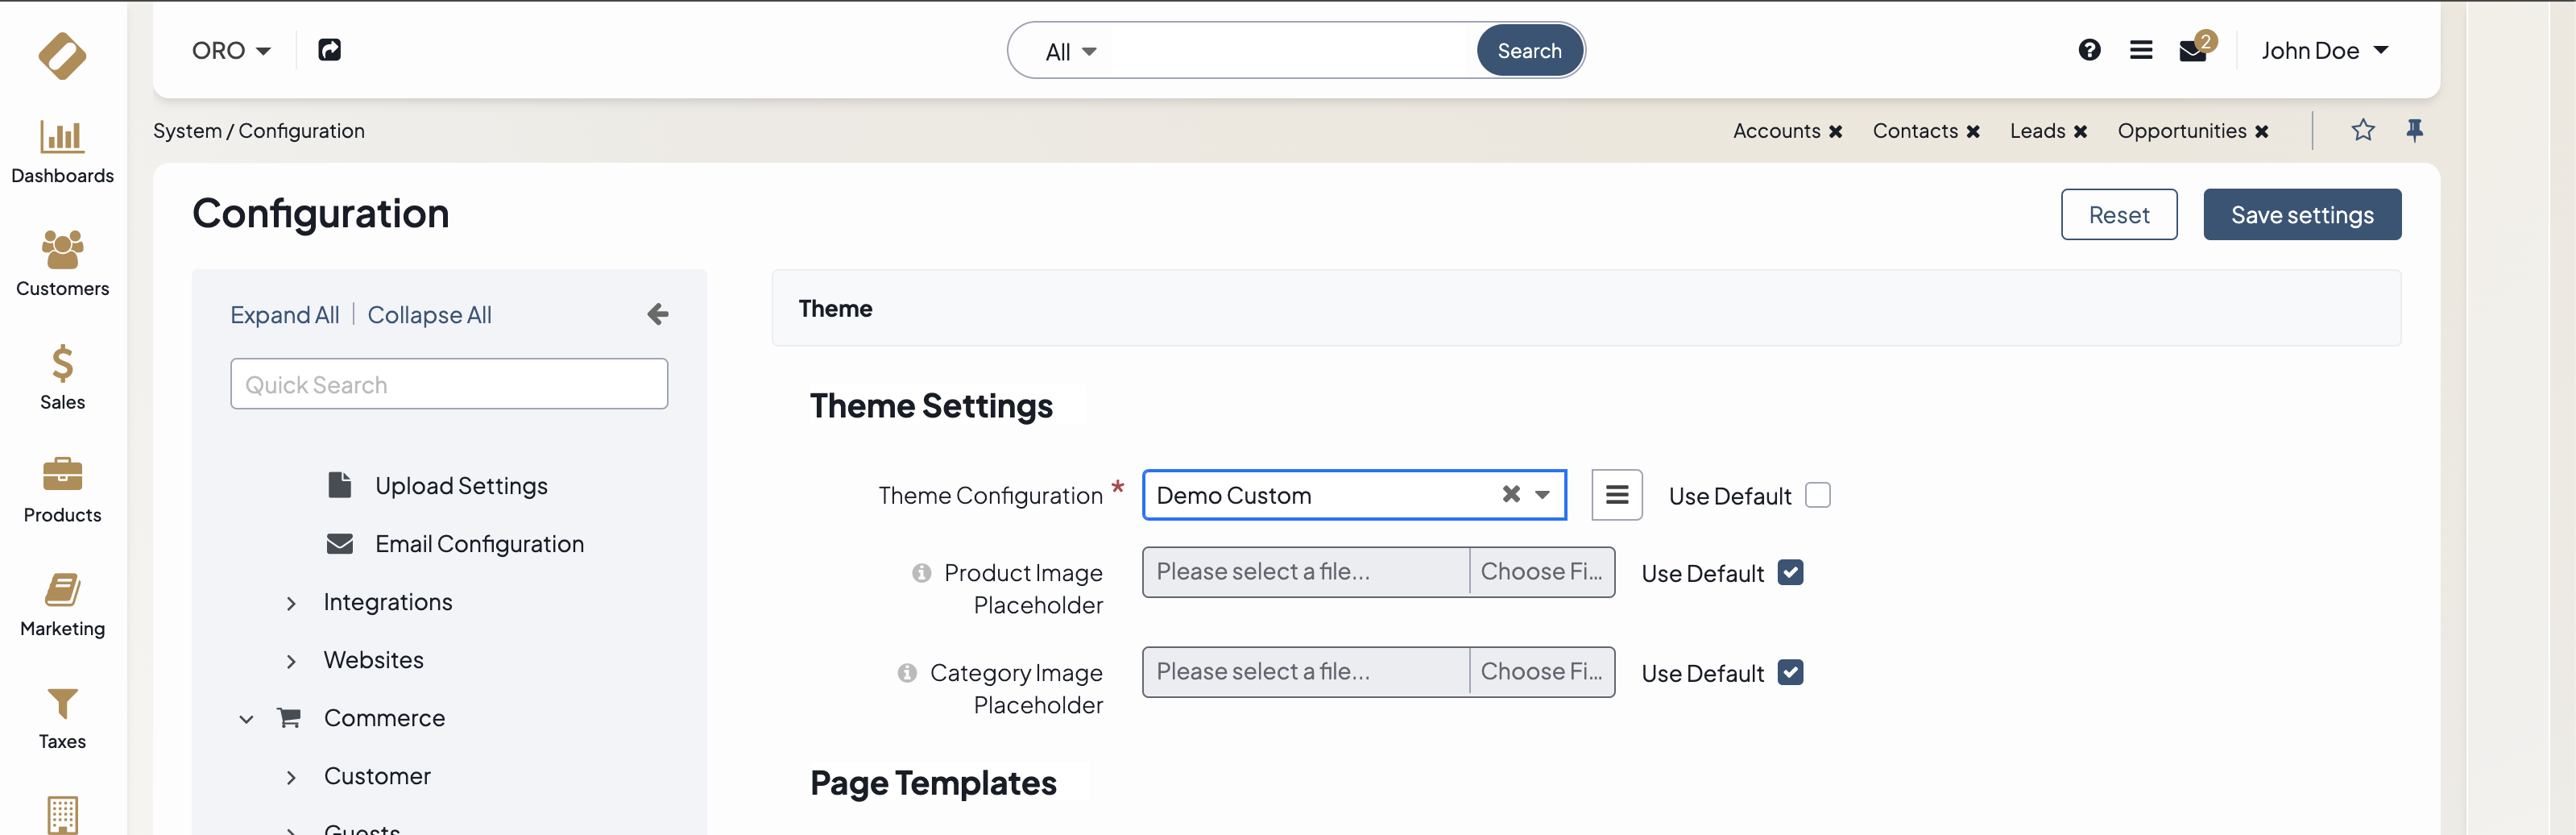
Navigate to System > Configuration > Commerce > Design > Theme and select your new theme.
Note
For more details on how to customize a theme configuration in the back-office, see the Theme Configuration user guide.
Add Stylesheets with SCSS
Create SCSS files with custom styles in
Resources/public/folder in a bundle.Run
bin/console assets:install --symlinkto symlink SCSS files from bundles topublic/bundles/folder in your application.Create the
assets.ymlfile in a themeconfig/folder and register all the new SCSS files in it.
mkdir -p src/Oro/Bundle/DemoThemeBundle/Resources/views/layouts/demo/config && \
touch src/Oro/Bundle/DemoThemeBundle/Resources/views/layouts/demo/config/assets.yml
 1critical_css:
 2    inputs:
 3        # Settings
 4        - 'bundles/orodemotheme/demo/scss/settings/global-settings.scss'
 5
 6        # Variables
 7        - 'bundles/orodemotheme/demo/scss/variables/base-config.scss'
 8        - 'bundles/orodemotheme/demo/scss/variables/uikit/buttons-config.scss'
 9    output: 'css/critical.css'
10    auto_rtl_inputs:
11        - 'bundles/oro*/**'
12
13styles:
14    inputs:
15        # Settings
16        - 'bundles/orodemotheme/demo/scss/settings/global-settings.scss'
17
18        # Variables
19        - 'bundles/orodemotheme/demo/scss/variables/base-config.scss'
20        - 'bundles/orodemotheme/demo/scss/variables/uikit/buttons-config.scss'
21
22        # Components
23        # - 'bundles/orodemotheme/demo/scss/components/uikit/buttons.scss'
24    output: 'css/styles.css'
25    auto_rtl_inputs:
26        - 'bundles/oro*/**'
27
28stylebook_styles:
29    inputs:
30        - 'bundles/orodemotheme/demo/scss/settings/global-settings.scss'
31    output: 'css/stylebook.css'
32    auto_rtl_inputs:
33        - 'bundles/oro*/**'
Note
Consider declaring separate CSS files for each output to ensure that branding elements such as colors and typography are consistently applied across your entire theme if it is based on the “default” one.
Run the
pnpm run build -- --env theme=democommand to process and combine SCSS files indemo.You can use SCSS source maps to find style definitions in a browser and Oro Frontend Stylebook to check how updated styles affect the UI elements.
Change Existing Pages Structure
The structure of all pages in the OroCommerce storefront is defined by the Layout.
To see the current page structure, open the website in a dev environment, and in a Symfony Profiler, click the Layout icon:
To change the page structure, you need to modify the layout.
Layout is a tree representation of the page where each tree item is a layout block. To define and modify the layout tree, use actions organized into layout update Yaml files:
@add@addTree@remove@moveetc.
Let’s add a slogan block just after the header for all the existing pages:
#DemoThemeBundle/Resources/views/layouts/demo/slogan.yml
layout:
     actions:
         - '@add':
             id: slogan
             parentId: page_main_content
             siblingId: page_main_header
             prepend: false
             blockType: text
             options:
                 text: Website Slogan!
Change the structure of a product display page. Remove Related products, move the block with title and SKU to another place, and add a CSS class to the SKU attribute. To apply layout updates to a single page, you need to place them in a folder with the route name inside a theme. For a product display page, the route name is
oro_product_frontend_product_view:
#DemoThemeBundle/Resources/views/layouts/demo/oro_product_frontend_product_view/product.yml
layout:
    actions:
        - '@move':
              id: product_view_primary_container
              parentId: page_title_container
        - '@remove':
              id: product_view_related_products_container
        - '@setOption':
              id: product_view_attribute_group_general_attribute_text_sku
              optionName: attr.class
              optionValue: page-title
Change the HTML
Each layout block is rendered with a Twig block. Twig blocks are organized into block theme twig files.
For example, the product_view_attribute_group_general_attribute_text_sku block from the previous section is rendered as follows:
{#ProductBundle/Resources/views/layouts/default/oro_product_frontend_product_view/layout.html.twig #}

{% block _product_view_attribute_group_general_attribute_text_sku_widget %}
 {% set attr = layout_attr_defaults(attr, {
     '~class': ' sku'
 }) %}
 <p {{ block('block_attributes') }}>
     {{ 'oro.product.frontend.index.item'|trans }} <span class="sku__code" itemprop="sku">{{ entity.sku|oro_html_strip_tags }}</span>
 </p>
{% endblock %}
To determine which Twig block is responsible for rendering a specific element on a page, you can use the Twig Inspector. First, activate it through the Symfony Profiler. Then, click on the Twig Inspector icon and select the element you want to inspect on the page. The corresponding template will be automatically opened in your IDE.
To override the template, you need to create a Twig file for the block theme in the same location within your bundle. Then, apply it using the @setBlockTheme layout action.
To change the label of an SKU attribute to the default value, do the following:
 {#DemoThemeBundle/Resources/views/layouts/default/oro_product_frontend_product_view/sku.html.twig #}

 {% block _product_view_attribute_group_general_attribute_text_sku_widget %}
  {% set attr = layout_attr_defaults(attr, {
      '~class': ' sku'
  }) %}
  <p {{ block('block_attributes') }}>
-   {{ 'oro.product.frontend.index.item'|trans }} <span class="sku__code" itemprop="sku">{{ entity.sku|oro_html_strip_tags }}</span>
+   {{ label|trans }}: <span class="sku__code" itemprop="sku">{{ entity.sku|oro_html_strip_tags }}</span>
  </p>
 {% endblock %}
#DemoThemeBundle/Resources/views/layouts/demo/oro_product_frontend_product_view/product.yml
layout:
    actions:
        - '@setBlockTheme':
              themes: '@DemoThemeBundle/layouts/demo/oro_product_frontend_product_view/product.html.twig'
        # ...
Set Up Favicon
To properly support favicons across multiple platforms and devices, you need to create several icons in different sizes and formats.
Start with a base icon in SVG format, named favicon.svg. This file will serve as the source for generating all the necessary favicon variations.
Required Tools
To generate favicons via the command line, install the following tools (macOS, Linux):
rsvg-convert(from thelibrsvgpackage)icotool(from theicoutilspackage)
macOS(Brew)
brew install librsvg icoutils
Debian / Ubuntu / Linux Mint
sudo apt install librsvg2-bin icoutils
Arch Linux / Manjaro
sudo pacman -S librsvg icoutils
Fedora
sudo dnf install librsvg2-tools icoutils
Create a directory to store the favicon assets and place favicon.svg inside it:
mkdir -p src/Oro/Bundle/DemoThemeBundle/Resources/public/demo/favicons && \
cd src/Oro/Bundle/DemoThemeBundle/Resources/public/demo/favicons
Step 1: Generate Favicon.ico
The favicon.ico file must contain three sizes: 16x16, 32x32, and 48x48 pixels.
First, convert the SVG into three PNG files:
rsvg-convert -w 16 -h 16 favicon.svg -o icon-16.png && \
rsvg-convert -w 32 -h 32 favicon.svg -o icon-32.png && \
rsvg-convert -w 48 -h 48 favicon.svg -o icon-48.png
Next, combine the PNGs into a single .ico file:
icotool -c -o favicon.ico icon-16.png icon-32.png icon-48.png
You can verify the contents of the .ico file:
icotool -l favicon.ico
Expected output:
--icon --index=1 --width=16 --height=16 --bit-depth=32 --palette-size=0
--icon --index=2 --width=32 --height=32 --bit-depth=32 --palette-size=0
--icon --index=3 --width=48 --height=48 --bit-depth=32 --palette-size=0
After verification, you may remove the temporary PNG files:
rm icon-16.png icon-32.png icon-48.png
Step 2: Generate favicon-96x96.png
Generate a 96x96 PNG from the SVG:
rsvg-convert -w 96 -h 96 favicon.svg -o favicon-96x96.png
Step 3: Generate Icons with Padding
Some icons (for Apple and Android) should include a safe zone (padding). Create a new SVG file named favicon_padded.svg with 15% padding:
<svg xmlns="http://www.w3.org/2000/svg" width="2048" height="2048" viewBox="0 0 2048 2048">
   <rect width="100%" height="100%" fill="#002434"/>
   <image href="favicon.svg" x="15%" y="15%" width="70%" height="70%"/>
</svg>
Note
You can change the background color by modifying the fill attribute.
Now, generate the following icons from this padded version:
rsvg-convert -w 180 -h 180 favicon_padded.svg -o apple-touch-icon.png && \
rsvg-convert -w 192 -h 192 favicon_padded.svg -o web-app-manifest-192x192.png && \
rsvg-convert -w 512 -h 512 favicon_padded.svg -o web-app-manifest-512x512.png
Step 4: Create site.webmanifest
Define a site.webmanifest file with metadata for your icons:
 1{
 2  "name": "Oro Commerce",
 3  "short_name": "OroCommerce",
 4  "icons": [
 5    {
 6      "src": "/bundles/orodemotheme/demo/favicons/web-app-manifest-192x192.png",
 7      "sizes": "192x192",
 8      "type": "image/png",
 9      "purpose": "maskable"
10    },
11    {
12      "src": "/bundles/orodemotheme/demo/favicons/web-app-manifest-512x512.png",
13      "sizes": "512x512",
14      "type": "image/png",
15      "purpose": "any"
16    },
17    {
18      "src": "/bundles/orodemotheme/demo/favicons/web-app-manifest-512x512.png",
19      "sizes": "512x512",
20      "type": "image/png",
21      "purpose": "maskable"
22    }
23  ],
24  "theme_color": "#002434",
25  "background_color": "#ffffff",
26  "display_override": ["window-control-overlay", "minimal-ui"],
27  "display": "standalone",
28  "start_url": "/"
29}
Step 5: Enable Favicons in Theme Configuration
Update your theme.yml file to use the new favicons by changing the favicons_path option:
# src/Oro/Bundle/DemoThemeBundle/Resources/views/layouts/demo/theme.yml
label: Demo Theme
description: 'Demo Theme description.'
groups: [ commerce ]
parent: default
icon: bundles/orofrontend/default/images/favicon.ico
- favicons_path: bundles/orofrontend/default/favicons/
+ favicons_path: bundles/orodemotheme/demo/favicons/
logo: bundles/orofrontend/default/images/logo/demob2b-logo.svg
logo_small: bundles/orofrontend/default/images/logo/demob2b-logo-small.svg
rtl_support: true
svg_icons_support: true
This change ensures that OroPlatform uses your newly generated favicons for your custom theme.