Important
You are browsing upcoming documentation for version 7.1 of OroCommerce, scheduled for release in 2027. Read the documentation for the latest LTS version to get up-to-date information.
See our Release Process documentation for more information on the currently supported and upcoming releases.
Set up Environment for OroPlatform Based Application on Windows Subsystem for Linux (WSL) 2
This guide demonstrates how to set up Docker and Symfony Server development stack for Oro applications on Windows 10, version 1903 or higher. Please make sure you have the latest version of the Windows OS before you start.
Environment Setup
Install a supported Ubuntu LTS release for WSL 2. Run the following command from Windows PowerShell or Windows Terminal:
wsl --install -d Ubuntu
To verify that the distribution is using WSL 2, run:
wsl --list --verbose
If the Ubuntu distribution is using WSL 1, upgrade it to WSL 2 by running:
wsl --set-version <distribution-name> 2
Replace
<distribution-name>with the name of your installed distribution as shown bywsl --list --verbose.Install Windows Terminal. While not required, we recommend using it as it comes with the built-in WSL integration. Run Windows Terminal as an administrator. You may be prompted to reboot your PC after installation.
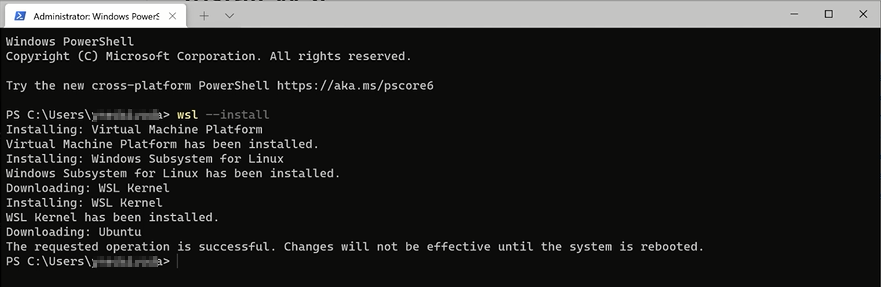
If you encounter an error during installation, please follow the link provided in the terminal to troubleshoot the issue or refer to the official Microsoft WSL documentation:

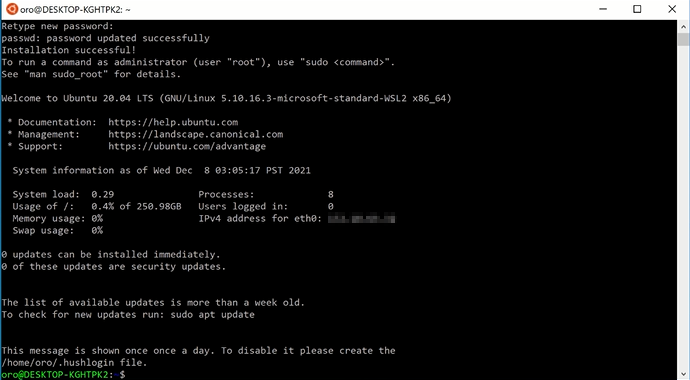
Once rebooted, create a new UNIX username and password to log into Ubuntu.
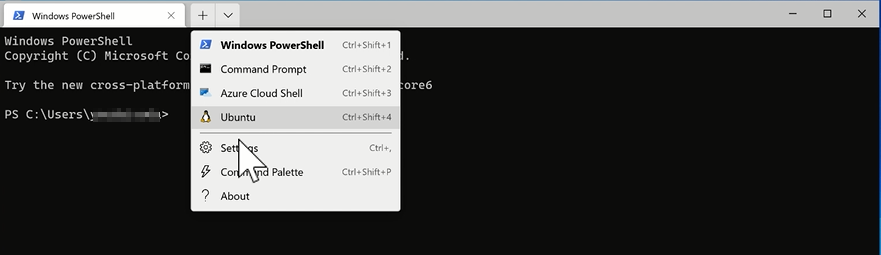
To switch to Ubuntu on your Windows Powershell, click on the drop-down next to the + tab and select Ubuntu from the list.
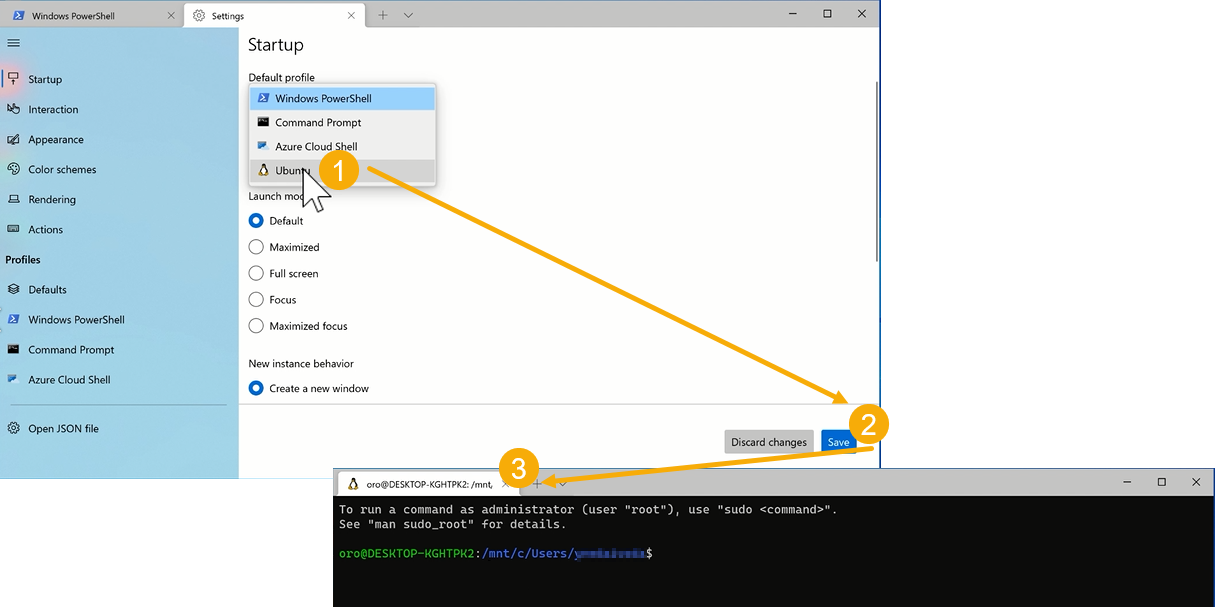
To avoid switching to Ubuntu manually every time, you can set up your Windows PowerShell to run Ubuntu by default on startup. For this, navigate to your Windows settings > Startup and change the Default Profile to Ubuntu, as illustrated in the screenshot below:
As WSL integration does not always work well with the Windows file system, go to the Linux file system by typing in
cdin the terminal:
Install Docker Desktop for Windows. After the installation is complete, open Docker Desktop and verify that Settings > General > Use the WSL 2 based engine is enabled. Reboot your PC if prompted during the installation.
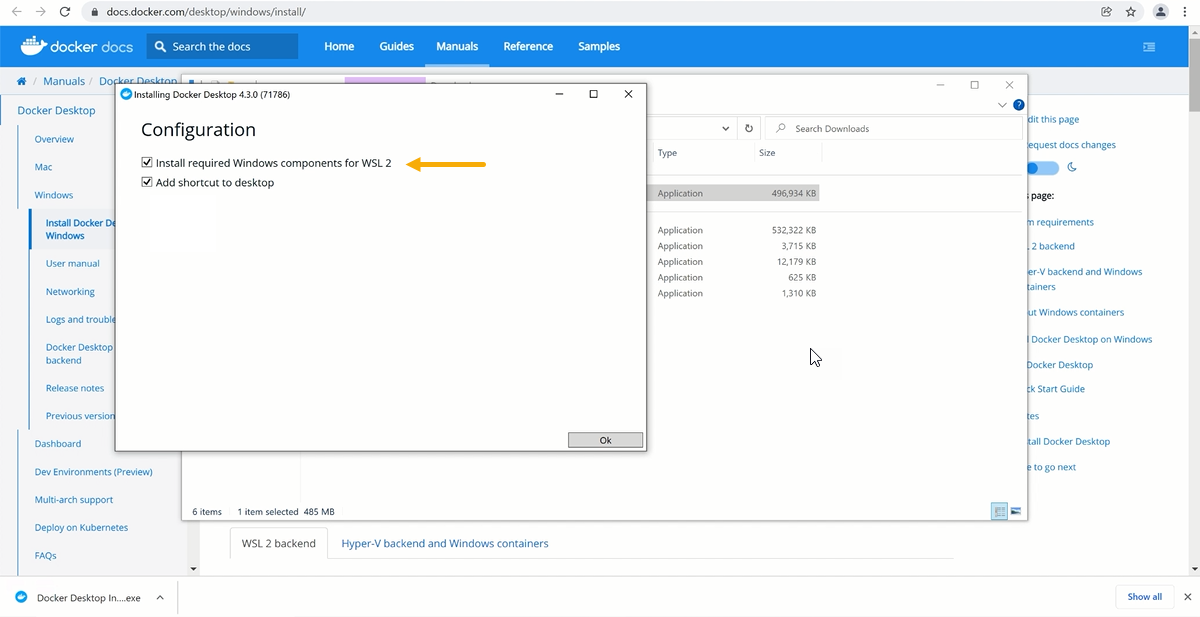
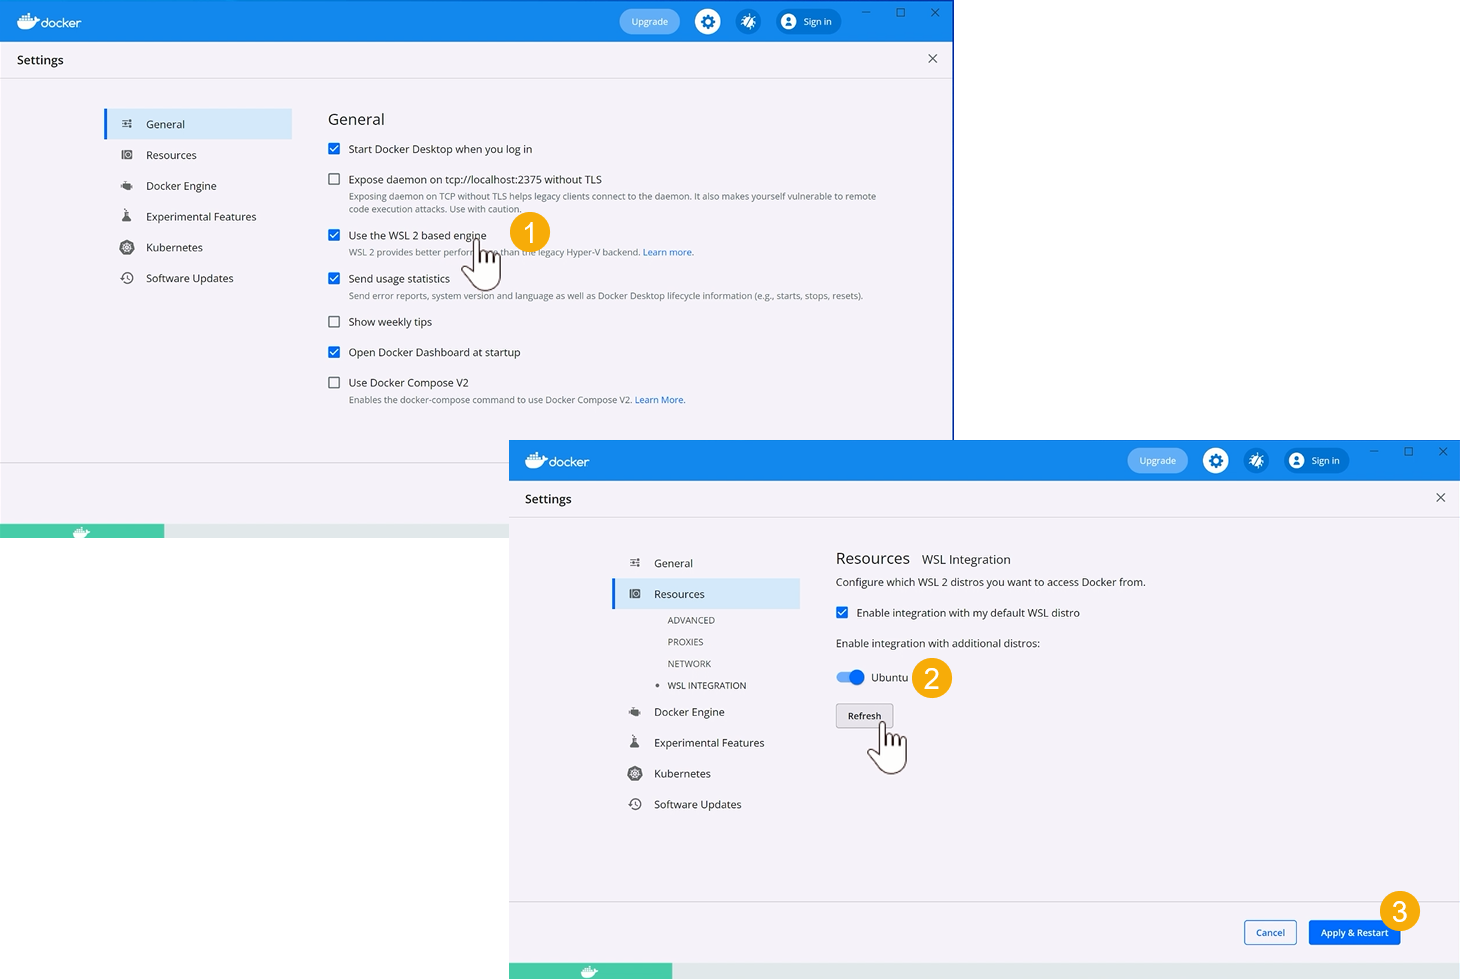
Enable Docker Desktop WSL 2 backend for the Ubuntu distribution that you installed in step 1.
In the General Settings of the Docker application, make sure that Use the WSL 2 based engine option is selected.
In Resources > WSL Integration, enable WSL integration for the Ubuntu distribution and restart Docker Desktop.
Log into the Ubuntu distribution using Windows Terminal. Run all remaining commands in the Ubuntu terminal unless instructed otherwise.
Install PHP 8.5 and the required extensions in Ubuntu:
Hint
It is recommended to run all commands one by one to make sure they exit successfully and avoid missing potential warnings. If you have unreliable connection leading to command failure, please rerun it.
sudo apt install software-properties-common
sudo add-apt-repository -y ppa:ondrej/php
sudo apt update
sudo apt -y install php8.5 php8.5-fpm php8.5-cli php8.5-pdo php8.5-mysqlnd php8.5-xml php8.5-soap php8.5-gd php8.5-zip php8.5-intl php8.5-mbstring php8.5-curl php8.5-bcmath php8.5-ldap php8.5-pgsql php8.5-mongodb
You will be prompted to type in your password as you are running the commands as a sudo user.
Configure PHP:
echo -e "memory_limit = 2048M \nmax_input_time = 600 \nmax_execution_time = 600 \nrealpath_cache_size=4096K \nrealpath_cache_ttl=600 \nopcache.enable=1 \nopcache.enable_cli=0 \nopcache.memory_consumption=512 \nopcache.interned_strings_buffer=32 \nopcache.max_accelerated_files=32531 \nopcache.save_comments=1" | sudo tee -a  /etc/php/8.5/fpm/php.ini
echo -e "memory_limit = 2048M" | sudo tee -a  /etc/php/8.5/cli/php.ini
Install Node.js 24:
sudo apt -y install curl dirmngr apt-transport-https lsb-release ca-certificates
curl -sL https://deb.nodesource.com/setup_24.x | sudo -E bash -
sudo apt -y install nodejs
Install PNPM 10 Using NPM:
npm install -g pnpm@latest-10
Note
If the installation fails because of insufficient permissions, rerun the command with
sudo.Install Composer:
php -r "copy('https://getcomposer.org/installer', 'composer-setup.php');" && php composer-setup.php
php -r "unlink('composer-setup.php');"
sudo mv composer.phar /usr/bin/composer
Install Symfony Server:
sudo apt -y install libnss3-tools
wget https://get.symfony.com/cli/installer -O - | bash
echo 'export PATH="$HOME/.symfony5/bin:$PATH"' >> ~/.bashrc
source ~/.bashrc
symfony server:ca:install
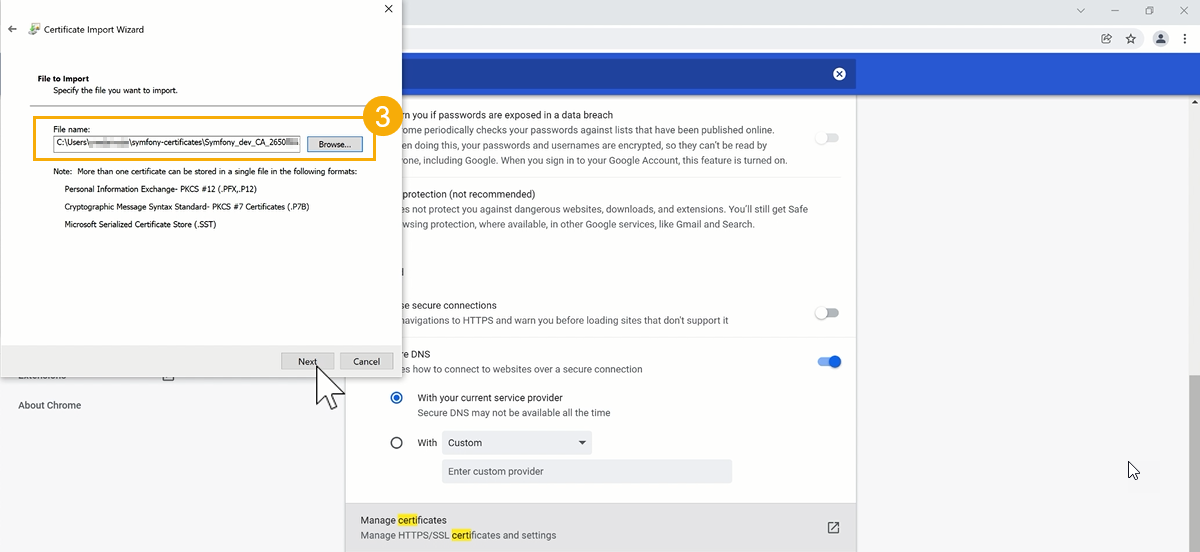
You can also enable TLS, but as Symfony Server does not automate certificate installation for WSL on Windows, you have to copy the generated certificate manually from the
/usr/local/share/ca-certificates/folder to the host filesystem and install it manually to your web browser: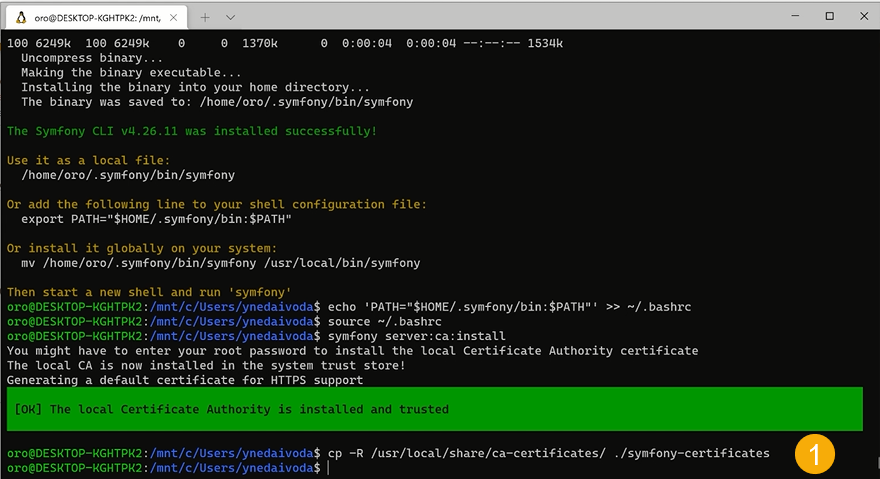
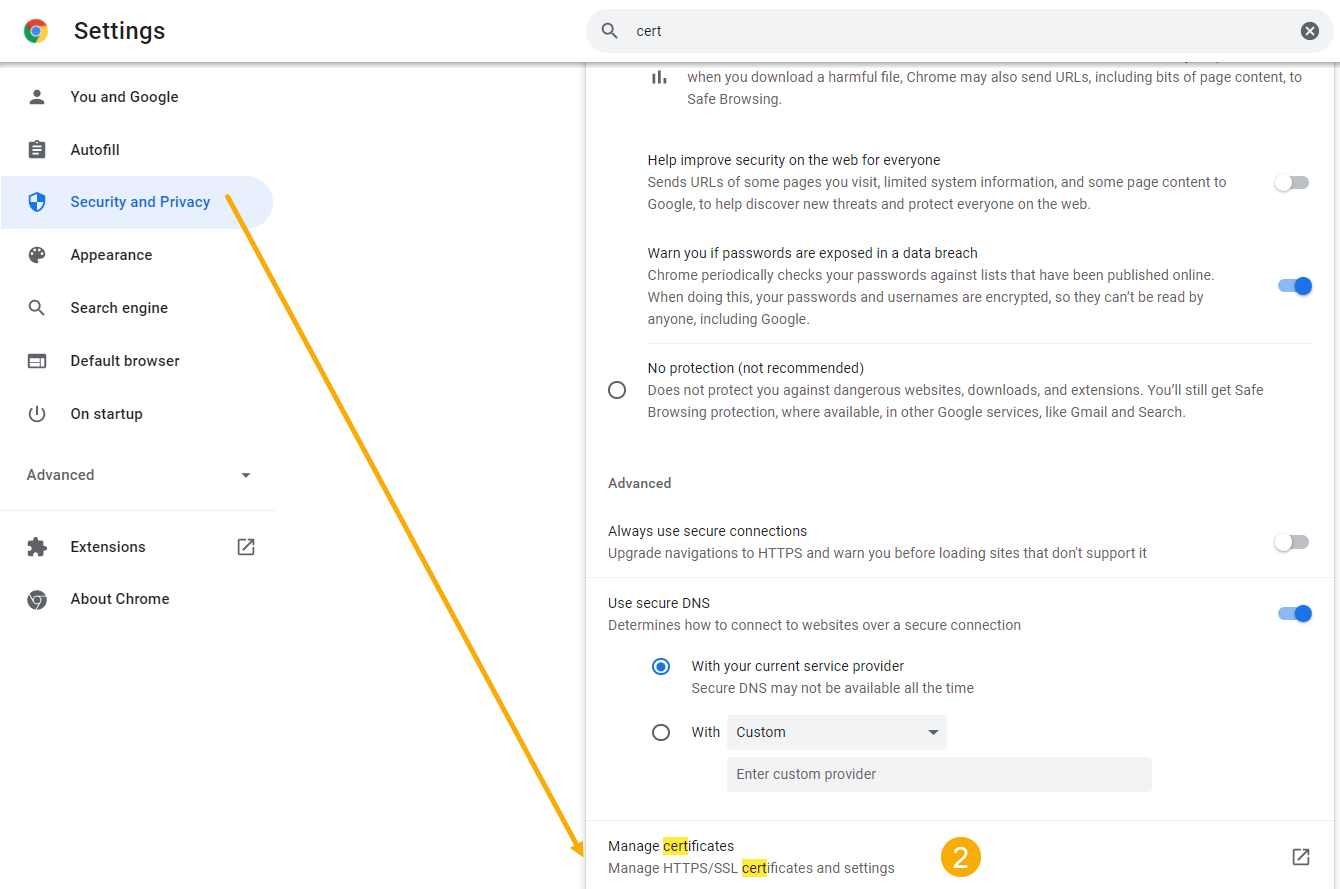
An example of importing a certificate in Chrome:
Configure the network. WSL 2 changes the way networking is configured compared to WSL 1. You must enable traffic proxying to permit traffic through the Windows firewall.
Before you continue, open PowerShell as an administrator. Right-click PowerShell and select Run as administrator, or run the following command from a terminal to launch an elevated PowerShell window:
Start-Process powershell -Verb RunAs
Approve the User Account Control (UAC) prompt when prompted. The
netsh interface portproxyandnetsh advfirewallcommands require administrator privileges.Run the following command in Ubuntu to obtain the IP address of the WSL 2 virtual machine:
ip addr | grep eth0

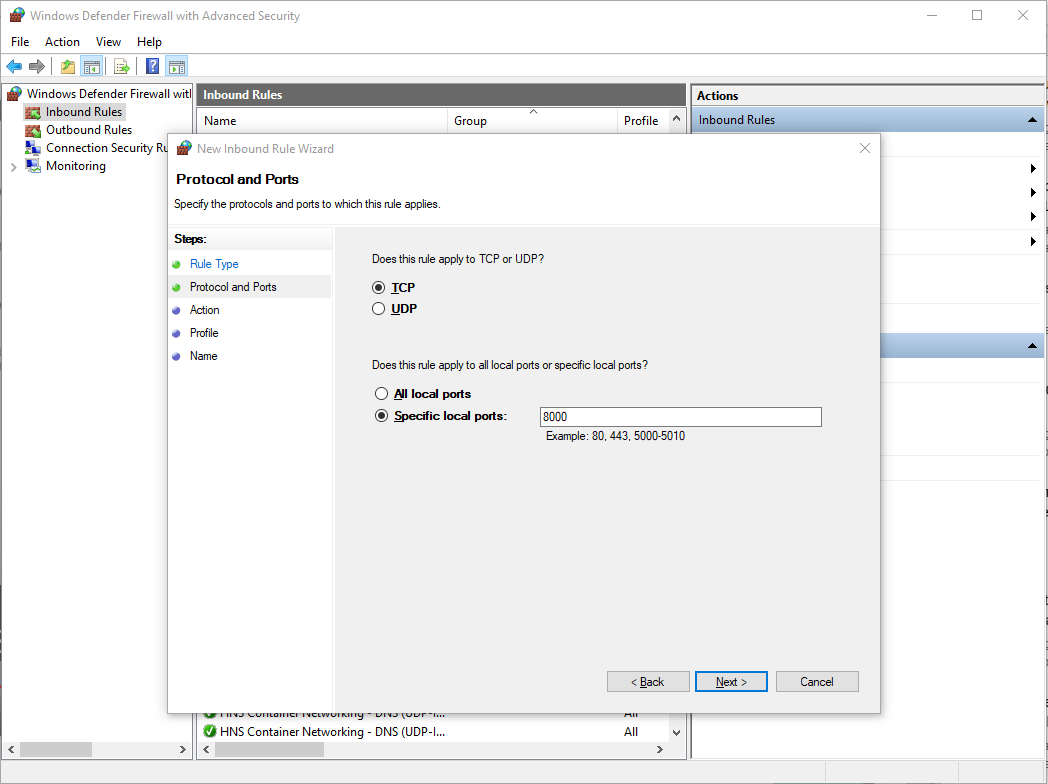
Map the WSL 2 port to the internal host:
netsh interface portproxy add v4tov4 listenport=8000 listenaddress=0.0.0.0 connectport=8000 connectaddress=172.22.33.170
Note
The IP address assigned to the WSL 2 virtual machine can change after Windows or WSL restarts. If the forwarded port stops working, obtain the current IP address again and update the
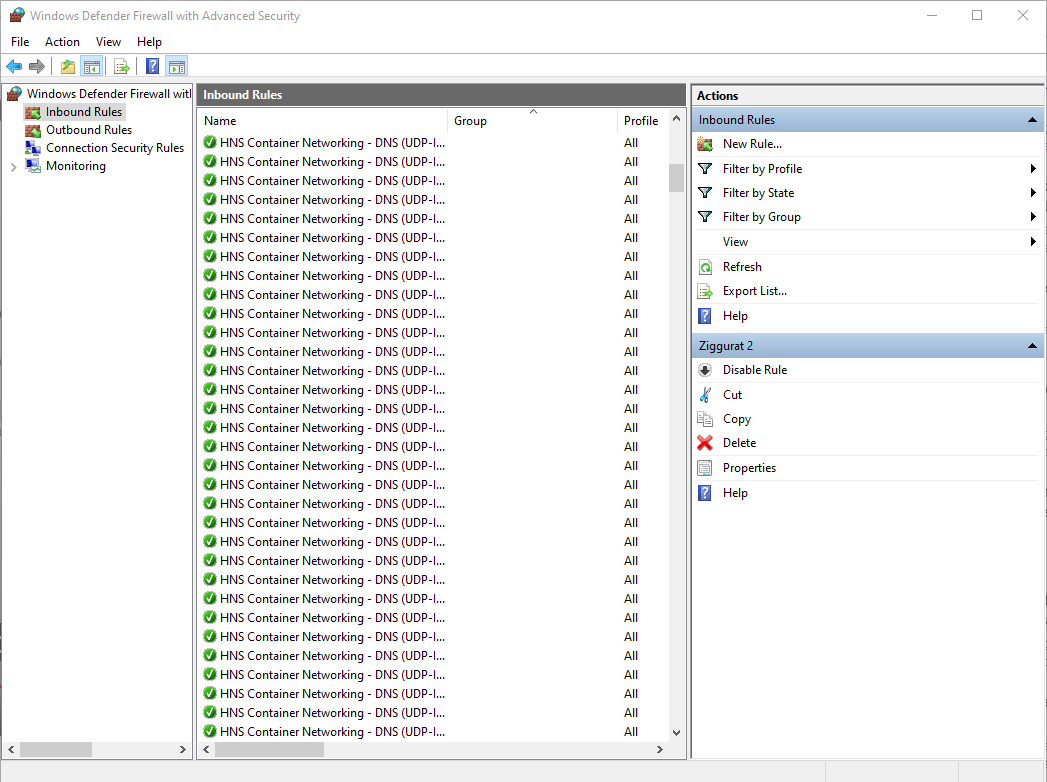
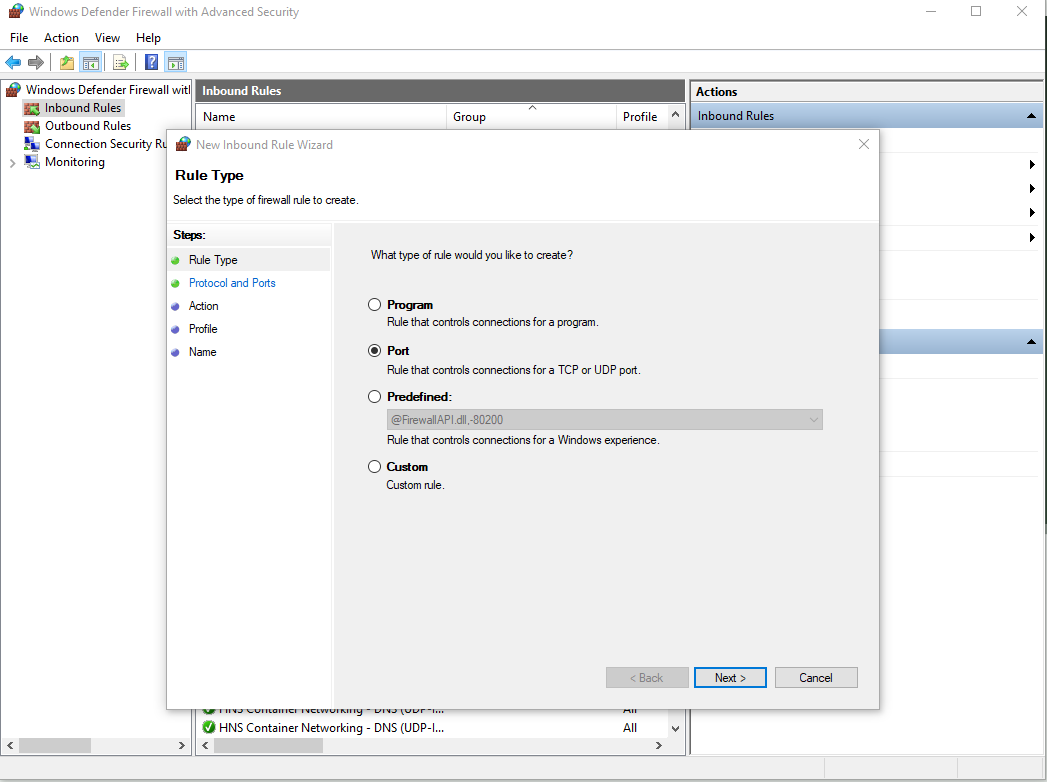
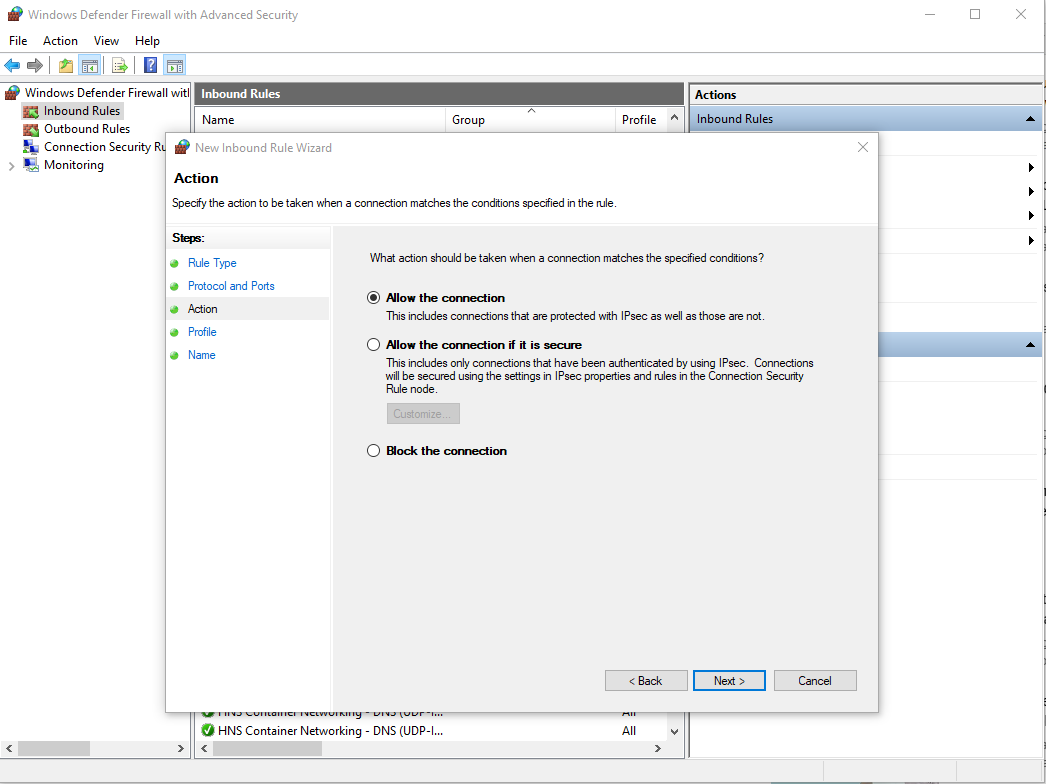
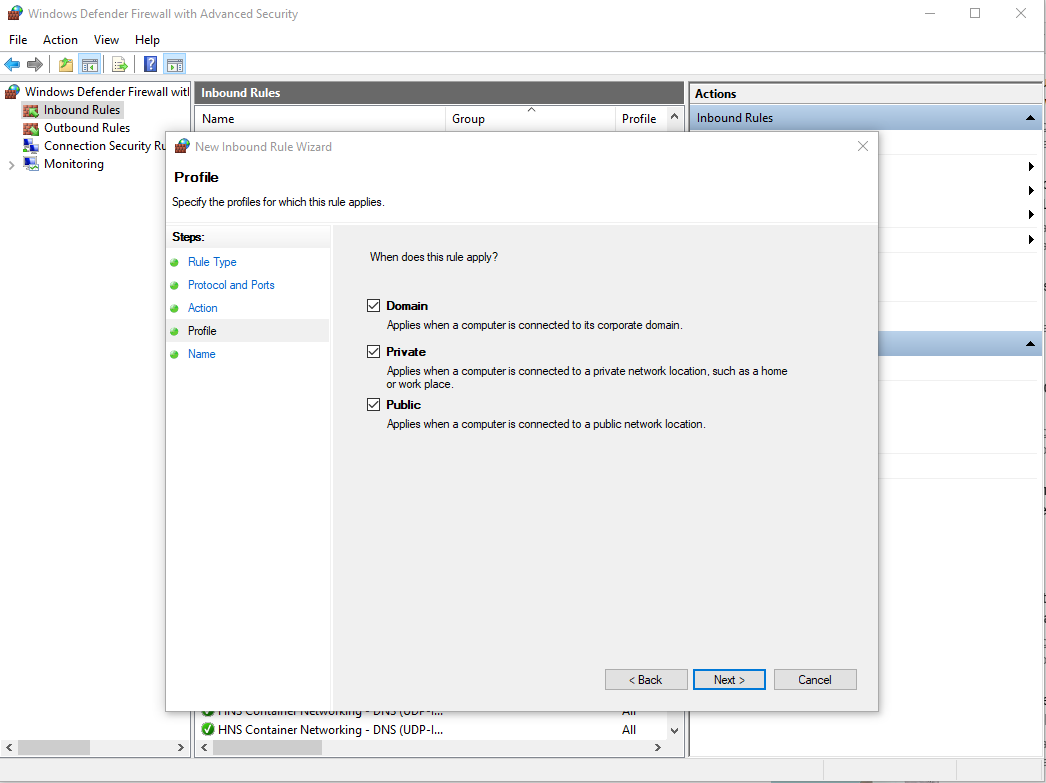
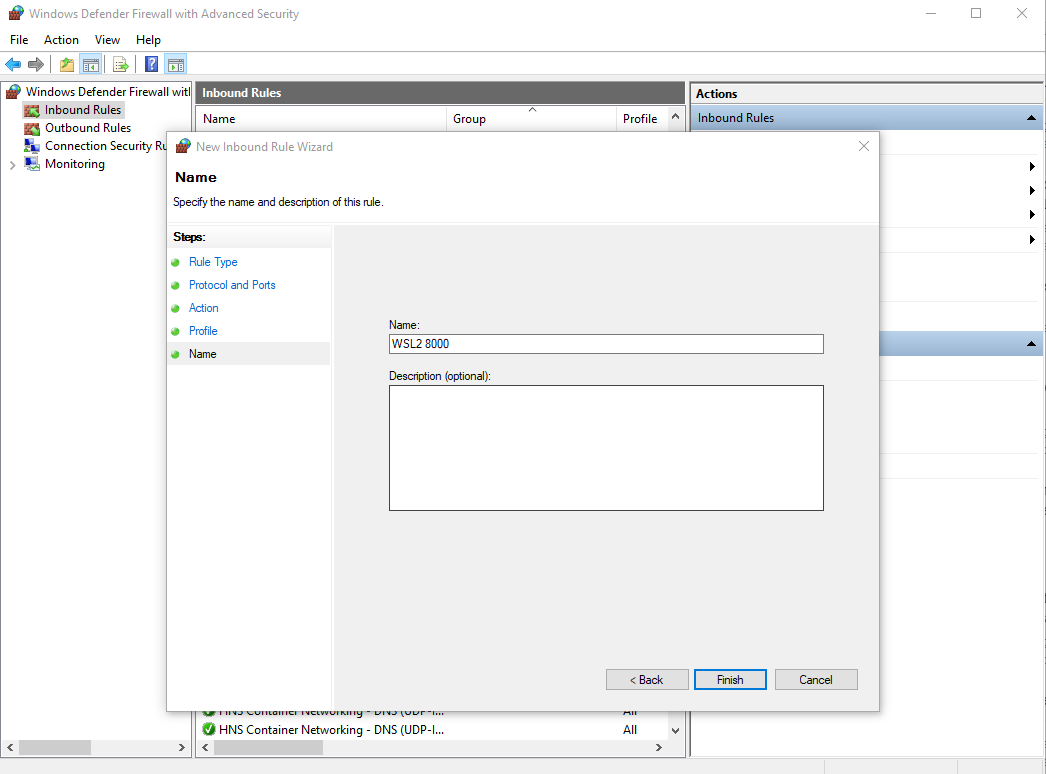
connectaddressvalue in thenetsh interface portproxycommand.Configure Windows Defender Firewall, as illustrated below:
Restart the terminal and the web browser to get them ready.
What’s Next
Installation of the Oro Application via the Command-Line Interface
Consider using the Visual Studio Code or PhpStorm with the built-in WSL integration for development.