Important
You are browsing documentation for version 5.0 of OroCommerce. Support of this version ended in January 2025. Read the documentation for version 6.1 (the latest LTS version) to get up-to-date information.
See our Release Process documentation for more information on the currently supported and upcoming releases.
Manage Dashboards in the Back-Office
The dashboard is a default page you see after you log in. It is an adjustable view that may contain different information blocks (widgets), such as today’s calendar, recent calls, emails, quick launchpad, etc. You can have several dashboards that serve different purposes and switch between them.
Create a Dashboard
To create a dashboard:
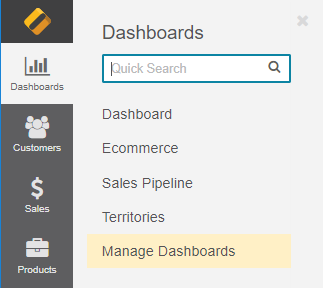
Navigate to Dashboards > Manage Dashboards in the main menu.
Click Create Dashboard.
Provide the following details in the form:

Label — The name used to refer to the dashboard in the system.
Clone from — Choose an existing dashboard to be used as a base for a new one. If you want to create a dashboard from scratch, choose the Blank Dashboard option.
Owner — Limits the list of users who can manage the dashboard to the users whose roles allow managing dashboards of the owner (e.g., the owner, members of the same business unit, head of the department, etc.)
Click Save and Close on the top right.
Initially, the dashboard contains all the widgets of the dashboard it has been cloned from. Dashboards cloned from the Blank Dashboard are empty.
Switch Between Dashboards
You can switch to a different dashboard either by:
Add, Edit, and Delete a Dashboard
To edit, create or delete a dashboard, you can either:
Hover over the Tools and select the required action, or
Use the More Options menu from the Dashboards page under Dashboards > Manage Dashboards.

