Important
You are browsing documentation for version 5.0 of OroCommerce. Support of this version ended in January 2025. Read the documentation for the latest LTS version to get up-to-date information.
See our Release Process documentation for more information on the currently supported and upcoming releases.
Configure Google Tag Manager Integration in the Back-Office (Google Analytics 4)
Hint
The configuration of Google Tag Manager with Google Analytics 4 is available starting from OroCommerce v5.0.4. To check which application version you are running, see the system information.
Integration between your Oro application and Google Tag Manager enables you to add tracking tags to your OroCommerce web store pages and collect information on customer behavior, purchases, product clicks, page views, etc. All this information can subsequently be shared with Google Analytics 4 (GA4), enabling you to monitor various user interactions with products on your website. This can help you get a complete picture of on-page visitor behavior, how well your marketing strategies work, and how to target your audience better.
Hint
This feature requires a Google Tag Manager extension, which you can download from the Oro Extensions Store. Next, use the composer to install it on your application.
Hint
Please, be aware that you must have Google Tag Manager and Google Analytics 4 accounts already created to proceed with the integration between your Oro application and Google Tag Manager and pass data to Google Analytics 4.
On the Google Analytics Side
Switch from Google Analytics Universal to Google Analytics 4
Google Universal Analytics (GA-UA) is deprecated on July 1, 2023 and is replaced with Google Analytics 4 (GA4). As the transition to GA4 comes with significant changes, including how data is viewed, collected, and tracked, we recommend that you create a GA4 integration well in advance of the deprecation date to ensure a seamless migration from GA-UA to GA4.
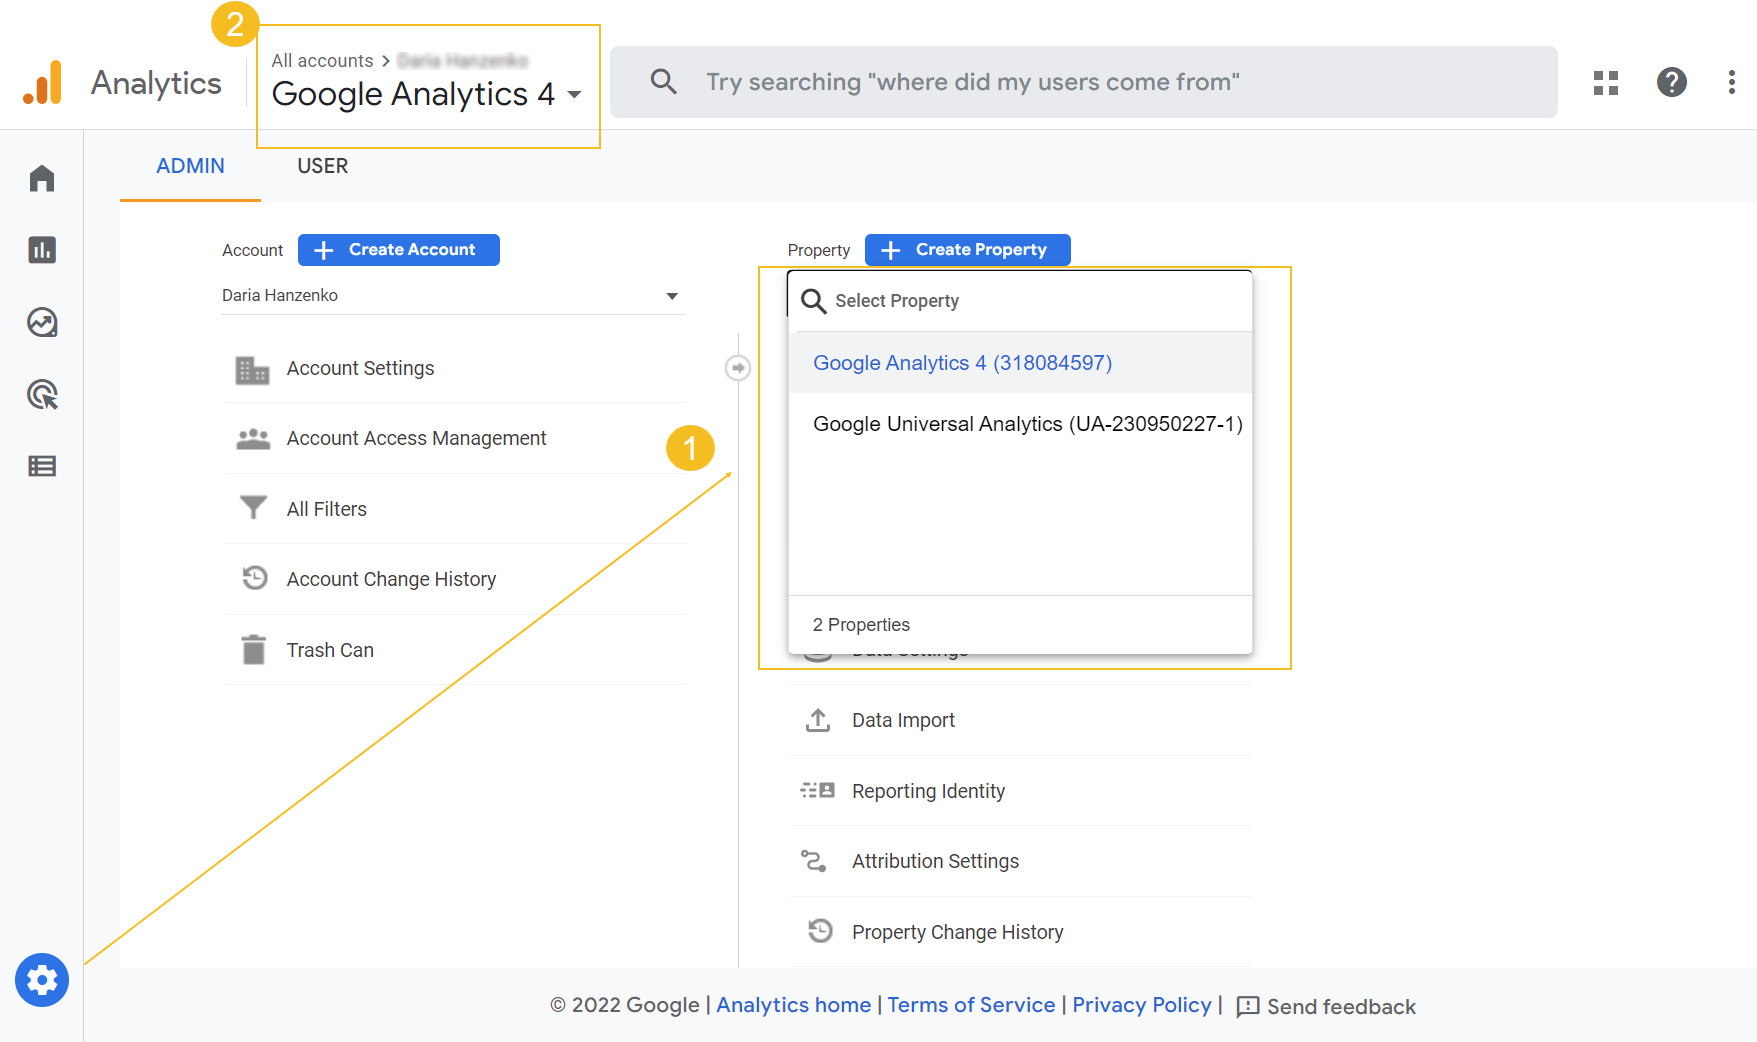
You can configure a new GA4 property alongside the existing GA-UA one. These two properties work alongside each other simultaneously, with your existing GA-UA property seeing no changes and continuing to collect data as usual. You can access both properties from the Admin menu panel (1) or via the property switcher on the top left of the home page (2).
Create a Google Analytics 4 Property
To create a GA4 property, navigate to your Google Analytics account.
There are two ways to create a new property.
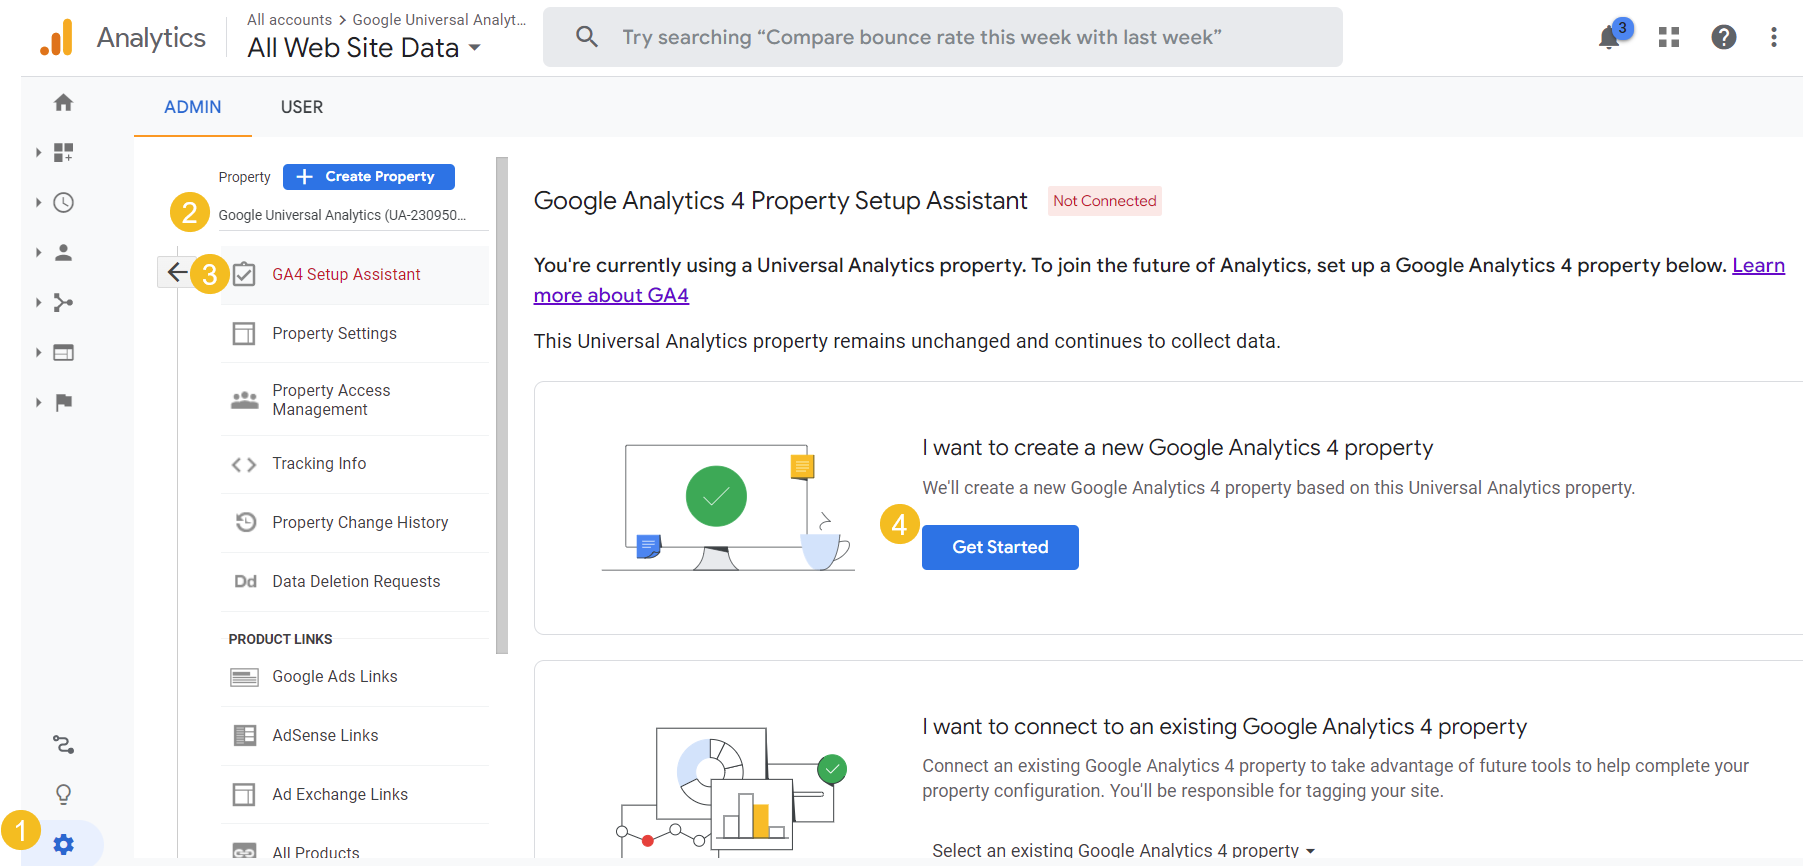
Method 1
This method enables you to create a GA4 property in one click, copying the property name, website URL, timezone, and currency from the existing Google Universal Analytics property.
Click Admin on the bottom left.
Under the Property column, select the Google Universal Analytics property to copy the initial data from (e.g., name, URL, timezone, currency).
Click GA4 Setup Assistant.
Click Get Started > Create Property under I want to create a new Google Analytics 4 property.
Your new Google Analytics 4 property should now be created.
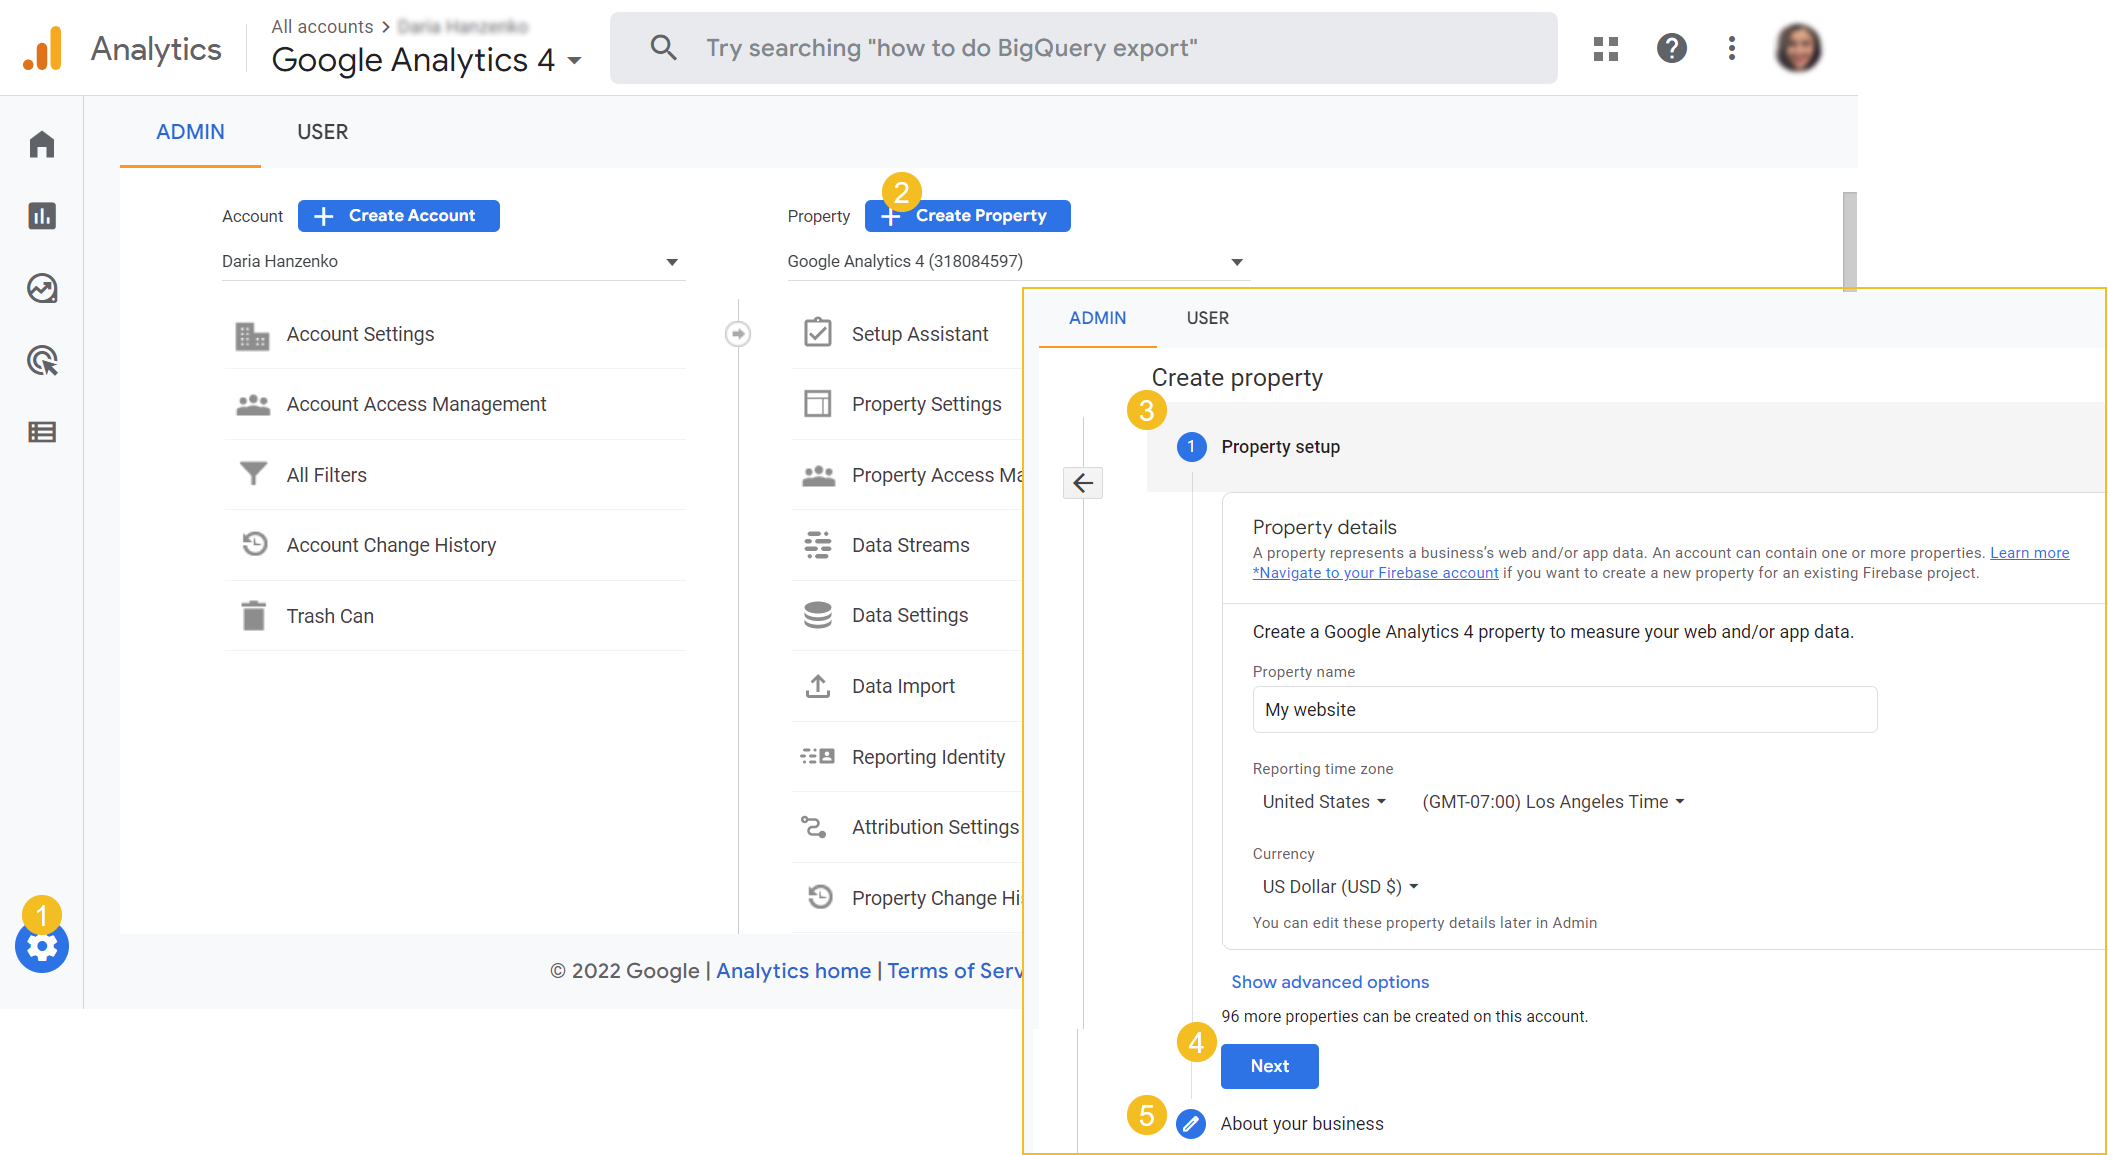
Method 2
With this method, you can create a new GA4 property from scratch, regardless of whether you are new to Google Analytics.
Click Admin on the bottom left.
Click + Create Property under the Property column.
Provide a name for the property, select the reporting time zone and the currency. Keep in mind that Google Analytics tracks only one currency at a time. This means that if, for example, your default currency is set to US Dollar, but you have a multi-currency web store (available for the Enterprise edition only), a purchase of 100EUR will be tracked in the converted dollar amount of 107USD (depending on the currency rate that day).
Click Next. Select your industry category and business size.
Click Create.
Note
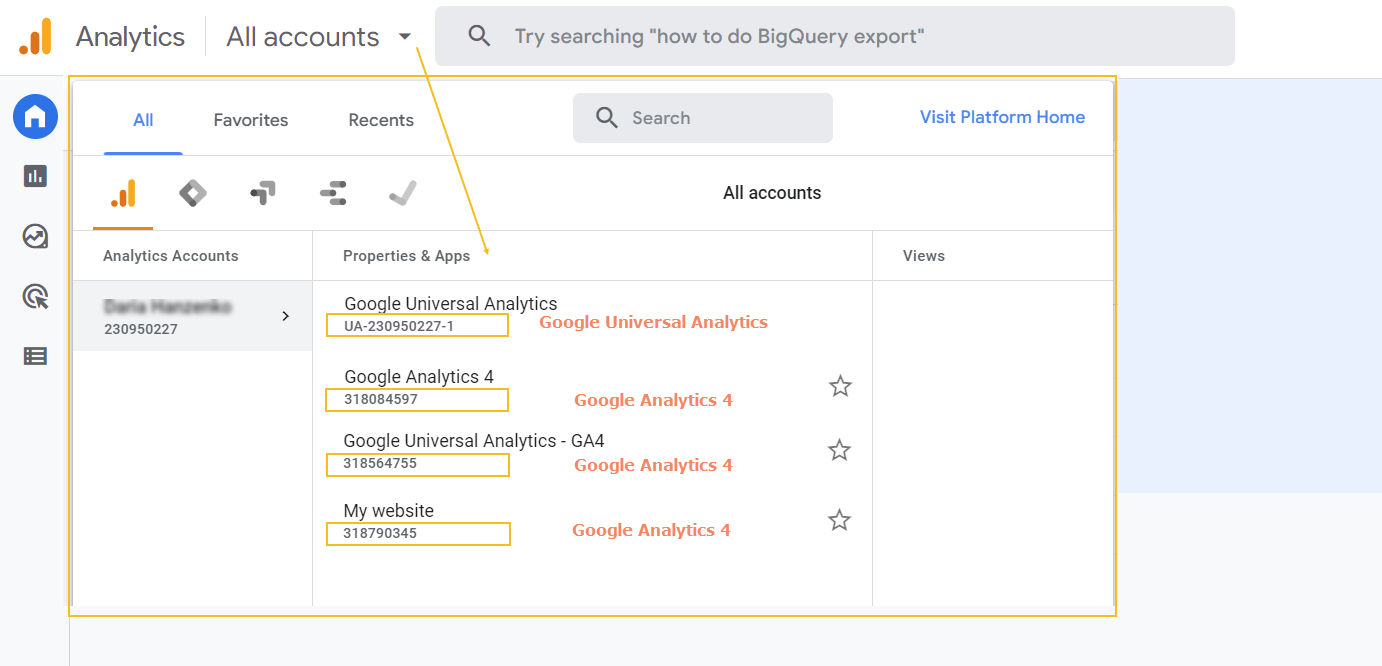
Remember that, unlike your GA-UA property number, which goes with the UA prefix as in UA-XXXX, your new GA4 property number is created as XXXX without the prefix.
Set up a Data Stream
Once you created a property, the next step is to set up a data stream to start collecting data.
In your Admin menu, make sure you have selected the required property under the Property column.
Click Data Streams and select the platform (Web, Android app, or IOS app) to add a data stream. You can add as many data streams as required.
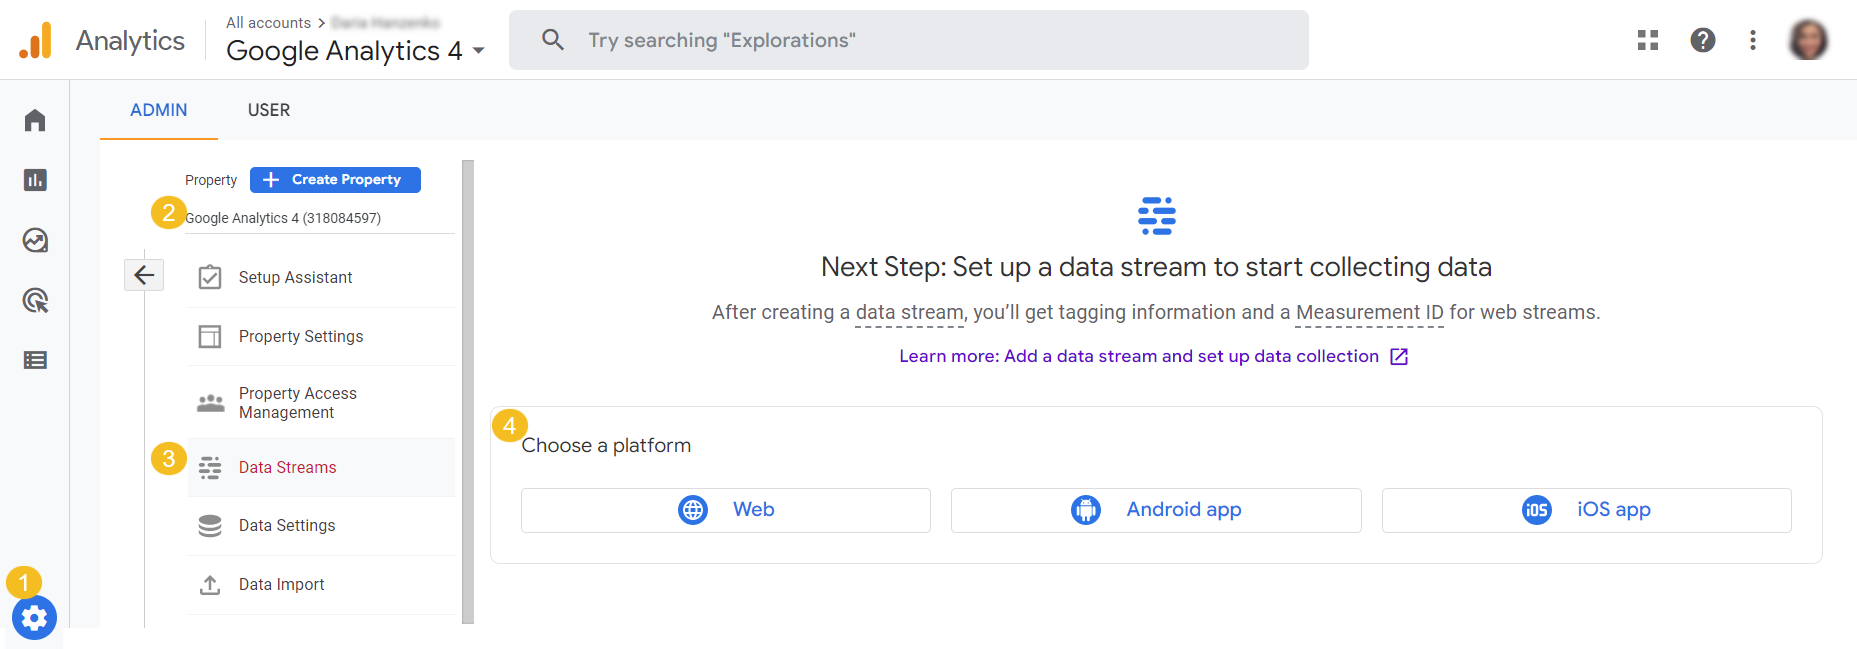
For Web, provide the URL of your website (e.g., “mywebsite.com”) and a stream name. Click Create stream.
For IOS app or Android app, add the Android package name, the app name, or the App Store ID, then click Register app. Follow the provided instructions to finish the configuration of data streams.
Once a data stream is set, add tags to your web pages via Google Tag Manager.
Hint
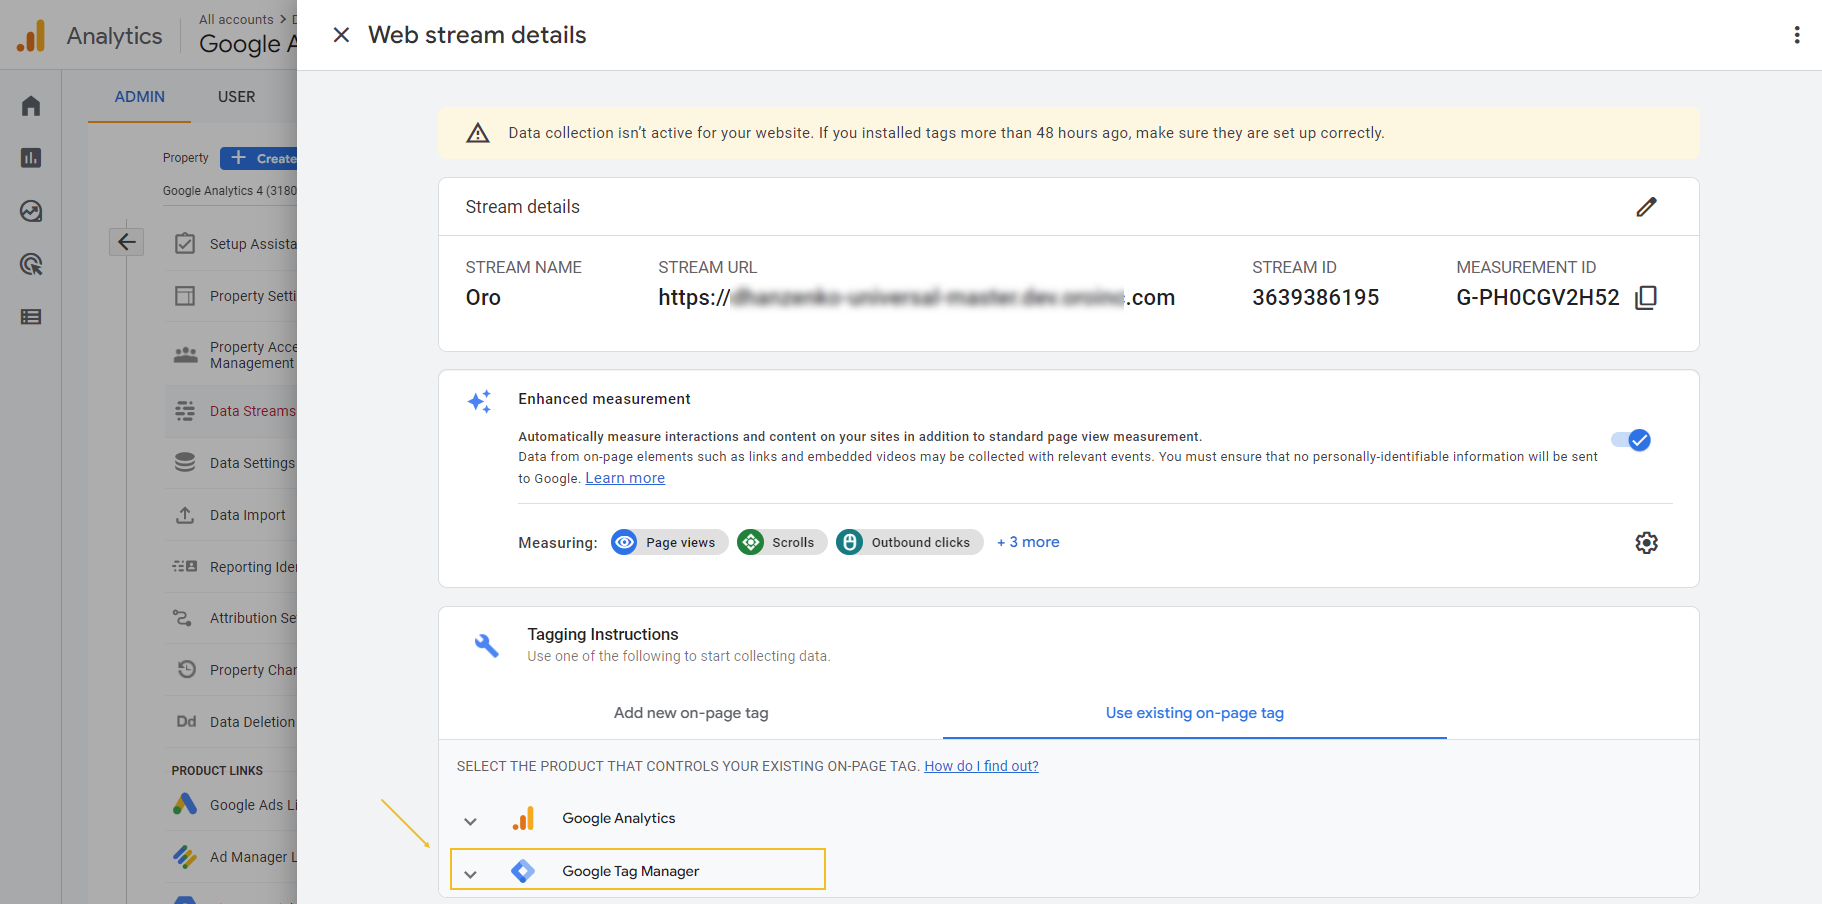
Keep the Measurement ID at hand, as you will need it when configuring tags in Google Tag Manager.

On the Google Tag Manager Side
Create Tags via GTM
To collect information (events) from your web store, you need to create tags in your Google Tag Manager account for each event you want to track.
There are two ways to create tags:
By importing our preconfigured container with the tags for all collected events. Importing pre-defined tags requires minimal effort, as each tag has already been pre-configured with triggers and variables to enable you to connect to your OroCommerce website.
Or
By configuring tags for all required events manually. Creating tags from scratch is more time-consuming but allows you to provide custom data during configuration or create tags only for specific events.
Option 1: Import a Container
We have prepared a .json file with a container that includes pre-configured tags to simplify your tag configuration process. You need to import this file into your Google Tag Manager account and substitute the dummy Measurement ID in the GA4 var variable with the data stream’s Measurement ID of your Google Analytics 4 account.
For that:
Download the .json file with a pre-configured container.
Save and extract the archive on your computer.
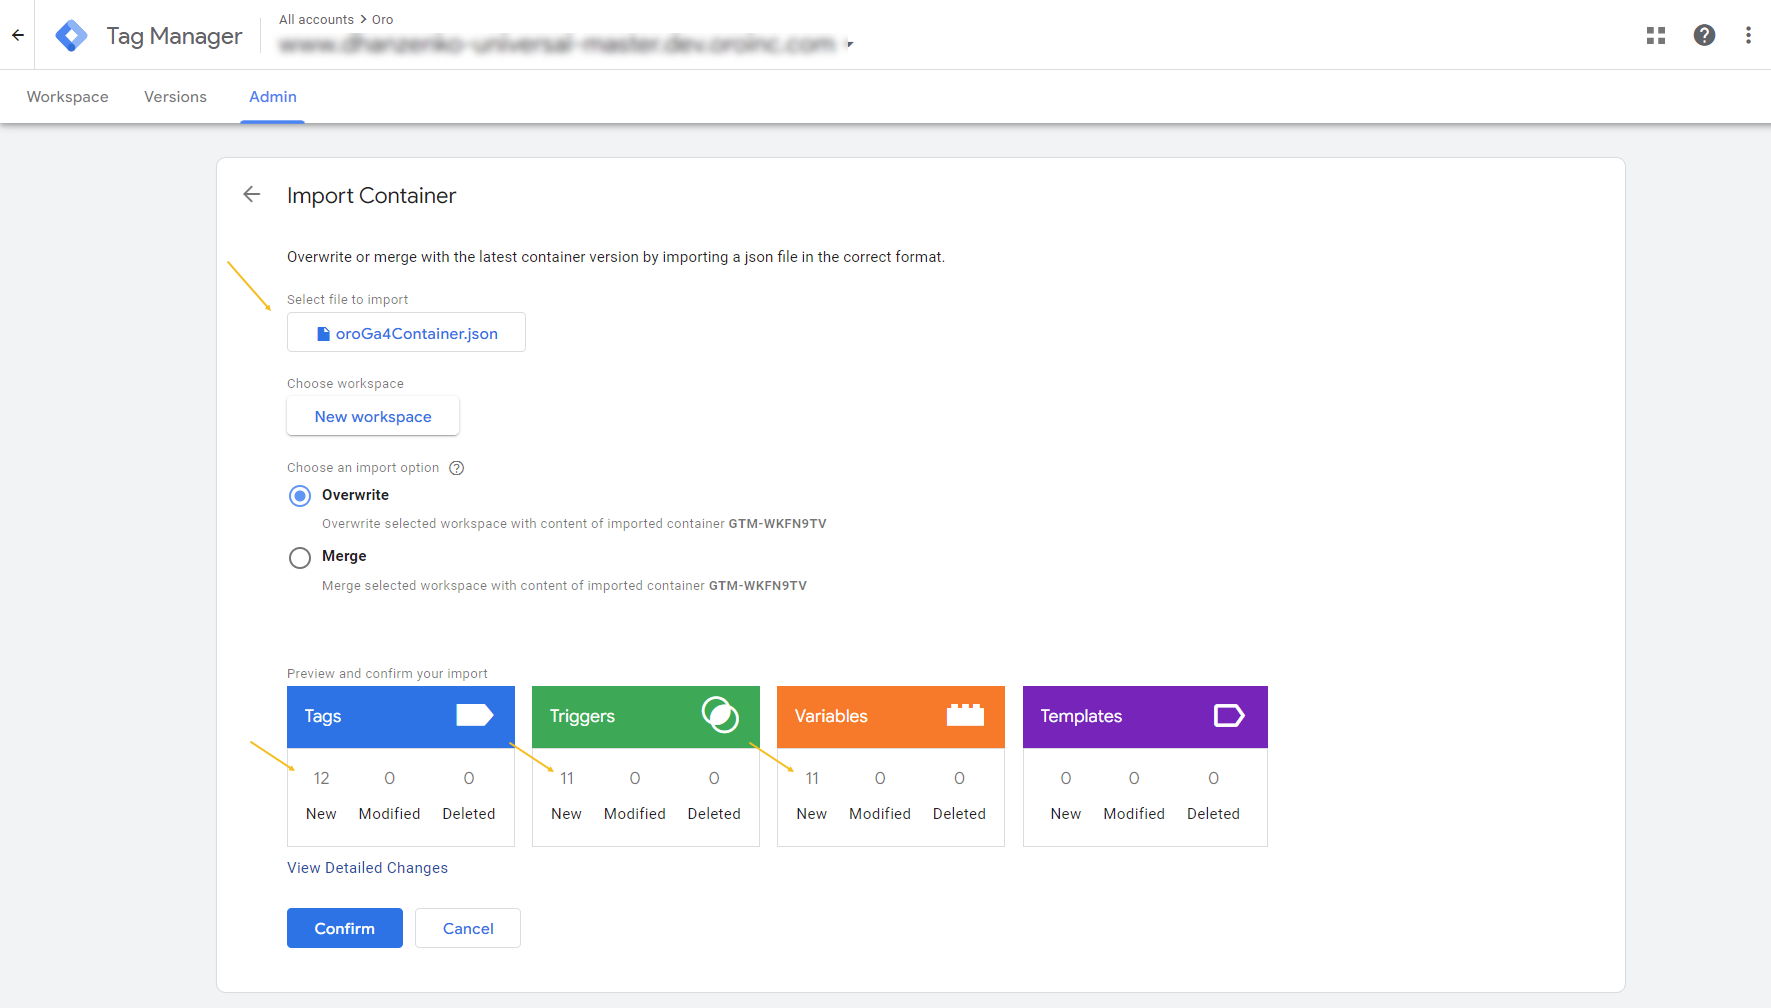
In your Google Tag Manager account, navigate to Admin > Import Container.
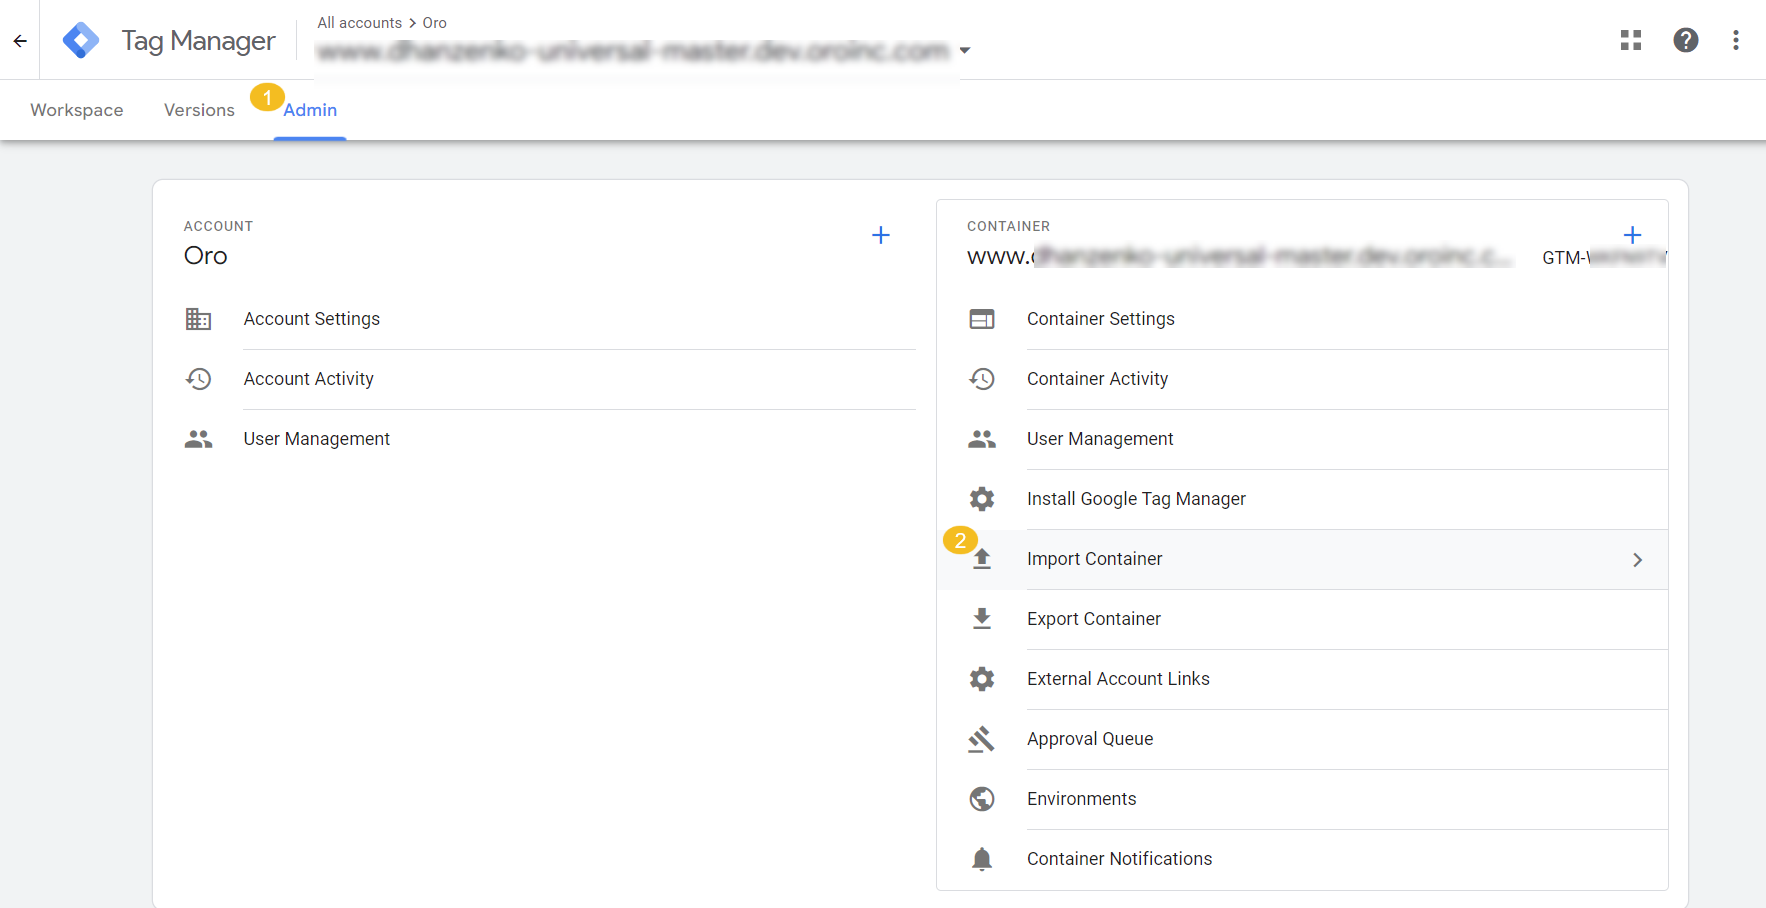
Click Choose container file to import the extracted .json file. The file contains 12 tags, 11 triggers, and 11 variables.
Choose the workspace and import option.
Click Confirm to start file import.
The container that you have imported contains a dummy data stream’s Measurement ID for the GA4 var variable. You need to change the ID to be able to transfer correct data to Google Analytics 4.
To change the measurement ID for the imported variable:
In your Google Tag Manager Account, click Variables in the menu to the left.
In the User-Defined Variables section, click GA4 var to open its configuration page.
Click the Edit icon.
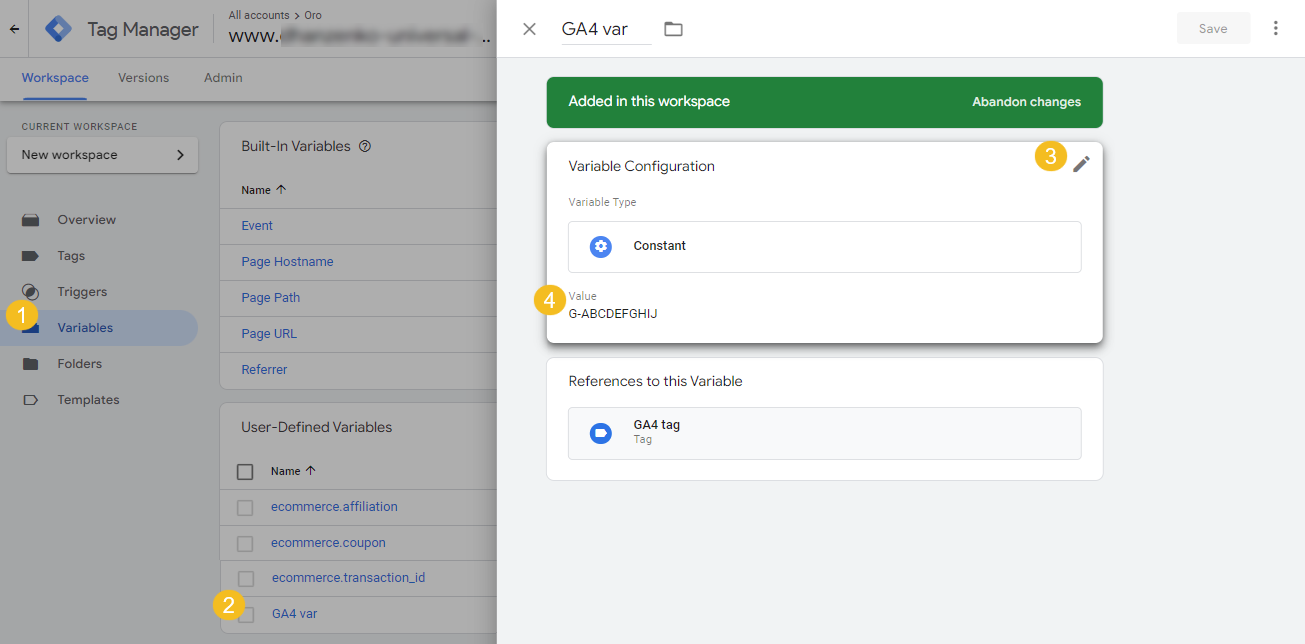
Provide the measurement ID of your Google Analytics data stream that follows the G-XXXXX pattern instead of the dummy number.
Click Save to save variable settings.
Click Submit and then Publish on the top right to apply the changes.
Except for the GA4 tag, the imported container also includes several pre-configured event tags.
Find the full tag list in the table below. The table compares the Google Analytics 4 tags to those of Google Universal Analytics. To customize the pre-defined parameters, refer to the Google Analytics 4 Event developer documentation for the list of the recommended event parameters.
Google Analytics 4 Event tag |
Google Universal Analytics tag |
|---|---|
pageView |
pageView |
Note
Be aware that the begin_checkout, add_shipping_info, and add_payment_info GA4 tags fire after the related events occur, unlike the GA-UA checkout tag which is triggered on any checkout step, and each time a user refreshes the page.
Option 2: Create Tags Manually
Google Tag Manager enables you to create one of the two tags that are passed to Google Analytics 4. Those are Google Analytics: GA4 Configuration as the principal configuration tag and Google Analytics: GA4 Event, which enables you to track custom events.
To create a Google Analytics: GA4 Configuration tag:
Navigate to the left menu of the Workspace page and click Tags > New.
Click Tag Configuration.
Select Google Analytics: GA4 Configuration from the tag list.
Enter the measurement ID of your Google Analytics data stream.
Optionally, add the parameters to configure the Fields to Set, User Properties, and Advanced Settings fields.
Click Triggering and select the necessary events that would fire the tag when they occur.
Save the tag configuration and publish it.

To create a Google Analytics: GA4 Event tag for custom events:
Navigate to the left menu of the Workspace page and click Tags > New.
Click Tag Configuration.
Select Google Analytics: GA4 Event from the tag list.
For Configuration Tag, select the GA4 tag configuration tag you have just created.
For Event Name, provide the name for the event (e.g., add_to_cart). See the Google Analytics 4 Event developer documentation for the list of recommended event parameters.
Under Event Parameters, click Add Row, and provide a name and a value for the parameter. Add as many parameters as required for a particular event. See the Google Analytics 4 Event developer documentation for the list of recommended event parameters.
Optionally, add the parameters to configure the User Properties and Advanced Settings fields.
Click Triggering and select the necessary events that would fire the tag when they occur.
Save the tag configuration and publish it.
Google Analytics 4 requires the event names and parameters to comply with their regulations. To configure the manually-added tags correctly, provide the following parameters and triggers for each tag:
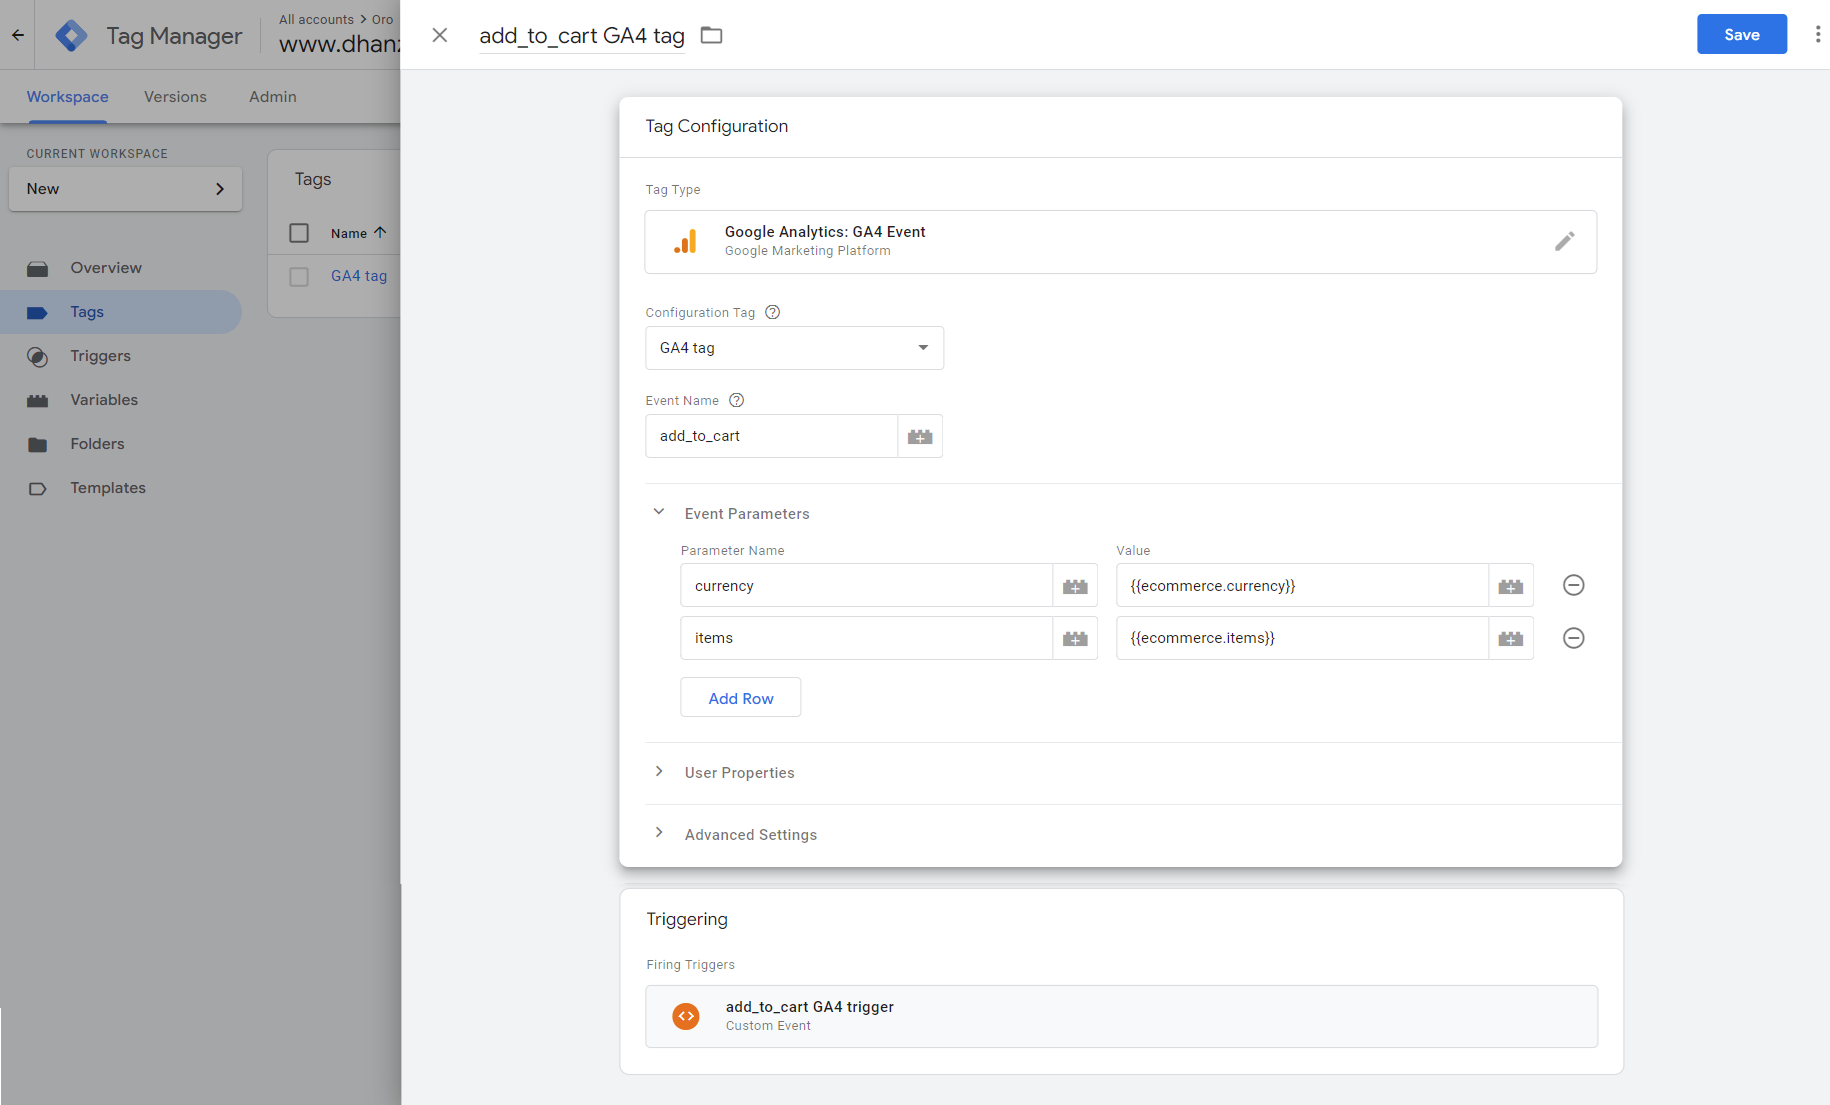
add_to_cart
The add_to_cart tag signifies that a customer user has added an item to a shopping list or submitted a request for quote.
Tag Configuration
Configuration Tag — GA4 tag (refers to your Google Analytics: GA4 Configuration tag)
Event Name — add_to_cart
Event Parameters
Parameter Name |
Value |
|---|---|
currency |
{{ecommerce.currency}} |
value |
{{ecommerce.value}} |
items |
{{ecommerce.items}} |
Triggering
Trigger Type — Custom Event
Event name — add_to_cart
This trigger fires on — All Custom Events
remove_from_cart
The remove_from_cart tag signifies that a customer user has removed an item from a shopping list.
Tag Configuration
Configuration Tag — GA4 tag (refers to your Google Analytics: GA4 Configuration tag)
Event Name — remove_from_cart
Event Parameters
Parameter Name |
Value |
|---|---|
currency |
{{ecommerce.currency}} |
value |
{{ecommerce.value}} |
items |
{{ecommerce.items}} |
Triggering
Trigger Type — Custom Event
Event name — remove_from_cart
This trigger fires on — All Custom Events
begin_checkout
The begin_checkout tag signifies that a customer user has started a checkout process.
Tag Configuration
Configuration Tag — GA4 tag (refers to your Google Analytics: GA4 Configuration tag)
Event Name — begin_checkout
Event Parameters
Parameter Name |
Value |
|---|---|
currency |
{{ecommerce.currency}} |
value |
{{ecommerce.value}} |
items |
{{ecommerce.items}} |
Triggering
Trigger Type — Custom Event
Event name — begin_checkout
This trigger fires on — All Custom Events
add_shipping_info
The add_shipping_info tag signifies that a customer user has selected a shipping method at checkout.
Tag Configuration
Configuration Tag — GA4 tag (refers to your Google Analytics: GA4 Configuration tag)
Event Name — add_shipping_info
Event Parameters
Parameter Name |
Value |
|---|---|
currency |
{{ecommerce.currency}} |
value |
{{ecommerce.value}} |
items |
{{ecommerce.items}} |
shipping_tier |
{{ecommerce.shipping_tier}} |
Triggering
Trigger Type — Custom Event
Event name — add_shipping_info
This trigger fires on — All Custom Events
add_payment_info
The add_payment_info tag signifies that a customer user has selected a payment method at checkout.
Tag Configuration
Configuration Tag — GA4 tag (refers to your Google Analytics: GA4 Configuration tag)
Event Name — add_payment_info
Event Parameters
Parameter Name |
Value |
|---|---|
currency |
{{ecommerce.currency}} |
value |
{{ecommerce.value}} |
items |
{{ecommerce.items}} |
payment_type |
{{ecommerce.payment_type}} |
Triggering
Trigger Type — Custom Event
Event name — add_payment_info
This trigger fires on — All Custom Events
select_item
The select_item tag signifies that a customer user has clicked a product.
Tag Configuration
Configuration Tag — GA4 tag (refers to your Google Analytics: GA4 Configuration tag)
Event Name — select_item
Event Parameters
Parameter Name |
Value |
|---|---|
items |
{{ecommerce.items}} |
item_list_name |
{{ecommerce.item_list_name}} |
Triggering
Trigger Type — Custom Event
Event name — select_item
This trigger fires on — All Custom Events
view_item
The view_item tag signifies that a customer user has reviewed a product details page.
Tag Configuration
Configuration Tag — GA4 tag (refers to your Google Analytics: GA4 Configuration tag)
Event Name — view_item
Event Parameters
Parameter Name |
Value |
|---|---|
currency |
{{ecommerce.currency}} |
value |
{{ecommerce.value}} |
items |
{{ecommerce.items}} |
Triggering
Trigger Type — Custom Event
Event name — view_item
This trigger fires on — All Custom Events
view_item_list
The view_item_list tag signifies that a customer user has looked over a list of products in a product block (top selling, featured, new arrivals, related, upsell).
Tag Configuration
Configuration Tag — GA4 tag (refers to your Google Analytics: GA4 Configuration tag)
Event Name — view_item_list
Event Parameters
Parameter Name |
Value |
|---|---|
currency |
{{ecommerce.currency}} |
items |
{{ecommerce.items}} |
Triggering
Trigger Type — Custom Event
Event name — view_item_list
This trigger fires on — All Custom Events
select_promotion
The select_promotion tag signifies that a customer user has clicked a slider from the homepage slider content block on your main website page.
Tag Configuration
Configuration Tag — GA4 tag (refers to your Google Analytics: GA4 Configuration tag)
Event Name — select_promotion
Event Parameters
Parameter Name |
Value |
|---|---|
items |
{{ecommerce.items}} |
Triggering
Trigger Type — Custom Event
Event name — select_promotion
This trigger fires on — All Custom Events
view_promotion
The view_promotion tag signifies that a customer user has reviewed a slider from the homepage slider block.
Tag Configuration
Configuration Tag — GA4 tag (refers to your Google Analytics: GA4 Configuration tag)
Event Name — view_promotion
Event Parameters
Parameter Name |
Value |
|---|---|
items |
{{ecommerce.items}} |
Triggering
Trigger Type — Custom Event
Event name — view_promotion
This trigger fires on — All Custom Events
purchase
The purchase tag signifies that a customer user has submitted an order.
Tag Configuration
Configuration Tag — GA4 tag (refers to your Google Analytics: GA4 Configuration tag)
Event Name — purchase
Event Parameters
Parameter Name |
Value |
|---|---|
currency |
{{ecommerce.currency}} |
value |
{{ecommerce.value}} |
items |
{{ecommerce.items}} |
transaction_id |
{{ecommerce.transaction_id}} |
affiliation |
{{ecommerce.affiliation}} |
coupon |
{{ecommerce.coupon}} |
shipping |
{{ecommerce.shipping}} |
tax |
{{ecommerce.tax}} |
shipping_tier |
{{ecommerce.shipping_tier}} |
payment_type |
{{ecommerce.payment_type}} |
Triggering
Trigger Type — Custom Event
Event name — purchase
This trigger fires on — Some Custom Events. For this trigger, add the following condition: ecommerce.items > does not equal > undefined.
On the Oro Side
Configure a Google Tag Manager Integration in the Back-Office
To configure a Google Tag Manager integration:
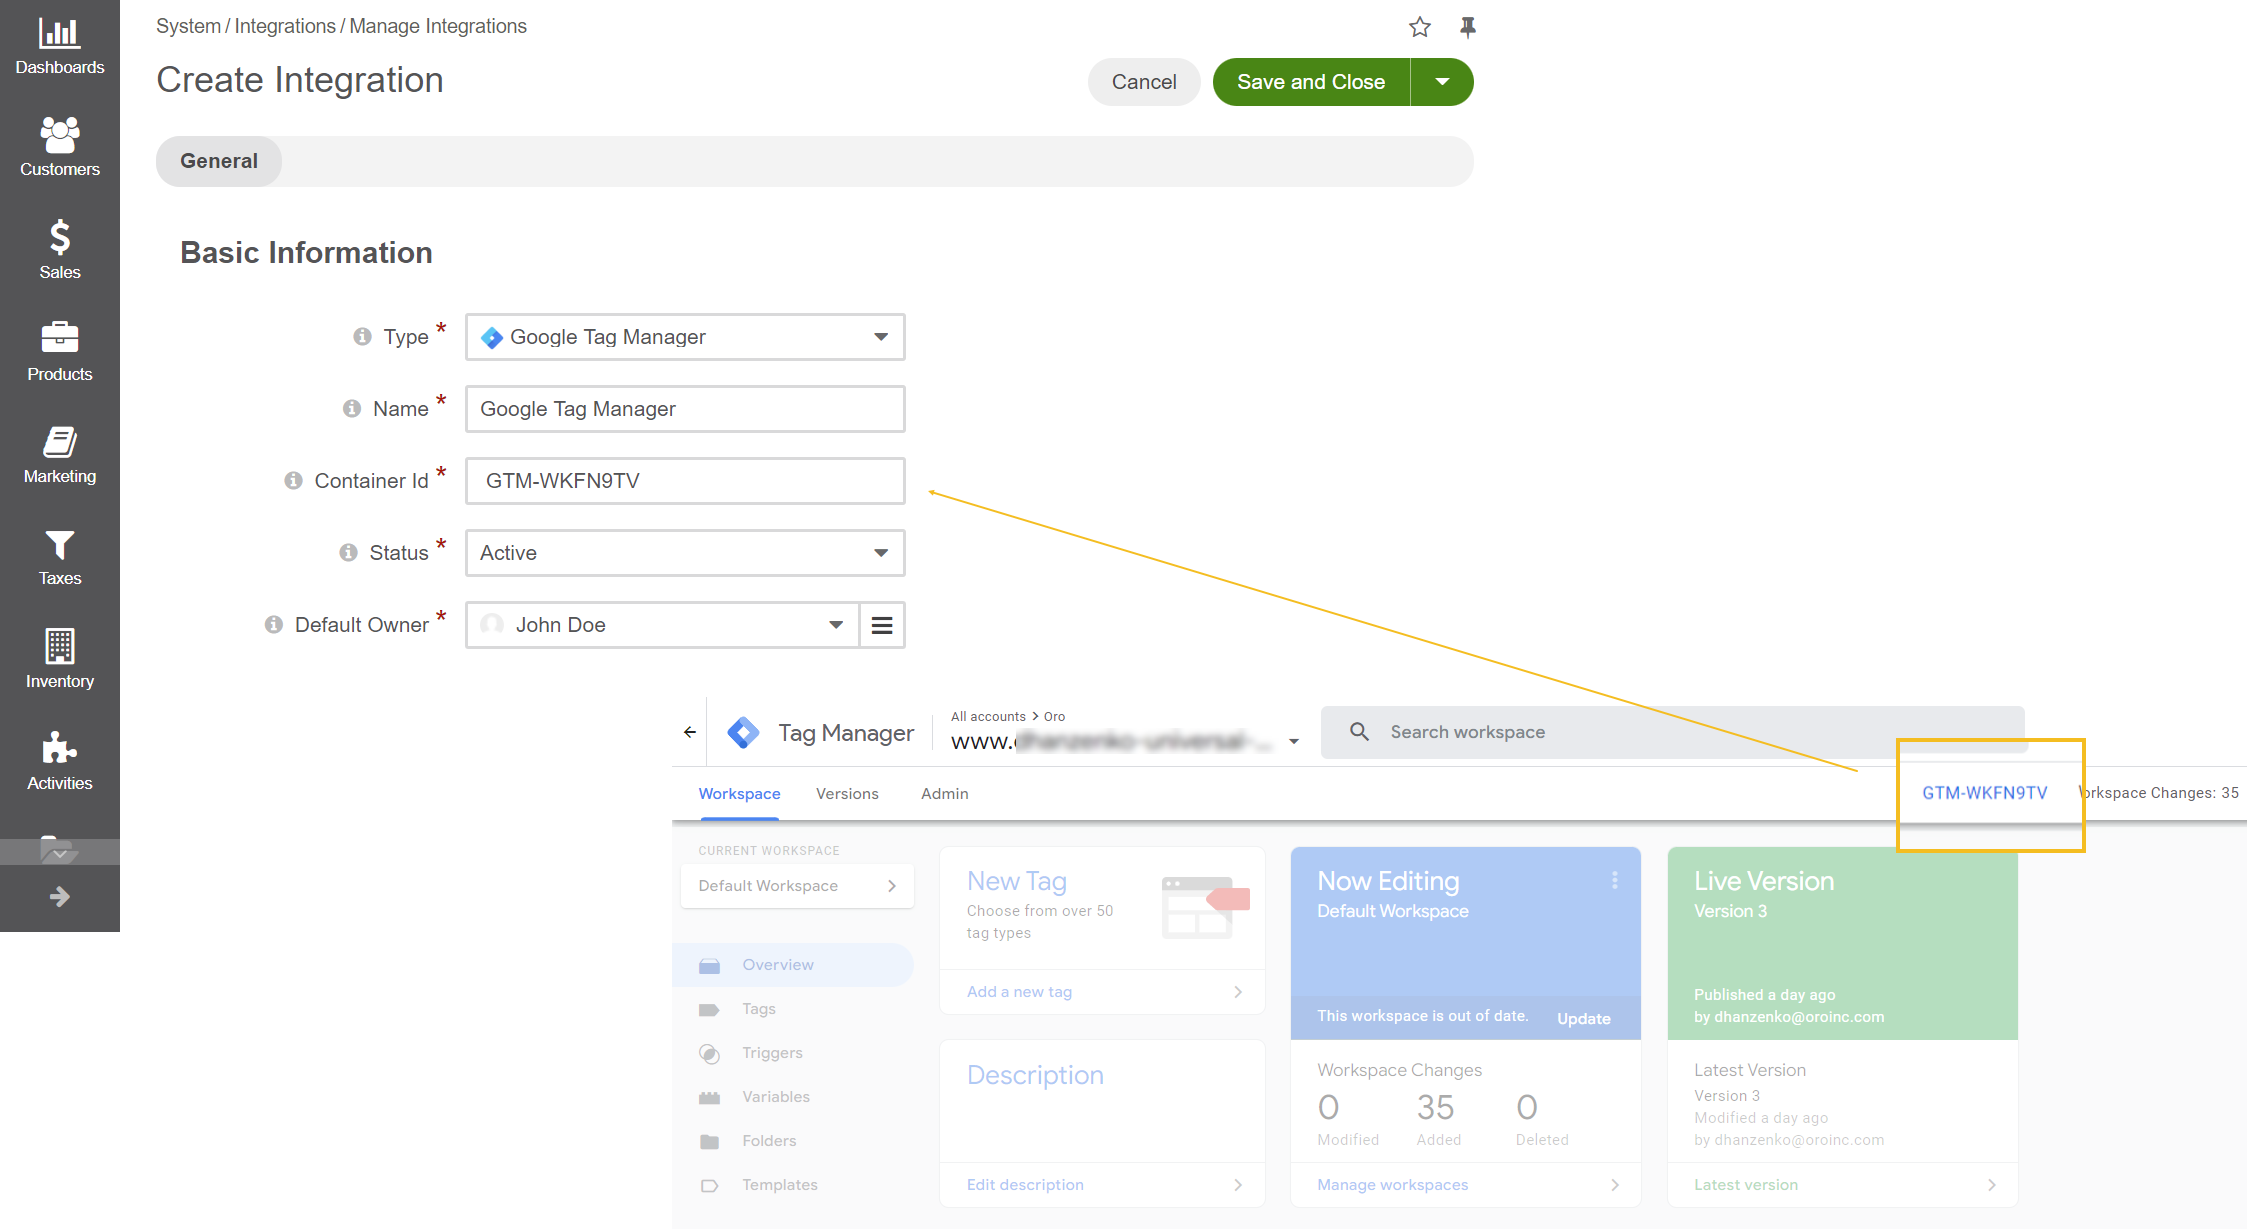
Navigate to System > Integrations > Manage Integrations in the main menu.
Click Create Integration on the top right.
In the Type field, select Google Tag Manager.
In the Name field, provide the name for the integration you are creating to refer to it in the Oro application. Since you can create many Google Tag Manager integrations, make sure the name is meaningful.
In the Container ID field, provide the Google Tag Manager Container ID. The Container ID is located in your Google Tag Manager account on the top right of the workspace page. It is formatted as GTM-XXXXXX.
In the Status field, set the integration to Active to enable it. Should you need to disable it, select Inactive from the list.
In the Default Owner, select the owner of the integration.
Click Save and Close.
Next Steps
Once the GTM integration is configured, you must connect it to the application in the system settings on the required level: