Integration Testing with Behat
Concepts
The information below summarizes concepts and tools essential for understanding and using the test framework delivered within OroBehatExtension.
Behavior-driven development (BDD) is a software development process that emerged from test-driven development (TDD). The behavior-driven development combines the general techniques and principles of TDD with ideas from domain-driven design and object-oriented analysis and design to provide software development and management teams with shared tools and a shared process to collaborate on software development.
Behat is a Behavior Driven Development framework for PHP.
Mink is an open source browser controller/emulator for web applications developed using PHP.
OroElementFactory creates elements in contexts.
SymfonyExtension provides integration with Symfony and Mink driver for Symfony application.
Oro\Bundle\TestFrameworkBundle\Behat\ServiceContainer\OroTestFrameworkExtension provides integration with Oro BAP based applications.
Selenium2Driver Selenium2Driver provides a bridge for the WebDriver’s wire protocol.
ChromeDriver is an open-source tool for automated testing of web apps across many browsers. It provides capabilities for navigating web pages, user input, JavaScript execution, and more.
Conventions
This section summarizes the limitations and agreements important for shared test maintenance and use.
Use form mapping instead of selectors in your scenarios to keep them clear and understandable for people from technical and non-technical backgrounds.
Do not:
I fill in "oro_workflow_definition_form[label]" with "User Workflow Test"
I fill in "oro_workflow_definition_form[related_entity]" with "User"
Do:
And I fill "Workflow Edit Form" with:
  | Name                  | User Workflow Test |
  | Related Entity        | User               |
 oro_behat_extension:
   elements:
     Workflow Edit Form:
       selector: 'form[name="oro_workflow_definition_form"]'
       class: Oro\Bundle\TestFrameworkBundle\Behat\Element\Form
       options:
         mapping:
           Name: 'oro_workflow_definition_form[label]'
           Related Entity: 'oro_workflow_definition_form[related_entity]'
Use the menu and links to get the right pages instead of the direct page URL
Do:
And I open User Index page
Do not:
And I go to "/users"
Avoid scenario redundancy (e.g., repeating the same sequence of steps, like login, in multiple scenarios).
Cover the feature with sequential scenarios where every following scenario reuses outcomes (the states and data) prepared by their predecessors. This path has the following benefits:
Faster scenario execution due to the shared user session and intelligent data preparation. The login action in the initial scenario opens the session that is reusable in the following scenarios. Preliminary scenarios (e.g., create) prepare data for the following scenarios (e.g., delete).
Feature level isolation boosts execution speed, especially in slow test environments.
Minimized routine development actions (e.g., you do not have to load fixtures for every scenario; instead, you reuse the available outcomes of the previous scenarios).
Easy handling of the application states that are difficult to emulate with data fixtures only (e.g., when adding new entity fields in the UI).
By coupling scenarios, the ease of debugging and bug localization get sacrificed. It is challenging to debug UI features and the scenarios that happen after several preliminary scenarios. The longer the line, the harder it is to isolate the issue. Once the issue occurs, you have to spend additional time localizing it and identifying the root cause (e.g., the delete scenario may malfunction vs. the delete scenario may fail due to the issues in the preliminary scenario, for example, create). The most critical actions/scenarios usually precede the less critical ones.
Use semantic yml fixtures
Use only the entities that are in the bundle you are testing. Include any other entities via import. See Alice fixtures for more information.
Name elements in camelCase style without spaces
You can still refer to it using the camelCase style with spaces in the behat scenarios. For example, you can mention an element called
OroProductFormin the step of the scenario as “Oro Product From”:I fill "Oro Product From" with:
Use Scenario: Feature Background instead of the Background step
Getting Started
Configuration
Application Configuration
Use the default configuration for the application installed in the production mode.
To test emails, install Mailcatcher and set up ORO_MAILER_DSN environment variable:
ORO_MAILER_DSN=smtp://127.0.0.1:1025
Behat framework uses the mailcatcher UI to assert emails. By default, the framework expects the mailcatcher UI at http://127.0.0.1:1080/. To change the URL, provide the ORO_MAILER_WEB_URL environment variable.
Behat Configuration
The base configuration is located in behat.yml.dist. Every application has its own behat.yml.dist file in the root of the application directory. Create your behat.yml (it is ignored by git automatically and is never committed to the remote repository), import the base configuration, and change it to fit your environment:
imports:
    - ./behat.yml.dist

default: &default
    extensions: &default_extensions
        Behat\MinkExtension:
            browser_name: chrome
            base_url: "http://your-domain.local"
Environment Variables
The behat.yml.dist file reads connection settings from environment variables with fallback to container parameters defined in
OroTestFrameworkBundle/Behat/ServiceContainer/config/services.yml. The following variables are available:
ORO_BEHAT_BASE_URLThe base URL of the application under test. Used as the Mink
base_url. Default:http://localhost(parameteroro_test.behat.base_url).ORO_SELENIUM_URLThe WebDriver hub URL used by all browser sessions in the
defaultprofile (Selenium Grid or a standalone Selenium server). Default:http://localhost:4444/wd/hub(parameteroro_test.behat.selenium_url).ORO_CHROMEDRIVER_URLThe ChromeDriver URL used by all browser sessions in the
chromedriverprofile. Default:http://localhost:9515(parameteroro_test.behat.chromedriver_url).
To override a variable for a single run, export it before invoking Behat:
export ORO_BEHAT_BASE_URL=http://myapp.local
export ORO_CHROMEDRIVER_URL=http://localhost:9515
php bin/behat --profile=chromedriver ...
Installation
Install Dev Dependencies
If you installed dependencies with the --no-dev parameter earlier, remove the composer.lock file from the root of the application directory.
Install dev dependencies using the following command:
composer install
Application Initial State
The Oro application’s initial state is when the application enters after installation without demo data. Scenarios that test features should rely on this state and create any data necessary for additional verifications. Data may be created by the scenario steps or as fixtures.
Install the application without demo data in production mode using the following command:
bin/console oro:install  --drop-database --user-name=admin --user-email=admin@example.com  \
  --application-url=http://dev-crm.local --user-firstname=John --user-lastname=Doe \
  --user-password=admin  --organization-name=ORO --env=prod --sample-data=n --timeout=3000
Hint
See the oro:install command reference for more information.
Install Test Automation Tools
Run the WebKit browser to execute scenarios that use Oro application features (using ChromeDriver). To install ChromeDriver, run the following commands:
CHROME_DRIVER_VERSION=142.0.7444.175
mkdir -p "$HOME/chrome" || true
wget "https://storage.googleapis.com/chrome-for-testing-public/${CHROME_DRIVER_VERSION}/linux64/chromedriver-linux64.zip" -O "$HOME/chrome/chromedriver_linux64_${CHROME_DRIVER_VERSION}.zip"
unzip "$HOME/chrome/chromedriver_linux64_${CHROME_DRIVER_VERSION}.zip" -d "$HOME/chrome"
sudo ln -s "$HOME/chrome/chromedriver" /usr/local/bin/chromedriver
Note
These commands create a subdirectory for Chrome in your home directory, download ChromeDriver into the directory you just created, uncompress files, and create a symbolic link.
After the command execution is complete, you can use chromedriver in the terminal.
Test Execution
Prerequisites
Run ChromeDriver:
chromedriver --url-base=wd/hub --port=4444 > /tmp/driver.log 2>&1
To run ChromeDriver in the background, append the ampersand symbol (&) to the end of the line:
chromedriver --url-base=wd/hub --port=4444 > /tmp/driver.log 2>&1 &
Run Tests
Before you begin, familiarize yourself with behat arguments and options. Run php bin/behat --help for a detailed description.
When the Oro application is installed without demo data and is running, and the ChromeDriver is running, you can start running the behat tests by feature from the root of the application. You can use one of the following commands.
Run the feature test scenario:
php bin/behat vendor/oro/platform/src/Oro/Bundle/UserBundle/Tests/Behat/Features/login.feature -vvv
Preview all available feature steps:
php bin/behat -dl -s OroUserBundle
View steps with full description and examples:
php bin/behat -di -s OroUserBundle
Every bundle has its dedicated test suite that can be run separately:
php bin/behat -s OroUserBundle
Running Consumers
To run multiple consumers during behat tests, you can use the --consumers option in php bin/behat, which applies an integer argument, for example:
php bin/behat --consumers=4
By default, when the option is not specified, 2 consumers are run.
If you want to disable the background running of the message viewer, see the information here Disable Message Consumer Background Running.
Architecture
DI Containers
Behat is a Symfony console application with its own container and services. A Behat container may be configured through Extensions using behat.yml in the root of the application directory.
Application container can be used by the injected Kernel in your Context after you implement Oro\Bundle\TestFrameworkBundle\Behat\Context\AppKernelAwareInterface and use Oro\Bundle\TestFrameworkBundle\Behat\Context\AppKernelAwareTrait trait.
use Oro\Bundle\TestFrameworkBundle\Behat\Context\AppKernelAwareInterface;
use Oro\Bundle\TestFrameworkBundle\Behat\Context\AppKernelAwareTrait;
use Oro\Bundle\TestFrameworkBundle\Behat\Context\OroFeatureContext;

class FeatureContext extends OroFeatureContext implements AppKernelAwareInterface
{
    use AppKernelAwareTrait;

    public function useContainer()
    {
        $doctrine = $this->getAppContainer()->get('doctrine');
    }
}
Moreover, you can inject into the behat context dependencies from either behat or application containers by declaring it as a service in services.yml located beside the behat.yml:
oro_behat_extension:
  suites:
    AcmeDemoBundle:
      contexts:
        - Oro\Bundle\ImportExportBundle\Tests\Behat\Context\ImportExportContext
services:
    Oro\Bundle\ImportExportBundle\Tests\Behat\Context\ImportExportContext:
        public: true
        arguments:
            - '@doctrine'
            - '%acme.batch_size%'
Note
Context service must be marked as public.
Using Mocks in Testing
Sometimes tests require mocks to simulate dependencies, such as an external web service or a custom application configuration for a payment method. To configure the application container for such testing, add the Tests/Behat/parameters.yml file in a bundle or modify the config/config_behat_test.yml at the application level.
To run Behat tests that rely on a custom configuration, use the behat_test application environment and tag the tests with @behat-test-env. This ensures that mocks are used for testing purposes only and that the production environment remains unaffected.
Using Different Mocks for Different Behat Tests
When running different Behat tests with different mocks in the behat_test environment, you can conditionally activate specific mocks based on feature tags.
The feature provides two key services:
- Oro\Bundle\TestFrameworkBundle\Behat\BehatFeature — Checks if a Behat feature tag is active
- Oro\Bundle\TestFrameworkBundle\Behat\Factory\FeatureTagAwareFactory — Creates services based on active feature tags
How It Works
When a Behat scenario runs, the following sequence occurs:
The
TagsBasedFeatureToggleContextcaptures all feature tags (via@BeforeFeaturehook) and stores them in cache using theBehatFeatureservice.Services configured with
FeatureTagAwareFactorycheck the cache at runtime.If the specified tag is active, the factory returns the alternative service (for example, a specific mock).
If the tag is not active, the factory returns the default service.
After the feature completes, feature tags are cleared from cache (via
@AfterFeaturehook).
Example Use Case
Consider a payment integration that needs three different mocks of the acme_payment.client service for different Behat features.
Add all mock definitions to your bundle’s
Tests/Behat/parameters.yml:services: # Default mock acme_payment.test.client.default_mock: class: Acme\Bundle\PaymentBundle\Tests\Behat\Mock\PaymentClientMock # Provider-specific mocks acme_payment.test.client.paypal_mock: class: Acme\Bundle\PaymentBundle\Tests\Behat\Mock\PayPalClient acme_payment.test.client.stripe_mock: class: Acme\Bundle\PaymentBundle\Tests\Behat\Mock\StripeClient
Replace the
acme_payment.clientservice with a factory that creates different mocks based on feature tags:services: acme_payment.client: class: Acme\Bundle\PaymentBundle\Client\PaymentClientInterface factory: '@oro_test.behat.feature_tag_aware_factory' arguments: - '@acme_payment.test.client.default_mock' - ['@acme_payment.test.client.paypal_mock', 'use-paypal-mock'] - ['@acme_payment.test.client.stripe_mock', 'use-stripe-mock']
Tag scenarios
This scenario uses
PaymentClientMockbecause no specific tag is set:Feature: Basic payment processing Scenario: Create payment Given I create a payment Then the payment should be successful
Add the
@use-paypal-mocktag to use thePayPalClientmock:@use-paypal-mock Feature: PayPal integration Scenario: Process PayPal payment with specific options Given I configure PayPal merchant account When I process payment through PayPal Then PayPal should return authorization code
Add the
@use-stripe-mocktag to use theStripeClientmock:@use-stripe-mock Feature: Stripe integration Scenario: Process Stripe payment with specific options Given I configure Stripe merchant account When I process payment through Stripe Then Stripe should return authorization code
Autoload Suites
Oro\Bundle\TestFrameworkBundle\Behat\ServiceContainer\OroTestFrameworkExtension is used for building testing suites.
During initialization, the extension creates a test suite with a bundle name if any Tests/Behat/Features directory exists in a bundle.
If the bundle has no Features directory, no test suite would be created for it.
If you need specific feature steps for your bundle, create the Acme\Bundle\DemoBundle\Tests\Behat\Context\FeatureContext class. This context is added to the suite with other common contexts.
The complete list of common context is configured in the behat configuration file under the shared_contexts.
You can manually configure the test suite for a bundle in the application behat configuration:
default: &default
    suites:
        AcmeDemoBundle:
            type: symfony_bundle
            bundle: AcmeDemoBundle
            contexts:
                - Oro\Bundle\TestFrameworkBundle\Tests\Behat\Context\OroMainContext
                - Oro\Bundle\DataGridBundle\Tests\Behat\Context\GridContext
                - Oro\Bundle\DemoBundle\Tests\Behat\Context\FeatureContext
            paths:
                - 'vendor/Acme/Bundle/DemoBundle/Tests/Behat/Features'
or in a bundle behat configuration {BundlePath}/Tests/Behat/behat.yml:
oro_behat_extension:
    suites:
        AcmeDemoBundle:
            contexts:
                - Oro\Bundle\TestFrameworkBundle\Tests\Behat\Context\OroMainContext
                - Oro\Bundle\DataGridBundle\Tests\Behat\Context\GridContext
                - Oro\Bundle\DemoBundle\Tests\Behat\Context\FeatureContext
            paths:
                - '@AcmeDemoBundle/Tests/Behat/Features'
The extension does not autoload manually configured test suits.
Feature Isolation
Every feature can interact with the application and perform some operations. As a result, the application state may be modified. To avoid data collisions and dependencies between features when they run one-by-one, the features are isolated: for example, the database and cache directories are dumped before running the feature tests; they are restored after the feature test execution is complete.
Every isolator must implement the Oro\Bundle\TestFrameworkBundle\Behat\Isolation\IsolatorInterface and oro_behat.isolator tags with priority.
Disable Feature Isolation
You can disable feature isolation by adding the --skip-isolators option to the bin/behat console command. As a result, the Behat no longer takes notice of the database, cache, and other layers’ isolation. This means the application state is not restored to the initial state, and the result is preserved after the test.
Disable Message Consumer Background Running
To simulate production conditions more accurately during testing, you can disable the message consumer background running using the --do-not-run-consumer option in php bin/behat.
Be aware that if you choose to use this option, the consumer will not be launched, and the application will not process any messages from the message queue. This could cause problems if you are testing functionality that relies on the timely processing of messages by the consumer.
Page Object
Elements
Elements is a service layer in behat tests. They wrap the complex business logic. Take a minute to investigate base Mink NodeElement.
It has many public methods; some of them apply only to certain elements. Every Bundle test can contain a particular number of elements.
All elements must be described in {BundlePath}/Tests/Behat/behat.yml the following way:
 oro_behat_extension:
     elements:
         Login:
             selector: '#login-form'
             class: Oro\Bundle\TestFrameworkBundle\Behat\Element\Form
             options:
                 mapping:
                   Username: '_username'
                   Password: '_password'
where:
Loginis an element name that MUST be unique. The element can be created in context byOroElementFactoryby its name:$this->elementFactory->createElement('Login')
selectordefines how the web driver shall find the element on the page. By default, when the selector type is not specified, the css selector is used. XPath selector is also supported and may be provided with the following configuration:selector: type: xpath locator: //span[id='mySpan']/ancestor::form/
The
classnamespace for element’s class (should be extended fromOro\Bundle\TestFrameworkBundle\Behat\Element\Element). When omitted, theOro\Bundle\TestFrameworkBundle\Behat\Element\Elementclass is used by default.optionsis an array of additional options stored in theoptionsproperty of the Element class. It is highly recommended to supply a class with options mapping for the form elements, as this increases test speed and ensures more accurate field mapping.
Mapping Form Fields
By default, tests use the named field selector to map form fields. Name field selector searched for the field by its id, name, label, or placeholder. You are free to use any selector for form fields mapping or wrap an element into the particular behat element.
oro_behat_extension:
    elements:
        Payment Method Config Type Field:
            class: Oro\Bundle\PaymentBundle\Tests\Behat\Element\PaymentMethodConfigType
        Payment Rule Form:
            selector: "form[id^='oro_payment_methods_configs_rule']"
            class: Oro\Bundle\TestFrameworkBundle\Behat\Element\Form
            options:
                mapping:
                    Method:
                        type: 'xpath'
                        locator: '//div[@id[starts-with(.,"uniform-oro_payment_methods_configs_rule_method")]]'
                        element: Payment Method Config Type Field
Now you should implement the element’s setValue method:
namespace Oro\Bundle\PaymentBundle\Tests\Behat\Element;

use Oro\Bundle\TestFrameworkBundle\Behat\Element\Element;

class PaymentMethodConfigType extends Element
{
    #[\Override]
    public function setValue($value)
    {
        $values = is_array($value) ? $value : [$value];
        foreach ($values as $item) {
            $parentField = $this->getParent()->getParent()->getParent()->getParent();
            $field = $parentField->find('css', 'select');
            self::assertNotNull($field, 'Select payment method field not found');
            $field->setValue($item);
            $parentField->clickLink('Add');
            $this->getDriver()->waitForAjax();
        }
    }
}
Now you can use it in a standard step:
Feature: Payment Rules CRUD
  Scenario: Creating Payment Rule
    Given I login as administrator
    And I go to System/ Payment Rules
    And I click "Create Payment Rule"
    When I fill "Payment Rule Form" with:
      | Method | PayPal |
Embedded Form Mappings
Sometimes, a form appears in the iframe. Behat can switch to the iframe by its id. To fill in the form in the iframe correctly, specify the iframe id in the form options:
oro_behat_extension:
    elements:
        CustomContactUsForm:
            selector: 'div#page'
            class: Oro\Bundle\TestFrameworkBundle\Behat\Element\Form
            options:
                embedded-id: embedded-form
                mapping:
                    First name: 'custom_bundle_contactus_contact_request[firstName]'
                    Last name: 'custom_bundle_contactus_contact_request[lastName]'
Page Element
The page element encapsulates the entire web page with its URL and path to the page. Every Page element should extend from Oro\Bundle\TestFrameworkBundle\Behat\Element\Page.
Typical Page configuration:
oro_behat_extension:
    pages:
        UserProfileView:
          class: Oro\Bundle\UserBundle\Tests\Behat\Page\UserProfileView
          route: 'oro_user_profile_view'
Sample Page class:
namespace Oro\Bundle\UserBundle\Tests\Behat\Page;

use Oro\Bundle\TestFrameworkBundle\Behat\Element\Page;

class UserProfileView extends Page
{
    #[\Override]
    public function open(array $parameters = [])
    {
        $userMenu = $this->elementFactory->createElement('UserMenu');
        $userMenu->find('css', '[data-toggle="dropdown"]')->click();

        $userMenu->clickLink('My User');
    }
}
Now you can use several meaningful steps:
And I open User Profile View page
And I should be on User Profile View page
Fixtures
Feature Fixtures
Whenever behat runs a new feature, the application state is reset to default (see Feature isolation for more information): there is only one admin user, one organization, one business unit, and default roles in the database.
The feature tests must rely on data available in the application after the oro:install command execution. In most cases, this is not enough.
You have two ways to get more data in the system: inline or alice fixtures.
Inline Fixtures
You can create any number of entities in the feature tests. The FixtureContext guesses the entity class, creates the necessary number of objects, and uses faker to fill in the required fields when their value was not specified explicitly.
You use both faker and entity references in inline fixtures.
Given the following contacts:
  | First Name | Last Name | Email     |
  | Joan       | Anderson  | <email()> |
  | Craig      | Bishop    | <email()> |
  | Jean       | Castillo  | <email()> |
  | Willie     | Chavez    | <email()> |
  | Arthur     | Fisher    | <email()> |
  | Wanda      | Ford      | <email()> |
And I have 5 Cases
And there are 5 calls
And there are two users with their own 7 Accounts
And there are 3 users with their own 3 Tasks
And there is user with its own Account
Alice Fixtures
Sometimes you need many different entities with complex relationships. In such cases, you can use alice fixtures. Alice is a library that allows you to easily create fixtures in the yml format.
Hint
See Alice documentation for more information.
Fixtures should be located in the {BundlePath}/Tests/Behat/Features/Fixtures directory. To load a fixture before the feature tests execution, add a tag (annotation) that is constructed using the following convention @fixture-BundleName:fixture_file_name.yml, e.g.:
@fixture-OroCRMBundle:mass_action.yml
Feature: Mass Delete records
It is also possible to load fixtures for any other bundles available for application.
For example:
@fixture-OroUserBundle:user.yml
@fixture-OroOrganizationBundle:BusinessUnit.yml
Feature: Adding attributes for workflow transition
In case if specific security context is required for fixture, it can be set up with additional options passed with the fixture’s tag in a query, like parameters style.
Available options are user and user_reference. user option accepts username and user_reference one
accepts user’s reference created in previously run fixtures.
For example:
@fixture-OroSecurityTestBundle:platform/user.yml
@fixture-OroSecurityTestBundle:commerce/shopping-list.yml?user_reference=xss_user
@fixture-OroSecurityTestBundle:commerce/saved-search.yml?user=admin
Feature: Store front saved search MUST NOT contain XSS vulnerabilities
Additionally, Alice allows you to include files via extension, so you can import files from other bundles:
include:
    - '@OroCustomerBundle/Tests/Behat/Features/Fixtures/CustomerUserAmandaRCole.yml'
You should always include fixtures from other bundles with entities that were declared within that bundle see Conventions.
Entity References
You can use references to the entities in both inline and alice fixtures.
{BundlePath}\Tests\Behat\ReferenceRepositoryInitializer is used to create references for objects that already exist in the database.
It is prohibited to modify or add new entities within Initializer.
It should implement
ReferenceRepositoryInitializerInterface.It should be registered as the Behat container service in the
{BundlePath}/Tests/Behat/services.ymlfile with theoro_behat.reference_repository_initializertag.To show all references, use the
php bin/behat --available-referencescommand.
The most commonly used references:
@admin— Admin user@adminRole— Administrator role@organization— Default organization@business_unit— Default business unit
Health Checkers
Behat has a native possibility to invoke formatters without executing the tests and hooks.
You can try:
php bin/behat --dry-run
This can be useful in case you are unsure that you have declared all the necessary context for your feature. OroBehatExtension enhances this feature and adds extra functionality.
FixturesChecker
Each feature can have alice fixtures, added by tags. FixturesChecker will check every feature for the ability to load fixtures without actually loading the fixture.
Write a Feature
Every bundle should contain its own behat tests for features in the {BundlePath}/Tests/Behat/Features/ directory.
Every feature is a separate file with the .feature extension and a specific syntax.
Hint
See more at Cucumber doc reference.
A feature starts with the following:
The
Feature:keyword and the feature name (these should stay on the same line),An optional description (can be formatted as multiple lines). A meaningful description is highly recommended.
Next goes the feature scenario - a specific example that illustrates a business rule and consists of sequential steps. In addition to being a test specification and test documentation, a scenario defines the test steps and serves as an executable specification of the system.
Normally, a step starts with Given, When, or Then.
If there are multiple Given or When steps underneath each other, you can use And or But to organize them into logical groups. Cucumber does not differentiate between the keywords, but choosing the right one is essential for the readability of the scenario as a whole.
Hint
Take a look at the login.feature in OroUserBundle: UserBundle/Tests/Behat/Features/login.feature.
Feature: User login
  In order to login in application
  As an OroCRM admin
  I need to be able to authenticate

Scenario: Success login
  Given I am on "/user/login"
  When I fill "Login Form" with:
      | Username | admin |
      | Password | admin |
  And I press "Log in"
  Then I should be on "/"

Scenario Outline: Fail login
  Given I am on "/user/login"
  When I fill "Login Form" with:
      | Username | <login>    |
      | Password | <password> |
  And I press "Log in"
  Then I should be on "/user/login"
  And I should see "Invalid username or password."

  Examples:
  | login | password |
  | user  | pass     |
  | user2 | pass2    |
The line
Feature: User loginstarts the feature and gives it a title.Behat does not parse the following three lines of text: In order to… As an… I need to… These lines provide a human-readable context to the people who will review or modify this feature. They describe the business value derived from the inclusion of the feature into the software.
The line
Scenario: Success loginstarts the scenario and provides a description for it.The next six lines are the scenario steps. Every step is matched to a regular expression defined in the Context.
The line
Scenario Outline: Fail loginstarts the following scenario. In the scenario outline, the placeholders are used instead of the actual values, and the values for scenario execution are provided as examples below the outline. Scenario Outlines help you run these steps several times, iterating through the values provided in theExamples:section and thus testing the same flow with different inputs. The Scenario Outline is a template that is never run on its own. Instead, a Scenario that follows an outline runs once for each row in the Examples section beneath it (except for the first header row that is skipped). Think of a placeholder as a variable. It is replaced with a real value from theExamples:table row, where the text between the placeholder angle brackets (e.g., <login>) matches the text of the table column header (e.g., login).
Troubleshooting
Increase application performance (Ubuntu)
Behat has isolators to make behat features independent of each other. One of those isolators is the database. It creates a database dump before the execution start, then drops it and restores it from the dump after each feature. This can take a while (up to 2 minutes on slow SSD). If you run behat tests often, you would like to decrease this time. You can mount the database directory to RAM to boost the database isolator. In the illustration below, we use tmpfs:
Create a tmpfs directory:
sudo mkdir /var/tmpfs
sudo mount -t tmpfs -o size=4G tmpfs /var/tmpfs
Edit /etc/postgresql/{version}/main/postgresql.conf
data_directory = /var/tmpfs/postgresql/{version}/main
Add new storage to /etc/fstab:
tmpfs /var/tmpfs tmpfs nodev,nosuid,noexec,noatime,size=4G 0 0
Copy PostgreSQL to tmpfs:
sudo service postgresql stop
sudo cp -Rfp /var/lib/postgresql /var/tmpfs
We need to tell AppArmor to let PostgreSQL write to the new directory by creating an alias between the default directory and the new location.
echo "alias /var/lib/postgresql/ -> /var/tmpfs/postgresql," | sudo tee -a /etc/apparmor.d/tunables/alias
For the changes to take effect, restart AppArmor:
sudo systemctl restart apparmor
Now you can start PostgreSQL again:
sudo service postgresql start
(optional) Create Startup Script
After you restart the computer, all the data and the database structure get lost. Therefore, you should copy the data directory manually after every restart. Alternatively, you can create a startup script that may be launched automatically as a systemd service.
To prepare for auto-recovery using a startup script:
Create a postgresql_copy_tmpfs.sh in the bin directory (e.g., /usr/local/bin):
#!/bin/bash
cp -Rfp /var/lib/postgresql /var/tmpfs
Create a unit configuration file /etc/systemd/system/postgresql_copy_tmpfs.service that will schedule priority of the service execution before the PostgreSQL starts:
[Unit]
Description=Copy postgresql to tmpfs
Before=postgresql.service
After=mount.target

[Service]
User=postgresql
Type=oneshot
ExecStart=/bash/script/path/postgresql_copy_tmpfs.sh

  [Install]
  WantedBy=multi-user.target
Once you have created the files, enable the configured service:
systemctl enable postgresql_copy_tmpfs.service
It starts automatically after rebooting the machine.
Couldn’t generate random unique value for Oro\Bundle\UserBundle\Entity\User: username in 128 tries
A hot fix:
Check your fixture. Remove (unique) suffix in entity property in entity fixture, like in the following example:
Incorrect fixture:
Oro\Bundle\UserBundle\Entity\User:
    charlie:
        firstName: Marge
        lastName: Marge Simpson
        username (unique): marge228
Corrected fixture:
Oro\Bundle\UserBundle\Entity\User:
    charlie:
        firstName: Marge
        lastName: Marge Simpson
        username: marge228
Route cause
Alice remembers all the values for the given entity property and tries to generate a unique value, which causes issues when there is just one value for the entity property.
This option still may be used if combined with the autogenerated fake value, like in the following example:
Oro\Bundle\UserBundle\Entity\User:
    charlie:
        firstName (unique): <firstName()>
        lastName: Marge Simpson
        username: marge228
Append snippets
The feature development consists of the following design stages:
Create a feature draft: implement a high-level scenario covering the story. At this stage, you should have a clear understanding of the business outcome that is achieved by the feature test automation.
Specify all the scenarios that may happen when using the feature. The exact steps are not necessary.
Finalize the big picture of the implementation and plan the individual steps.
Some of the steps may already be fully automated. Ideally, you should automate the missing steps after you plan to use them in your feature test scenarios. If the feature functionality is already implemented, it is necessary to implement the behat steps involved in the feature testing.
However, sometimes it is impossible to do right away (because of the incomplete feature implementation, blocking issues, or missing information). In this case, you can temporarily mock the steps that are missing implementation.
A quick way to do so is to dry-run your feature tests. In the console, run the following command:
php bin/behat path/to/your.feature --dry-run --append-snippets --snippets-type=regex
The feature is executed in the –dry-run mode, and at the final stage of execution, you are prompted to add undefined steps mock implementation to one of the existing contexts.
How to find the necessary step
When you design test automation scenarios for the new feature, you may have trouble finding steps to reuse from the hundreds of already automated steps. Use the tips below to find the necessary step.
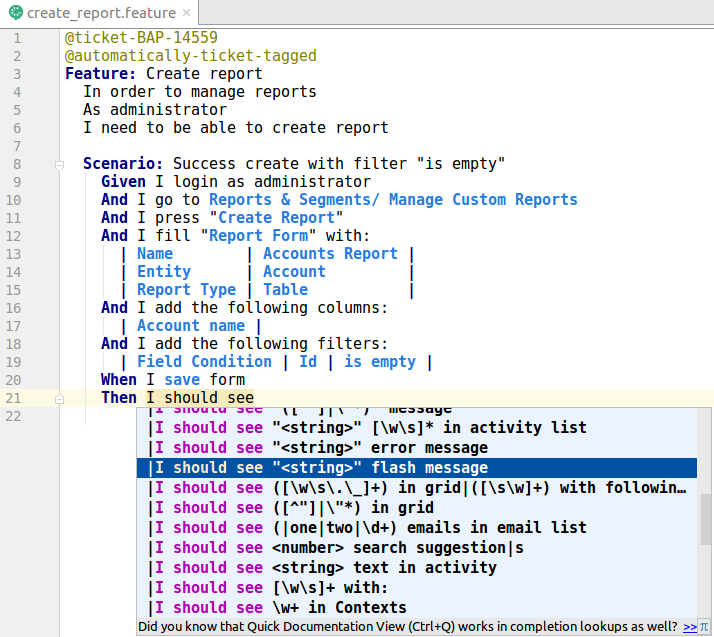
Auto Suggestion in PhpStorm
While designing a scenario in the feature file, PhpStorm offers hints on the implemented steps matching the keywords. E.g., when you type grid or form, the steps that involve these items pop up in the suggestions block.
If PhpStorm does not offer you any hints as you type, please, verify the following:
You have installed vendors for at least one application
You have installed behat plugin for PhpStorm
Find the Necessary Context
Every Context class should implement the Behat\Behat\Context\Context interface. Get the list of implemented contexts and find the necessary one by name.
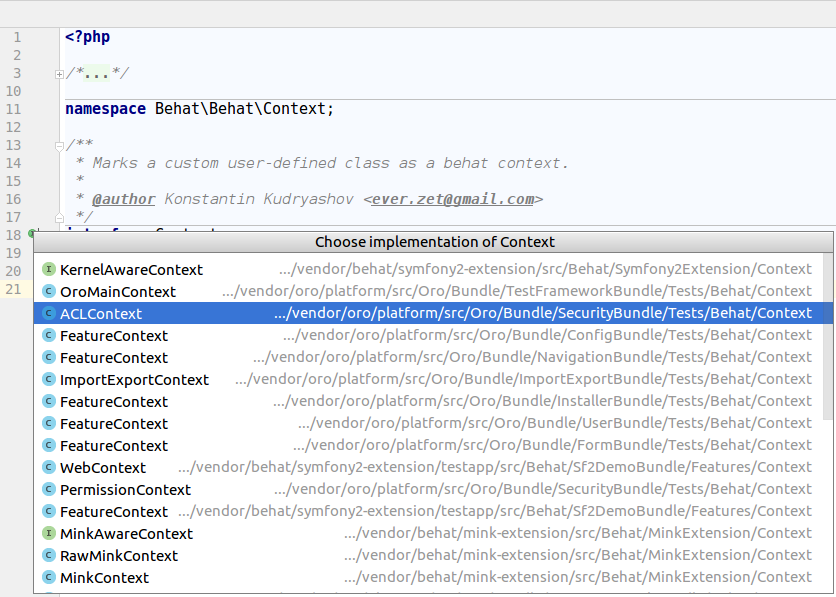

Usually, the name of context is self-explanatory, e.g., GridContext, FormContext, ACLContext, etc.
Use Grep in Console
If you do not use PhpStorm or behat plugin for any reason, you can still find the necessary step by filtering the output of the command that previews all the feature steps (use Grep).
Type the following command in your console:
php bin/behat -dl -s AcmeDemoBundle | grep "flash message"
$ php bin/behat -dl -s OroUserBundle | grep "flash message"
OroUserBundle | Then /^(?:|I )follow "(?P<title>[^"]+)" link within flash message "(?P<message>([^"\\]|\\.)*)"$/
OroUserBundle | Then /^(?:|I )should see "(?P<title>[^"]+)" flash message$/
OroUserBundle | Then /^(?:|I )should see '(?P<title>[^']+)' flash message$/
OroUserBundle | Then /^(?:|I )should not see "(?P<title>[^"]+)" flash message$/
OroUserBundle | Then /^(?:|I )should not see '(?P<title>[^']+)' flash message$/
OroUserBundle | Then /^(?:|I )should see "(?P<title>[^"]+)" flash message and I close it$/
OroUserBundle | Then /^(?:|I )should see '(?P<title>[^']+)' flash message and I close it$/
OroUserBundle | Then /^(?:|I )close all flash messages$/
OroUserBundle | Then I should not see flash messages
OroUserBundle | Then /^(?:|I )should see only following flash messages:$/
OroUserBundle | Then /^(?:|I )should see following flash messages:$/
OroUserBundle | Then /^(?:|I )should see (Schema updated) flash message$/
php bin/behat -dl -s AcmeDemoBundle | grep "grid"
$ php bin/behat -dl -s OroUserBundle | grep "grid"
OroUserBundle | Then /^I see that grid has scrollable header$/
OroUserBundle | Then /^I see that grid header is sticky$/
OroUserBundle | When /^I do not select any record from "(?P<gridName>[^"]+)"$/
OroUserBundle | Then I edit first record from grid:
OroUserBundle | Then /^(?:|I )should see following grid:$/
OroUserBundle | Then /^(?:|I )should see following "(?P<gridName>[^"]+)" grid:$/
OroUserBundle | Then /^(?:|I )should see following grid containing rows:$/
OroUserBundle | Then /^(?:|I )should see following "(?P<gridName>[^"]+)" grid containing rows:$/
OroUserBundle | Then /^(?:|I )should see following grid with exact columns order:$/
OroUserBundle | Then /^(?:|I )should see following "(?P<gridName>[^"]+)" grid with exact columns order:$/
OroUserBundle | Then /^It should be (?P<count>.+) columns in grid$/
You can use the behat command-line interface only after you install the application.
Business Tip
Digital technologies assist manufacturing companies in remaining competitive. Learn how eCommerce and digital transformation in manufacturing can help your business grow.