Basic Workflow Configuration
To configure a custom workflow, create the workflows.yml file with the configuration and save it into the /Resources/config/oro directory of your bundle.
Hint
You can simplify workflow creation by cloning the existing workflow. See Clone a workflow.
For each entity, you can configure as many workflows as required.
Note
Pay attention to the business logic. When you create workflows that can be mutually exclusive, make sure that there is no possibility that they may be activated simultaneously.
Translations
To correctly display the user interface text for a workflow (button labels, page names, etc.), specify translations for it.
Create translation files as:
src/Acme/Bundle/DemoBundle/Resources/translations/workflows.{lang_code}.yml,
where {lang_code} is a two-letter language code, e.g., workflows.en.yml.
Create one such file for each language you use.
Tip
To simplify creation of the translation file, you can first create a workflow configuration, and then dump all related translation keys to the workflows.{lang_code}.yml. For example, if you create workflow ‘my_workflow’:
bin/console oro:workflow:translations:dump my_workflow –locale=en > src/Acme/Bundle/DemoBundle/Resources/translations/workflows.en.yml
For more information, see Workflow Translation Wizard.
Add a Workflow
In the workflows.yml, use the workflows key to specify that you are going to add workflows.
The value of the workflows key is the array of workflows.
To define a new workflow, add its name to the array.
workflows:
    phone_call:   # This is the workflow name.
For each workflow key, the corresponding value is the array of the workflow settings. The basic settings include the definitions of:
An entity that the workflow is applicable to.
The initial step that is attained upon initializing the workflow.
The following example configures the Phone Call workflow, which defines the process of making a call to a customer:
workflows:
    phone_call:
        entity: Acme\Bundle\DemoBundle\Entity\PhoneCall    # This is the entity that the workflow is applicable to.
        start_step: start_call                             # This is the initial step that is attained upon initializing of the workflow.
        defaults:
            active: true
        priority: 10
Translations
Define the user-interface workflow name:
Translation Key |
Description |
|---|---|
oro.workflows.{workflow_name}.label |
The workflow name. |
Clone a Workflow
Avoid modifying a system workflow. Instead, clone it and modify the clone. To clone a workflow, dump its configuration and translation files, adjust them, and load them into the system:
Dump the workflow configuration.
For example, you want to dump a configuration of the Alternative Checkout workflow to your DemoBundle:
php bin/console oro:debug:workflow:definitions b2b_flow_alternative_checkout > /home/oro/commerce-application/src/Acme/Bundle/DemoBundle/Resources/config/oro/workflows.yml
where /Acme/Bundle/DemoBundle is the path to the bundle you want to create a workflow for. The
oro:debug:workflow:definitionscommand displays the current workflow definitions registered in the application.The copy of the initial file will be created in the destination directory.
Dump the workflow translations. Translations contain labels for workflow steps, transitions, and so on, so you must clone them too.
php bin/console oro:workflow:translations:dump b2b_flow_alternative_checkout --locale=en > /home/oro/commerce-application/src/Acme/Bundle/DemoBundle/Resources/translations/workflows.en.yml
The copy of the initial file will be created in the destination directory.
Open copied files with workflow configuration and translations. Change the workflow name in both files. If required, adjust other settings.
Important
You need to change the workflow name to avoid conflicts with the existing workflow: workflows must have unique names in the system.
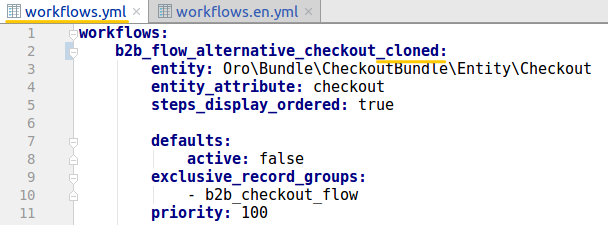
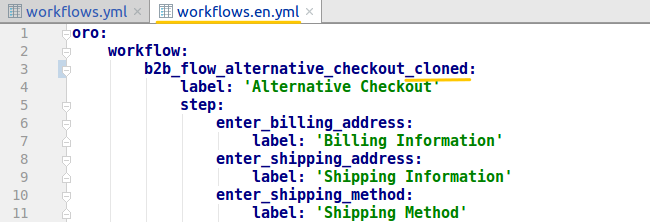
Remove section
init_routesfrom the cloned workflow configuration: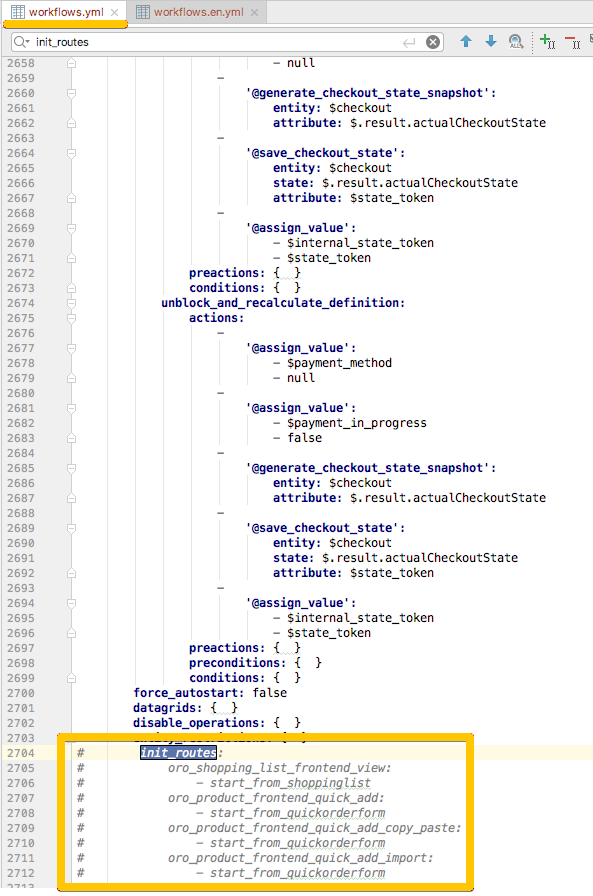
Load your cloned and adjusted workflow translations to the database:
php bin/console oro:translation:load
Load your cloned and adjusted workflow configuration:
php bin/console oro:workflow:definitions:load
Toggle Workflow Enable/Disable
By default, all new workflows are created in an inactive state, so no steps and transitions appear on an entity view page. Multiple workflows for each entity can be active at the same time. You can activate a workflow in several ways.
User Interface
You can activate a workflow through the UI in the workflow datagrid, available in the back-office main menu under System > Workflows. Activate each workflow using the row actions Activate and Deactivate, or from the workflow view page using the appropriate buttons.
Configuration
A developer can set the active sub-node of the defaults node in the workflow’s YAML config. Use this approach when you need to automatically activate a workflow on application installation. For example:
workflows:
    b2b_flow_sales:
        defaults:
            active: true #workflow will be automatically activated during installation
        entity: Oro\Bundle\SalesBundle\Entity\Opportunity
        entity_attribute: opportunity
Manipulation with workflow entity
REST API
WorkflowBundle provides a REST API to activate or deactivate a workflow.
Activation URL attributes:
route: oro_api_workflow_activate
parameter: workflowDefinition - the name of the appropriate workflow
Deactivation URL attributes:
route: oro_api_workflow_deactivate
parameter: workflowDefinition - the name of the appropriate workflow
Workflow Manager
WorkflowBundle has a WorkflowManager service (oro_workflow.manager) with methods to activate and deactivate workflows:
activateWorkflow(workflowIdentifier) — activate workflow by workflow name, Workflow instance, WorkflowItem instance or WorkflowDefinition instance;
deactivateWorkflow(workflowIdentifier) — deactivate workflow by workflow name, Workflow instance (same as above).
Mutually Exclusive Workflows
An application can be configured with several workflows that are mutually exclusive on different levels. For example, the standard workflow in the default package might not cover the business logic a client needs. You can then implement another workflow for the same related entity, so the two workflows conflict by data or logic operations. For such cases, developers can configure their workflows in a mutually exclusive manner. There are two levels of exclusiveness: activation level and record level.
Activation level exclusiveness - exclusive_active_groups
If your custom workflow replaces existing workflows, you can secure your customization by ensuring that only one of them is active in the system at a time.
To do this, define a common exclusive activation group for both workflows in the workflow configuration node called exclusive_active_groups.
For example, consider the basic_sales_flow and my_shop_sales_flow workflows, assuming they both use the same related entity (e.g., Order) and my_shop_sales_flow completely replaces the other. Here, the task is to prevent administrators from enabling both at the same time. To do this, give both workflows a common group named ‘sales’ under the exclusive_active_groups node. Now, when an administrator attempts to activate one of them, the system runs an additional check for group conflicts and warns if the other workflow in the ‘sales’ group is already active. This ensures that the two workflows are never active simultaneously.
Record level exclusiveness - exclusive_record_groups
The other level of exclusiveness is the record level. It lets several workflows be active at the same time, with one limitation: only one workflow can be started for a related entity within the same exclusive record group. So, if you have workflows that offer different ways to reach the goal of a common business process around the same entity (but not both at once), configure them with the same group in exclusive_record_groups in their configurations.
When no workflows are running for an entity in the same exclusive record group, you can launch starting transitions from any of them. But once one of these workflows has started, you cannot perform any actions from the other workflow or start it. This is the business process outcome that the exclusive_record_group in workflows configuration provides.
Priority Case
Suppose you have two workflows that are exclusive at the record level, and both have automated start transitions (for example, they perform the start transition automatically when a new instance of their common related entity is created). In this case, configure the priority flag in the workflow configurations. When a new record of the related entity is created, the workflows are processed by that priority flag, and the second workflow from the same exclusive record group does not perform its start transition if another workflow record from the same exclusive group is already present.
For example, take first_workflow and second_workflow. To process second_workflow before first_workflow, set its priority higher than the other one. Then, when a new SomeEntity entity is persisted, the system performs the second_workflow start transition first. Additionally, if the dominant workflow’s start transition does not meet its conditions to start, the second workflow still has a chance to start its flow.
Initial Transitions
To start a workflow from an unrelated entity, use initial transitions. This special type of transition configuration uses a transition as the initiative (as the name suggests) for creating a new workflow instance (workflow item). Unlike start transitions, an init transition can be invoked from almost any part of an application, with only an indirect relation to the main workflow entity or none at all (as long as you can fill in all the necessary data of the main entity).
The distinctive configuration features of init transitions are the special nodes init_entities, init_routes, and init_datagrids in the transition configuration, together with is_start: true.
For more details see configuration reference section.
Disable Operations
Some workflows expand an existing configuration and replace the old (primitive) behavior. Oro-based applications usually manage simple custom behavior through operations. When you create a more advanced way to manage the business logic through a specific workflow configuration, you might need to disable those operations. Use the disable_operations configuration node:
workflows:
    WORKFLOW_NAME:
        disable_operations:
            operation_one:      #disable operation for custom entities (match by context)
                - EntityClass1
                - EntityClass2
                - EntityClass3
            operation_two: ~    #disable operation for any occurrences
Note
See Work with Operations for more details.
Filter by Scopes
If a scope configuration is provided for a workflow, the Oro application filters all available workflows by the scopes defined for the workflow_definition scope type and uses only the selected ones.
Example of scope configuration:
workflows:
    WORKFLOW_NAME:
        scopes:
            -
                scopeField1: 2
            -
                scopeField1: 42
                scopeField2: 3
                scopeField3: 77
Note
The scopeField1, scopeField2, and scopeField3 are scope criteria that are delivered by scope providers. Scope provider should be registered in the Oro application for the workflow_definition scope type.