Important
You are browsing the documentation for version 4.1 of OroCommerce, OroCRM and OroPlatform, which is no longer maintained. Read the latest LTS version of the Oro documentation to get up-to-date information.
See our Release Process documentation for more information on the currently supported and upcoming releases.
Payment Configuration Concept Guide
In B2B, sellers must take personalization to the next level, as each buyer represents a larger piece of the revenue pie. It is unusual for business buyers to pay for their purchases instantly. Each buyer has specific payment requirements and negotiated prices. Their internal operations may require different net terms or the use of specific payment solutions for internal policy or security reasons. That is why OroCommerce enables you to integrate and configure a variety of payment methods and, depending on the method, either process payment immediately, or delay it for a pre-configured period of time or until a particular event (for example, until an order is ready for delivery).
The payment options available to buyers when they are creating orders in the OroCommerce storefront depend on the payment address collected at the checkout. Once an address is provided, OroCommerce evaluates payment methods against the special payment rules and exposes only the options recommended for the particular location and/or based on other order details. After the customer user has selected the payment method, they are prompted to enter payment details and proceed to the checkout. After the payment details are provided, the salesperson can view the payment history, and capture the delayed payment.
To enable the buyer to have one or several payment options in the storefront, you need to set up payment integrations and link them to payment rules in the OroCommerce back-office.
Note
See a short demo on how to set up payment method integrations or keep reading the step-by-step guidance below.
Payment Integration
In OroCommerce, payment methods are conditions required for a sale to be completed. These can include cash in advance, money orders, authorized payment apps like PayPal, and more. To bind any payment method to the checkout process, you need to set up an integration with a payment service that you select.
OroCommerce works with the following payment methods out-of-the-box:
-
A money order is an alternative to cash or personal checks. It is a prepaid piece of paper that you get in exchange for cash. This integration does not require registration with third-party services.
-
Payment term is a set of conditions required for the sale to be completed, e.g. the period that is allowed to a buyer to pay off the amount due. Payment terms may also include cash in advance requirement, cash collection on delivery, a deferred payment period of 10/20/30 days, etc. Payment terms are configured per customer to help them use the payment conditions guaranteed by their contract with your company. This integration does not require registration with third-party services.
-
PayPal is a global online payment system. OroCommerce supports integration with PayPal services to offer the following payment methods: PayPal Payflow Gateway, PayPal Payments Pro, and PayPal Express Package. However, the list of available payment methods in OroCommerce may also vary when integrated using PayPal accounts created in different countries. This integration requires registration with a business account with Paypal, a Paypal Payflow Gateaway account, and a PayPal Manager/Merchant account to accept payments.
-
Authorize.Net is a global payment gateway for businesses based in the United States, Canada, United Kingdom, Europe, and Australia. Integration of OroCommerce with Authorize.Net enables you to accept credit and debit cards on your OroCommerce website. This integration requires registration with the Authorize.Net service.
-
InfinitePay is a financial management company that provides guaranteed delayed payments on open account terms. Integration of OroCommerce with InfinitePay enables you to secure your company from financial risks related to delayed payments. This integration requires registration with the InfinitePay service, and obtaining the required credentials for the integration with OroCommerce from their support team.
-
Apruve is a B2B credit management service that provides a credit line for your buyers. This integration requires registration with the Apruve service, and obtaining the required credentials for the integration with OroCommerce from the Apruve support team.
-
Ingenico ePayments’ global payment platform extension for OroCommerce enables sellers to improve their payments experience by accepting online payments from customers in the OroCommerce storefront and manage all transactions in the OroCommerce back office.
-
CyberSource is a payment gateway solution that allows merchants to safely accept and effectively process payments.
Hint
Check out OroCommerce's Extension Marketplace to download other payment extensions that you can pair with your OroCommerce applications.
Payment Rules
In OroCommerce, payment rules are used to determine and display payment options for a buyer. You can configure one or more payment rules that enable the payment methods for the provided websites, destinations, or qualify a payment rule related to a customer or product attribute using expression conditions. For example, you can create an expression to show a certain payment method only to the customers with billing address in US and for orders over $1000. Payment rules examine a customer’s address against the pre-defined rules and the sort order to display only those payment options that are relevant to a specific customer.
When OroCommerce reaches the payment rule with enabled Stop Further Rule Processing flag, the remaining rules are not taken into account, and their payment methods are not displayed as the payment options at the checkout. This is helpful when you need to enforce the recommended payment method for any location or applicable conditions.
When the payment option is enabled by multiple payment rules, only the first occurrence is displayed to the customer user—the one from the payment rule with the lower sort order value (higher priority). The payment methods from the same service provider can be enabled in different payment rules.
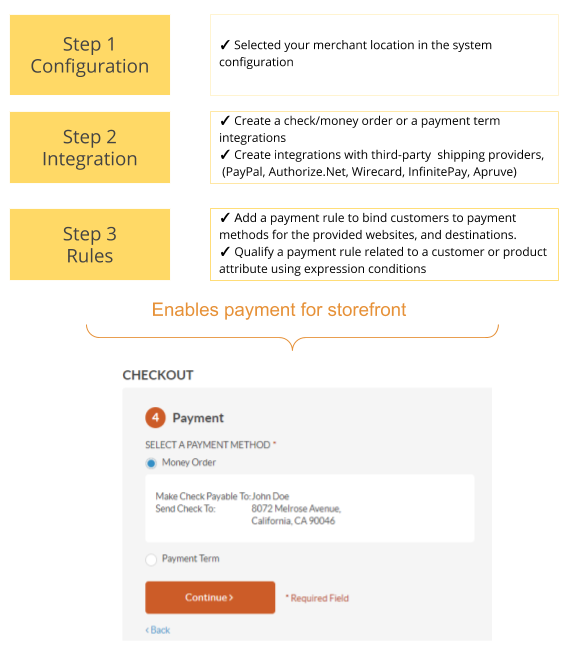
Configuration Sequence
-
Before proceeding to setting up a payment integration, make sure that you have selected your merchant location. A merchant location is a system-wide setting that applies to all websites.
-
To bind any payment method to the checkout process, first set up an integration with a payment service.
-
Once the integration is set up and a payment method is added, you need to add a payment rule to make this payment option visible to the buyer in the storefront. When this is done, the buyer in the storefront can proceed through the checkout.
Related Topics