
Important
You are browsing the documentation for version 1.6 of OroCommerce, OroCRM and OroPlatform, which is no longer maintained. Read the latest LTS version of the Oro documentation to get up-to-date information.
See our Release Process documentation for more information on the currently supported and upcoming releases.
Add a Calendar Event
You can add calendar events from the following pages in your Oro application:
From the Page of All Events
To add a calendar event when viewing a list of events:
Navigate to Activities > Calendar Events in the main menu.
On the page that opens, click Create Calendar Event on the top right.
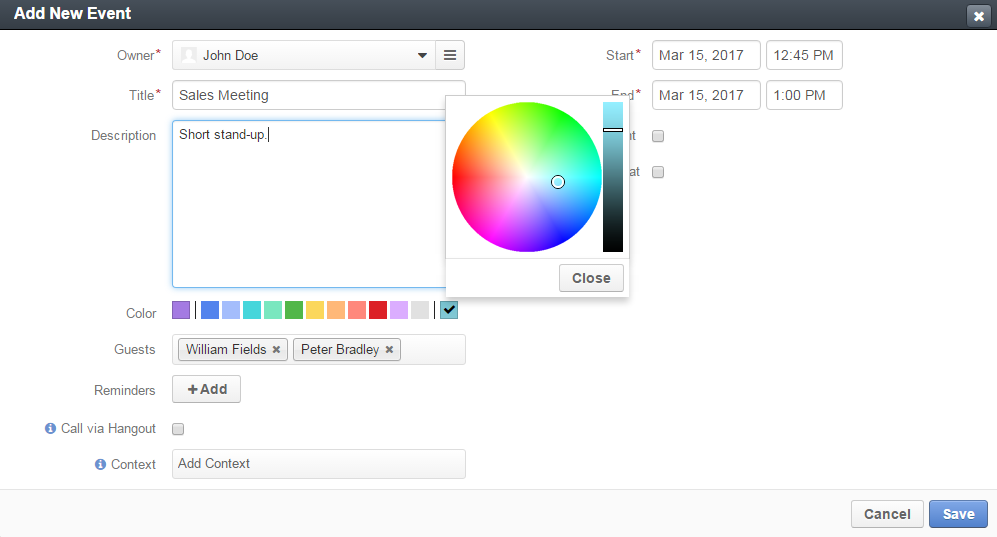
On the Create Calendar Event page, provide the following information:
Owner — A user who is eligible to manage this event and who is responsible for it. The event appears in the calendar of the owner. By default, a person who is creating an event is selected as its owner. To change the owner, select another user from the list.
Title — A name for your calendar event.
Description — Any details regarding the event: summary, agenda, etc. Use the embedded editor to format text, add images, links, etc.
Important
Whether the embedded editor is available, is specified in the configuration. If you have access to the My Configuration page, see the WYSIWYG settings section of the Display Settings description.
- If you do not have access to the page, contact your administrator who can enable the editor at the organization level.
- If you are an administrator, see the WYSIWYG settings section of the System Display Settings description.
Color — Select the color to label the event with. The first item is the calendar color and it is selected by default. Click a different color to change the setting. To customize the color using a color picker, click the last color in the line (initially it is blank).
Important
The list of available colors is specified in the system configuration. Please contact your administrator if you want to change it. If you are an administrator, see the Calendar settings section of the Display Settings description.
Add to … or Calendar — You will see one of these additional settings if any system calendars are defined in the system:
- The Add to … option appears when only a single system calendar exists. When enabled, the event is added to the system calendar.
- The Calendar list appears when several system calendars exist. Select the calendar from the list to move the event to it.
Guests — People invited to the event inside and outside your company. Click the field to add Oro user to the event. To add a person outside your company as a guest, type their email address in the field. The number of guests is not limited. The event appears in the calendar of every invited Oro users. To cancel the invitation, click the x icon next to the guest name.
Reminders — A notification about the upcoming event. Click +Add to configure when and how OroCommerce and OroCRM remind the participants about the event:
- Specify the type of the notification: whether to show a flash message in Oro application or send the notification email.
- Select the time units in which the time lag between a reminder and the event is measured: minutes, hours, days, or weeks.
- Enter what number of selected time intervals the time lag between a reminder and the event comprises.
To remove a reminder, click the x icon next to it.
Important
Reminders are disabled for recurring events.
Note
In Oro applications, an event start time is displayed adjusted according to the recipient’s timezone settings both in notification emails and flash messages. (That is, if the event is set to start at 7 a.m. in the organizational calendar that is run according to the New York time, the start time displayed in the reminder to the user in Tokio will be 8 p.m.)
Call via Hangout — Enable this option to plan a Google Hangout meeting for the calendar event. When enabled, a button that starts Hangout call appears on the event card and view page when viewed by the guest.
Important
For Hangouts calls to be possible, integration with Google services should be created. Contact your administrator or see Google Integration Settings for more information.
Tip
For more help on Hangouts calls, see Hangouts Help on google.com.
Context — Select a record that has a meaningful relation to the event. Start entering a record name to quickly find the required user, and when the list of suggestions appears, click the required name to select it. The event is now linked to the selected item and is displayed in its Activity section.
Start — Specify day and time when the event starts. Click the day field to select a day in the calendar dialog. Click the time field to select a time from the list. Alternatively, you can type in date and time values.
Note
The time option is disabled when the All-day event is selected.
End — Specify day ant time when the event ends. Click the day field to select a day on the calendar dialog. Click the time field to select a time from the list. Alternatively, you can type in date and time values.
Note
The time option is disabled when the All-day event is selected.
All-day event — Enable this option to reserve the whole day(s) for the event.
Repeat — Enable this option for a recurring event. Once you enable it, you can configure the event schedule.
- Repeats: Select how often the event repeats: daily, weekly, monthly, or yearly.
- Ends: Select when the event ends (never, after … occurrences, by date).
Click Save and Close.
From the Page of a Related Record
To create a calendar event when viewing the related record (e.g., opportunity, customer user, etc.):
On the page of the selected related record, click More Actions on the top right of the page and click Add Event on the list.
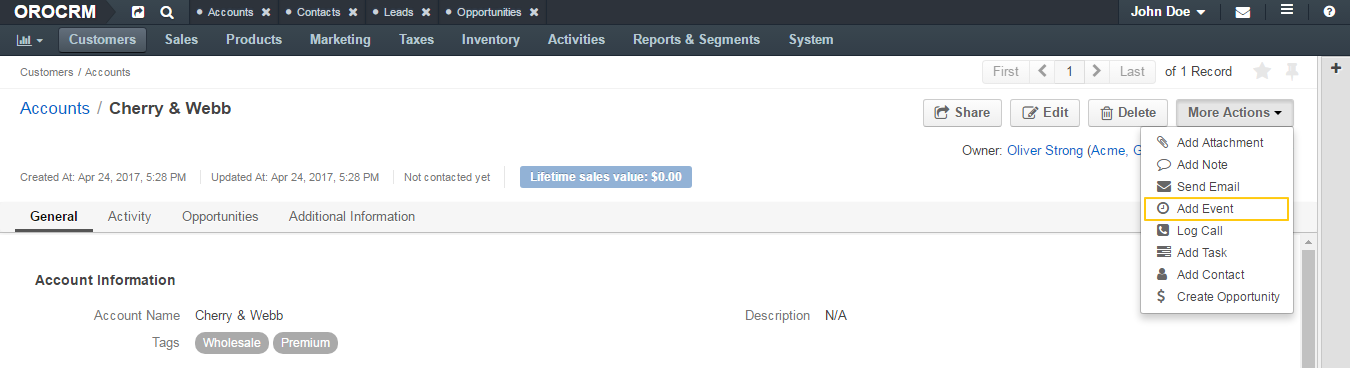
In the Add Event dialog box, specify event details, as described in the Create Calendar Event From the Page of All Events section above.
Click Save on the top right.
Calendar events are displayed in the Activity section of the pages of related records.
If you create a calendar event from the view page of a related entity record, this entity record appears as a context of the calendar event.
From My Calendar
To add calendar events on the My Calendar page or in the Today’s Calendar widget:
- Under your user name on the top right of the application page, click My Calendar.
- Click the empty cell that represents the desired time period. If you are adding an event from the widget, you can alternatively click the New Event button on the top right of the widget.
- In the Add Calendar Event dialog box, specify the event details.
- Click Save. The event appears in your calendar if you have specified yourself as an event owner or a guest.
- Refresh a page to update the widget after you created the new event.
From the Page of a System Calendar
To add an event to a system calendar from its page:
- Navigate System > System Calendars in the main menu.
- Click on the required calendar.
- On the page of the selected calendar, click Create Calendar Event.
- The Create Calendar Event page appears. Specify the event details.
- Click Save and Close.