
Important
You are browsing the documentation for version 1.6 of OroCommerce, OroCRM and OroPlatform, which is no longer maintained. Read the latest LTS version of the Oro documentation to get up-to-date information.
See our Release Process documentation for more information on the currently supported and upcoming releases.
Localizations
Localization helps to bind the language and locale-specific formatting for smooth localization of the Oro system elements and messages visible to the user.
To enable easy inheritance from the parent or similar language, localizations may form groups organized as an ancestors tree, for example:
English
- English (UK)
- English (USA)
- English (Canada)
To view all localizations, navigate to System > Localization > Localizations in the main menu.
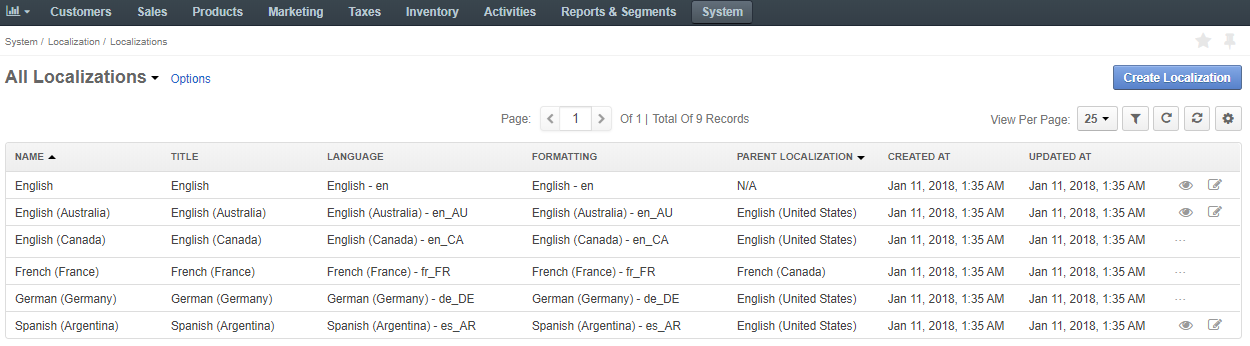
The following information about the localizations is available in the Localizations list:
| Name | Description |
|---|---|
| NAME | The name of the localization that identifies settings for the particular locale. It is displayed in the back-office. |
| TITLE | The name of the localization set with a specific configuration displayed to the user in the storefront. |
| LANGUAGE | The target language of the UI elements displayed to the user in the storefront. |
| FORMATTING | The formatting style of the corresponding target language that is applied in the localized instance. |
| PARENT LOCALIZATION | Another localization that the current one should fall back to whenever a system element has no translation in the target language. |
| CREATED AT | The date when the localization is created. |
| UPDATED AT | The date when the localization is updated. |
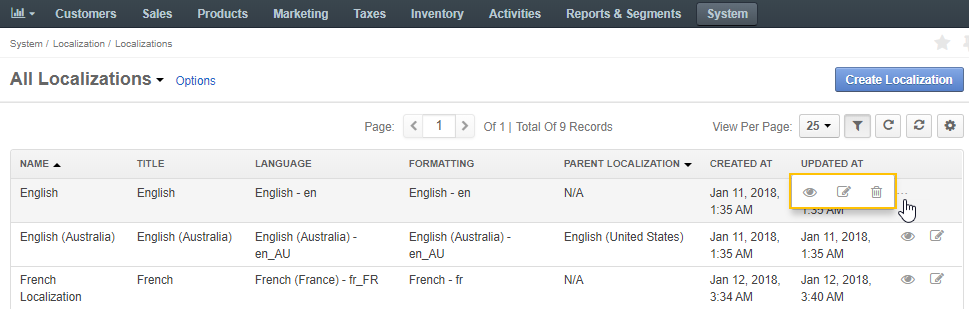
Manage Localizations
Hover over the More Options menu to the right of the necessary localization:
- Click to view the localization details. Alternatively, click the corresponding item to open its details page.
- Click to edit the localization.
- Click to remove the localization from the list.
Create a New Localization
Create a new localization with a specific configuration by clicking Create Localization in the top right.
- In the page that opens, give the localization a meaningful name and a title. The name is displayed in the back-office while the corresponding title is used in the storefront.
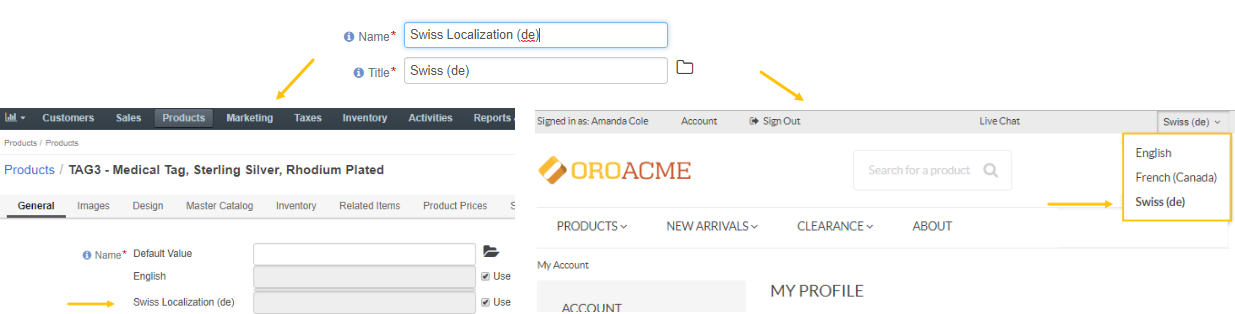
- Select the target language from the list for this particular localization. Make sure to enable the required language as described in the Languages section to display it in the list of the available languages.
- Select the language formatting style.
- Select the parent localization from the available list. If no relations are set, the current localization inherits the English translation equivalents by default.
- Click Save in the top right.
- Now, you need to update the translation cache so that all the changes could enter into force.
- Click the reference link at the top to move to the Translations page.
- Click Update Cache in the top right.
Once the localization is configured and the cache is updated, you need to enable it in the system configuration menu. Proceed to the Localization Settings section and follow the steps described in the guide.