
Important
You are browsing the documentation for version 1.6 of OroCommerce, OroCRM and OroPlatform, which is no longer maintained. Read the latest LTS version of the Oro documentation to get up-to-date information.
See our Release Process documentation for more information on the currently supported and upcoming releases.
Create Simple and Configurable Products
Product Type: Simple vs Configurable
In OroCommerce, products can be of two types, simple and configurable. The product type selected at the fist step of product creation in the back-office determines the way product information is used and managed in OroCommerce.
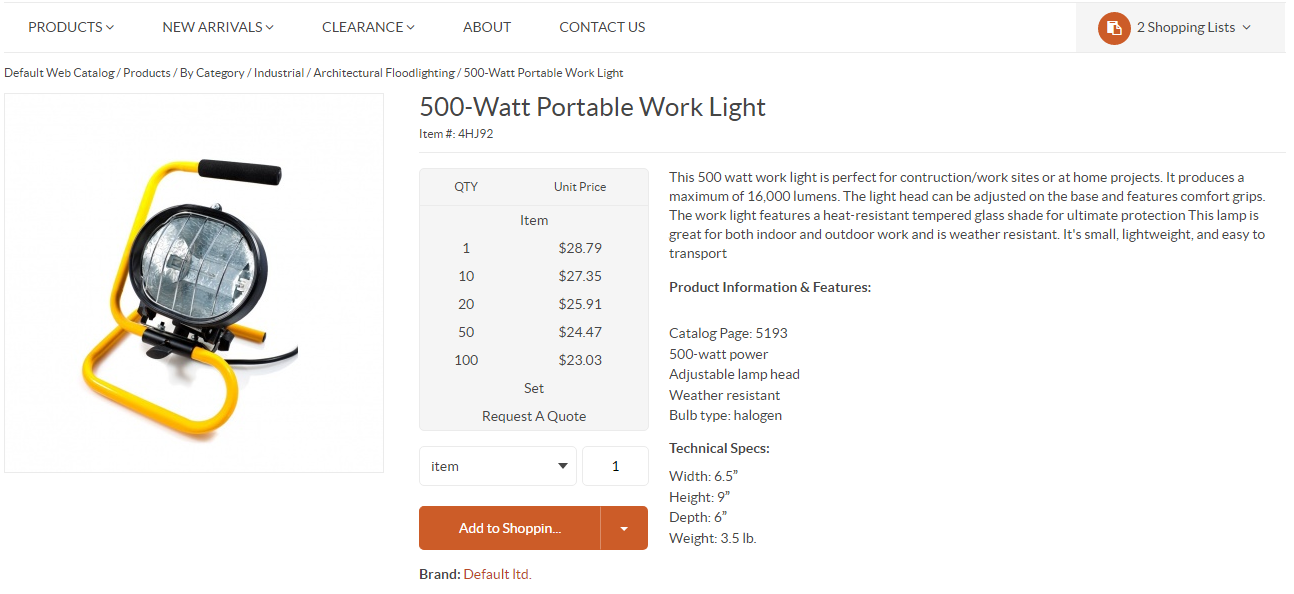
Simple products are physical items that exist in a basic, single variation. Their qualifiers, such as color or size, cannot be modified meaning customers cannot select the same product with slightly different characteristics. Simple products have a unique SKU and serve as ‘building blocks’ for configurable products. You can manage the inventory information and the price for a simple product.
Unlike a simple product, a configurable product is an item available in multiple variations. Customers ‘configure’ the product in terms of its color, size or any other applicable parameters according to buying needs. Buyers in the storefront choose from the options provided to ‘configure’ a product according to their needs.
However, in the back-office, configurable products are more sophisticated. A configurable product is known as a single parent product uniting multiple product variants. These product variants are assigned unique SKUs for easy inventory tracking, have their own inventory and price settings, and are generally treated as separate products in product information management (PIM) UIs. As the configurable product and all of its variants share the same set of attributes, they share the product family.
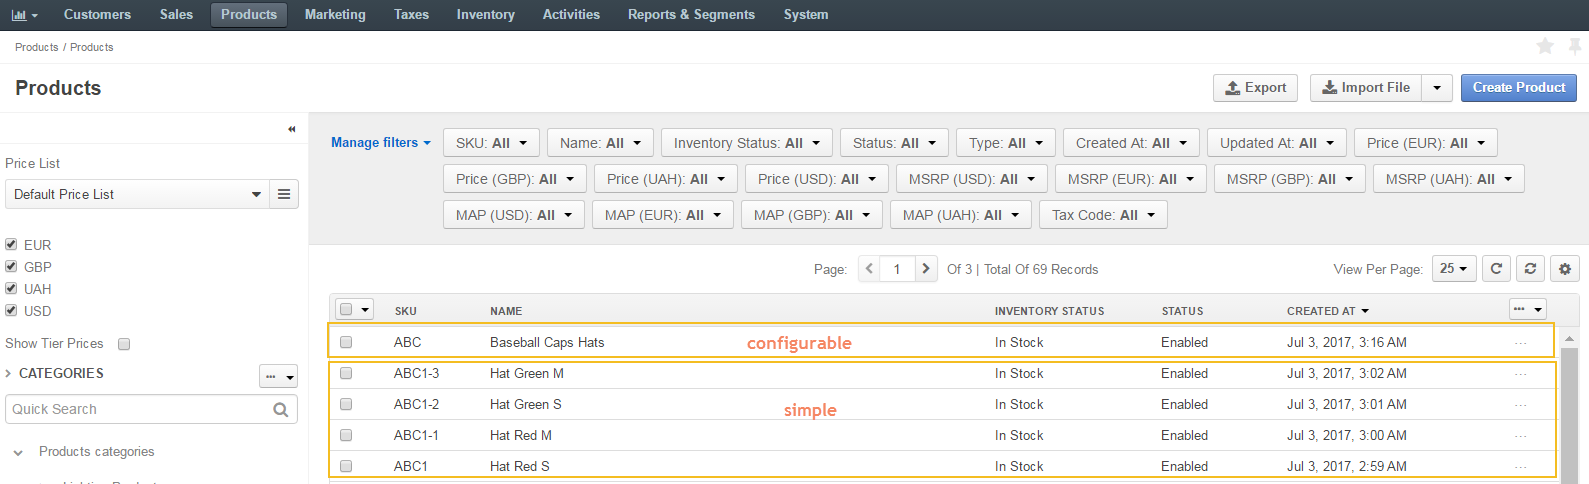
For example, a T-Shirt may be available in various sizes and colors (e.g., Red T-Shirt XL, Red T-Shirt XXL, Green T-Shirt XL, Green T-Shirt M). In this case, the generic T-Shirt is a configurable product, Red T-Shirt XL, Red T-Shirt XXL, Green T-Shirt XL, and Green T-Shirt M are product variants (created as simple products), and Size and Color are Configurable Attributes in the generic T-Shirt.
A configurable attribute is one of the product attributes that are used to distinguish product variants of the same configurable product. There should be at least one configurable attribute specified for the configurable product in order to enable the customer to perform product variant selection.
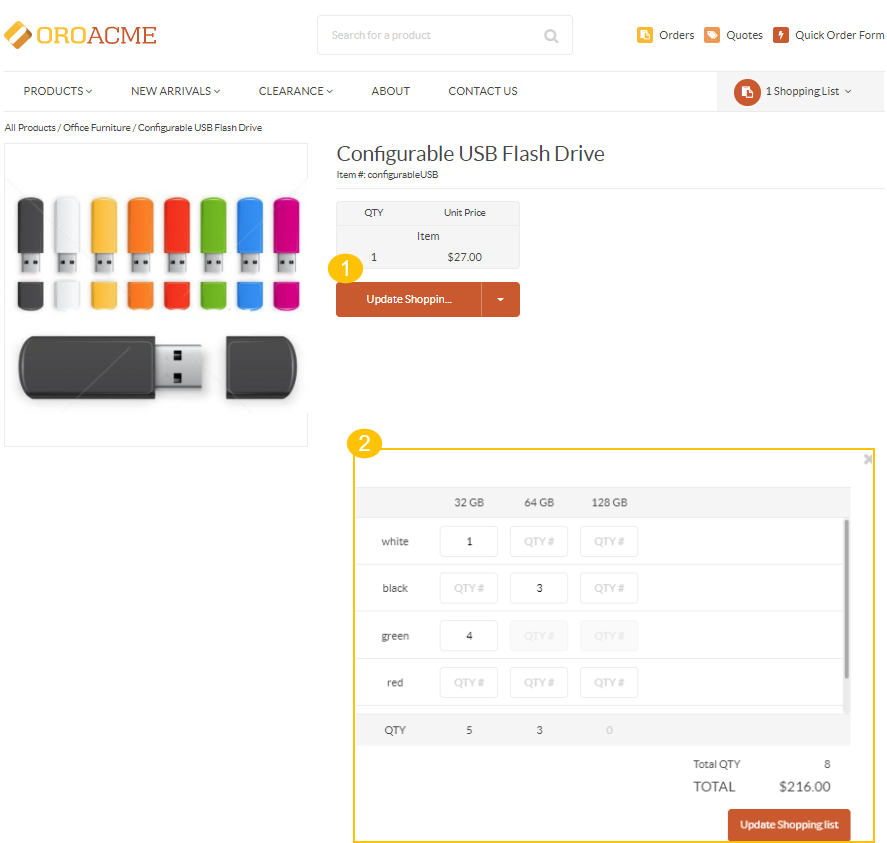
To purchase multiple product variants in one order, use a matrix order form in the storefront. It provides improved visibility into product offerings and enables you to create complex bulk orders quickly.
Create a Simple Product
See a short demo on how to create a simple product or keep reading the step-by-step guidance below.
To add a new simple product and make it available in the master catalog (for internal product management) and for purchase in the storefront:
Navigate to Products > Products in the main menu.
Click Create Product.
Select the Simple product type.
Select the product family to define the product options and details that will be filled in the following steps.
Place the product under the necessary category in the master catalog by clicking on the category. Use the search to limit the list of categories.
Click Continue.
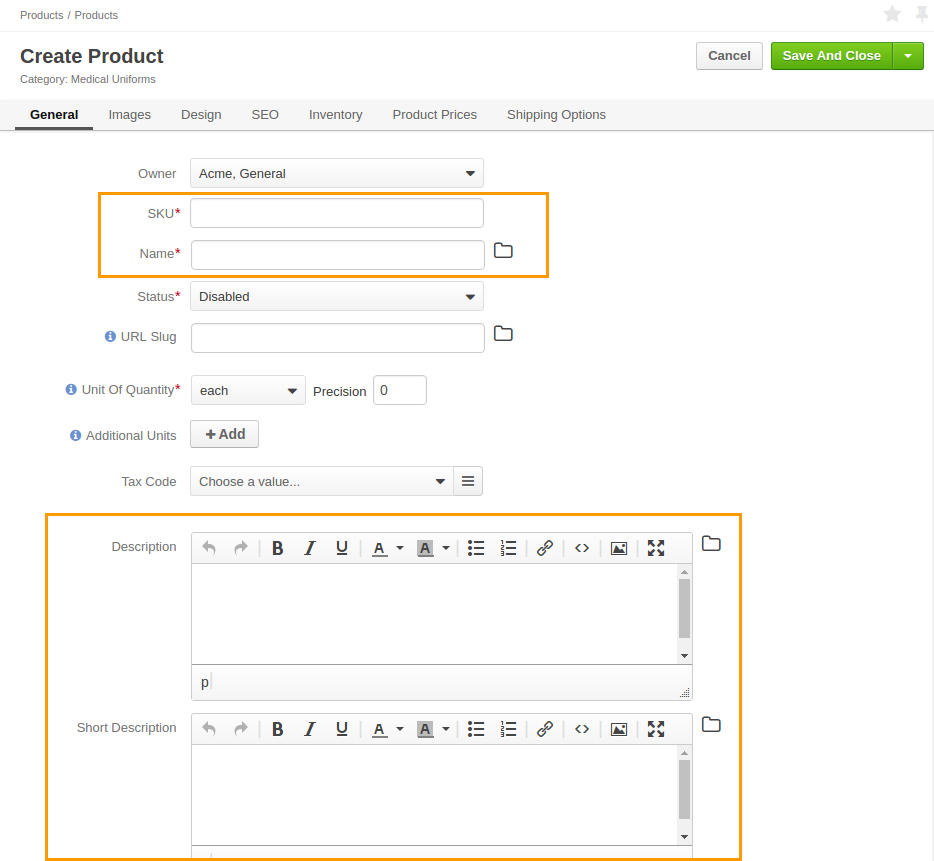
In the General section:
Enter the product SKU, name, description that will appear on the product view, and a short description that best positions the product for your target audience and will appear in the catalog listing. Use the WISIWIG editor to format the information.
Select the product status: Enabled or Disabled. When disabled, the product is not included in the catalog and is considered to be a draft.
Enter a URL slug that is used to build a human-readable URL for the product page on the storefront.
Configure units of quantity:
In the Unit Of Quantity list, select the main product unit that is shown by default when you view the product details in the storefront. Available options: each, item, kilogram, piece, set.
In the Precision field, set the acceptable precision (number of digits after the decimal point) for the quantity that a user may order or add into the shopping list. Items and sets are usually whole numbers, and units like kilograms may get precision of 2 to allow buying a custom volume (e.g., 0.5 kg).
Click + Add to add more than one unit of quantity.
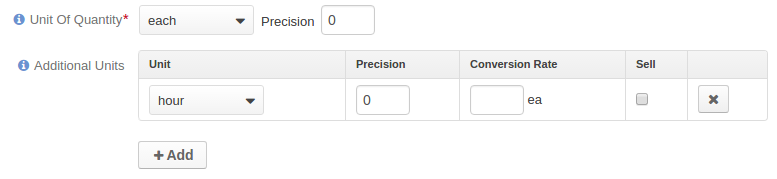
For every additional unit, provide precision and conversion rate compared to the main unit of quantity.
Select the Sell check box to enable selling the product in these units. Unless Sell is selected, the unit is considered to be a draft.
You can delete the unnecessary unit of quantity by clicking the Delete icon next to it.
In the Tax Code list, select the product tax code that defines the percentage of tax that may be included into the purchase order during the checkout.
The tax calculation process depends on the tax jurisdiction that you decided to use in OroCommerce and other tax calculation options.
For Brand, select a brand from the list. Use to view the list of all available brands. To create a new brand, click +.
In the Image section, add a new image to the product by clicking +Add Image and uploading the necessary file. You can select whether the image will be shown as main (the image is used in the product details view), listing (the image is shown in the catalog listing), or additional (additional product pictures). All three categories can be selected at the same time. To remove an image, click the Delete icon next to it.
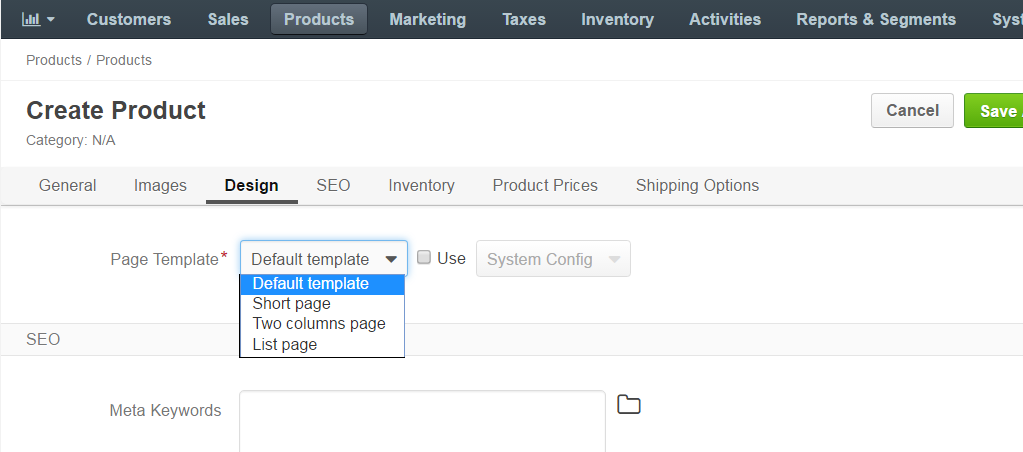
In the Design section, select the page template from the drop-down.
In the SEO section, provide the following information:
- Meta Keywords — Enter the meta keywords for the product. A meta keyword is a specific type of a meta tag that appears in the HTML code of a web page and helps tell search engines what the topic of the page is.
- Meta Title — Enter the meta title for the product. A meta title is what is seen by search engine users and helps a search engine to index the page.
- Meta Description — Enter the meta description for the product. A meta description summarizes a page content. Search engines show a meta description in search results if they see the searched phrase in the description.
In the Inventory section, provide the following information:
Field Description Inventory Status This setting enables you to define and modify status information for the stock of the product. Managed Inventory This setting defines the method for inventory management.
With Use category defaults, the product’s Manage Inventory inherits the setting selected for the product’s parent category. With Use system config, the product uses the system configuration setting.
Selecting Yes enables interactive updates based on the product inventory information from the Inventory > Warehouses section. Selecting No disables connection to the inventory, and uses the static Inventory Status value.
Highlight Low Inventory This option defines if low inventory for products is displayed in the storefront. Inventory Threshold A minimum quantity of the product that is treated as In stock. When a product quantity drops below this value, the product inventory status becomes Out Of Stock. Low Inventory Threshold The minimum stock level defined for the product. Reaching the defined level will trigger a warning message to the buyer in the storefront. Backorders A flag that indicates whether OroCommerce accepts backorders. When set to Yes, buyers and salespeople can order products in the quantities that are not currently available in the warehouses. The remaining portion of the order will be sustained until the product gets back in stock. Decrement Inventory A flag that indicates whether OroCommerce decrements inventory upon order.
When both Decrement Inventory and Backorders are enabled, a product quantity may become negative.Minimum Quantity to Order A minimum quantity that a buyer or salesperson can claim in the RFQ, customer order, quote, or a shopping list. Maximum Quantity to Order A maximum quantity that a buyer or salesperson can claim in the RFQ, customer order, quote, or a shopping list. Is Upcoming This option informs a customer that the product of the selected category is not in stock currently, but will be available later. When set to Yes, additional Availability Date is displayed. To remove the upcoming products label, set the option to No or customize the required behavior in the system configuration. Availability Date The date which indicates the exact date and time since when the selected product will be available in stock. 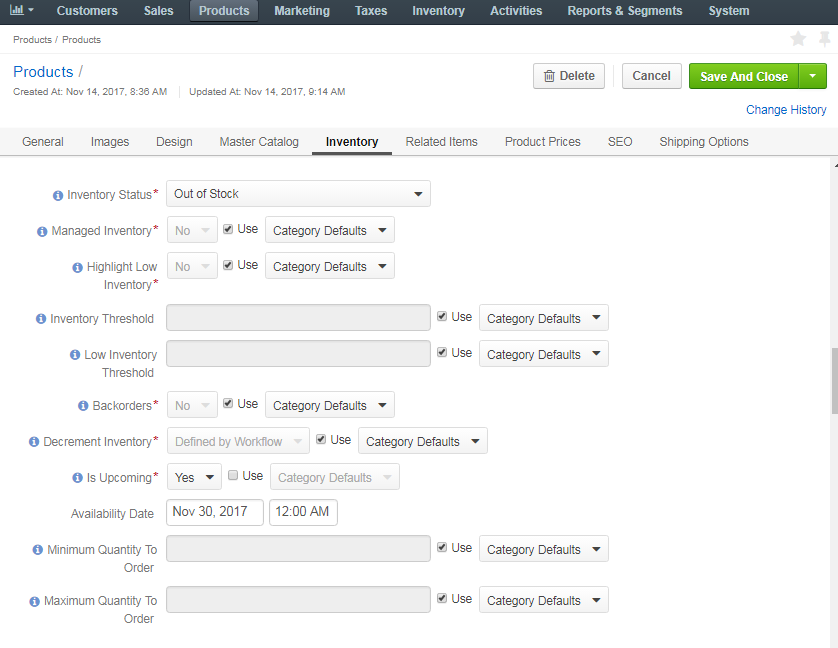
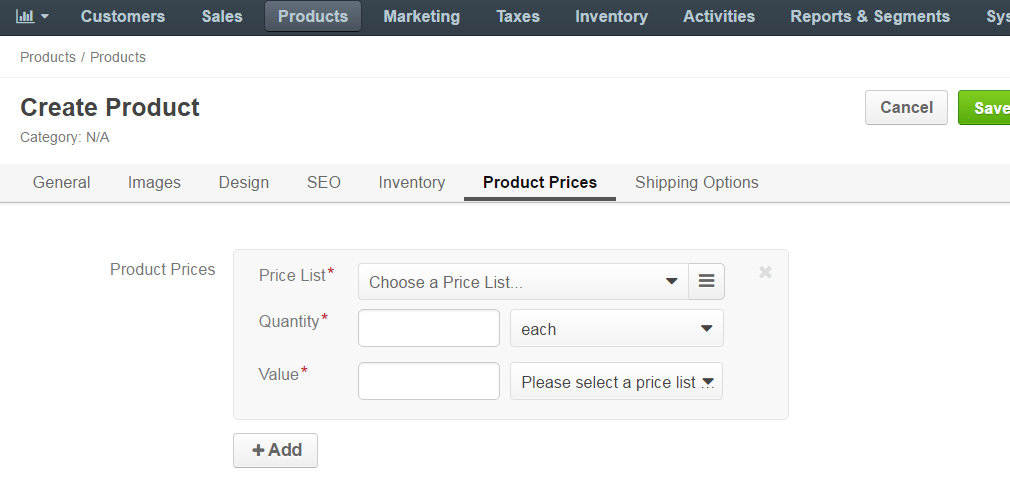
In the Product Price section, add fixed product prices. Note that fixed prices override the automatically generated price lists.
Click +Add, select a price list, specify quantity, units, price value, and currency.
In the Shipping Options section, click +Add Options and provide unit, weight and weight measuring unit, dimensions (width, height, depth), and dimensions measuring unit and freight class.
Review translation rules for a product name, URL slug, description, and short description.
To enter translation manually, click , clear the Use <parent translation> check box next to the required language, and provide your version of the translation.

Click Save.
Create a Configurable Product
See a short demo on how to create a configurable product or keep reading the step-by-step guidance below.
Checklist
Prior to creating a configurable product, ensure that you have performed the following steps:
Created attributes.
A configurable attribute is one of the product attributes that are used to distinguish product variants of the same configurable product. There should be at least one configurable attribute specified for the configurable product in order to enable a customer to select product variants.
Created a product family.
As a configurable product and all of its variants share the same set of attributes, they should share the product family as well.
Created product variants (simple products).
A configurable product may group several simple products or configurable product variants whose information mostly overlaps except for several product attributes. It means that you have to create a simple product for each variant that you need to add to the configurable product.
Note
Make sure the configurable product you are creating has the same product unit as its product variants.
Note
Product variants for configurable products in the storefront are displayed only when either customer users are logged in or guest shopping lists are enabled in the system configuration.
Flow
To add a new configurable product and make it available in the master catalog (for internal product management) and for purchase in the storefront:
Navigate to Products > Products using the main menu.
Click Create Product.
From the Type list, select Configurable to enable product variants.
Select the product family to define the product options and details that will be filled in the following steps.
Note
Ensure that the product attributes that store product variant options are created and included in the product’s product family.
Place the product under the necessary category in the master catalog by clicking on the category. Use the search to filter the list of categories.
Click Continue.
In the General section, provide the following information:
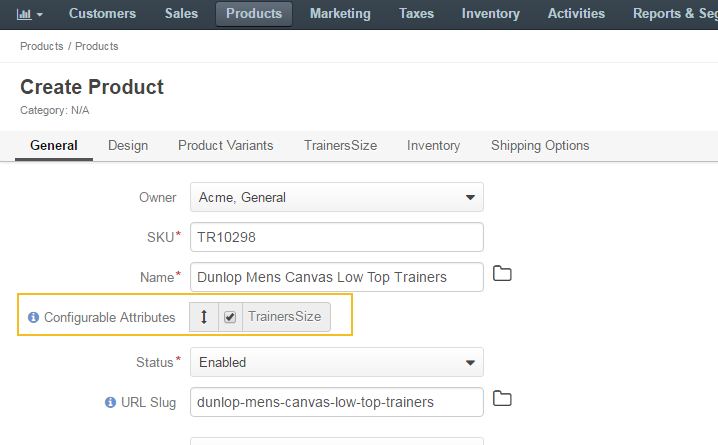
Field Description Owner Limits the list of users who can manage the product. SKU Enter the product SKU number. The field is mandatory. Name Enter the name of the product. The field is mandatory. Configurable Attributes Define the configurable attributes that distinguish product variants by selecting the check boxes next to them.
Note
A configurable product should contain at least one configurable attribute of select or boolean type.
Status Select the product status (e.g., Enabled/Disabled). When disabled, the product is not included in the catalog and is considered to be a draft. The field is mandatory. URL Slug Enter a URL slug that is used to build a human-readable URL for the product page in the storefront. If left blank, the slug will be autogenerated. Is Featured Select whether the product is featured. The field is mandatory. New Arrival Select whether the product is a new arrival. When set to Yes, the product is highlighted in the storefront. The field is mandatory. Description Enter product description. A description is detailed information about the product that shows on the product view. Short Description Enter a short description to be displayed in the catalog listing. Use the WISIWIG editor to format the information. Brand Choose the product brand, if available. Click to select the brand from the full list. Also, specify the value of your configurable attributes and define any other custom attributes if required.
In the Image section, add a new image to the product by clicking +Add Image and uploading the necessary file. You can select whether the image will be shown as main (the image is used in the product details view), listing (the image is shown in the catalog listing), or additional (additional product pictures). All three categories can be selected at the same time. To remove an image, click next to it.
In the SEO section, specify the required attributes:
Field Description Meta Keywords Enter meta keywords for the product. A meta keyword is a specific type of a meta tag that appears in the HTML code of a web page and helps search engines to understand what the topic of the page is. Meta Title Enter a meta title for the product. A meta title is what is seen by search engine users and helps a search engine to index the page. Meta Description Enter a meta description for the product. A meta description summarizes the page content. Search engines show a meta description in search results when the searched phrase is found in the description. And any other custom attributes if defined.
In the Design section, select the page template from the list.
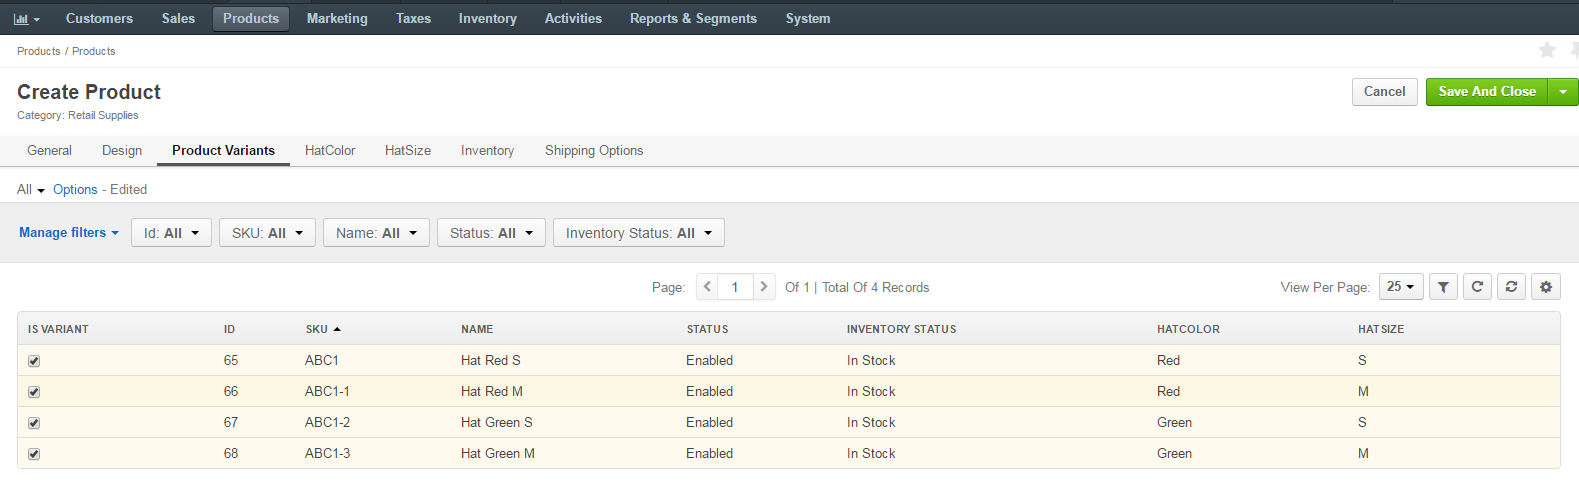
In the Product Variants section, select the configurable product variants by ticking the Is Variant check box next to the product.
Note
Make sure the configurable product has the same product unit as its product variants.
Review translation rules for a product name, URL slug, description, and short description.
To enter a translation manually, click , clear the Use <parent translation> check box next to the required language, and provide your version of the translation.
Click Save to save your configurable product.
Create a Sample Configurable Product
The sample flow below shows all the steps required for the creation of a configurable product.
Product: Red and green hats, sizes S and M.
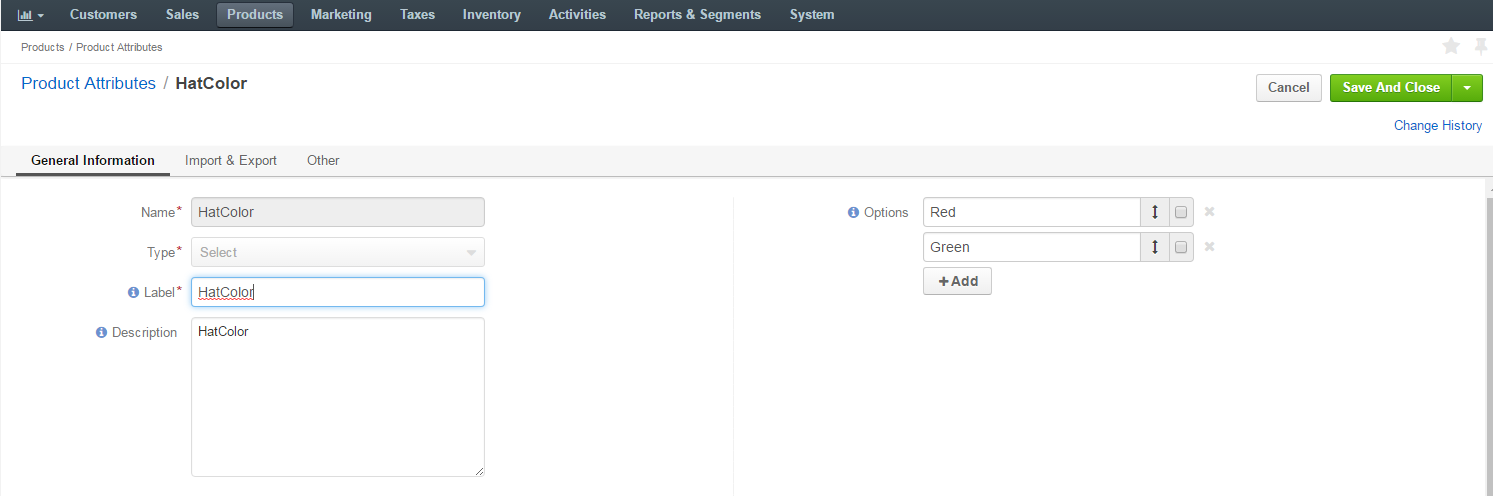
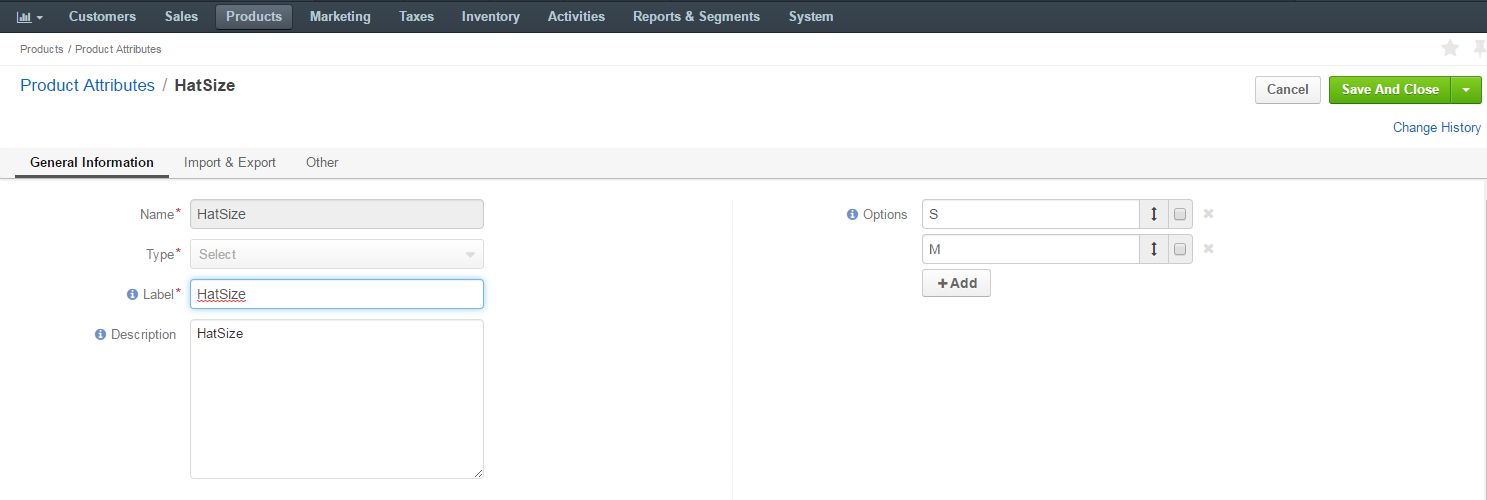
Step 1. Create Attributes.
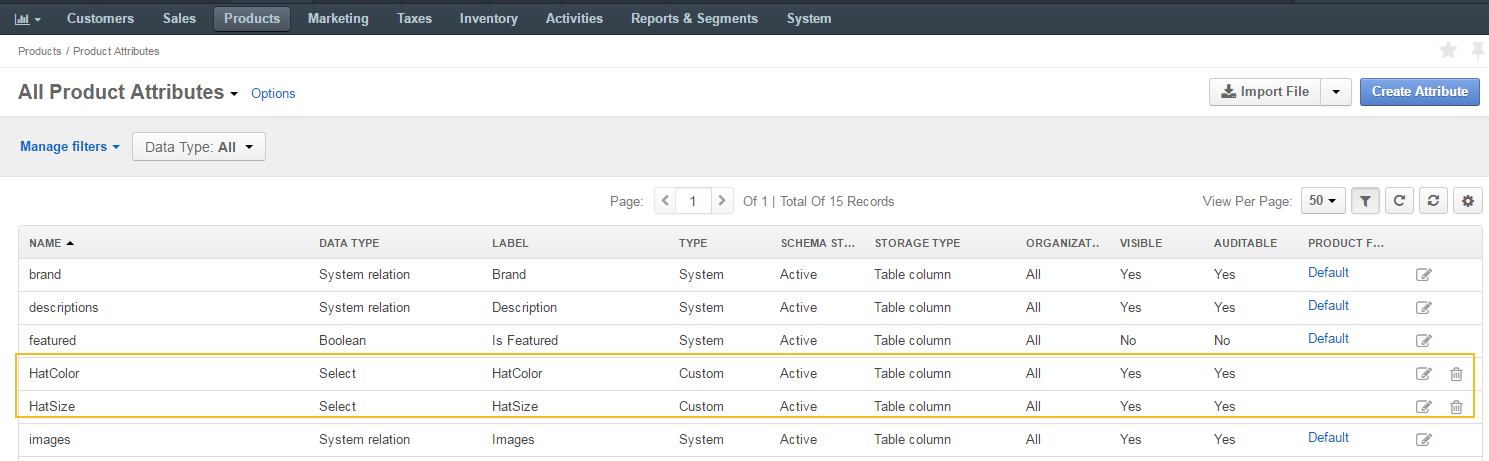
Navigate to Products > Product Attributes in the main menu.
Click Create Attribute on the top right.
We will create two attributes, one after another: ‘HatColor’ and ‘HatSize’.
Select the type of an attribute.
Currently, Select and Boolean types are available for configurable attributes. We will use Select for both attributes.
Fill in the required information and add the necessary options for the attributes by clicking +Add.
For ‘HatColor’, attribute options will be ‘Red’ and ‘Green’.
For ‘HatSize’, attribute options will be ‘S’ and ‘M’.
Click Save to save the attributes.
Step 2. Create a Product Family.
Navigate to Products > Product Families in the main menu.
Click Create Product Family in the top right corner.
Fill in the required information and add attributes ‘HatColor’ and ‘HatSize’ to the attribute group by clicking +Add.
Each attribute must have a separate group in our case.
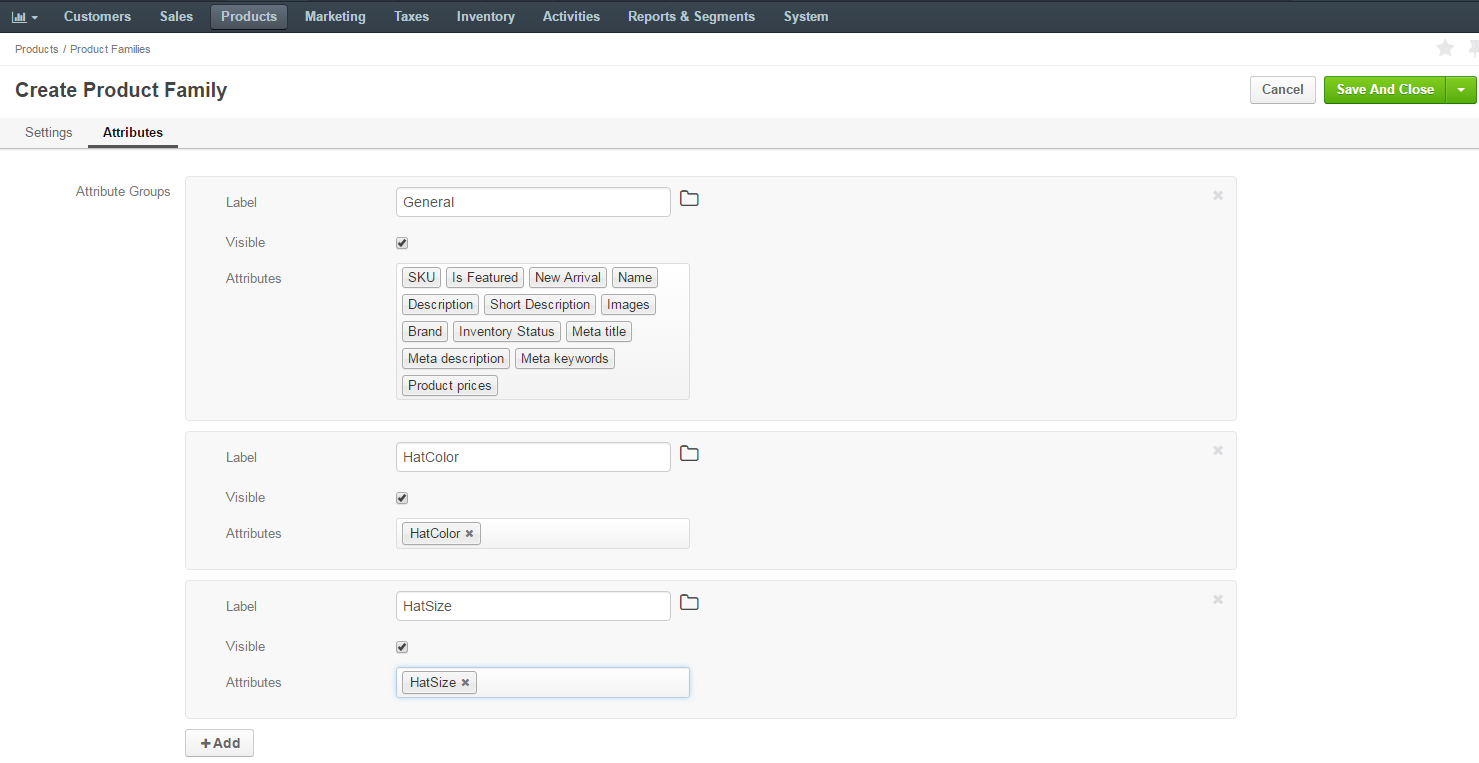
Click Save to save the product family.
Step 3. Create Configurable Product Variants.
We now need to create one configurable product variant (simple product) per each variant that we would like to have available in the configurable product. Since we have two attributes, ‘HatSize’ and ‘HatColor’, and each attribute has two options (‘S’/’M’ for the first and ‘Red’/’Green’ for the second), we need to create four simple products.
Navigate to Products > Products in the main menu.
Click Create Product in the top right corner.
Set the product type to Simple, select the ‘HATS’ product family.
Fill in the required information and add the attributes required for this particular product.
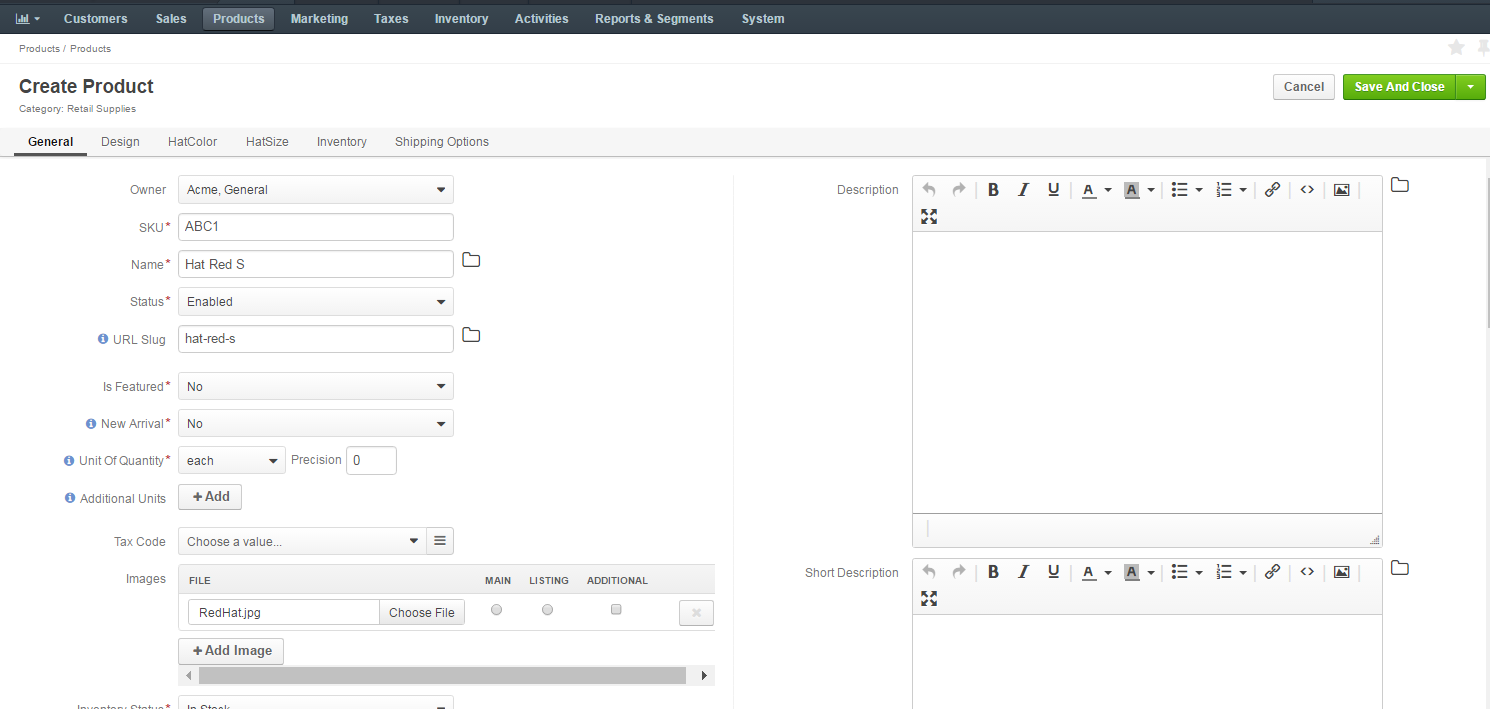
Click Save.
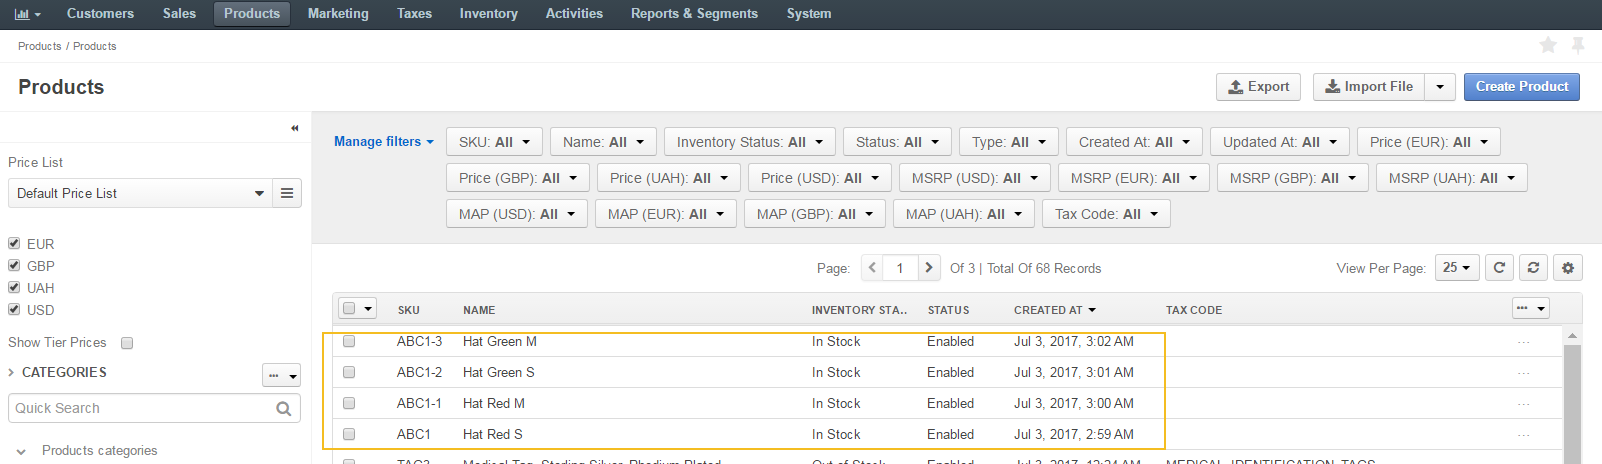
Perform step 3 for all four simple products.
Note
Make sure that all your simple products are enabled.
Step 4. Create a Configurable Product.
Navigate to Products > Products in the main menu.
Click Create Product.
Set the product type to Configurable.
Select the category.
Note
Choosing category is mandatory at this stage, as it determines whether the product is available on the website.
Choose the ‘Hats’ product family.
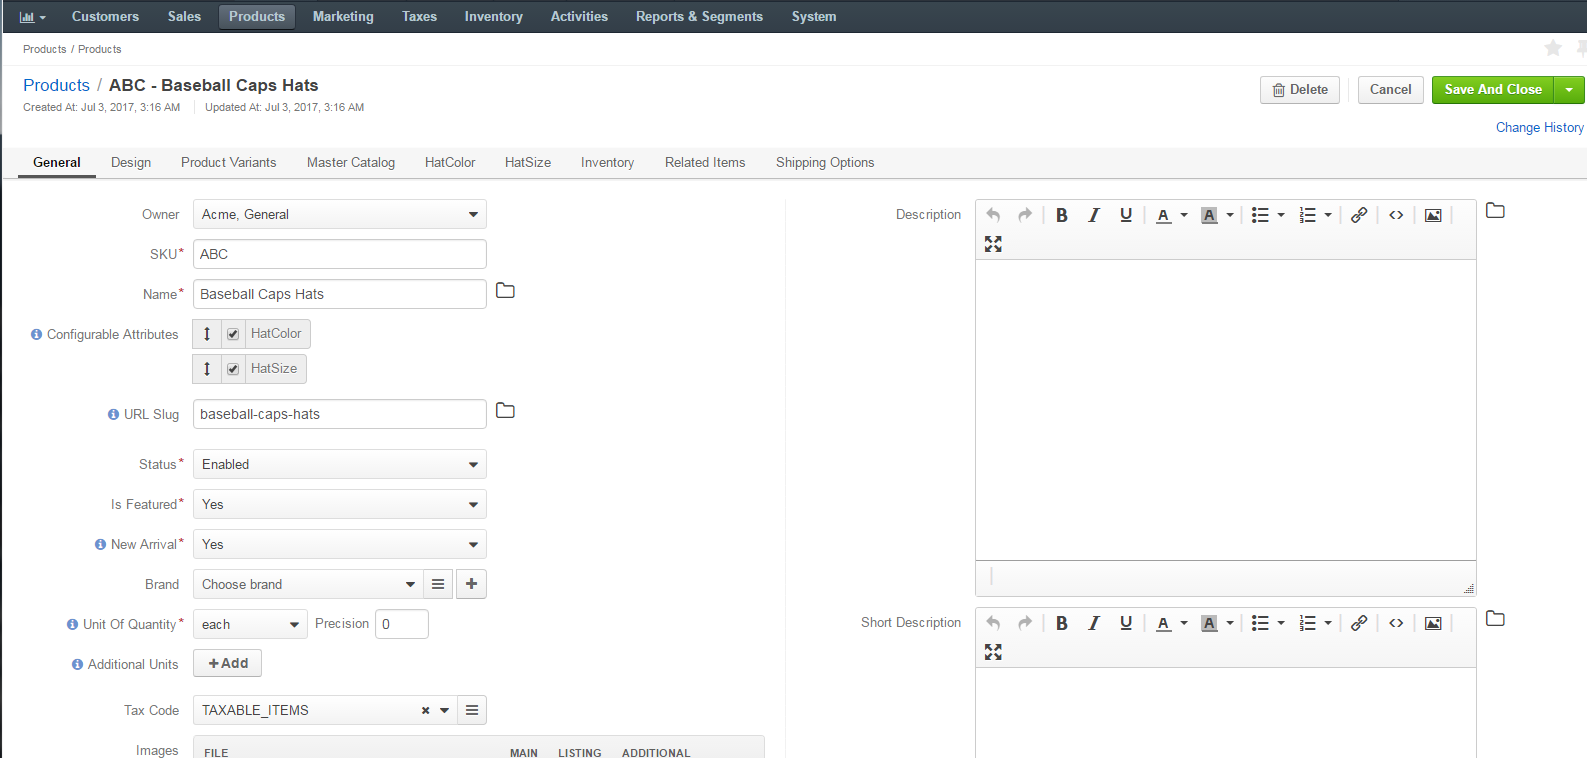
Add ‘HatSize’ and ‘HatColor’ attributes to the product.
Fill in the required information and add the created product variants for this configurable product.
Note
You might want to save the product at this point to make sure that product variants are available in the Product Variants section of the product you are creating.
Click Save.
The product should now be available on the website in the category we have previously assigned it to.