
Important
You are browsing the documentation for version 1.6 of OroCommerce, OroCRM and OroPlatform, which is no longer maintained. Read the latest LTS version of the Oro documentation to get up-to-date information.
See our Release Process documentation for more information on the currently supported and upcoming releases.
Coupons
As a promotional tool, coupons can be generated and distributed to customers to be redeemed for a discount when purchasing goods online. In your Oro application, coupons are always linked to promotions, although they can be created separately and linked to a promotion when the need arises.
The following topics will explore how to create, generate, and manage coupons in your Oro application.
Note
You can check out how to create coupons and link them to promotions in our media library.
Before You Begin
As coupons are linked to promotions, make sure that promotions are enabled in your system. For more information on configuration of promotions, see the relevant Configure Promotions topic, or refer to your administrator.
Enabling promotions allows you to perform the following actions with coupons:
- See Coupons under Marketing > Promotions > Coupons in the main menu of the back-office.
- View and add coupons to orders in the back-office.
- Apply coupons in shopping lists and checkout in the storefront.
Coupons can be created manually or generated. Usually, you create coupons manually when you need a small number of them (e.g., 2), or generate coupons when you need many (e.g., 1000).
Create Coupons
To create a new coupon:
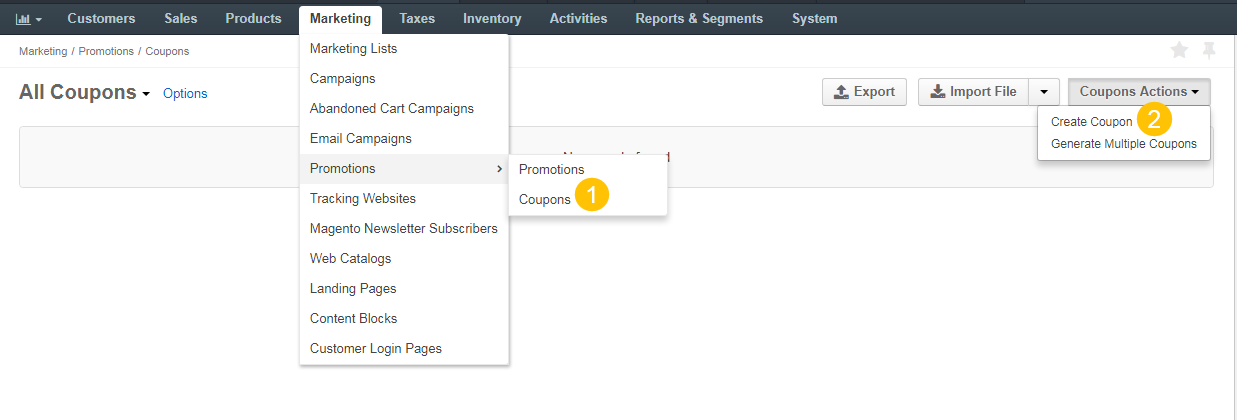
Navigate to Marketing > Promotions > Coupons in the main menu.
Click Coupons Actions > Create Coupon on the top right.
In the General section, complete the following fields:
- Owner — Select the business unit responsible for the coupon.
- Coupon Code — Enter the coupon code. Code value should be numeric, alphabetic or both, and have no spaces. This field is mandatory.
- Promotion — Select the promotion that the coupon should relate to, or click to load the list of promotions to choose from. Please note that only promotions with the Triggered by option set to Coupons and Conditions will be displayed on the list of available promotions. If there are no promotions to link the coupon to, they can be created and added to the coupon later.
- Enabled — Enable the check box to activate the coupon. To deactivate it, clear the check box.
- Uses Per Coupon — Enter the number of times that the coupon may be used.
- Uses Per Person — Enter the number of times a specific customer can use the coupon.
- Valid From/Until — Provide the expiration date and time for the coupon.
Click Save.
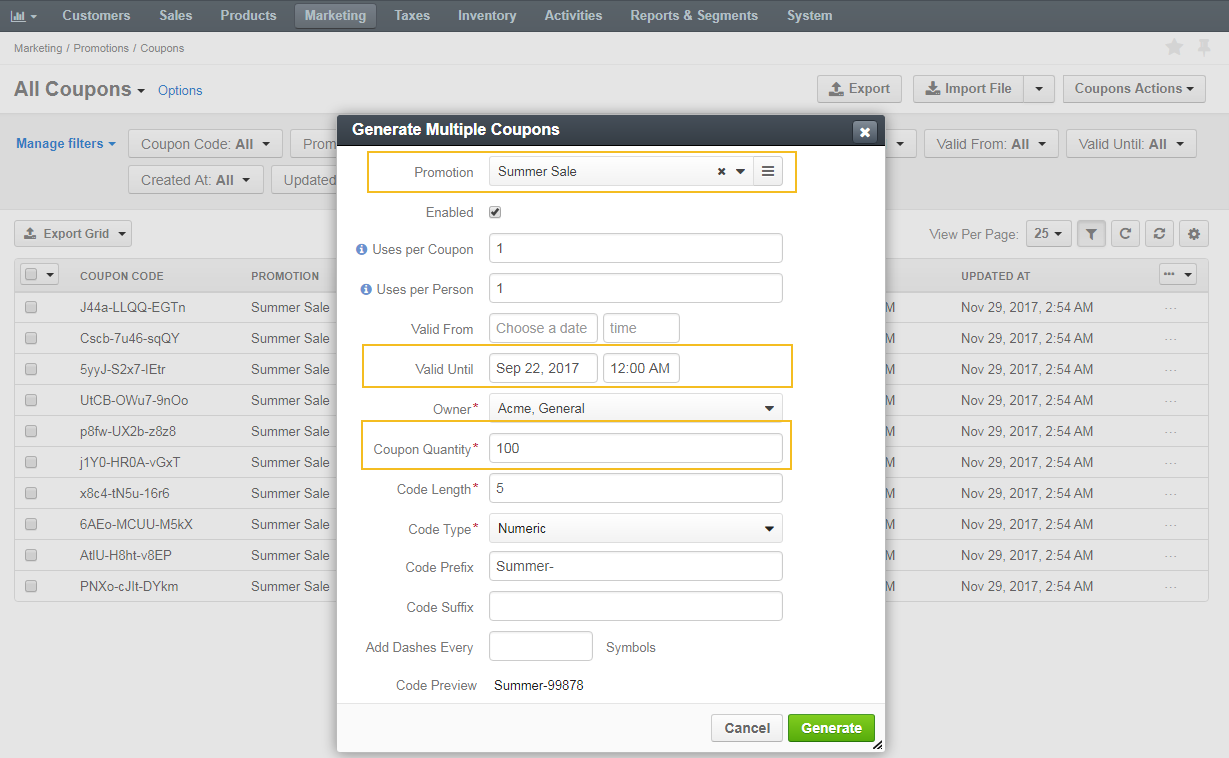
Generate Coupons
To generate new coupons:
Navigate to Marketing > Promotions > Coupons in the main menu.
Click Coupons Actions > Generate Multiple Coupons on the top right.
The following form appears:
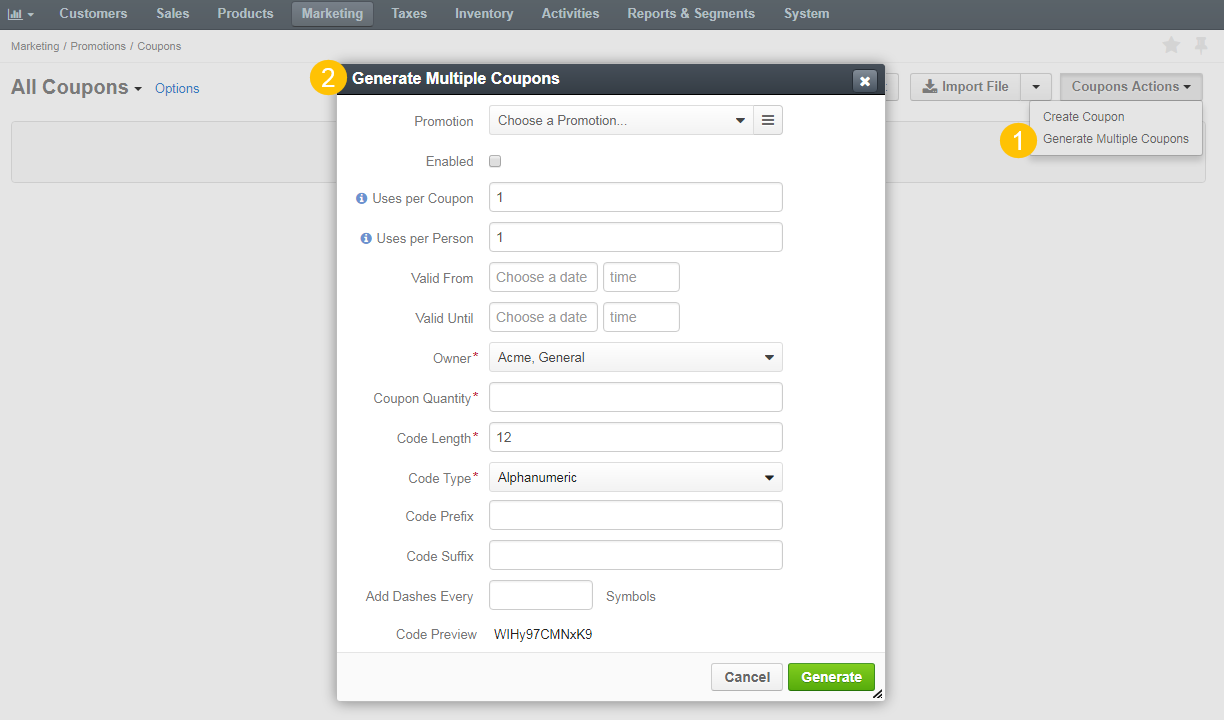
In the form, complete the following fields:
- Promotion — Select the promotion that the coupon should relate to, or click to load the list of promotions to choose from. Please note that only promotions with the Triggered by option set to Coupons and Conditions will be displayed on the list of available promotions.
- Enabled — Enable the check box to activate the coupons.
- Uses Per Coupon — Enter the number of times that the coupon may be used.
- Uses Per Person — Enter the number of times a specific customer can use the coupon.
- Valid From/Until — Provide the expiration date and time for the coupon.
- Owner — Select the business unit responsible for the coupon.
- Coupon Quantity — Specify the quantity of coupons to be automatically generated.
- Code Length — Enter the number that represents the desired length of the coupon code.
- Code Type — Select the coupon code type from the list (numeric, alphanumeric or alphabetic).
- Code Prefix — Enter the prefix for the coupon code. If provided, each code will start from this prefix.
- Code Suffix — Enter the suffix for the coupon code. If provided, each code will finish with this suffix.
- Add Dashes Every…Symbols — Provide the number to indicate where a dash should be placed in the coupon code (e.g., after every 2 symbols: xx-xx-xx).
- Code Preview — Preview the sample of the code to be generated for the coupon.
Note
Please note that coupon codes must not be longer than 255 symbols, including prefix, suffix, and dashes.
Click Generate.
The coupons list should now have the coupon codes you have just generated.
Manage a Coupons List
Navigate to Marketing > Promotions > Coupons in the main menu.
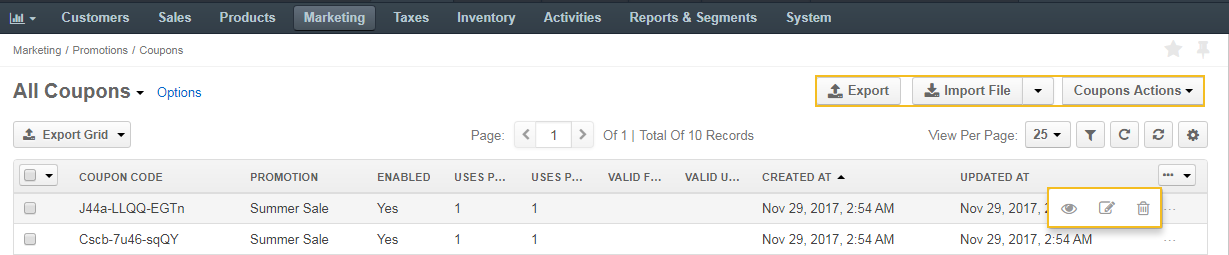
The page contains the list of all available coupons in your Oro application. From here, you can perform the following actions:
Create a new coupon: Click Coupons Actions > Create Promotion on the top right.
Generate coupons: Click Coupons Actions > Generate Multiple Coupons on the top right.
Export coupons: Click Export on the top right.
Import coupons: Click Import on the top right.
View coupon details: Click on the item from the list to open its details page.
Hover over the More Options menu to the right of the necessary coupon and select either to View, Edit, or Delete the existing coupons from the system.
Mass edit or mass delete coupons: Select the check boxes on the left of the corresponding rows. Click on the far right of the table header. Click Edit to edit, or Delete to delete the selected coupons.
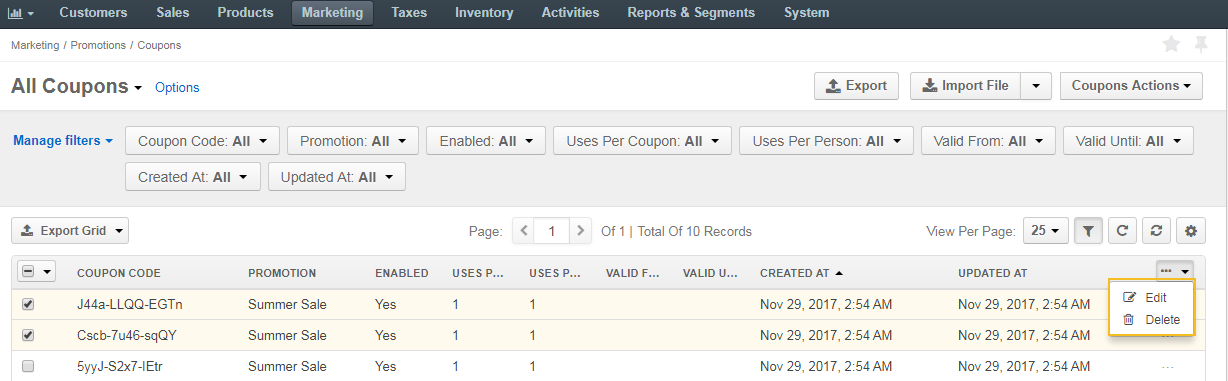
Filter a coupons grid to find the required records quicker: Click above the table on the far right to display the filters. To apply a filter, click on its button in the bar, and specify your query in the control that appears.
Note
Filter controls might look different depending on the type of data you are going to filter, e.g., textual, numeric, a date or an option set.
Organize a coupons list to define which columns to show in the grid: Click above the table on the far right.
- To choose the columns to be displayed in the table, select the check box next to the required column under Show. Clear the check box to make the column disappear from the table.
- To change the order of the columns, click next to the name of the column you wish to move, hold the mouse button and drag the column to the required position.
- To refresh the coupon list, click .
- To reset the coupon list, click to clear list customization and return to default settings. Reset applies to all filters, records per page and sorting changes that you have made.
Manage Coupons in Orders
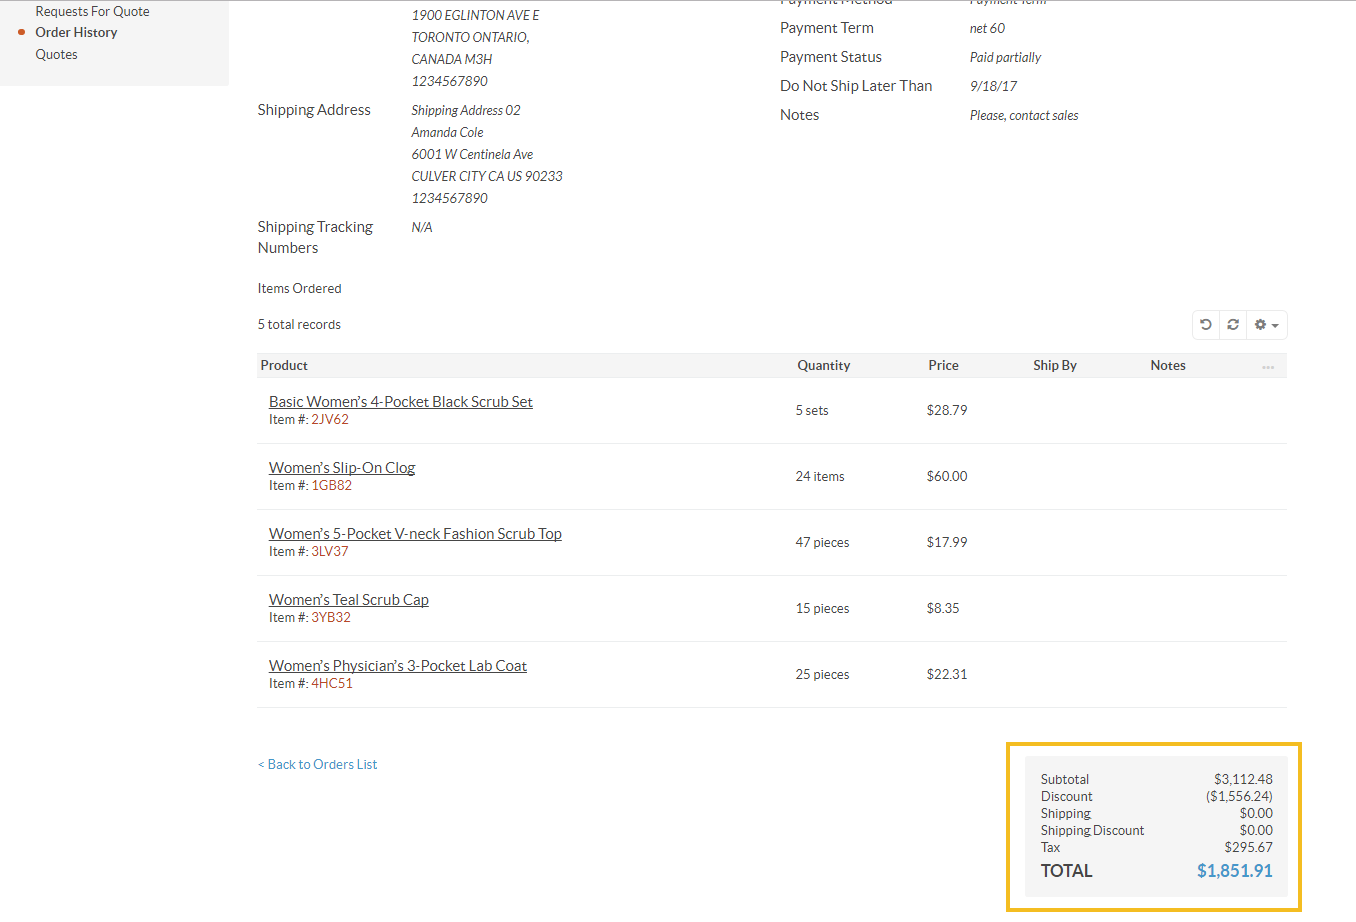
In your Oro application, you can manage coupons from the page of the selected order. Specifically, you can:
- View the coupon applied to the order under Promotions and Discounts of the order page.
- Add a coupon to the order manually.
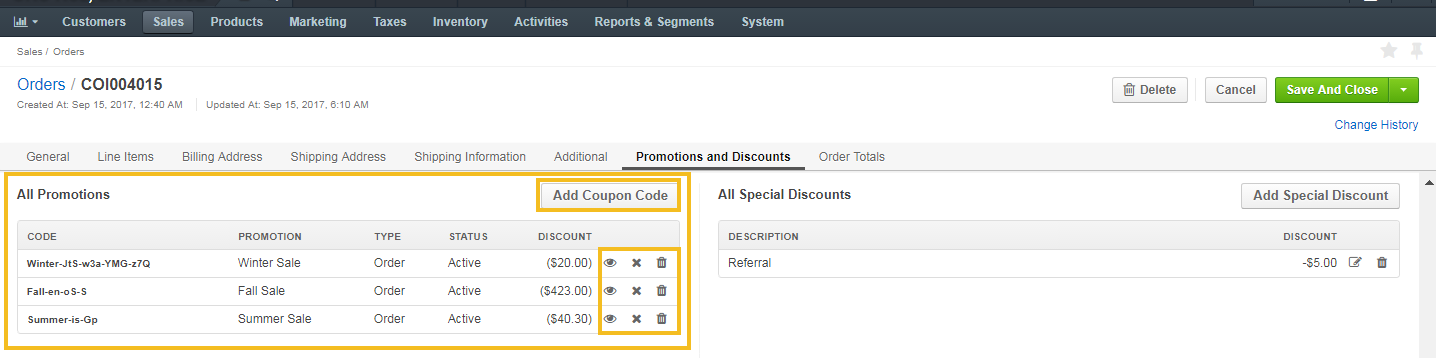
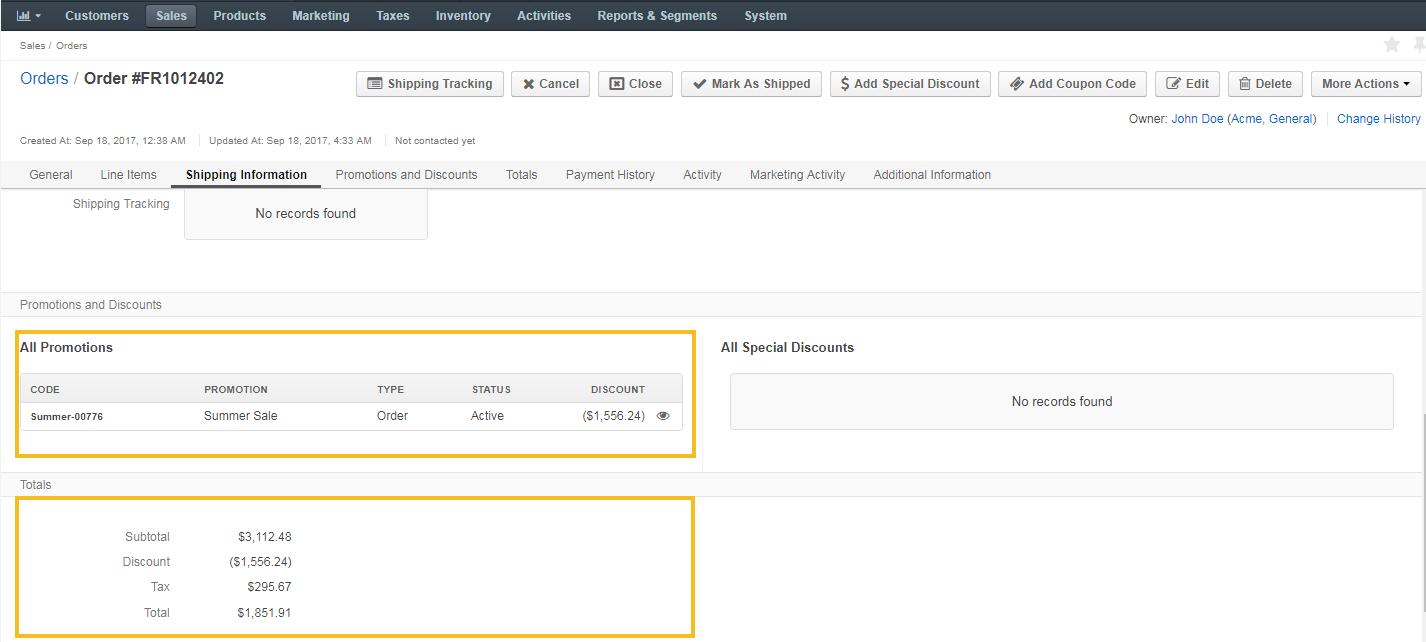
View Coupon Codes
To view the coupon codes that apply to the selected order:
Navigate to Sales > Orders in the main menu.
Click once to open the required order to open it.
Click Promotions and Discounts to open the section.
Under All Promotions on the left of the section, click at the end of the coupon code row.
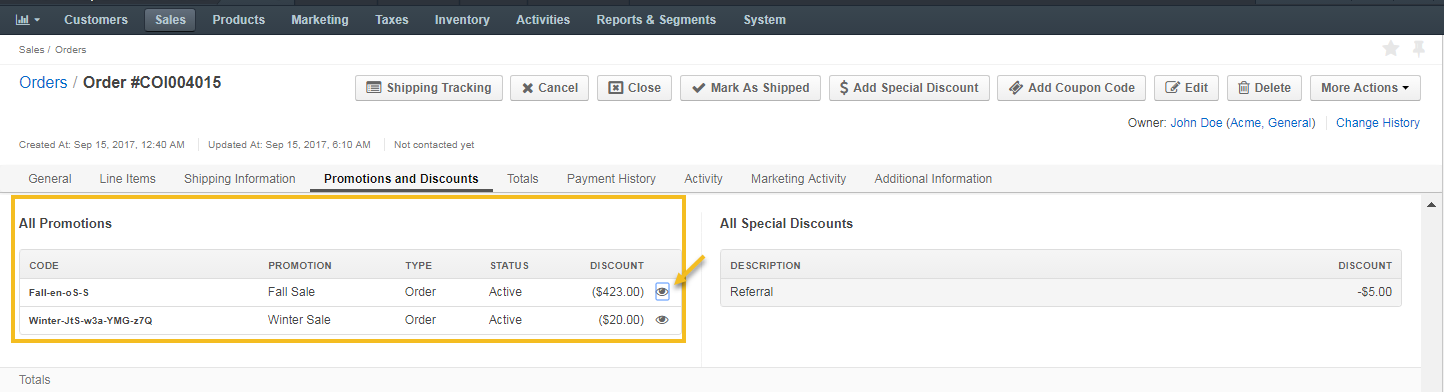
In the popup that opens, you can view the details of the selected coupon, as illustrated below.

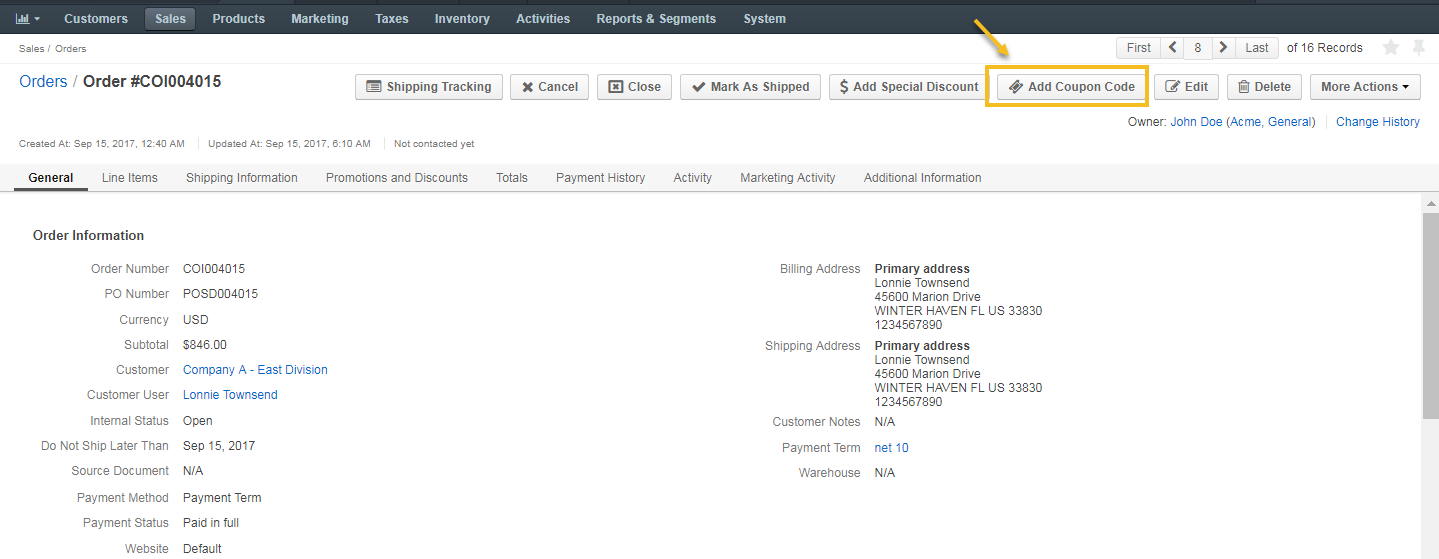
Add Coupons Through the Order Page
To add a coupon code to the required order from its page:
Navigate to Sales > Orders in the main menu.
Click once to open the required order to open it.
On the order page, click Add Coupon Code on the top right.
In the popup that opens, choose a coupon code from the list:
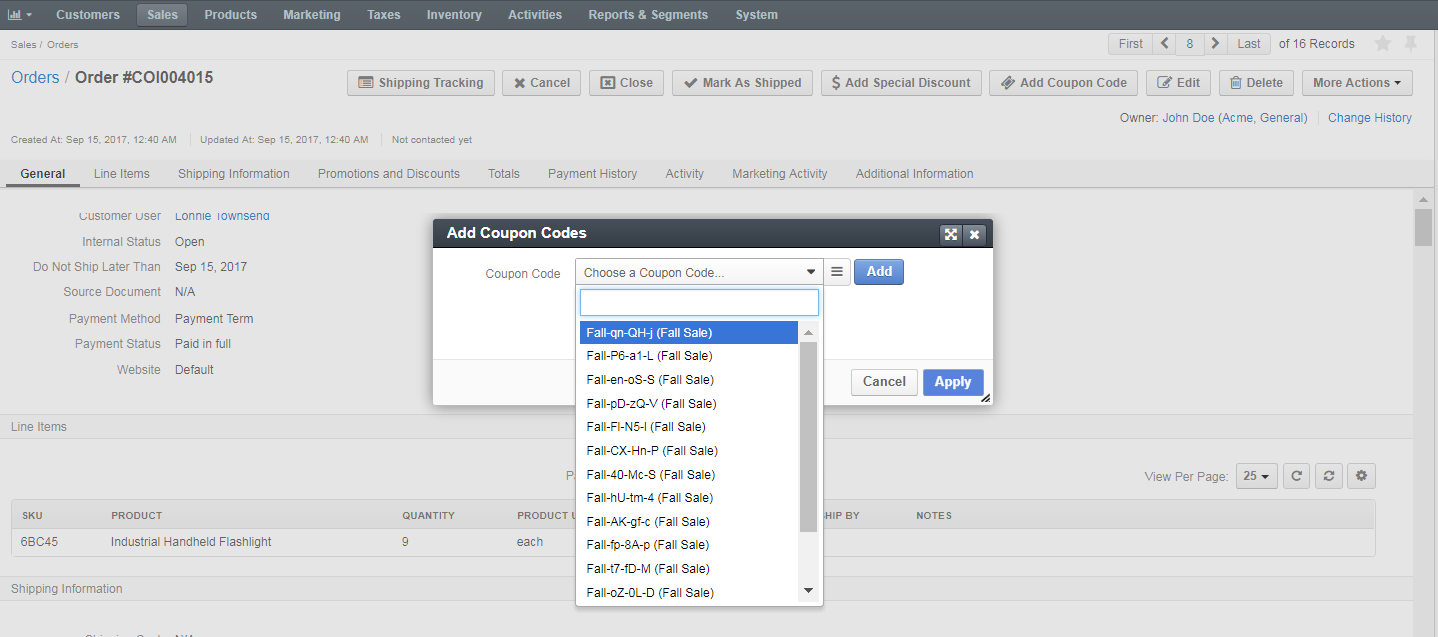
Alternatively, click to load the list of all available coupons:
Click Add to add the selected coupon code.
Click Apply to apply the coupon code.
Note
Please keep in mind that you cannot apply two coupon codes to one order if they are related to the same promotion.
The applied coupon code will be displayed under All Promotions in the Promotions and Discounts section.
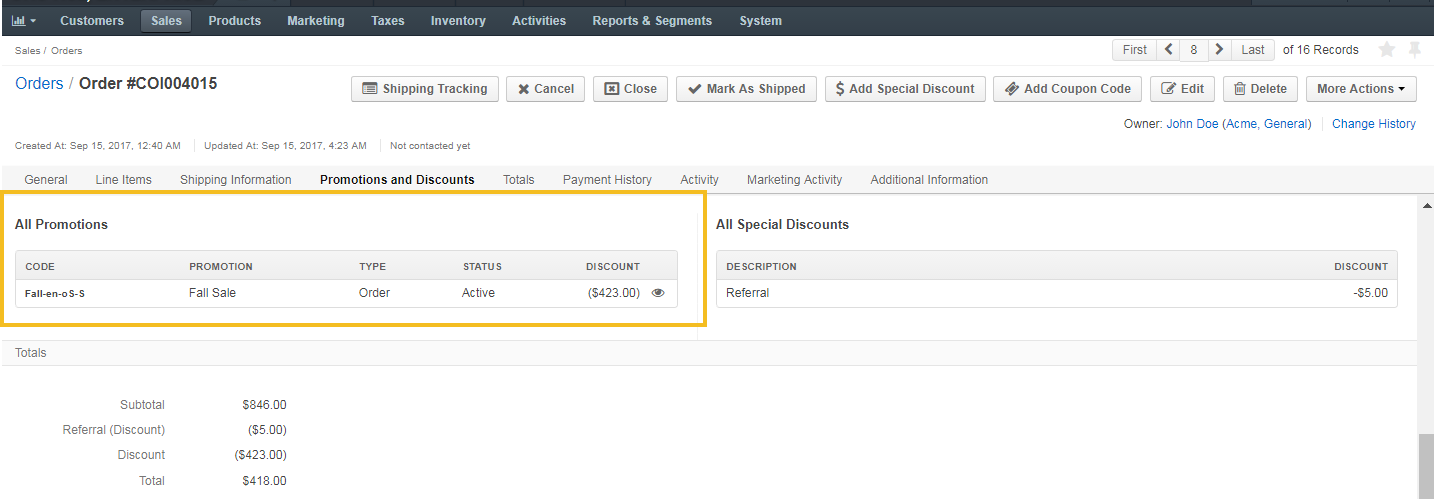
This way you can apply as many coupons to the order as necessary as long as they belong to different promotions.
Manage Coupons When Editing the Order
When editing the selected order, you can perform the following actions with the coupons under All Promotions in the Promotions and Discounts section:
Add Coupon Code and follow the steps described in the Add Coupons Through the Order Page page.
View a coupon code.
Deactivate/ activate a coupon code.
Note
When you deactivate the coupon code, its status is changed from active to inactive. It is not removed, and you can reactivate it when necessary.
Delete a coupon code.
Note
When you add, deactivate, or delete coupons when editing orders, the price totals and the shipping cost may change. Please, review the order totals to make sure that the cost is acceptable.
Create a Sample Coupon
As an illustration, let us create a sample promotion and generate 100 coupons for it. These coupons will be redeemed for orders placed by first-time customers. The promotion will offer a 50% discount for all orders between 18 and 22 September 2017.
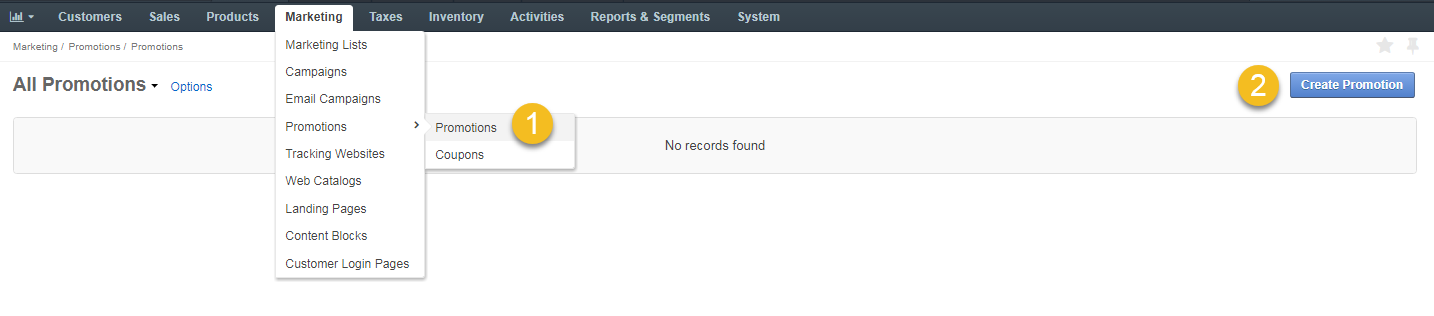
Create a Promotion
As coupons should always be linked to promotions, the first step is to create a new promotion:
Navigate to Marketing > Promotions > Promotions in the main menu.
Click Coupons Actions > Create Promotion on the top right.
In the form that opens, specify the discount details and items, making sure that the Triggered by field is set to Coupons and Conditions.
The sample promotion is called Summer Sale, and the discount options are 50% off all orders
- Click Save and Close.
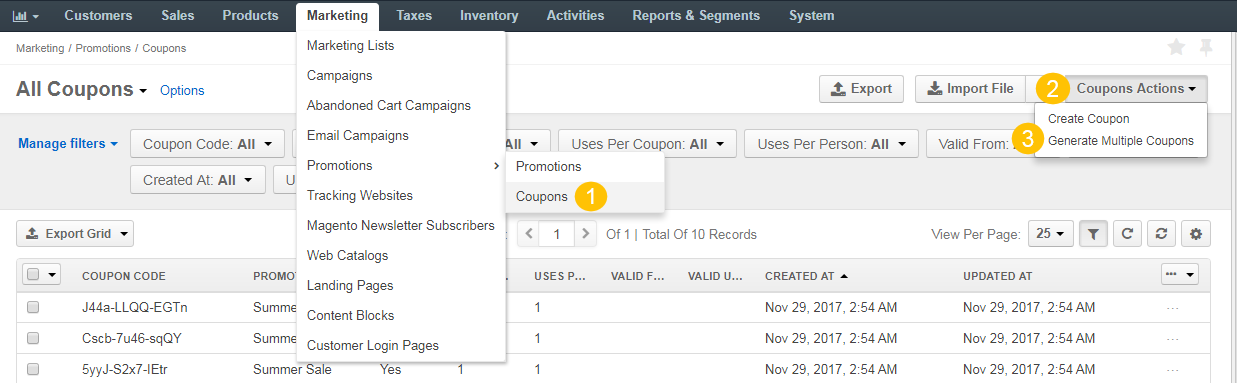
Generate Coupons
Next, we will generate coupons for this promotion:
Navigate to Marketing > Promotions > Coupons in the main menu.
Click Coupons Actions > Generate Multiple Coupons.
In the pop up that opens, specify the details of the coupons, making sure that the Coupon Quantity is set to 100 and the coupons are linked to the newly created promotion (in our case, the Summer Sale promotion).
Click Generate once all the details are provided.
Add Coupons to an Order
Now that the promotion has been created and coupons generated, we can add a coupon to the order that fits the conditions of the discount.
Navigate to Sales > Orders in the main menu.
Select the relevant order and click on it once to open.
Click Add Coupon Code on the top right of the order page.
Select the coupon from the list, click Add and then Apply.
The coupon for 50% off is now applied to the order.
In their storefront account, the customer will be able to see the discount applied to their order in the Order History menu.
Export Coupons
To export the coupons in a .csv format:
- In the main menu, navigate to Marketing > Promotions > Coupons.
- To export information on all coupons, click Export on the top right.
- Once export is complete, you will receive an email to download the .csv file.
Import Coupons
Import File option helps import large bulk of coupon information into the coupons list using the .csv file.
Example of coupon bulk import template
| Coupon Code | Enabled | Uses per Coupon | Uses per Person | Valid From | Promotion Name | Owner Name |
|---|---|---|---|---|---|---|
| 123 | 1 | 1 | 1 | 01-12-2018 | Discounts | Owner Name |
To import a bulk of coupons:
In the main menu, navigate to Marketing > Promotions > Coupons. The coupons list opens.
Click Import File on the top right.
Prepare data for import: Create your bulk information in the .csv format. Once your file is ready, click Choose File, select the prepared comma-separated values (.csv) file, and click Import File.
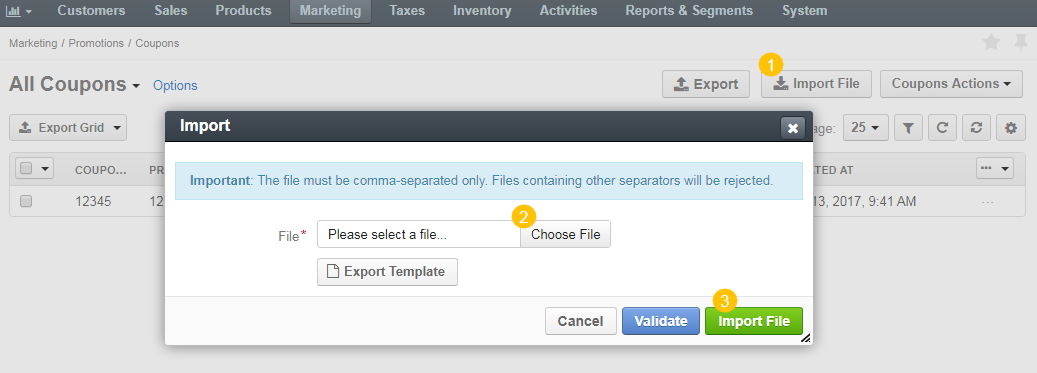
Validate import results: Click Validate to check your import results. If there are any Records with errors, fix them in the .csv file before starting the import.
Launch import: After successful validation, click Import File.
Click Cancel to decline the import.
Important
Interactive status messages inform about the import progress, and once the import is complete, the changes are reflected in the list upon refresh. Additionally, an email message with the import status is delivered to your mailbox.