Important
You are browsing the documentation for version 3.1 of OroCommerce, OroCRM and OroPlatform, which is no longer maintained. Read the latest LTS version of the Oro documentation to get up-to-date information.
See our Release Process documentation for more information on the currently supported and upcoming releases.
Manage Customer Groups in the Back-Office
Hint
This section is a part of the Customer Management topic that provides the general understanding of accounts, contacts, customers and customer hierarchy available in Oro applications.
In the Customer Group section, you can organize customers into groups and share the price lists, payment and tax-related settings between several customers.
Hover over the More Options menu to the right of the necessary customer group to perform the following actions:
View customer group details. Alternatively, click on the item to open its details page.
Edit customer group details.
Delete existing customer groups.
Create a Customer Group
Note
See a short demo on how to create customer groups in OroCommerce, or keep reading the step-by-step guidance below.
To create a new customer group:
Navigate to Customers > Customer Groups in the main menu.
Click Create Customer Group.
Fill in the customer Name.
Select Tax Code that will label the customer group taxation schema.
In the Additional section, select a Payment term to be used as a payment option available to the customer users during on the checkout.
In the Customers section, check the customers to add them to the customer group.
In the Price Lists section as described in the Price List Management for a Customer Group section.
Click Save in the top right corner.
Manage Price Lists for a Customer Group
To configure the price list priority and controlled merge for the customer group:
Navigate to Customers > Customer Groups in the main menu.
Find the necessary customer group in the list, hover over the More Options menu in the line and click to start editing the customer group details.
In the Price Lists section, you can build an aggregated price list for every website you have configured in OroCommerce. Use tabs to switch between the websites, e.g., Default, US, Australia, etc. in the example below.
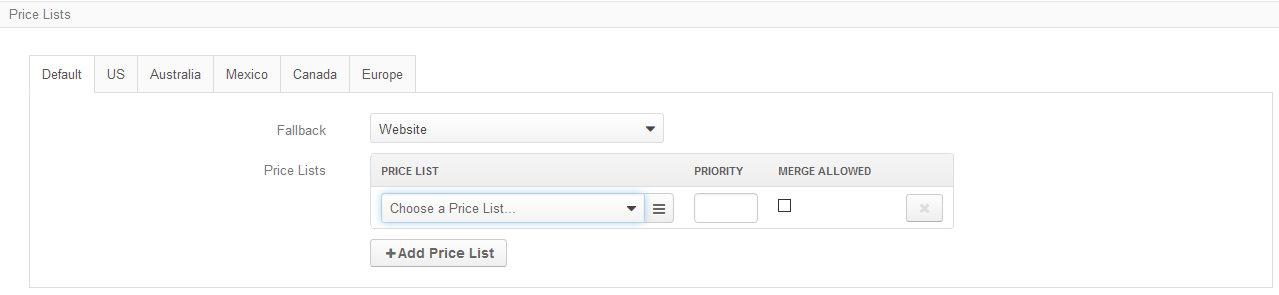
To form an aggregated price list:
Set up the fallback option to provide the price source if the price is not available in the directly configured price lists.
Select the price list to enable it for the customer group.
Note
You can add more than one price list:
Click + Add Price List.
Select the additional price list from the list.
Set the numeric priority. OroCommerce searches for the product price in the higher priority price lists first.
Enable price lists merge, if necessary. When the merge is enabled, the unit prices may be merged from the lower priority price lists, when they are missing in the higher priority ones.
Click Save once you are happy with the price list set up.