Important
You are browsing the documentation for version 3.1 of OroCommerce, OroCRM and OroPlatform, which is no longer maintained. Read the latest LTS version of the Oro documentation to get up-to-date information.
See our Release Process documentation for more information on the currently supported and upcoming releases.
My User
Important
The provided description covers fields and features that are default or commonly used. The actual set of available elements may vary depending on your role and other system settings.
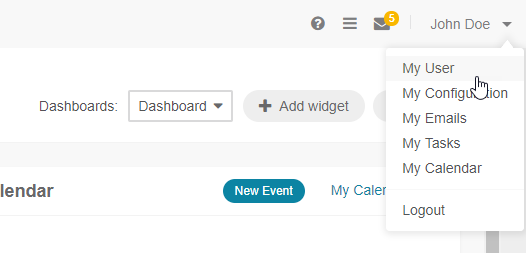
When you log into the Oro application, you can always find a link to your user page under menu below your username. This is a fast way to access your user profile, calendar, mailbox, and task list.
Explore Your User Page
There are a number of effective tools and actions available on the page of your user profile, from configuring your personal profile to generating an API key for third-party applications. In particular, from the page of your user profile you can:
View your full name, avatar, and system information such as status, login count, date and time of the last login.
The first status shows that you are granted rights to use the system. The second status is called an authentication status and shares the state of your password. As you can see your user page only when you are logged into the system, you will always see Enabled as the first status and Active as the second one. When an administrator views your page, they will able to see the values of your statuses.

You can also check which business unit owns your user record. Click on the owner name (e.g., Acme, General ) to open the page of the corresponding business unit. If you are logged into the organization with global access (i.e., a technical organization that aggregates data from all organizations created in the system), then in brackets you will see the name of the organization that owns the user.

You can also see who, how, and when modified your profile by clicking Change History link.
Access user-level configuration options.
In particular, you can set up localization, language, display settings, update email configuration details, provide MS Outlook integration and synchronization settings details, as well as configure customer-visible contact information in the storefront. Read more about the available settings in the relevant User-Level Configuration section of the documentation library.
Edit your user profile.
To update the details of your profile, click Edit on the top right on the page. On the edit page, you can update your credentials, change the password, upload a new avatar, and update email details.
Perform actions available under the More Actions menu:
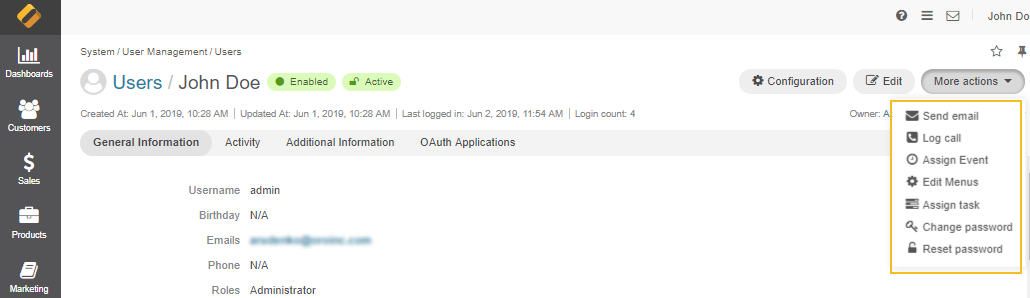
Note
Non-default buttons can be added to More Actions menu. If you see non-default buttons such as Add Task, Add Event or Add Attachment, please refer to the Activities guide for more information.
View your profile details aggregated under 3 sections: general information, activity, and additional information.
In the General Information section, you can view the details of your profile, create an API key, and download the latest MS Outlook add-in.
In the Activity section, you can see the emails you sent and the calls you logged. If a user mentions you as a context for their activity, this activity also appears on the list. See the Activities topic for more information on activities available in the Oro application.
In the Additional Information section, you can view and manage tasks and cases related to you. See the Activities topic for more information on activities available in the Oro application.
Generate an API Key
When a third-party software requires an API key to integrate with your Oro application, you can generate it on the page of your profile.
Click on your user name on the top right of the screen.
Click My User.
In the General Information section, click Generate Key next to the API Key label.
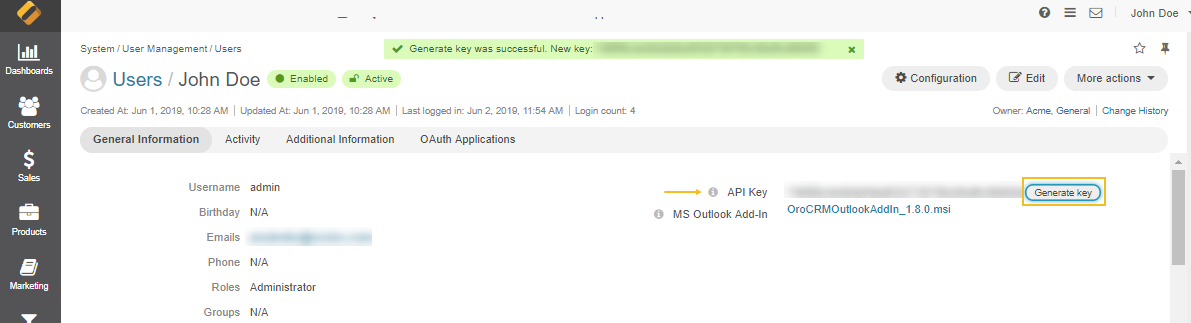
Copy the generated key and use it where required.
Caution
One user can have only one API key at a time. When you generate a new key, the old key becomes invalid.
Change Your Password
You can change your password to the Oro application in 3 ways:
When editing your user profile.
Using the More Actions menu on your user profile page.
By resetting it using the More Actions menu on your user profile page.
Note
It is recommended to change your password after the first login, unless you use a Google account or corporate-wide credentials.
To change your password when editing your user profile:
Click on your user name on the top right of the screen.
Click My User.
On the page of your profile, click Edit.
In the Password section, provide the following information:
Password — Provide your current password.
New Password – Provide new password. It must be at least 8 characters long and include a lower case letter, an upper case letter, and a number
Repeat New Password – Confirm the new passport by typing it in once again.
Click Save. The new password will be sent to your primary email address.
To change your password via the More Actions menu:
Click on your user name on the top right of the screen.
Click My User.
On the page of your profile, click More Actions > Change Password.
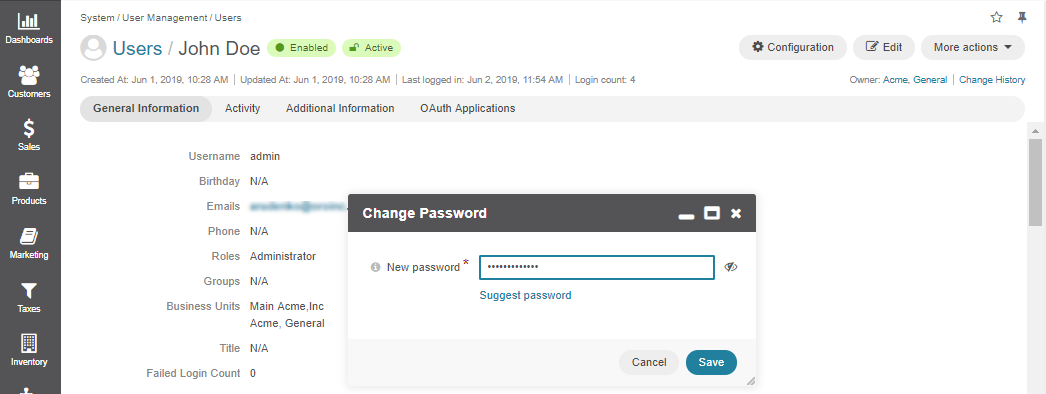
Provide a new passport in the corresponding field. Alternatively, click Suggest Password to generate a secure random password. To see/hide the entered password, click the Show / Hide icon next to the New password field.
Click Save. The new password will be sent to your primary email address.
To reset your password via the More Actions menu:
Only administrators can reset passwords.
Click on your user name on the top right of the screen.
Click My User.
On the page of your profile, click More Actions > Reset Password.
In the dialog box, click Reset. The password reset link will be sent to your (admin) primary email address.
Download MS Outlook Add-in
Important
The Outlook integration is deprecated and therefore no longer maintained. The integration will be removed in version 4.1.
The Enterprise edition of your Oro application (OroCRM or OroCommerce) supports an out-of-the-box integration with MS Outlook (2010, 2013, 2016). To configure this integration between your Oro Enterprise application and MS Outlook, you need to download the MS Outlook add-in.
The link to the MS Outlook add-in is located in your Oro application instance on the page of your user profile.
To download the add-in:
Click My User below your username on the top right of the application screen.
Next to the MS Outlook Add-in option, click the link to download the file.
Open the downloaded file and start the installation process.
More information on how to setup MS Outlook Integration is available in the relevant MS Outlook Integration topic in the Oro documentation library.
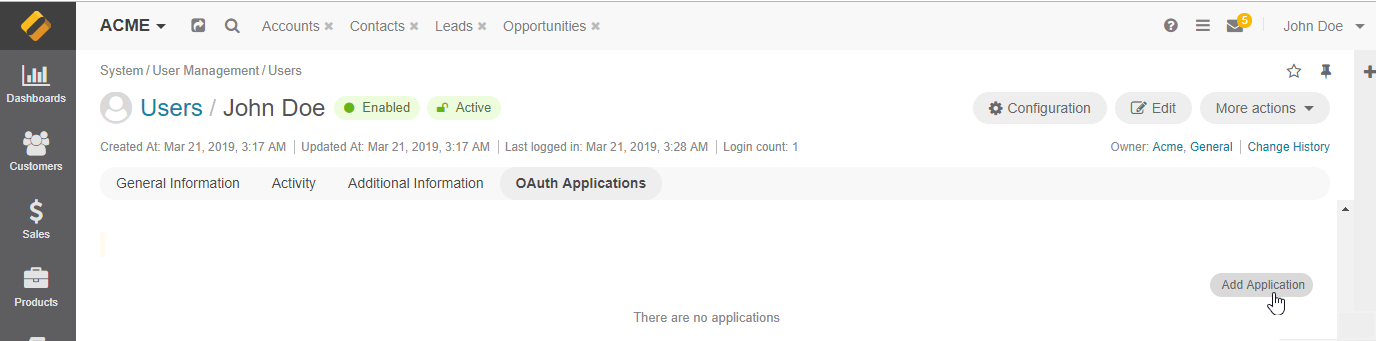
Add OAuth Applications
Hint
The feature requires extension, so visit Oro Marketplace to download the OAuth 2.0 Server extension and then use the composer to install the extension to your application.
Oro applications support oAuth 2.0 credentials authorization grant type to enable connection of third-party applications to the web API. To connect a third-party application, you need to add it and configure its pre-generated credentials in the back-office of your Oro application. These credentials are managed on user level which enables generation of different credentials for various applications across multiple organizations.
Starting Conditions
To be able to add an OAuth application, make sure that you generate private and public encryption keys and add them to the /var directory of the installed Oro application. Although the path to the keys is predefined, you can change it by providing your custom location in the config.yml file.
Note
If no keys are found, the following warning message will be displayed in the back-office:
OAuth authorization is not available as encryption keys configuration was not complete. Please contact your administrator.
Oro Side: Add an Application
To add a new OAuth application in the back-office:
Click on your user name on the top right of the screen.
Click My User.
In the OAuth Applications section, click Add Application on the top right and provide the following details in the pop-up dialog:
Organization — If you are adding an application within the organization with global access, you can select which other available organization to add the application to. This field is displayed to users with access to multiple organizations.
Application Name — Provide a meaningful name for the application you are adding.
Active — Select the Active check box to activate the new application.
Click Create.
A corresponding notification is sent to the primary email address of the user, the owner of oauth application. You can change the default recipient, localization, or an email content if needed by updating the OAuth email templates and the related notification rule set out-of-the-box in the system configuration.
Once the application is created, you are provided with a Client ID and a Client Secret. Click on the icon to copy the credentials to the clipboard.

Important
For security reasons, the Client Secret is displayed only once – immediately after you have created a new application. You cannot view the Client Secret anywhere in the application once you close this dialog, so make sure you save it somewhere safe so you can access it later.
You can add as many applications as you need for any of your existing organizations. All added applications are displayed in the grid, and you can filter them by name, organization, and status.
Hint
Use the More Options menu to edit, deactivate or delete an application.

Use the generated Client ID and Client Secret to retrieve an access token to connect to your Oro application.
Third Party Side: Generate Token
To configure machine-to-machine authentication and retrieve the access token:
Provide your Request URL.
The Request URL consists of your application URL and the /oauth2-token slug, e.g.,
https://yourapplication/oauth2-token.Send a POST request with the following body parameters to the authorization server:
grant_type with the value client_credentials
client_id with the client’s ID
client_secret with the client’s secret
scopes with a space-delimited list of requested scopes permissions
Note
client_credentials is currently the only supported grant type.
Receive response from the authorization server with a JSON object containing the following properties:
token_type with the value Bearer
expires_in = 3600 seconds. Once the token is generated, it is valid for an hour and can be used multiple times within this time limit to request the necessary data.
access_token a JSON web token signed with the authorization server’s private key
Use the generated access token to make requests to the API.
Note
Access tokens for backend and frontend API are not interchangeable. If you attempt to request data for the frontend API with a token generated for the backend application (i.e., a back-office user), access will be denied.
Note
Next, read the topic on how to Add OAuth Applications to OroCommerce Storefront.
Configure User-Level Settings
Read the My Configuration topic for the details on how to configure available system settings for a particular user.
Related Topics