Important
You are browsing the documentation for version 3.1 of OroCommerce, OroCRM and OroPlatform, which is no longer maintained. Read the latest LTS version of the Oro documentation to get up-to-date information.
See our Release Process documentation for more information on the currently supported and upcoming releases.
MS Outlook Integration
Important
The Outlook integration is deprecated and therefore no longer maintained. The integration will be removed in version 4.1.
The Enterprise edition of your Oro application (OroCRM or OroCommerce) supports an integration with MS Outlook (2010, 2013, 2016). All contacts, tasks and calendar events can be synchronized between Oro and a specific MS Outlook account with the help of an MS Outlook add-in. In addition, with the help of the add-in, leads, opportunities and cases can be created on the Outlook side and synchronized back to Oro.
The following guide outlines the prerequisites for the MS Outlook extension integration, describes the step-by-step setup process on both sides, and gives an overview of the synchronization workflow between the applications.
Note
Please be aware that emails are not synced in the course of Outlook integration. To learn about email synchronization, please refer to Email Configuration topic.
Install Extension
To setup MS Outlook integration, use the composer to install the oro/outlook package in your Oro Enterprise application, as described in the Extensions and Package Manager Guide topic.
Before You Begin
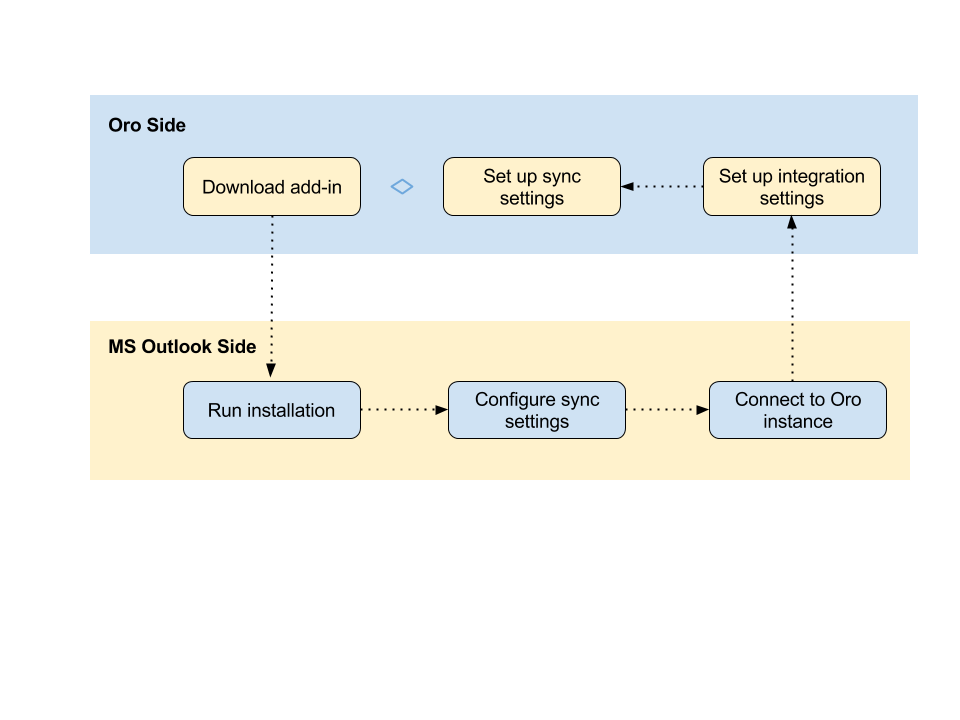
To configure the integration between your Oro Enterprise application and MS Outlook, you need to perform 6 simple steps:
Ensure that you meet the hardware and software requirements.
Download MS Outlook Add-in.
Set up the add-in on the Outlook side.
Connect the add-in to your Oro instance.
Configure Outlook settings on the Oro side.
Synchronize applications.
Check Hardware and System Requirements
Hardware Requirements
Hardware |
Minimum |
Recommended |
|---|---|---|
RAM |
MS Outlook x86, x64 – 4GB |
MS Outlook x86 – 4GB, MS Outlook x64 – 8GB |
CPU |
MS Outlook x86 - 1 GHz IA-32 processor, MS Outlook x64 - 1 GHz x86-64 processor |
MS Outlook x86 – 2-3 GHz IA-32 processor (Dual Core), MS Outlook x64 – 2-3 GHz x86-64 processor (Dual Core) |
HDD |
Requirements for available disk space depend on the size of PST file you operate, and other programs installed on your computer. |
At least 40GB of available disk space. |
Disk average rotational latency |
20 milliseconds |
5 milliseconds |
Software Requirements
OroCRM Enterprise version 1.6+
Outlook 2010+
Note
Please be aware that the following factors may influence your Outlook add-in performance:
Email archiving
Antivirus
Mobile devices connected to the computer
Voice mail
Other programs or Outlook add-ins that create additional views or search folders
Download MS Outlook Add-in
The link to the MS Outlook add-in is located in your Oro application instance.
To download the add-in:
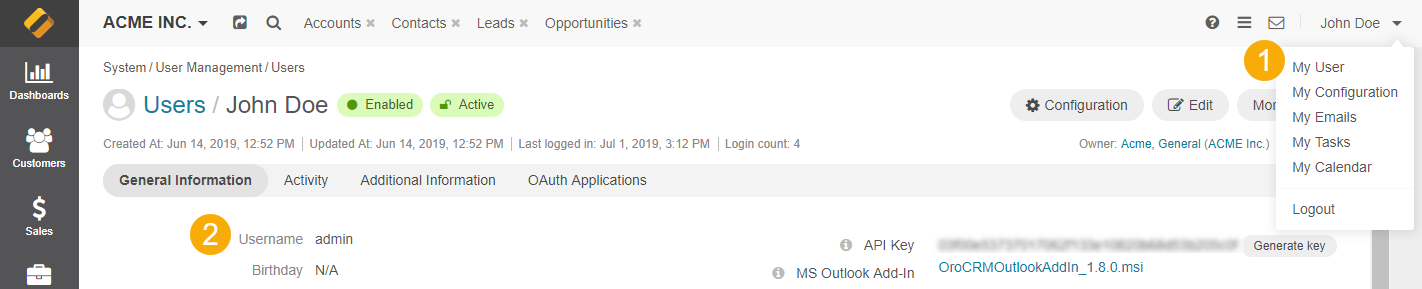
Click My User below your username on the top right of the application.
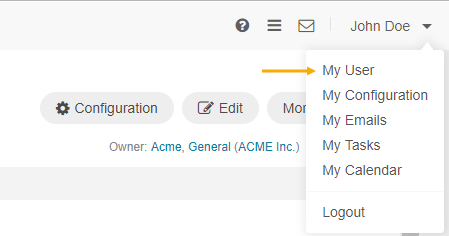
Next to the MS Outlook Add-in option, click the link to download the file.
Note
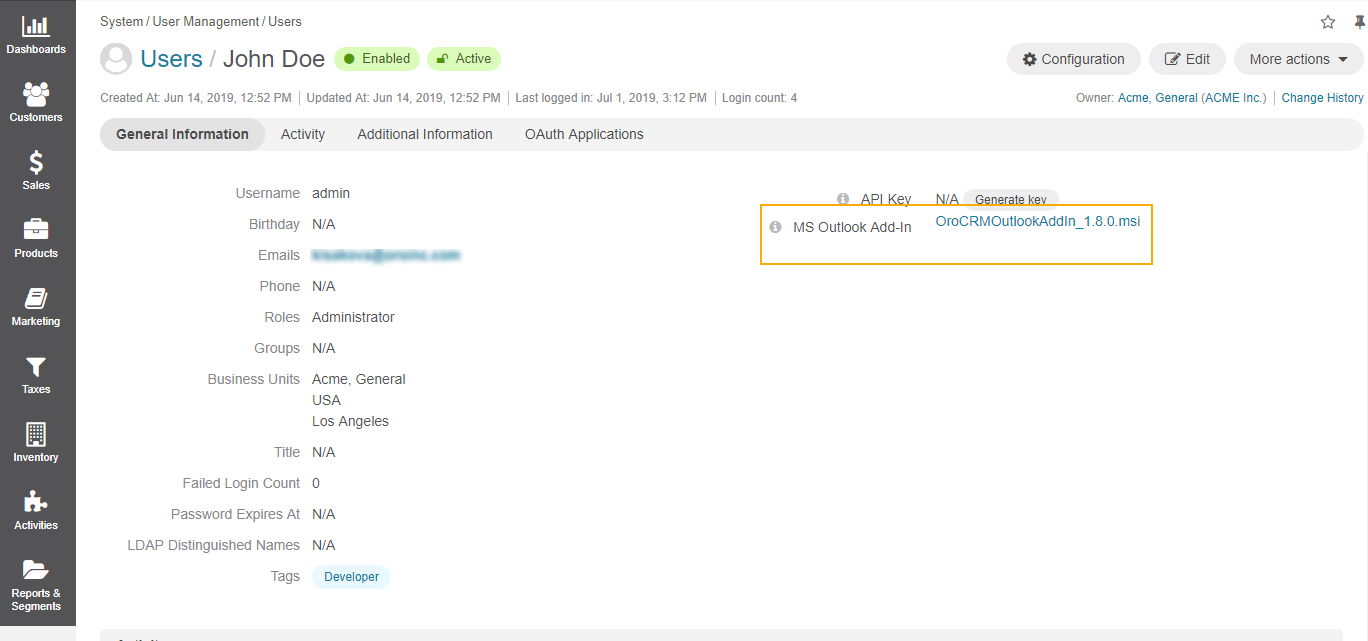
At this point it is also recommended to generate an API key by clicking Generate Key next to the API Key option. Once generated, copy the key as it will later be required during add-in installation.
Open the downloaded file and start the installation process.
Note
You may be asked to install Visual Studio 2010 for office Runtime before proceeding with the add-in installation.
Connect MS Outlook Add-in to Oro Instance
During add-in installation you are required to provide integration settings to ensure correct work between applications:
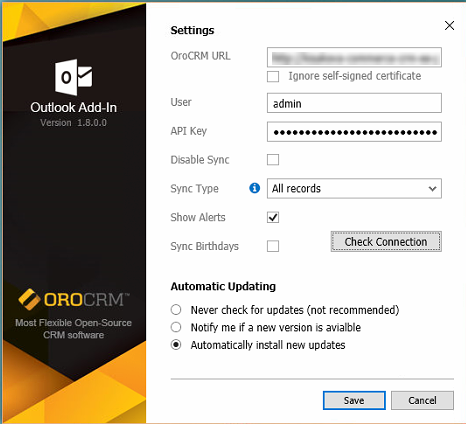
OroCRM URL — Provide the URL of your instance:
If you are running a CRM application, copy the URL from the address bar. Alternatively, copy it from the Application URL field by navigating to System > Configuration > System Configuration > General Setup > Application Settings (e.g. demo.orocrm.com).
If you are running an OroCommerce application, add /admin at the end of the URL. Otherwise, connection between the add-in and your Oro instance may fail (e.g. demo.orocommerce.com/admin).
Ignore self-signed certificate — Check this box to allow connection to secure servers that use self-signed certificates. We recommend to keep this box checked at all times.
User — Provide the username defined on the My User page of your Oro instance.
API Key — Paste the API key generated in your Oro instance.
Note
You can generate the key by opening My User page and clicking Generate Key next to the API Key option. Copy the key once generated.
Disable Sync — this check box defines synchronization conditions.
When Disable Sync is not selected, synchronization runs automatically within the intervals defined in your Oro instance.
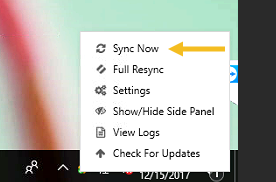
When Disable Sync is selected, synchronization has to be triggered manually. One way of doing this is by right-clicking on the Outlook add-in icon on the bottom right of your screen and clicking Sync Now.
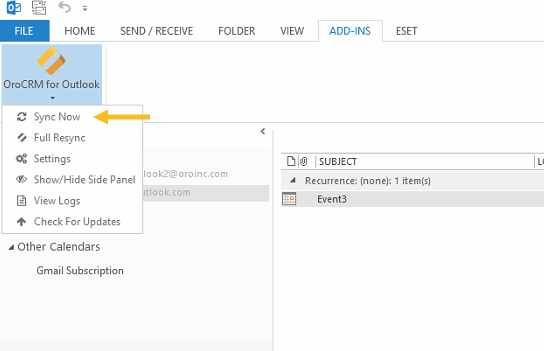
Alternatively, start sync within your Outlook application by clicking the ADD-INS tab, and clicking Sync Now in the OroCRM for Outlook settings menu.
Sync Type — Select whether you wish to sync all or selected records.
Show Alerts — This check box controls whether alerts are displayed in the bottom panel next to the add-in icon:
If the Show Alerts check box is checked, sync-related alerts pop up in the bottom panel.
If the Show Alerts check box is not checked, alerts are not displayed.
Sync Birthdays — Select the check box if you wish to sync contacts’ birthdays.
Check Connection — Click Check Connection once you filled in all the settings fields. A corresponding message pops up when the connection fails/is successful.
Automatic Updating — Define the schedule and conditions for updates.
Click Save to save these settings.
When the add-in is installed, you see its icon displayed on the bottom right corner of your computer screen.

Note
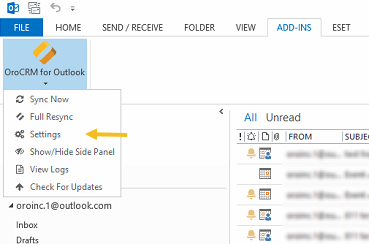
You can access the same settings after installation by clicking Settings in the OroCRM for Outlook menu under the ADD-INS tab in your Outlook application.
Configure Outlook Integration in Oro
Once you downloaded and installed the add-in, you can configure MS Outlook settings on the Oro side. These settings include:
MS Outlook add-in settings
Integration settings
Synchronization settings
Hint
MS Outlook settings can be configured globally, per organization, and per user, with the exception of MS Outlook add-in settings, which can only be managed globally.
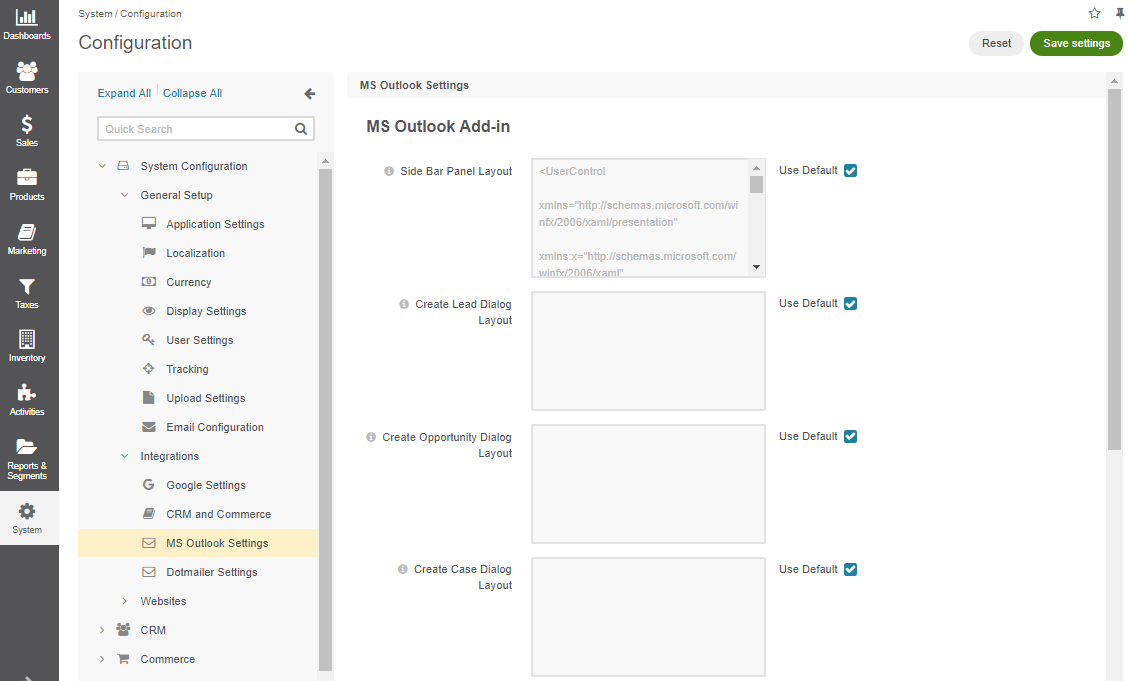
Configure MS Outlook Add-in Layout Settings
When the add-in is installed, a side bar panel appears on the right side of the Outlook window which displays the actions that can be performed in Outlook and synchronized back to Oro (e.g. create a lead). Depending on the synchronization settings set up between the applications, you can create leads, opportunities, and cases from within MS Outlook using the side bar, and then sync them back to Oro.
The layout of this sidebar, as well as the lead, opportunity, and case dialogs, can be changed by amending the default XAML code (or providing a new one) in the MS Outlook Add-in Settings on the Oro side.
To change the layouts:
Navigate to System > Configuration in the main menu.
Click System Configuration > Integrations > MS Outlook Settings in the panel to the left.
On the MS Outlook settings page, clear the Use Default check box for the required option (e.g. Side Bar Panel Layout).
Modify the default XAML code to alter the layout.
Click Save Settings.
Note
For the changes to take effect, remember either to start sync manually, or wait until automatic sync finishes.
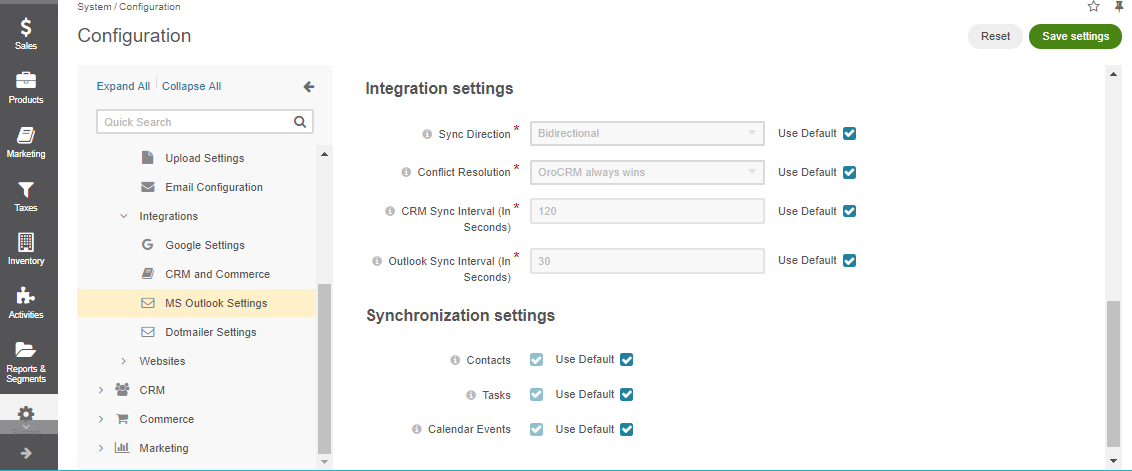
Configure Integration Settings
To configure the set of entities to be synchronized, the synchronization direction, intervals and priority of conflict resolution between Oro and MS Outlook:
Navigate to System > Configuration in the main menu.
Click System Configuration > Integrations > MS Outlook Settings in the panel to the left.
The following settings are available:
Setting
Description
Possible Values
Default Value
Sync Direction
The data synchronization direction
OroCRM to Outlook
Outlook to OroCRM
Bidirectional
Bidirectional
Conflict Resolution
Conflict resolution strategy to be used if the same data are changed in both Outlook and OroCRM
OroCRM always wins
Outlook always wins
OroCRM always wins
CRM Sync Interval (In Seconds)
How often changes on the CRM side are checked
Any numeric value from 1 to 86399
120
Outlook Sync Interval (In Seconds)
How often changes on Outlook side are checked
Any numeric value from 1 to 86399
30
To change the default values, clear the Use Default check box next to the required option, and select anew value.
Click Save Settings.
Configure Synchronization Settings
You can select what data you wish to synchronize between your Oro application and MS Outlook. These can be contacts, tasks, or calendar events. By default, all three are synchronized. To change the default settings globally:
Navigate to System > Configuration in the main menu.
Click System Configuration > Integrations > MS Outlook Settings in the panel to the left.
In the Synchronization section, first clear the Use Default check box next to the required option, and then the check box of the option itself.
Click Save Settings.
Create Leads, Opportunities, and Cases from Outlook
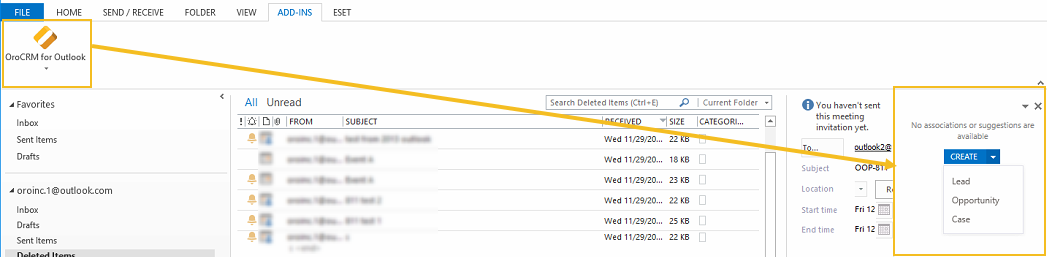
With the help of the OroCRM for Outlook add-in side panel, you can create leads, opportunities and cases from Outlook based on email data, or manually, and sync the data back to your Oro application.
Create a Lead from Outlook
To create a lead, open the add-in side panel in Outlook:
Navigate to ADD-INS in the main menu.
Click OroCRM for Outlook on the top left.
Click Show/Hide Side Panel to open the panel on your right.
Note
You can move the panel to a different location on the screen, if necessary.
In the panel, click Create.
Click Lead.
A pop-up window opens with a form to fill in. The Create Lead form has the same fields as the one in the Oro application.
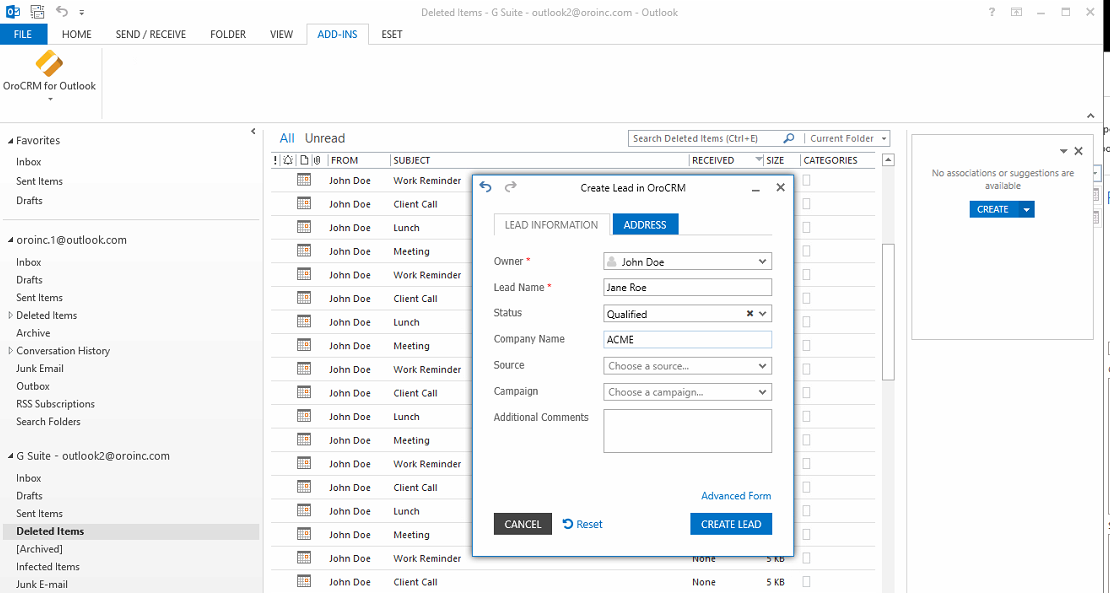
Fill in the required details, and click Create Lead on the bottom right of the pop-up window.
Start sync between the Oro and Outlook applications to sync the new lead back to Oro.
Create an Opportunity from Outlook
To create an opportunity, open the add-in side panel in Outlook:
Navigate to ADD-INS in the main menu.
Click OroCRM for Outlook on the top left.
Click Show/Hide Side Panel to open the panel on your right.
Note
You can move the panel to a different location on the screen, if necessary.
In the panel, click Create.
Click Opportunity.
A pop-up window opens with a form to fill in. The Create Opportunity form has the same fields as the one in the Oro application.
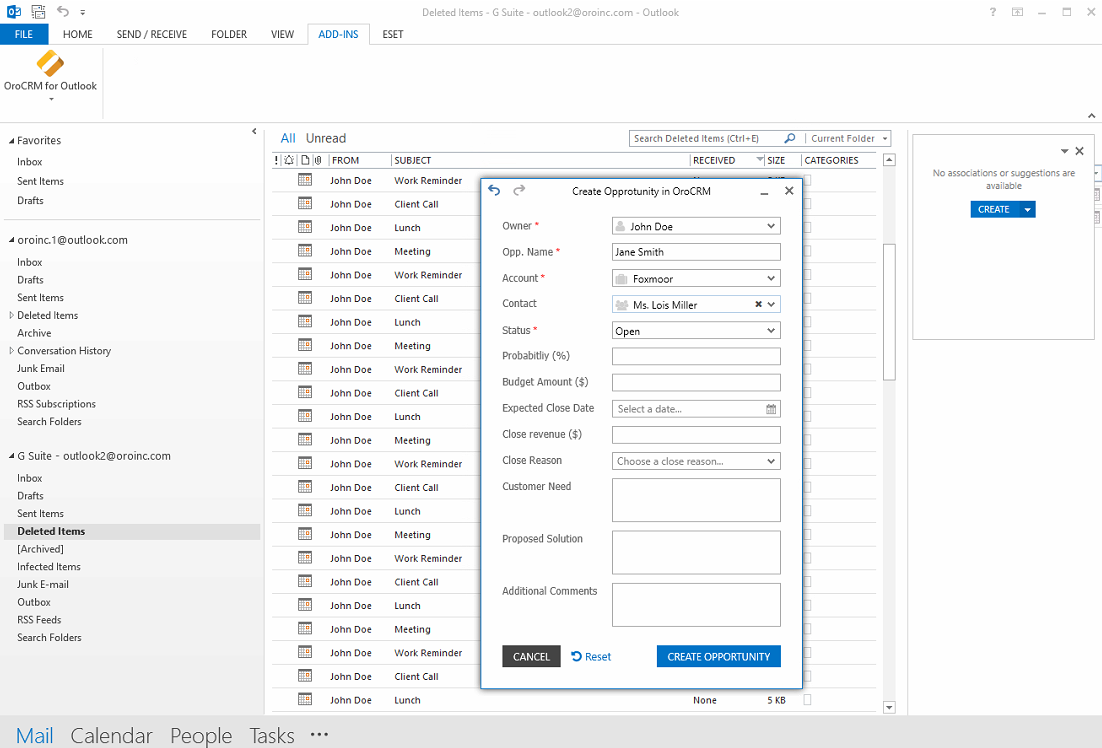
Fill in the required details, and click Create Opportunity on the bottom right of the pop-up window.
Start sync between the Oro and Outlook applications to sync the new opportunity back to Oro.
Create a Case from Outlook
To create a case, open the add-in side panel in Outlook.
Navigate to ADD-INS in the main menu.
Click OroCRM for Outlook on the top left.
Click Show/Hide Side Panel to open the panel on your right.
Note
You can move the panel to a different location on the screen, if necessary.
In the panel, click Create.
Click Case.
A pop-up window opens with a form to fill in. The Create Case form has the same fields as the one in the Oro application.
Fill in the required details, and click Create Case on the bottom right of the pop-up window.
Start sync between the Oro and Outlook applications to sync the new case back to Oro.
Review Mapping Rules Between Oro and Outlook
Specific values of the fields of OroCRM and Outlook records are mapped during synchronization of contacts, tasks, and events.
Contact Mapping Rules
The following rules represent the mapping strategy of the OroCRM contact record fields into the Outlook contact record fields.
OroCRM Field |
Outlook Field |
Note |
|---|---|---|
First Name |
First Name |
If no First Name is defined in the Outlook record, the Last Name value is used for the both first name and last name in OroCRM. |
Middle Name |
Middle Name |
— |
Last Name |
Last Name |
If no Last Name is defined in the Outlook record, the First Name value is used for both the first name and the last name in OroCRM. |
Name Suffix |
Name Suffix |
— |
Description |
Notes |
— |
All the existing email addresses are mapped. |
||
Phone |
Primary Phone |
Only the first OroCRM phone number is mapped. |
Job Title |
Job Title |
— |
Birthday |
Birthday |
— |
Gender |
Gender |
— |
Fax |
Fax |
— |
Address of a Billing Type |
Business Address |
— |
Address of a Shipping Type |
Home Address |
— |
Address with no type defined |
Other Address |
— |
Task Mapping Rules
The following fields of an OroCRM task record are mapped into the following fields of an Outlook task record.
OroCRM Field |
Outlook Field |
|---|---|
Subject |
Subject |
Priority |
Priority |
Due Date |
Due Date |
OroCRM statuses are mapped into Outlook unchanged:
OroCRM Task Status |
Outlook Task Status |
|---|---|
In progress |
In progress |
Closed |
Closed |
Open |
Open |
The Outlook statuses that are not available in OroCRM are mapped as follows:
Outlook Task Status |
OroCRM Task Status |
|---|---|
Not Started |
Open |
Completed |
Closed |
Waiting on someone else |
In progress |
Deferred |
In Progress |
Calendar Mapping Rules
The following fields of an OroCRM calendar event record are mapped to the following fields of an Outlook appointment.
OroCRM Field |
Outlook Field |
|---|---|
Title |
Subject |
Start |
Start time |
End |
End time |
All-Day Event |
All day event |
Note
Only a calendar assigned to the specified user is mapped, regardless of access settings.
Invitations, received by the user are sent to Outlook as regular calendar events.
Review Sync Rules Between Oro and Outlook
Select Sync Type: Automatic VS Manual
When connecting your MS Outlook application to the Oro instance, you can define the sync settings to be used. Synchronization can be triggered either automatically within defined time intervals, or manually. Manual synchronization can happen either via the Outlook add-in settings, or by right-clicking on the Outlook icon at the bottom of you screen. More information on synchronization settings and conditions is described in the Connect MS Outlook Add-in to Oro Instance topic.
Identify a Record
For every synchronized record, there is a defined key. The key is a set of field values used to identify a record. Fields of a key can be chosen subject to the specific company needs and defined in the back-office.
The following keys are used by default:
Entity |
Key Fields |
|---|---|
Contact |
First Name, Last Name, Gender and Birthday |
Calendar Event |
Title(Subject), Start Time, End Time and whether it is an All-day event |
Task |
Subject and Task Priority |
Every contact, task and calendar event available in OroCRM has a unique ID. When a record is saved in Outlook, the ID value is saved from OroCRM in the OroCRM_id field.
Sync Records from OroCRM to Outlook
Synchronization is run in the same way for records of activities, tasks and calendar events:
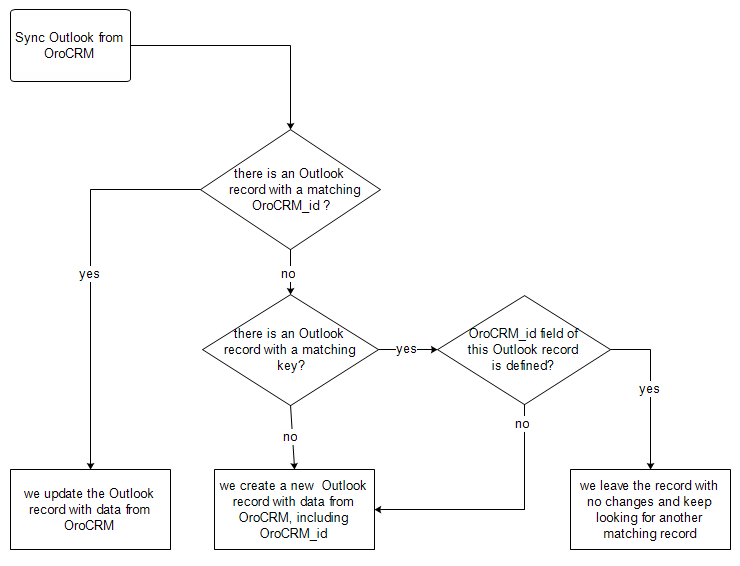
All the records processed in OroCRM since the latest synchronization date and available to the user are checked:
If the ID of an OroCRM record matches the OroCRM_id value of an Outlook record, the Outlook record is updated. (Values of all the mapped fields in Outlook are overwritten with the corresponding values from OroCRM).
If the ID of an OroCRM record does not match the OroCRM_id of any Outlook records, their keys are checked against the fields of Outlook records with an empty OroCRM_id field.
As soon as an Outlook record with empty OroCRM_id and a matching key is found, it is updated from OroCRM, and the ID value is saved from OroCRM into the OroCRM_id field of the Outlook record.
If no Outlook record with empty OroCRM_id and matching key is found, a new record is created in Outlook.
Note
During the first synchronization, or resynchronization, all Outlook records with a non-empty OroCRM_id field are deleted first, and then OroCRM record keys are checked for all of them.
If |
Then |
|---|---|
Such record already exists in Outlook. |
Values of the mapped fields of the OroCRM record replace the corresponding values for the Outlook record. |
A record does not yet exist in Outlook. |
OroCRM creates the record in Outlook. |
Multiple matching records exist in Outlook. |
OroCRM updates one of them. |
You updated a record in OroCRM. |
Values of the mapped fields of the OroCRM record replace corresponding values for the Outlook record. |
You updated a record in Outlook. |
The updates remain in the Outlook record, but are not synced into OroCRM. |
You deleted a record in Outlook. |
OroCRM creates the record again. |
You deleted a record in OroCRM. |
The record stays in Outlook with no changes. |
Sync Records from Outlook to OroCRM
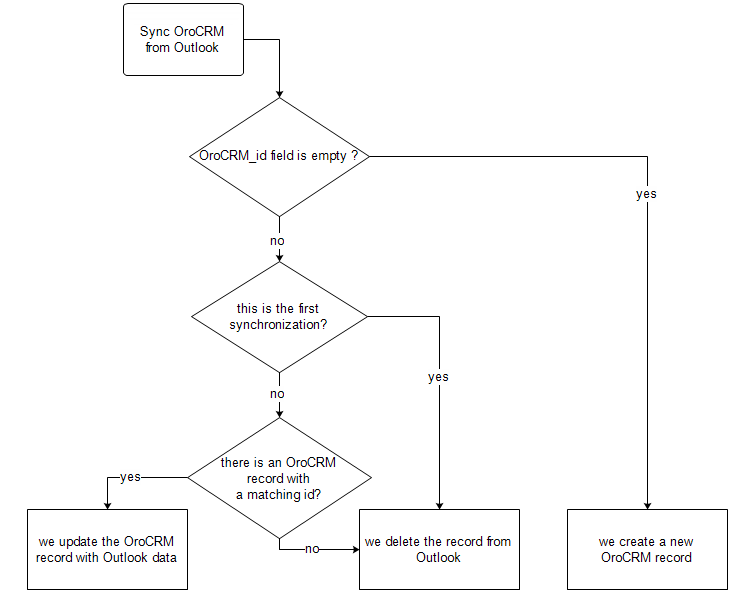
All the records processed in Outlook since the latest synchronization date and available to the user are loaded:
If the OroCRM_id field of a record is empty, a new record is created in OroCRM.
If the OroCRM_id field is defined, and this is the first synchronization or resynchronization, the record is deleted.
Otherwise, the OroCRM_id is checked against ID values of the records in OroCRM:
if a record with the matching ID is found in OroCRM, it is updated with data from Outlook.
if a record with a matching ID is absent in OroCRM, it is deleted from Outlook.
If |
Then |
|---|---|
Such record (record with such ID) already exists in OroCRM. |
Values of the mapped fields of the Outlook record replace the corresponding values for the OroCRM record. |
A record does not yet exist in OroCRM. |
A new record is created in OroCRM. |
You updated a record in OroCRM. |
Values of the mapped fields of the Outlook record replace the corresponding values of the OroCRM record. |
You updated a record in Outlook. |
Values of the mapped fields of the Outlook record replace the corresponding values of the OroCRM record. |
You deleted a record in Outlook. |
The record stays in OroCRM. |
You deleted a record in OroCRM. |
The record is deleted from Outlook. |
Sync Records with Bidirectional Synchronization
For bidirectional synchronization, synchronization from OroCRM to Outlook is performed first and followed by synchronization from Outlook to OroCRM.
If |
Then |
|---|---|
A record exists in both OroCRM and Outlook. |
Values of the mapped fields of the OroCRM record replace the corresponding values for the Outlook record. |
A record does not yet exist in OroCRM. |
A new record is created in OroCRM. |
A record does not yet exist in Outlook. |
A new record is created in Outlook. |
You updated a record in OroCRM. |
Values of the mapped fields of the OroCRM record replace the corresponding values of the Outlook record. |
You updated a record in Outlook. |
Values of the mapped fields of the Outlook record replace the corresponding values of the OroCRM record. |
You updated a record in the both OroCRM and Outlook. |
Subject to your conflict resolution settings. |
You deleted a record in Outlook. |
The record stays in OroCRM and is added to Outlook. |
You deleted a record in OroCRM. |
The record is deleted from Outlook. |