Important
You are browsing the documentation for version 3.1 of OroCommerce, OroCRM and OroPlatform, which is no longer maintained. Read the latest LTS version of the Oro documentation to get up-to-date information.
See our Release Process documentation for more information on the currently supported and upcoming releases.
Manage Product Attributes in the Back-Office
Overview
Hint
This section is a part of the Product Management topic that provides the general understanding of the product concept in OroCommerce.
A Product Attribute is a special type of custom field in the product details. For product attributes, OroCommerce enables you to manage and group attributes that are unique to a special product family. By adding the product attributes only to the product families they fit, you can limit the product data to the necessary characteristics.
For example, when your OroCommerce store sells TVs and T-shirts, these items share some generic attributes (e.g., name, vendor), and differ in the remaining attributes set. For example, there might be a Screen properties group that contains resolution, diagonal, and matrix that should be linked to the products in the TV product family. For the T-shirts family, the linked attribute group may have color, size, material, fit and care guidance (washing, ironing, dry cleaning, etc).
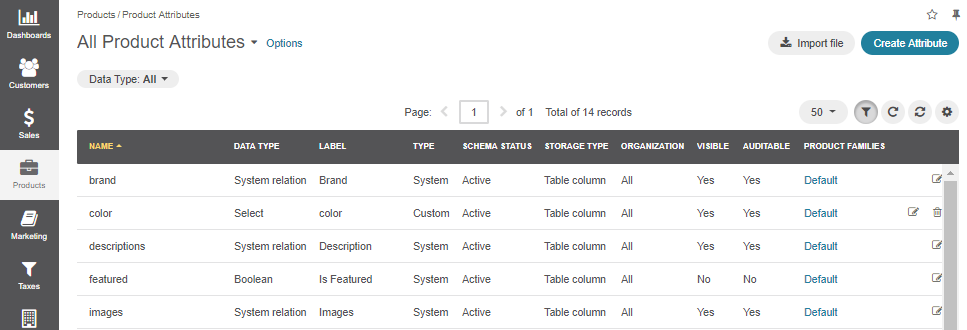
By default, OroCommerce comes with the following system product attributes:
Add new product attributes to introduce new custom parameters in your product details. Include product attributes into the new or existing attribute group in one or multiple product families.
Note
System attributes are shared among all product families. You can reorganize the way system attributes are grouped, but you cannot remove a product attribute from the product family.
Hint
Instead of using one general purpose attribute (e.g., color), create multiple specific attributes (e.g., car_color, laptop_color, table_color). This prevents loading all attributes as filters on all product pages and as a result, reduces the load on the database and improves the overall application performance.
Create a Product Attribute
See a short demo on how to create product attributes, or keep reading the step-by-step guidance below.
Creation of an attribute happens in two steps:
In step 1, you specify the basic properties, such as the attribute name and type.
In step 2, you specify more advanced properties, some of which may depend on the selected attribute type.
Step 1
To create an attribute:
Navigate to Products > Product Attributes using the main menu.
Click Create Attribute.
Complete the following fields:
Field
Description
Field Name
Fill in the field name that should be used to store the values of the product attribute. It should be between 2 and 22 characters long. Use only alphabetic symbols, underscore and numbers.
Type
- Select an attribute type to store the value of the specific data type. Select one of the Relations for the attribute to connect your custom entities as product information (these can be used for business intelligence and segments):
Many to many – No limit of how many entity records of the selected type can be connected to the attribute, e.g., many custom entity records can be related to many products.
Many to one – Attributes cannot have more than one entity record related to them, e.g., Products A-Z can relate to Promotion A. Product A cannot relate to multiple promotions. You can reuse the same promotion in multiple product details.
One to many – One attribute can relate to many entity records, but every related entity record may be connected only once, e.g., Product A can be related to many promotions, but Promotion A cannot be related to multiple products.
Click Continue.
The page with more product attribute details opens.
Step 2
Proceed to create the attribute as described below.
Fill in remaining general information:
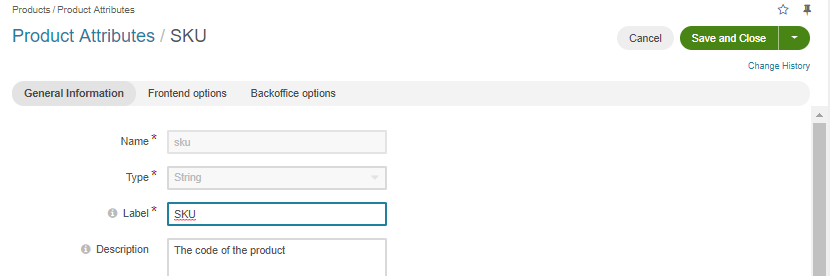
Label – Enter the attribute label. It will be displayed both in the back-office and in the storefront.
Description – When filled in, the description will be used as a field tooltip when the attribute appears on the forms.
Provide additional information for product attributes depending on their type:
Attribute Type
Steps
Select and Multi-Select
- Perform the following actions:
Click + Add next to Options.
Type in the option label. Enable the check box next to the default option.
Repeat for more options.
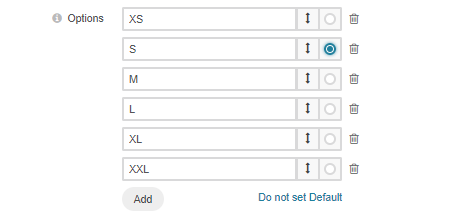
Click Do not set as default link to clear the Default flag.
Image
Enter the maximum allowed file size and provide the thumbnail dimensions.
File
Enter the maximum allowed file size.
String
Enter the maximum allowed string length.
Decimal
Enter the following:
Precision — Maximum number of digits in a decimal number. For example, 15.252 has a precision of 5 and 1.12 has a precision of 3.
Scale — Maximum number of digits to the right of a decimal point. For example, 15,252 has a scale of 3 and 1.12 has a scale of 2.
Relations:
Many to Many
One to many
Many to One
- Complete the following fields:
Target Entity – Select the entity you wish to relate your current attribute to.
Bidirectional – Select Yes or No. If set to Yes, the attribute and the selected entity will be interconnected.
Related Entity Data Fields – Available only for the Many to Many and One to Many relations. Select those fields of the entity selected in Target Entity which contain information that you want to see on the master entity record edit page. These could be a couple of important details in addition to the title which gives you the most important information about the related entity record. Hold the Ctrl key to choose several fields.
Related Entity Info Title – Available only for the Many to Many and One to Many relations. Select the fields of the entity selected in Target Entity by which the users can identify the related entity record. These fields serve as a title to the related entity record on the master entity pages. Choose these fields carefully. It would be a good idea to select a related entity name or similar information. On the view page of the master entity record, these fields will appear as links to the corresponding related entity record. On the edit page of the master entity record, you will see these fields as titles of the section that contains information selected in Related Entity Data Fields. Hold the Ctrl key to choose several fields.
Related Entity Detailed – Available only for the Many to Many and One to Many relations. Select those fields of the entity selected in Target Entity which contain additional information that you want to see on the master entity record edit page. The values of the fields selected will be available in the dialog that appears when you click the title of the related entity on the master page edit page. Hold the Ctrl key to choose several fields.
Target Field – Available only for the Many to One relation. Select the field of the entity selected in Target Entity by which the entity records will be tied.
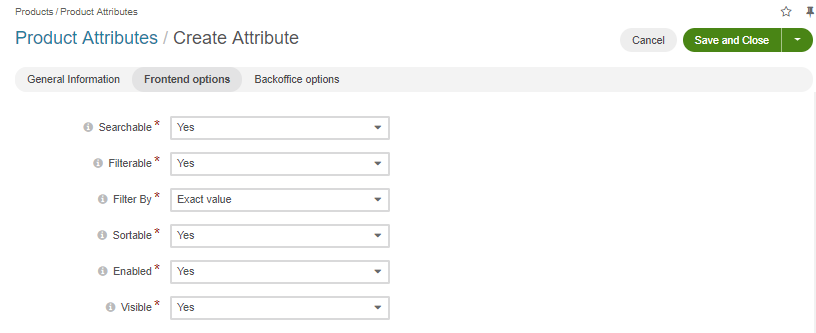
In the Frontend options section, set up the storefront options applicable to the product attribute.
Note
Please note that if the option is not applicable to attributes of the selected type (e.g., image, text, multi-select, etc.), it does not appear in this section.
Field |
Description |
|---|---|
Searchable |
If enabled, attribute content can be found in the storefront via search. |
Filterable |
Defines whether a dedicated filter is available for the attribute in the storefront. |
Filter By |
Defines the type of filtering to be applied to the attribute:
|
Sortable |
Defines whether sorting is available for the attribute in the storefront.
|
Enabled |
Defines whether the attribute is enabled in the storefront.
|
Visible |
Defines whether the attribute is visible or hidden in the storefront. |
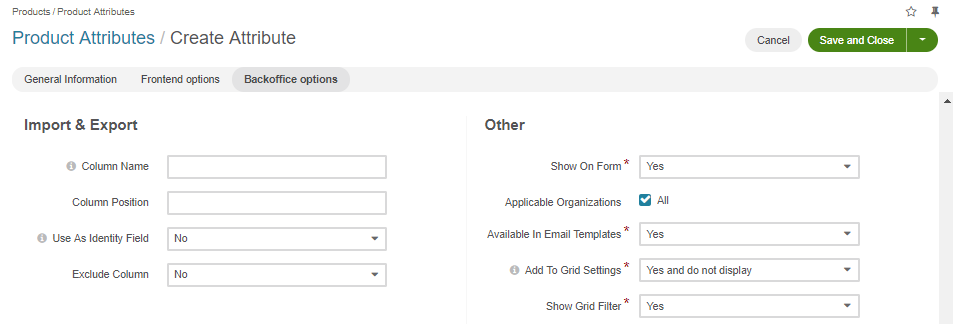
In the Backoffice options section, fill in the Import & Export subsection to configure details of the product attribute’s import/export:
Column Name – Enter the name of the column (in a CSV file) that would represent the attribute you are creating. If left blank, a label will be used.
Column Position – Type a number that corresponds to the position of the attribute in a CSV file.
Use As Identity – Specify whether this column should be used as an identifier of the entity record. Select No, Only when not empty, or Always. If set to Only when not empty, the field may be omitted in the identity when it has no value.
Exclude Column – Select No, if you want this field available for export, or Yes if you wish to exclude the column.
Export Fields – If the attribute is of the relation type, this option defines which fields of the related entity record to export:
Identity only – Export only the field that serves as an identifier of the related entity record.
All – Export all fields of the related entity record.
In the Backoffice options section, fill in the Other subsection, specifying the configuration options for the product attribute view, search and use in the back-office and storefront.
Note
Please note that available options depend on the type selected for the attribute (e.g., image, text, multi-select, etc.).
Option
Description
Contact Information
Labels the product attribute as contact information that may be used in the marketing lists. The contact information may be:
Empty — In this case, the product attribute will not be treated as contact information.
Email — When this option is selected, the product attribute value is treated by marketing lists as email addresses.
Phone — When this option is selected, the product attribute value is treated by marketing lists as a phone number.
Show on Form
In this field, select Yes if you wish to have the product attribute displayed and be editable on record and page edits.
Applicable Organization
This check box determines whether you want the product attribute to be available throughout all organizations.
Available In Email Templates
- Select Yes if you wish the product attribute to be available in email templates. To use the product attribute value in the email template:
When creating an attribute, mark it as Available in Email Templates.
Navigate to System > Emails > Templates and click Create Email Template.
In the template, select Product as the entity that the template should relate to.
On the entity variables list on the right, find the attribute and click on it to add to the template.

Add To Grid Settings
- The option controls the availability and display of the product attribute in the products grid:
By default, Yes and Display is selected which makes the product attribute available and visible in the grid.
The Yes and do not display option means that the product attribute is hidden by default, but the visibility may be toggled in the grid settings.
The Yes as Mandatory option adds it permanently to all grid views and disables visibility toggle.
No – The product attribute visibility and appearance order cannot be toggled in the grid settings
Show Grid Filter
Select Yes to display the filter for the product attribute on the user interface.
Grid Order
Defines the order of the product attributes in the product grid. The product attributes with a smaller value of the grid order number will be displayed before the attributes with a bigger value.
Show On View
Select Yes if you wish to have this product attribute displayed on the product view page.
Priority
- Priority defines the order of the product attributes on the view, edit, create pages.
Custom product attributes are always displayed one by one, usually below the system fields. If no priority is defined or the defined priority is 0, the product attributes will be displayed in the order in which they have been added to the system. The product attributes with a higher priority (a smaller value) will be displayed before the attributes with a lower priority.
Searchable
When set to Yes, the attribute is included in the search options in the back-office.
Auditable
When set to Yes, the system will log changes made to this product attribute value when a user edits the product details.
Once all options are configured, and the necessary information is provided, click Save.
If the created attribute is of a table column storage type, click Update Schema to reindex the data for search and filter.
Note
The product attribute storage type is set to table column for the attribute with Select of Multi-Select data type, and also for the attribute of any type with Filterable or Sortable option enabled. If this step is omitted, the newly created attribute will not appear in the select attribute options in other areas of OroCommerce (e.g., product families configuration).
You can check an attribute’s storage type on the page with the attributes list:
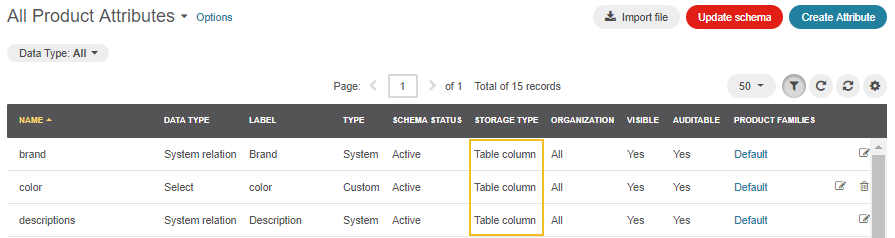
Import Product Attributes
Import File option helps import a large bulk of product attributes information into the product attributes list using the .csv file.
Example of product attributes bulk import template
fieldName |
type |
entity.label |
entity.description |
entity.contact_information |
form.is_enabled |
importexport.header |
importexport.order |
importexport.identity |
attachment.mimetypes |
|---|---|---|---|---|---|---|---|---|---|
field_money |
money |
label_value |
description_value |
marketinglist.entity_config. |
yes |
header_value |
12 |
no |
mimetypes_value |
Note
Keep in mind that multi-select attribute type doesn’t support the sorting option, so make sure to set this option to “0” or “No” when preparing the corresponding file for importing.
To import a bulk of product attributes:
In the main menu, navigate to Products > Product Attributes.
Click Import File on the top right.
Prepare data for import: Create your bulk information in the .csv format. Once your file is ready, click Choose File, select the prepared comma-separated values (.csv) file, and click Import File.
Note
Ensure that your .csv file is saved in the Unicode (UTF-8) encoding. Otherwise, the content of the file can be rendered improperly.

Validate import results: Click Validate to check your import results. If there are any Records with errors, fix them in the .csv file before starting the import.
Launch import: After successful validation, click Import File.
Click Cancel to decline the import.
Important
Interactive status messages inform about the import progress, and once the import is complete, the changes are reflected in the list upon refresh. Additionally, an email message with the import status is delivered to your mailbox.
Follow the on-screen guidance for any additional actions. For example, for the inventory template, select one of the options: a) inventory statuses only or b) detailed inventory levels.
Related Topics