Important
You are browsing the documentation for version 3.1 of OroCommerce, OroCRM and OroPlatform, which is no longer maintained. Read the latest LTS version of the Oro documentation to get up-to-date information.
See our Release Process documentation for more information on the currently supported and upcoming releases.
Import Inventory Levels and Statuses
When your need your Oro application and other systems (like asset management and accounting software) exchange and synchronize product inventory information, you may transfer the inventory data from and into the Oro application in the .csv format.
Hint
This section is a part of the Data Import concept guide topic that provides guidelines on import operations in Oro applications.
Inventory Statuses and Levels
Import File option helps import the product inventory statuses (In Stock, Out of Stock, or Discontinued) and levels (quantity and unit) for the warehouses using the .csv file that follows the inventory details data structure.
Example of inventory levels bulk import template
SKU |
Product |
Inventory Status |
Warehouse |
Quantity |
Unit |
|---|---|---|---|---|---|
product.1 |
Product Name |
In Stock |
First Warehouse |
50 |
kg |
Hint
Inventory status should be In Stock, Out of Stock, or Discontinued.
The warehouse and unit should be created prior to the inventory levels import.
To import a bulk of inventory levels or statuses:
In the main menu, navigate to Inventory > Manage Inventory. The inventory levels list opens.
Click Import File on the top right.
In the Import dialog, click Choose File, select the .csv file you prepared, and then click Import File.
Note
Ensure that your .csv file is saved in the Unicode (UTF-8) encoding. Otherwise, the content of the file can be rendered improperly.
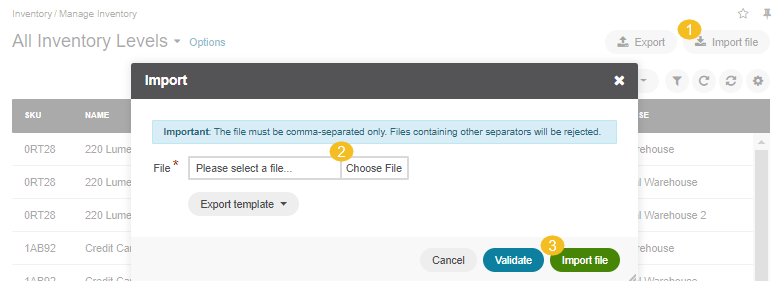
Click Export Template to download a sample .csv file with the necessary headers.
Prepare data for import: Based on the downloaded file, create your bulk information in the .csv format. Once your file is ready, click Choose File, select the prepared comma-separated values (.csv) file, and click Import File.
Validate import results: Click Validate to check your import results. If there are any Records with errors, fix them in the .csv file before starting the import.
Launch import: After successful validation, click Import File.
Click Cancel to decline the import.
Important
Interactive status messages inform about the import progress, and once the import is complete, the changes are reflected in the list upon refresh. Additionally, an email message with the import status is delivered to your mailbox.
Follow the on-screen guidance for any additional actions. For example, for the inventory template, select one of the options: a) inventory statuses only or b) detailed inventory levels.
Inventory Statuses Only
Import File option helps import the global product inventory statuses (In Stock, Out of Stock, or Discontinued) using the .csv file that follows the high-level inventory details data structure.
Example of inventory statuses bulk import template
SKU |
Product |
Inventory Status |
|---|---|---|
product.1 |
Product Name |
In Stock |
Note
Inventory status should be In Stock, Out of Stock, or Discontinued.
Inventory status import process is similar to the inventory level import.