Important
You are browsing the documentation for version 3.1 of OroCommerce, OroCRM and OroPlatform, which is no longer maintained. Read the latest LTS version of the Oro documentation to get up-to-date information.
See our Release Process documentation for more information on the currently supported and upcoming releases.
Manage Tracking Websites in the Back-Office
Oro application offers an out-of-the-box tracking website solution that helps gain insight into how your customers use your website, track their actions on the website, and then use these data to collect statistics. These statistics can be used to generate segments of potential consumers to send targeted email campaigns to.
Prerequisites for Creating a Tracking Website
Before you start using tracking websites, ensure that you have configured and enabled marketing features and tracking settings in Oro application via the system configuration.
Once the tracking configuration is ready, create a tracking website record and add the generated code to the web pages that you want to monitor.
Create a Tracking Website and Generate a Tracking Code
To generate a new website tracking code:
Navigate to Marketing > Tracking Websites in the main menu.
Click Create Tracking Website in the top right corner.
In the General section, provide the following information:
Owner — Limits the list of users who can manage the tracking website record to the users, whose roles allow managing tracking websites of the owner (e.g. the owner, members of the same business unit, system administrator, etc.). By default, the field is prepopulated with the user creating the tracking website.
Name — The name used to refer to the tracking website record in the system.
Identifier — A unique code of the website used to generate its tracking.
URL — The URL of the website to be tracked.
Description — Additional information about the record. This field is optional.
Channel — Select the channel to connect the tracking record to. If this is done, you will be able to bind events registered by the tracking engine and other Oro application data like orders, shopping carts, customer profiles, etc. This connection can be further utilized in reports and segments.
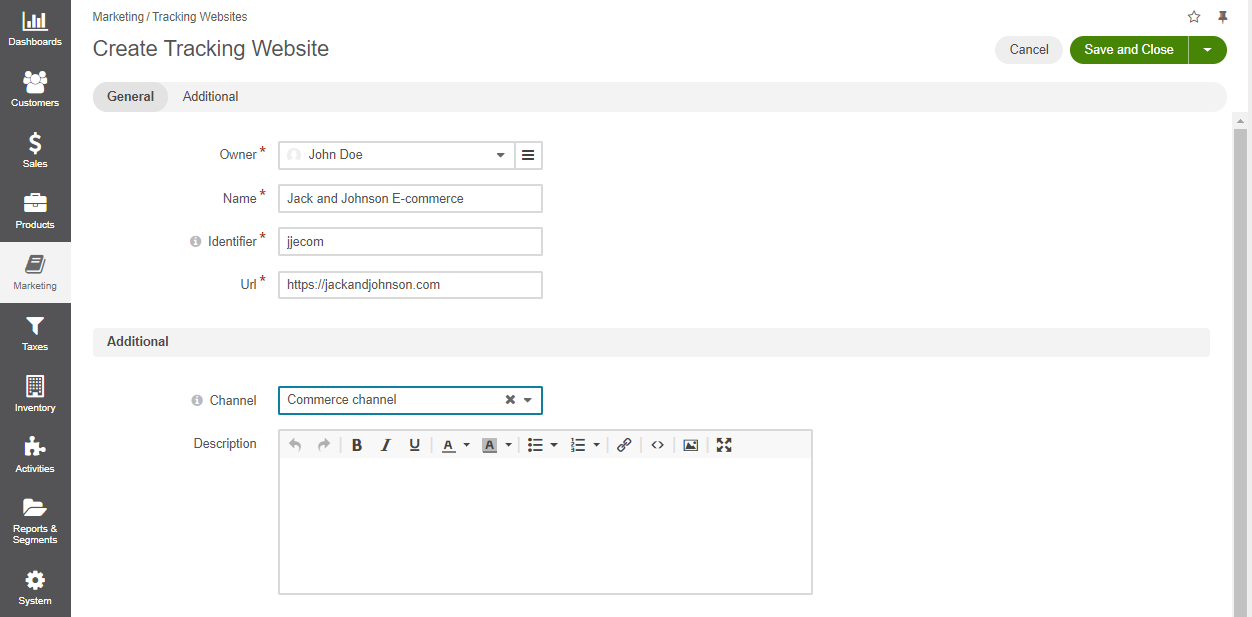
Click Save and Close.
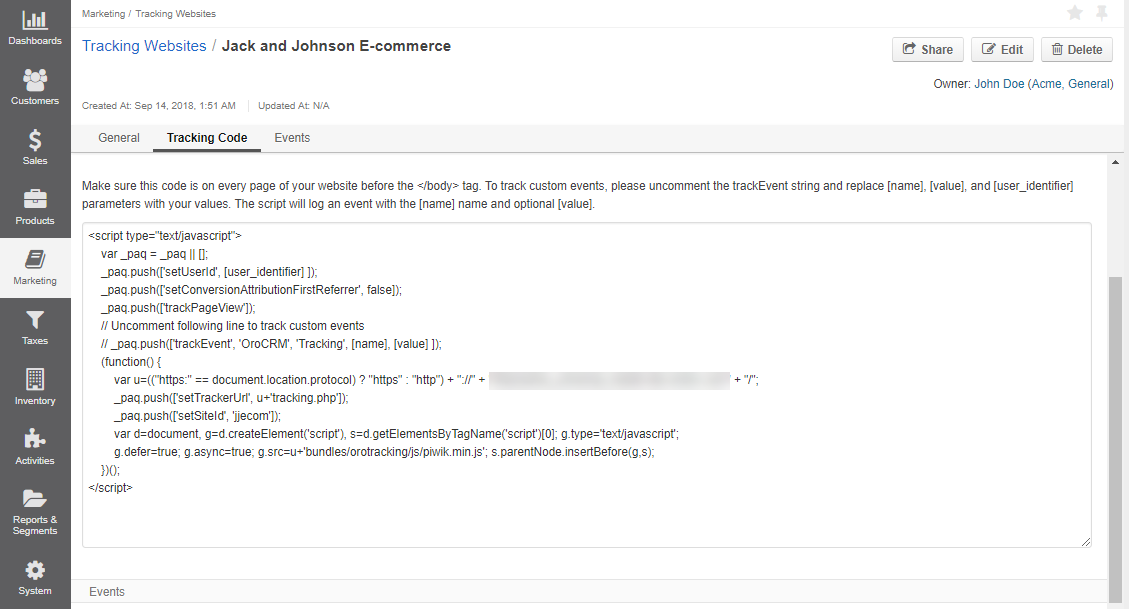
The javascript code is generated once you save the tracking website.
Use the Tracking Code
Now that the tracking code is generated, you can embed it into every page of the website you would like to monitor.
Note
The tracking code comes with the following instructions on its basic use and customization:
Make sure this code is on every page of your website before the </body> tag. To track custom events, please uncomment the trackEvent string and replace [name], [value], and [user_identifier] parameters with your values. The script will log an event with the [name] name and optional [value].
Oro application uses the Matomo software (previously known as Piwik), a highly customizable open-source platform, that enables you to create a javascript code to track your website’s visitors and their actions on the website with respect to your business objectives.
Make sure to amend the following variables for the code to work properly:
1 _paq.push(['setUserId', [user_identifier] ])
[user_identifier] defines the user ID used in compliance with the website settings. The user ID is generated once a user signs into your website. Then you will get a unique code that will represent this particular user. This may be an email address (user@sample.com), a username, or a random string such as UUID (universally unique identifier UID1234567)
If you want to track user activities on a specific page of the website, uncomment this line
1 _paq.push(['trackEvent', 'OroCRM', 'Tracking', [name], [value] ]
and replace the [name] and [value] with the event name (string) and value (number) that you would like to see in the Events report in Oro application (e.g. for a cart, event name may be cart_created, and the value may store the item code or cost).
Note
The code may be filled with both static and dynamic values. However, the usage of dynamic values requires complex backend development.
Example of a Tracked Website
With the tracking code, you can monitor the following user activities:
visits
adding product items to the shopping list
clicking a phone button
clicking a campaign banner
placing an order
Visit
This is a code pre-implemented for an average website:
 1    <script type="text/javascript">
 2        var _paq = _paq || [];
 3        _paq.push(['setUserId', "id=guest; visitor-id=51"]);
 4        _paq.push(['setConversionAttributionFirstReferrer', false]);
 5        _paq.push(['trackPageView']);
 6
 7        (function() {
 8            var u="http://an.average.website.com/";
 9            _paq.push(['setTrackerUrl', u+'tracking.php']);
10            _paq.push(['setSiteId', 'ANAWERAGEWEBSITE']);
11            var d=document, g=d.createElement('script'), s=d.getElementsByTagName('script')[0]; g.type='text/javascript';
12            g.defer=true; g.async=true; g.src=u+'bundles/orotracking/js/piwik.min.js'; s.parentNode.insertBefore(g,s);
13        })();
14    </script>
Every time a user gets to the page where this code is embedded, a visit event is recorded in the Event section of the website tracking details with the corresponding value.
Visitors are treated as guests unless they sign in. As soon as a visitor signs in, their identification is logged in the visitor-id field. A special block has been implemented to enable transfer of the ID data to Oro application.
Cart Item Added
For example, on the shopping list or shopping cart page, the following tracking script may be used:
 1    <script type="text/javascript">
 2        var _paq = _paq || [];
 3        _paq.push(['setUserId', "id=guest; visitor-id=51"]);
 4        _paq.push(['setConversionAttributionFirstReferrer', false]);
 5        _paq.push(['trackPageView']);
 6        _paq.push(['trackEvent', 'OroCRM', 'Tracking', 'cart item added', '27' ]);
 7        (function() {
 8           var u="http://crm.dev/";
 9         _paq.push(['setTrackerUrl', u+'tracking.php']);
10         _paq.push(['setSiteId', 'ANAWERAGEWEBSITE']);
11         var d=document, g=d.createElement('script'), s=d.getElementsByTagName('script')[0]; g.type='text/javascript';
12         g.defer=true; g.async=true; g.src=u+'bundles/orotracking/js/piwik.min.js'; s.parentNode.insertBefore(g,s);
13        })();
14    </script>
Every time a visitor gets to the website page where the code is embedded, a Cart item added event is recorded in the Event section of the website tracking details.
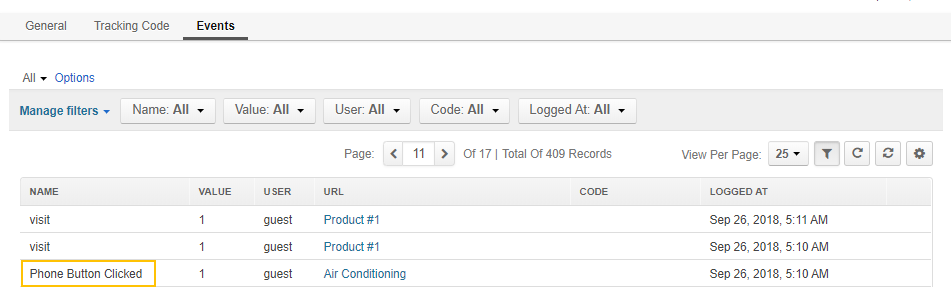
Phone Button Clicked
If you need to retrieve the statistics of how many visitors clicked the phone number, add the following code:
1 <a href="#" onclick="javascript:_paq.push(['trackEvent', 'SideMenu', 'Click', 'Phone Button Clicked']);">Phone: + (123) 456-789</a>
to the corresponding phone number line. Once a user clicks the specified phone button, the corresponding event is logged in the application.
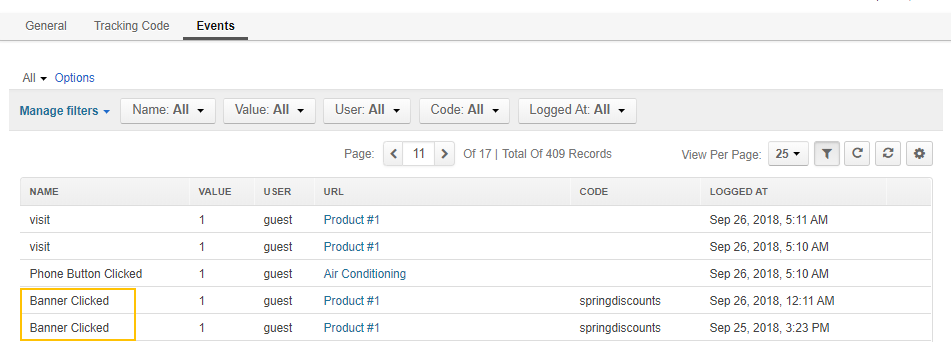
Banner Clicked
Similarly, clicking a specific campaign banner will trigger a Banner Clicked event. Its value is the number of times the banner was clicked.
Manage Tracking Websites
You can manage tracking websites directly from their details page. Here, you can perform the following actions:
Share the website tracking summary with other Oro application user
Edit the existing website tracking record
Delete the unnecessary website tracking
The same actions are available on the page of all tracking websites under Marketing > Tracking Websites.
Hover over the More Options menu to the right of the required tracking website and select the necessary action, either View, Edit, or Delete.
Note
The tracking process also depends on the Tracking Settings defined for the Oro instance.
Share the Tracking Website
To share the website tracking summary with other Oro application user:
Navigate to Marketing > Tracking Websites in the main menu.
Click the selected tracking website to preview its content.
Click Share at the top right corner of the page to open the Sharing Settings popup dialog.
Type in the username in the Share with field, or search for the necessary user: click , find the person you need, select the check box next to their name, and click Add.
The Already shared with section gets automatically populated with the person you have added.
Click Apply to save the changes.
To cancel sharing of the tracking website with a particular person, click Share, and then click next to the username. Use mass actions to cancel sharing for more than one user.
Assign a Marketing Campaign to the Tracking Website
Now that you have generated a tracking code and embedded it into your website, you can assign any marketing campaign to promote your commercial products and track users that arrive at your website from different marketing channels such as direct links in email campaigns, social media, and so on.
To assign a certain marketing campaign to the tracking website, follow the next steps:
Create a marketing campaign that will generate marketing tracking codes, a URL parameter and a push code.
Note
Check the difference between these two codes in the Compare a URL Parameter and a Push Code topic.
Add the URL parameter to the URL of every website page that you want to monitor. Use this modified URL as a target in mailing, advert, landing pages, and other links that lead to the website page. Each time a user reaches a page using the modified URL, an event is logged within the campaign.
Or
Add the push code to the tracking script provided in the Tracking Code section of the website tracking details (insert it after the setUserId call). Each time a user reaches a page with such a code hardcoded into the website’s javascript, an event will be logged within the campaign.
Collect Website Statistics
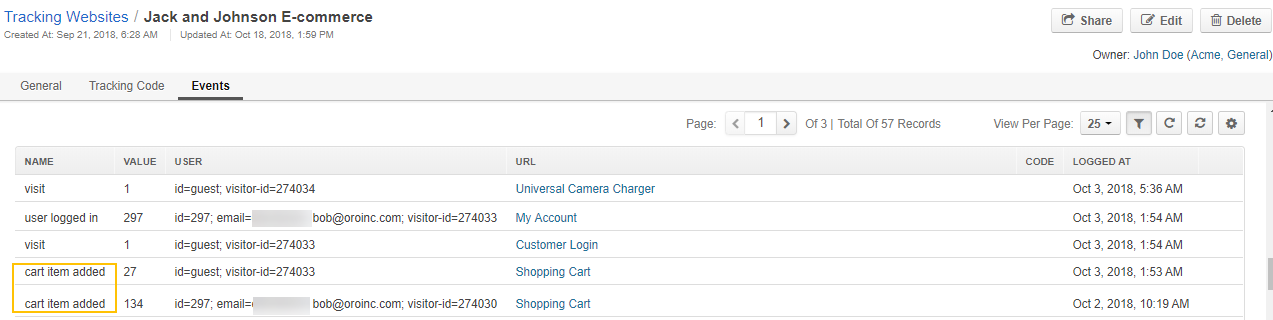
A list of events on the tracking website page helps you monitor every occurrence of the tracked action (e.g. a user has accessed a pre-defined part of the website following the campaign). You can find event name and value, user id (guest or user email), the URL of the visited page, the code of the marketing campaign and time when the event was logged.
In the example above, you can see the three kinds of events defined for the Jack and Johnson E-commerce website tracking. As soon as a user gets on any of the website pages, a visit event is logged with the 1 value. As soon as a user gets to the Orders page of the website, an Order event is logged, with the value that stores an ordered item id. As soon as a user gets to the Item Details page of the website, a View item event is logged with a value that stores a viewed item id.
Important
To make sure that synchronization between your website and the application is successful, you may need to enable dynamic website tracking. For this, navigate to System > Configuration > General Setup > Tracking, and select the Enable Dynamic Tracking check box.