Important
You are browsing the documentation for version 3.1 of OroCommerce, OroCRM and OroPlatform, which is no longer maintained. Read version 5.1 (the latest LTS version) of the Oro documentation to get up-to-date information.
See our Release Process documentation for more information on the currently supported and upcoming releases.
MS Outlook Settings
Important
The Outlook integration is deprecated and therefore no longer maintained. The integration will be removed in version 4.1.
Once you downloaded and installed the add-in, you can configure MS Outlook settings on the Oro side. These settings include:
MS Outlook add-in settings
Integration settings
Synchronization settings
Hint
MS Outlook settings can be configured globally, per organization, and per user, with the exception of MS Outlook add-in settings, which can only be managed globally.
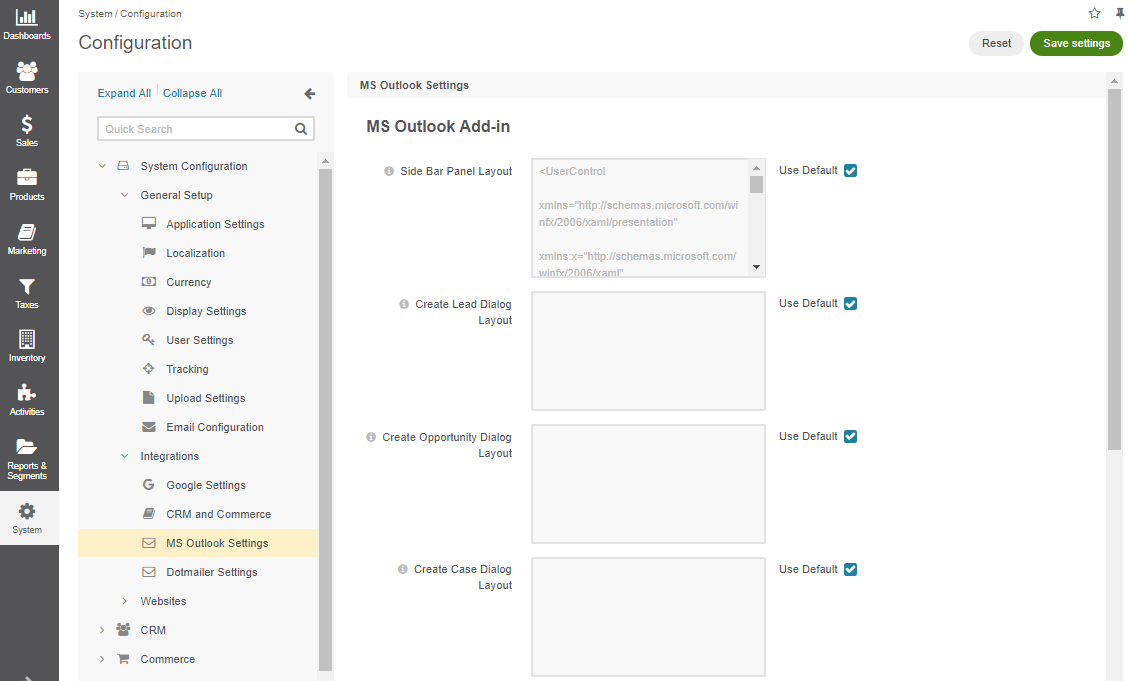
Configure MS Outlook Add-in Layout Settings
When the add-in is installed, a side bar panel appears on the right side of the Outlook window which displays the actions that can be performed in Outlook and synchronized back to Oro (e.g. create a lead). Depending on the synchronization settings set up between the applications, you can create leads, opportunities, and cases from within MS Outlook using the side bar, and then sync them back to Oro.
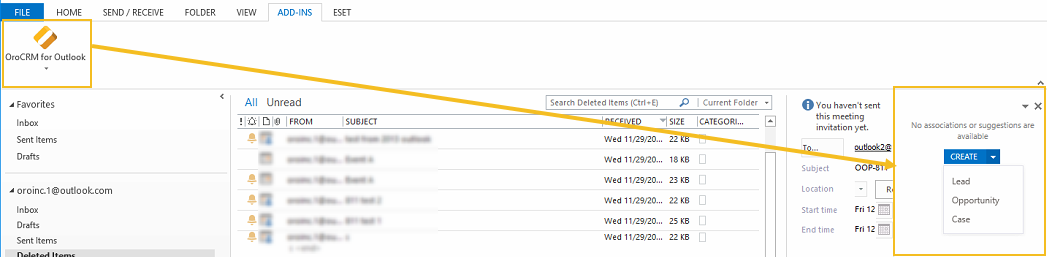
The layout of this sidebar, as well as the lead, opportunity, and case dialogs, can be changed by amending the default XAML code (or providing a new one) in the MS Outlook Add-in Settings on the Oro side.
To change the layouts:
Navigate to System > Configuration in the main menu.
Click System Configuration > Integrations > MS Outlook Settings in the panel to the left.
On the MS Outlook settings page, clear the Use Default check box for the required option (e.g. Side Bar Panel Layout).
Modify the default XAML code to alter the layout.
Click Save Settings.
Note
For the changes to take effect, remember either to start sync manually, or wait until automatic sync finishes.
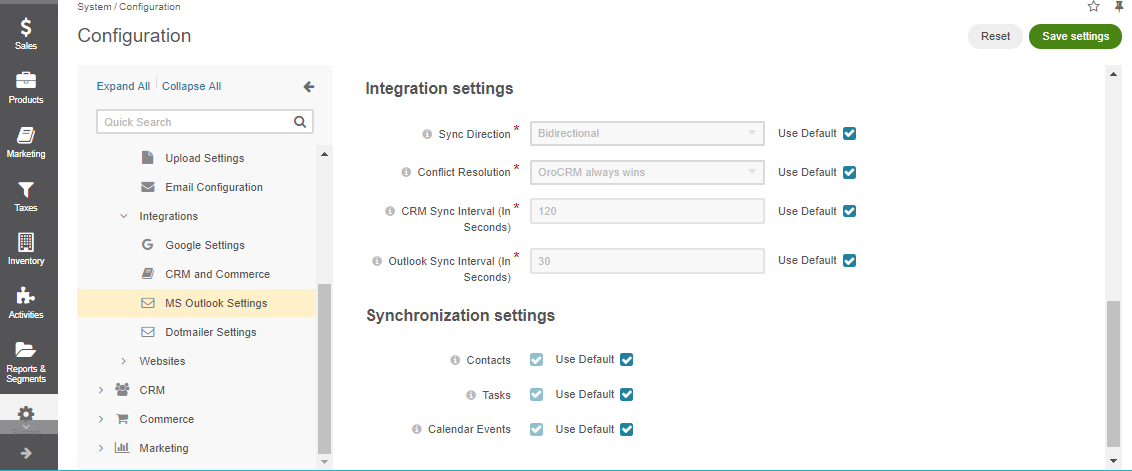
Configure Integration Settings
To configure the set of entities to be synchronized, the synchronization direction, intervals and priority of conflict resolution between Oro and MS Outlook:
Navigate to System > Configuration in the main menu.
Click System Configuration > Integrations > MS Outlook Settings in the panel to the left.
The following settings are available:
Setting
Description
Possible Values
Default Value
Sync Direction
The data synchronization direction
OroCRM to Outlook
Outlook to OroCRM
Bidirectional
Bidirectional
Conflict Resolution
Conflict resolution strategy to be used if the same data are changed in both Outlook and OroCRM
OroCRM always wins
Outlook always wins
OroCRM always wins
CRM Sync Interval (In Seconds)
How often changes on the CRM side are checked
Any numeric value from 1 to 86399
120
Outlook Sync Interval (In Seconds)
How often changes on Outlook side are checked
Any numeric value from 1 to 86399
30
To change the default values, clear the Use Default check box next to the required option, and select anew value.
Click Save Settings.
Configure Synchronization Settings
You can select what data you wish to synchronize between your Oro application and MS Outlook. These can be contacts, tasks, or calendar events. By default, all three are synchronized. To change the default settings globally:
Navigate to System > Configuration in the main menu.
Click System Configuration > Integrations > MS Outlook Settings in the panel to the left.
In the Synchronization section, first clear the Use Default check box next to the required option, and then the check box of the option itself.
Click Save Settings.