Important
You are browsing the documentation for version 3.1 of OroCommerce, OroCRM and OroPlatform, which is no longer maintained. Read the latest LTS version of the Oro documentation to get up-to-date information.
See our Release Process documentation for more information on the currently supported and upcoming releases.
Configure Settings for Email Configuration per Organization
Hint
Read more on this topic in Emails.
Configure Email Settings
Note
You can configure email settings globally, per organization, per website, per user.
To configure email settings per organization:
Navigate to System > User Management > Organizations in the main menu.
For the necessary organization, hover over the More Options menu at the end of the row and click to start editing the configuration.
Note
For faster navigation between the configuration menu sections, use Quick Search.
On the Email Configuration page, define options applied to all the emails in the application.
Note
To change any of the system-wide options, clear the Use System check box first.
Email settings — User emails are enabled by default. To disable the option, clear the Use System check box and clear the Enable User Emails option.
Signature — Add a signature to the emails.
Signature Content — Specify the text and formatting of your signature. By default, the email signature body is empty.
Append Signature to Email Body — Define whether a signature must be added automatically or manually.
Email Threads — Display Email Conversations As and Display Emails In Activity Lists As define how emails and replies are displayed to the users, as threads or separately. Two options are available: threaded and non-threaded.
SMTP Settings — SMTP protocol allows to send email messages. Click Check SMTP Connection once you provide the following details:
Host — SMTP Host name, e.g. smtp.gmail.com
Port — SMTP Port number, e.g. 465
Encryption — Encryption type: None, SSL or TLS
Username — Your email address
Password — The password for your email address
HTML in templates — Enable or disable HTML Purifier. Disabling HTML Purifier allows to paste any HTML code into a template or an email body editor without tag stripping.
System Mailboxes — A system mailbox allows people who do not have access to the company mailbox addresses write to the company. To add a new system mailbox, click Add Mailbox.
Click Save Settings.
Configure a System Mailbox
To configure a system mailbox on the organization level:
Navigate to System > User Management > Organizations in the main menu.
For the necessary organization, hover over the More Options menu at the end of the row and click to start editing the configuration.
Note
For faster navigation between the configuration menu sections, use Quick Search.
Click System Configuration > General Setup > Email Configuration in the panel to the left.
In the System Mailboxes section, click Add Mailbox.
In the General section, define the basic settings of the mailbox:
Mailbox Label — Provide a name for the system mailbox.
Email — Provide the email address.
In the Synchronization Settings, configure your IMAP/SMTP connection:
Enable IMAP — Select the check box to enable retrieving email messages
IMAP Host — Provide the IMAP Host, e.g. imap.gmail.com
IMAP Port — Provide the IMAP Port, e.g. 993
Encryption — Select the encryption type, SSL or TSL
Enable SMPT — Select the check box to enable sending messages
SMTP Host — Provide the SMTP host, e.g. smtp.gmail.com
SMTP Port — Provide the SMTP port, e.g. 587
Encryption — Select the encryption type, SSL or TSL
User — Provide your email address
Password — Provide your password
Click Check Connection/Retrieve Folders. After successful connection, a list of available folders is displayed. Select the check boxes next to the folders you wish to synchronize.
Hint
Detailed instructions on the way to set-up IMAP and SMTP connection in Gmail, are provided on the Google support page.
Hint
To enable connection, select the check box next to Allow Access for Less Secure Apps Box.
In the Email Processing section, choose what happens to all the emails received in the mailbox.
Do Nothing — No actions are performed. Letters are saved in the mailbox.
Convert To Lead — Letters will be saved in the mailbox. Based on the first letter in the thread, a new Lead record will be created in OroCRM.
Convert To Case — Letters will be saved in the mailbox. Based on the first letter in the thread, a new Case record will be created in OroCRM.
Note
Options in the Source field should be defined in advance. This can be done through the entity manager in System > Entities > Entity Management > Lead > Source.
In the Access Management section, define which users will have access to the system mailbox. You can select roles and/or specific users. All the users with defined roles and all the specifically defined users will have access to this mailbox.
In the Autoresponse Rules section, generate one or several auto-response rules. These rules determine which template is sent to the sender of the email.
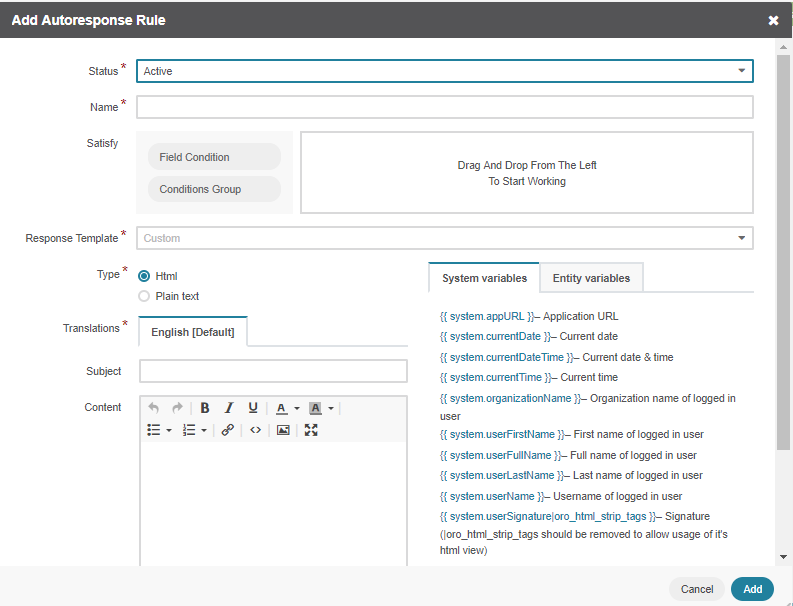
Click Add Rule to add a new auto-response rule and complete the following details in the dialog:
Status (Active/Inactive) — Only rules with active statuses are applied
Name — Select the name for the rule to be used within the system.
Conditions — Define the rules according to which the rule will be applied. In the first selector, choose the field for which the condition is to be set: Body, From, Cc, Bcc. In the second selector, choose the conditions (e.g. contains, does not contain, is equal to, starts with, etc.). In the field besides the selectors, define the values where required. Click the + or +Add button to add another condition for the rule. Click the x button to remove the condition. All conditions are summed up (AND operator).
Response Template — Choose an email template for auto-response.
Type — Choose if you want to use html or plain text for the email.
Translations — If you have more than one language configured in the system, select the necessary translation.
Email Template — Enter the subject and content of your email.
Save Response As Email Template — Checking the box automatically saves the current email as a template.
Click Add on the bottom to save the rule.
Click Save Settings.
Related Topics