Important
You are browsing upcoming documentation for version 7.1 of OroCommerce, scheduled for release in 2027. Read the documentation for the latest LTS version to get up-to-date information.
See our Release Process documentation for more information on the currently supported and upcoming releases.
Manage Content Blocks in the Back-Office
Hint
This section is part of the Content Management Concept Guide topic that provides a general understanding of the tools that help manage the content of your website, such as web catalog, landing page, content blocks, widgets, and WYSIWYG editor.
Content Blocks are the foundation of your site, and they can help create a custom layout. You can modify the existing content blocks in Oro applications or create your own.
Note
Creating a new content block requires developers’ assistance. As a sample, use the Home Page Slider content block, configuration in the yaml file that helps embed it into the website homepage.
To edit a defined content block:
Navigate to Marketing > Content Blocks in the main menu.
Click at the end of the content block you wish to edit, and click to open the selected block for editing.
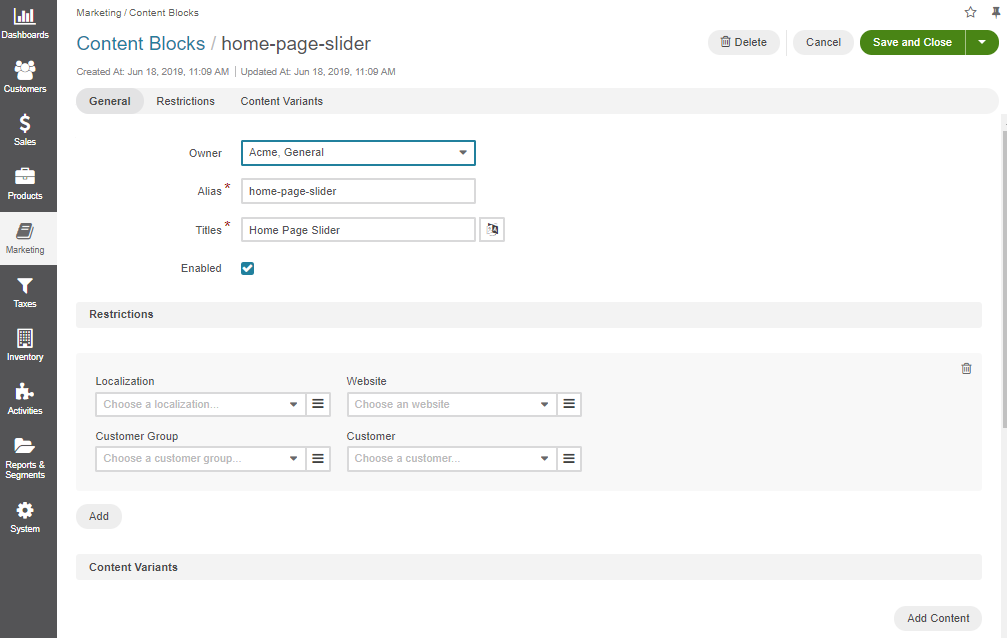
In the General tab, you can amend the following fields:
Owner — The owner of the content block.
Alias — The unique identifier that can be used in the layout to render a block.
Titles — Localized block title.
Note
To enable/disable the content block, select/clear the Enabled checkbox.
In the Restrictions section, you can specify or edit visibility restrictions for the content block.
By default, the content block is displayed for any localization, on any website, and for any customer. To make OroCommerce apply a content block to the storefront only for the particular combination of these facts, create a restriction by selecting all or some of the following: target localization, website, customer, or customer group.
Note
Only one field must be chosen for customers at a time, either a customer group or a customer.
In the Content Variants section, you can add (click Add Content) or remove (click ) various content variants for the content block. Once you add more than one content variant, you will have to apply restrictions to any non-default variants. These restrictions help you set the conditions where content should override the default option.
Warning
Never leave the restrictions for non-default variants empty. This may cause an unexpected priority collision between the default and non-default variants.
Note
Only one field must be chosen for customers at a time, either a customer group or a customer.
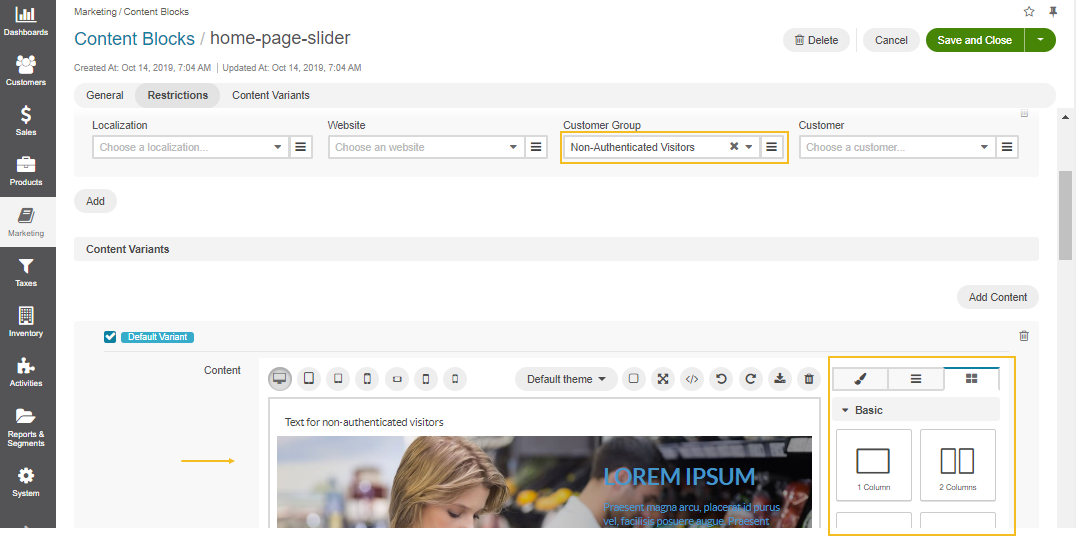
For instance, you can set the content block to display a specific text for Non-authenticated Visitors. For that:
Set visibility restrictions to Non-authenticated Visitors in Restrictions > Customer Groups.
Add a new content variant by clicking Add Content in the Content Variant section.
Enter text.
Drag the selected element (a text, an image, a column, or a <> source code) from the editor’s manager panel and drop it to the required location.
Rearrange the content or modify the style of the elements by navigating from tab to tab of the WYSIWYG editor’s manager panel. For more details on WYSIWYG management, see the WYSIWYG Editor topic.
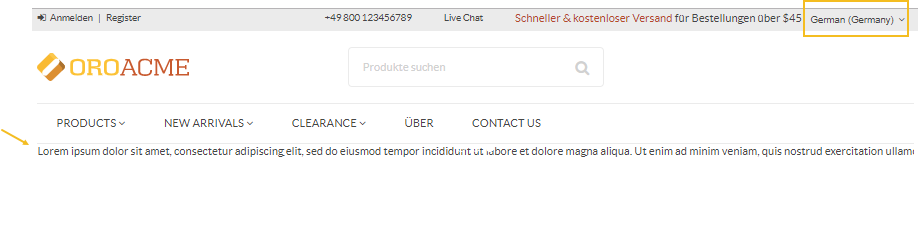
To translate the content block (e.g., the homepage slider), restrict it to the required localization(s).
For instance, to translate the homepage slider into German:
Set the visibility restriction to German in Restrictions > Localization.
Edit the default variant to include Germany-specific content, or add another content variant by clicking +Add.
Click Save and Close.
Once switched to the German localization, the home page slider displays the new content.