Important
You are browsing upcoming documentation for version 7.1 of OroCommerce, scheduled for release in 2027. Read the documentation for the latest LTS version to get up-to-date information.
See our Release Process documentation for more information on the currently supported and upcoming releases.
Manage Content Widgets in the Back-Office
Hint
This section is part of the Content Management Concept Guide topic that provides a general understanding of the tools that help manage the content of your website, such as web catalog, landing page, content blocks, widgets, and WYSIWYG editor.
Content widgets are snippets of structured information that you can insert into any WYSIWYG field in your application. WYSIWYG fields are available throughout OroCommerce; for example, in category descriptions, on edit pages of products, content blocks, and landing pages.
There are seven content widget types:
An Image Slider
A Contact Us Form
A Product Mini Block
A Product Segment
Tabbed Content
Customer Dashboard DataGrid
Customer Dashboard Scorecard
Each of these widget types has a different set of options.
Please keep in mind that:
You can:
You cannot:
|
Note
Whenever you modify a content widget, changes are applied everywhere the widget is used.
Create a Content Widget
To create a new content widget:
Navigate to Marketing > Content Widgets in the main menu.
Click Create Content Widget at the top right.
Note
If you have more than one organization in your OroCommerce application, first select the organization to which you want to add a new content widget.
Depending on the widget type, form fields are different:
Contact Us Form — Enables you to add a standard Contact Us form to the Contact Us storefront page. Once the widget is saved, add it to the Contact Us Form field under the theme configuration.
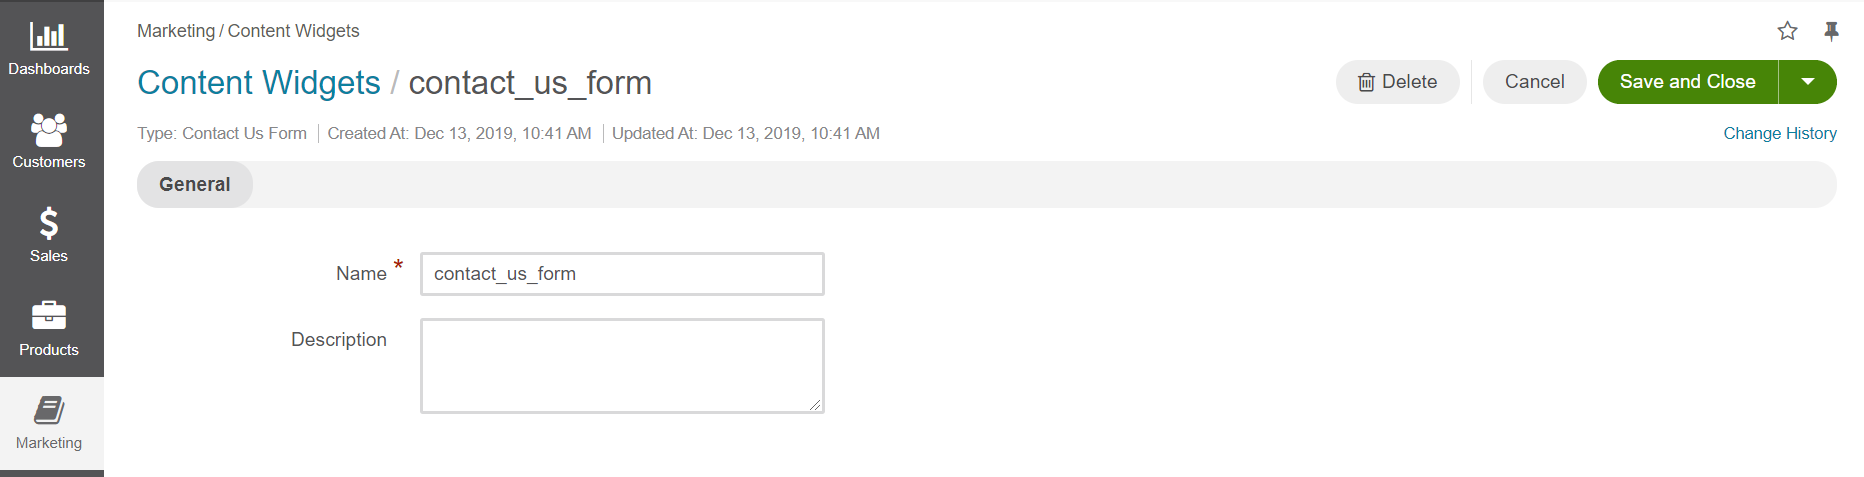
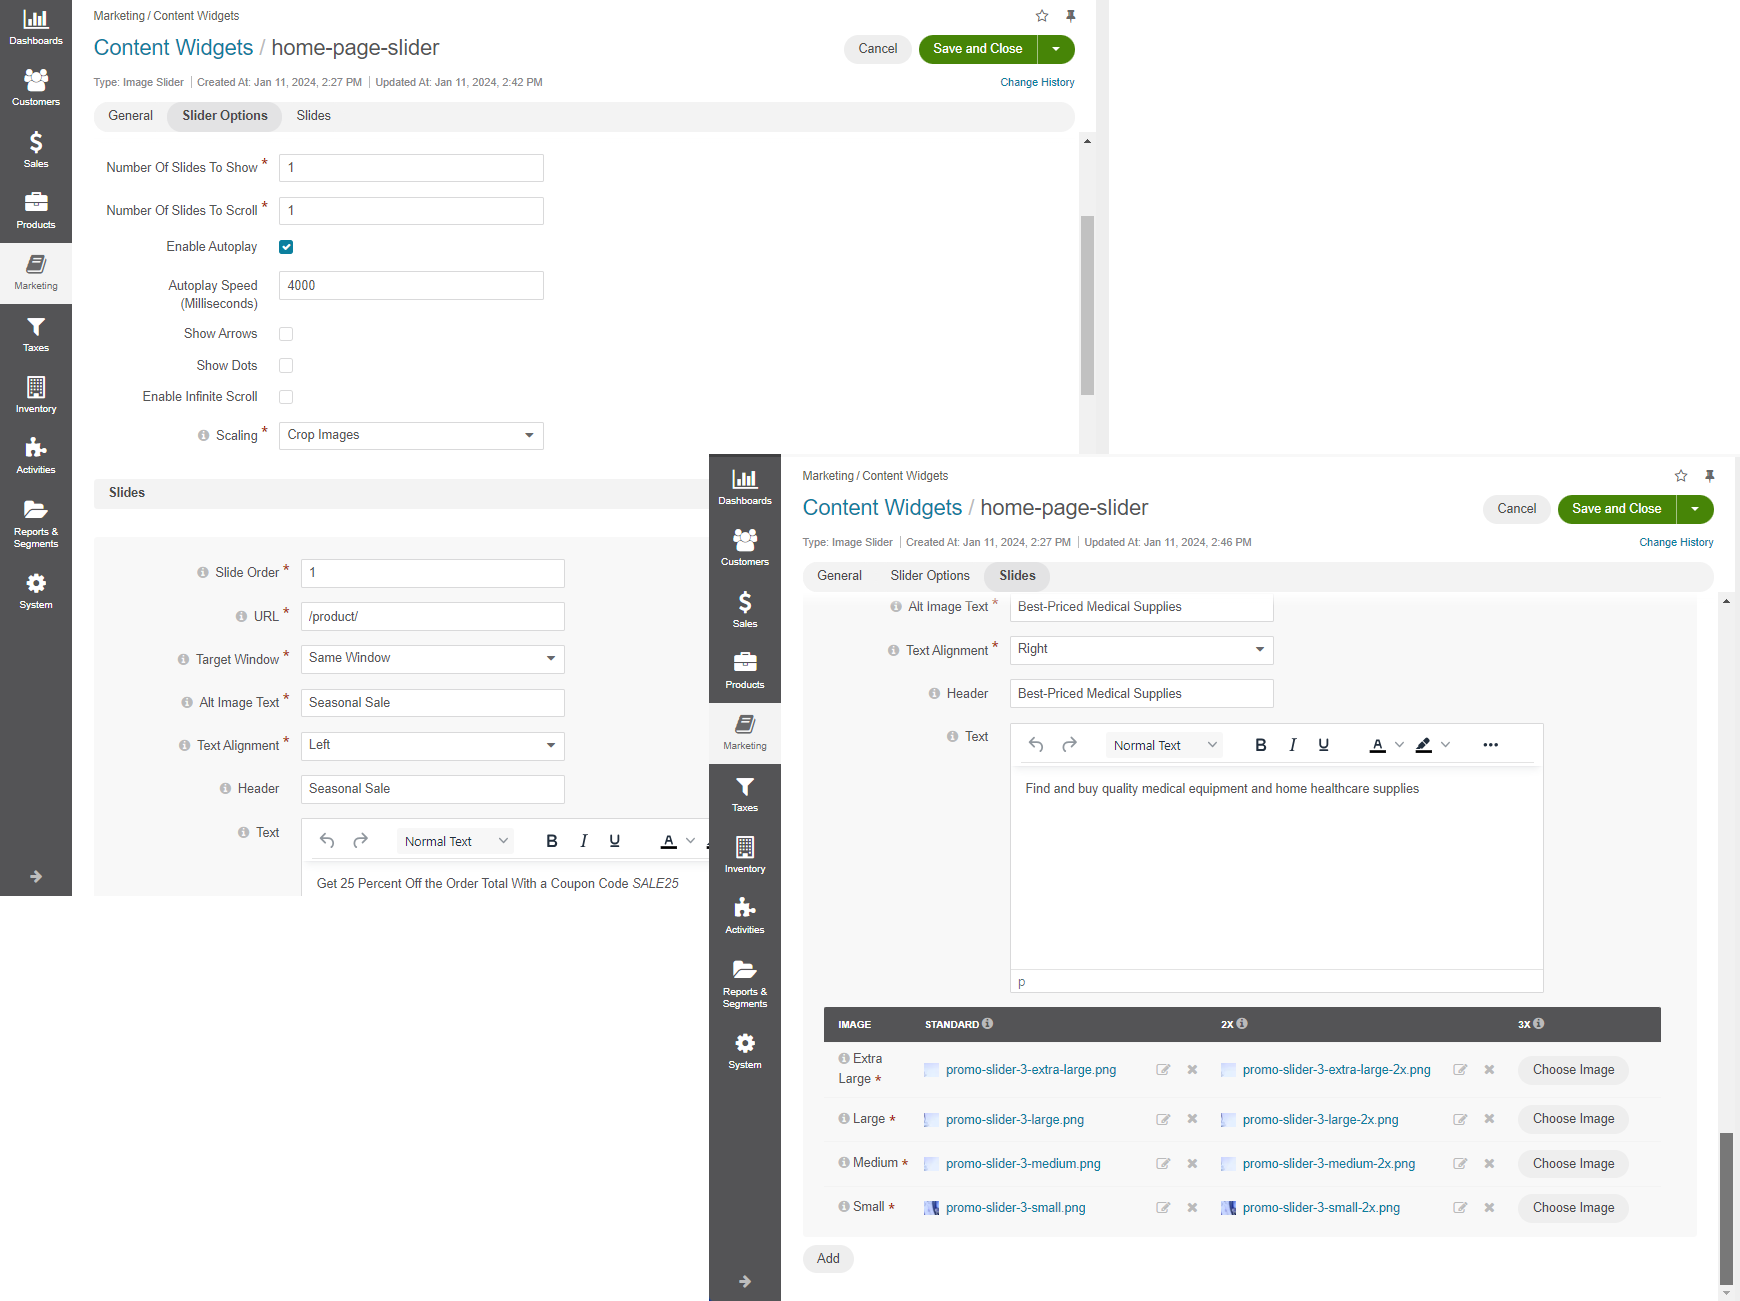
Image Slider — Enables you to add an image slider with multiple images, configure slider options and style each slide. To configure the image slider, you can select the number of slides to show or scroll, enable or disable autoplay and control its speed in milliseconds, select whether to display dots and/or arrows at the bottom of the image slider in the storefront, control how the slide images are positioned and scaled, and enable or disable infinite scroll. To add slides, click Add at the bottom of the Slides section. You can customize each slide by setting its sort order, URL, target window, ALT text, text alignment, header and text for the image. You can choose different image sizes based on screen size (extra large, large, medium, small).
In addition, you can control how each slide’s image loads using the Loading and Fetch Priority options. Loading defines when the image is loaded (Lazy or Eager), while Fetch Priority defines its importance for page load (Auto, High, or Low). Use Eager and High for images that are visible immediately when the page opens. Prefer Lazy with Auto or Low for images shown after sliding or placed lower on the page.
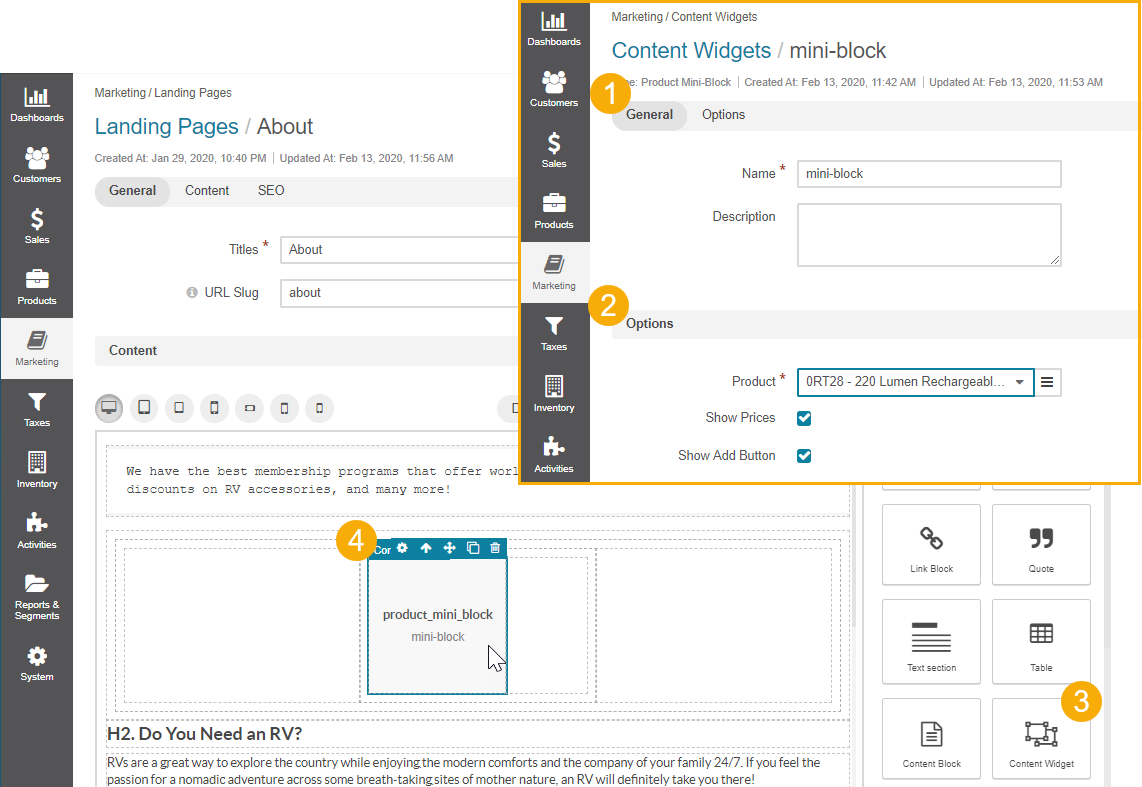
Product Mini Block — Enables you to add a block with product information with or without prices and/or the Add to Shopping List button.
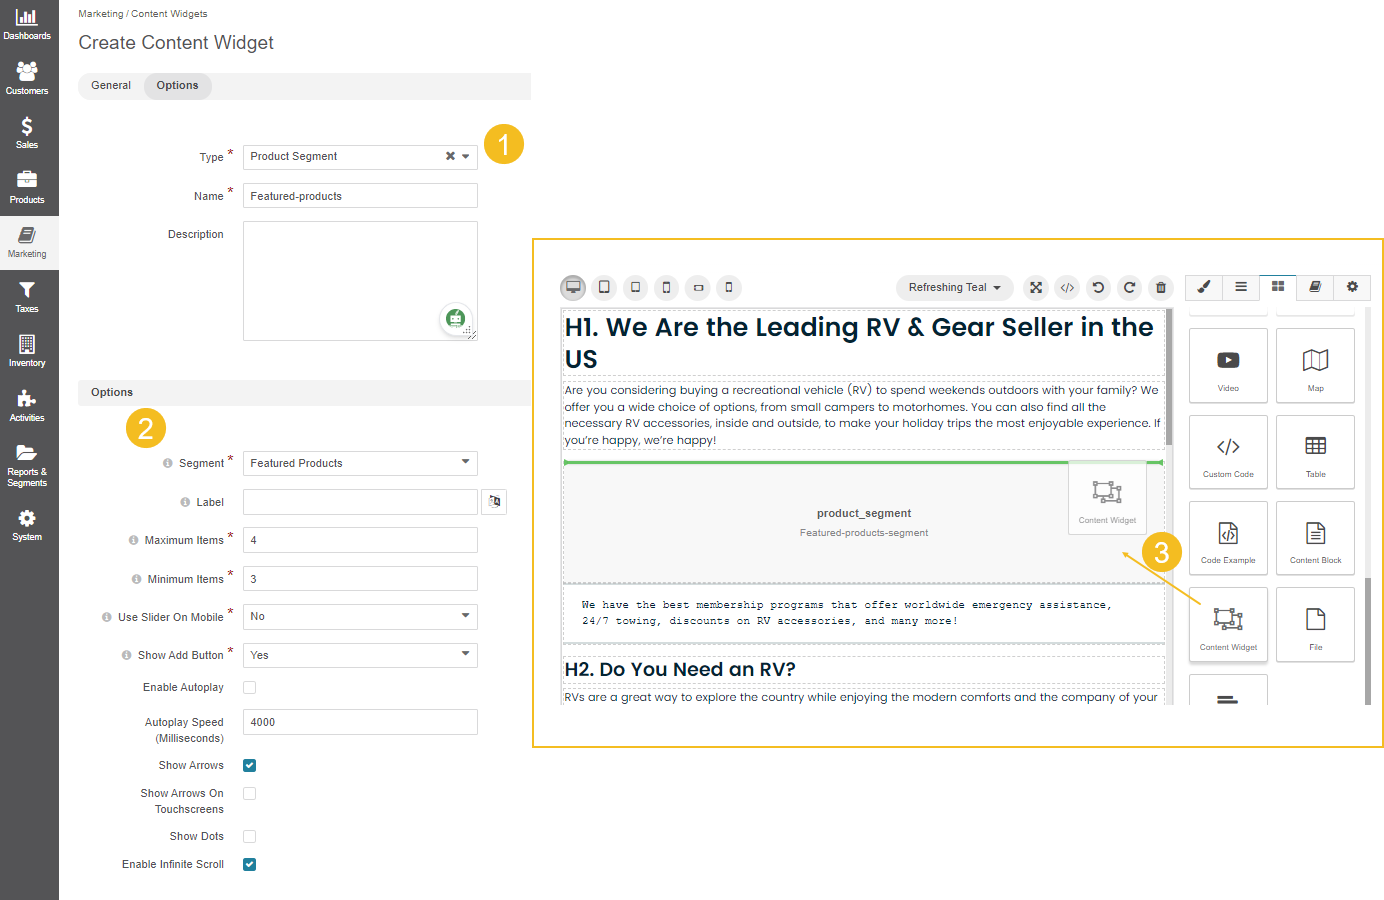
Product Segment — Enables you to add a product segment content widget to your website page. Only segments with type Product are listed in the Segment field drop-down. You can modify an existing segment or create a new one under Reports & Segments > Manage Segments. You can add a label to be displayed above the list of the products, configure the max and min number of items to show, whether to use slider on mobile, and show the Add to Shopping List button in the storefront. Additionally, you can enable or disable autoplay and control its speed in milliseconds, select whether to display dots and/or arrows at the bottom of the product segment and on touchscreens, enable or disable infinite scroll, and enable the display of inventory levels for customers in the storefront.
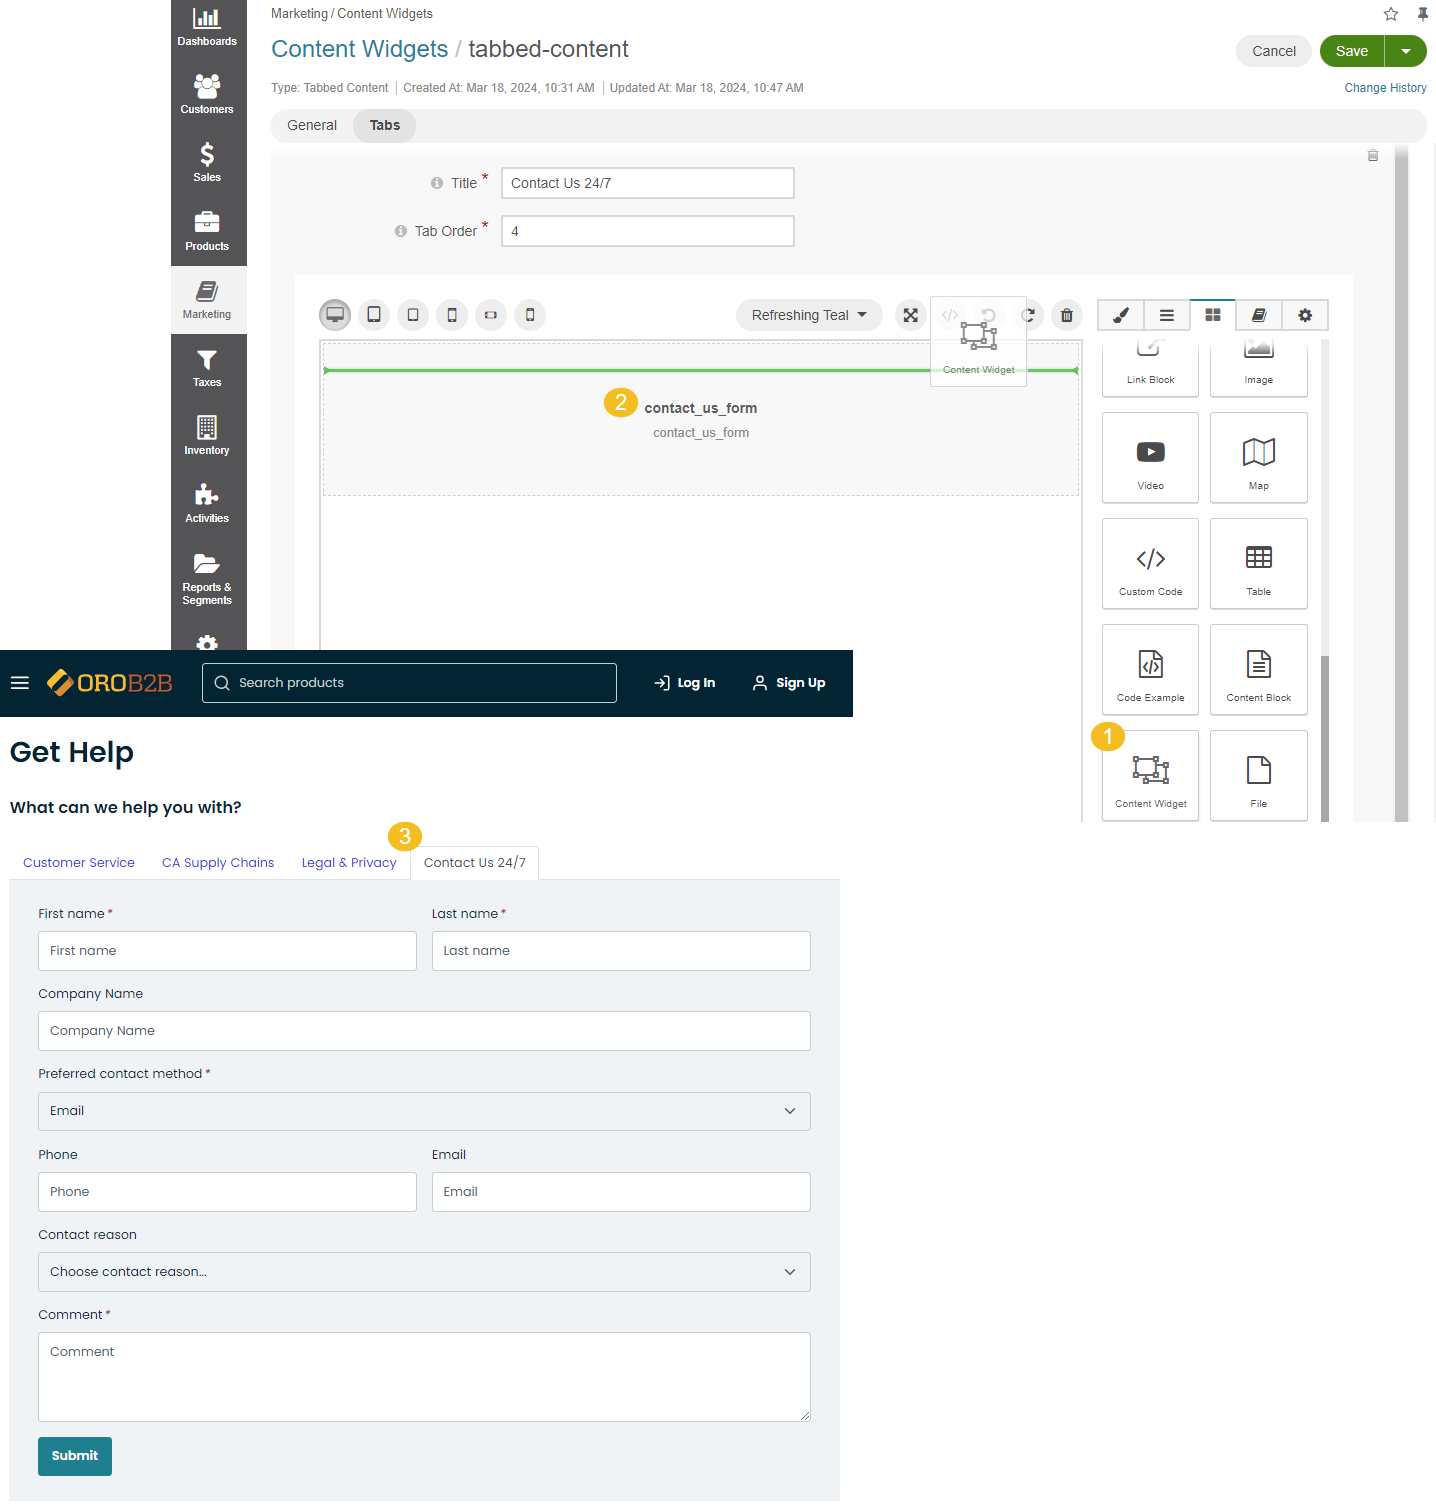
Tabbed Content — Enables you to add content to your storefront website in a form of tabs or an accordion.
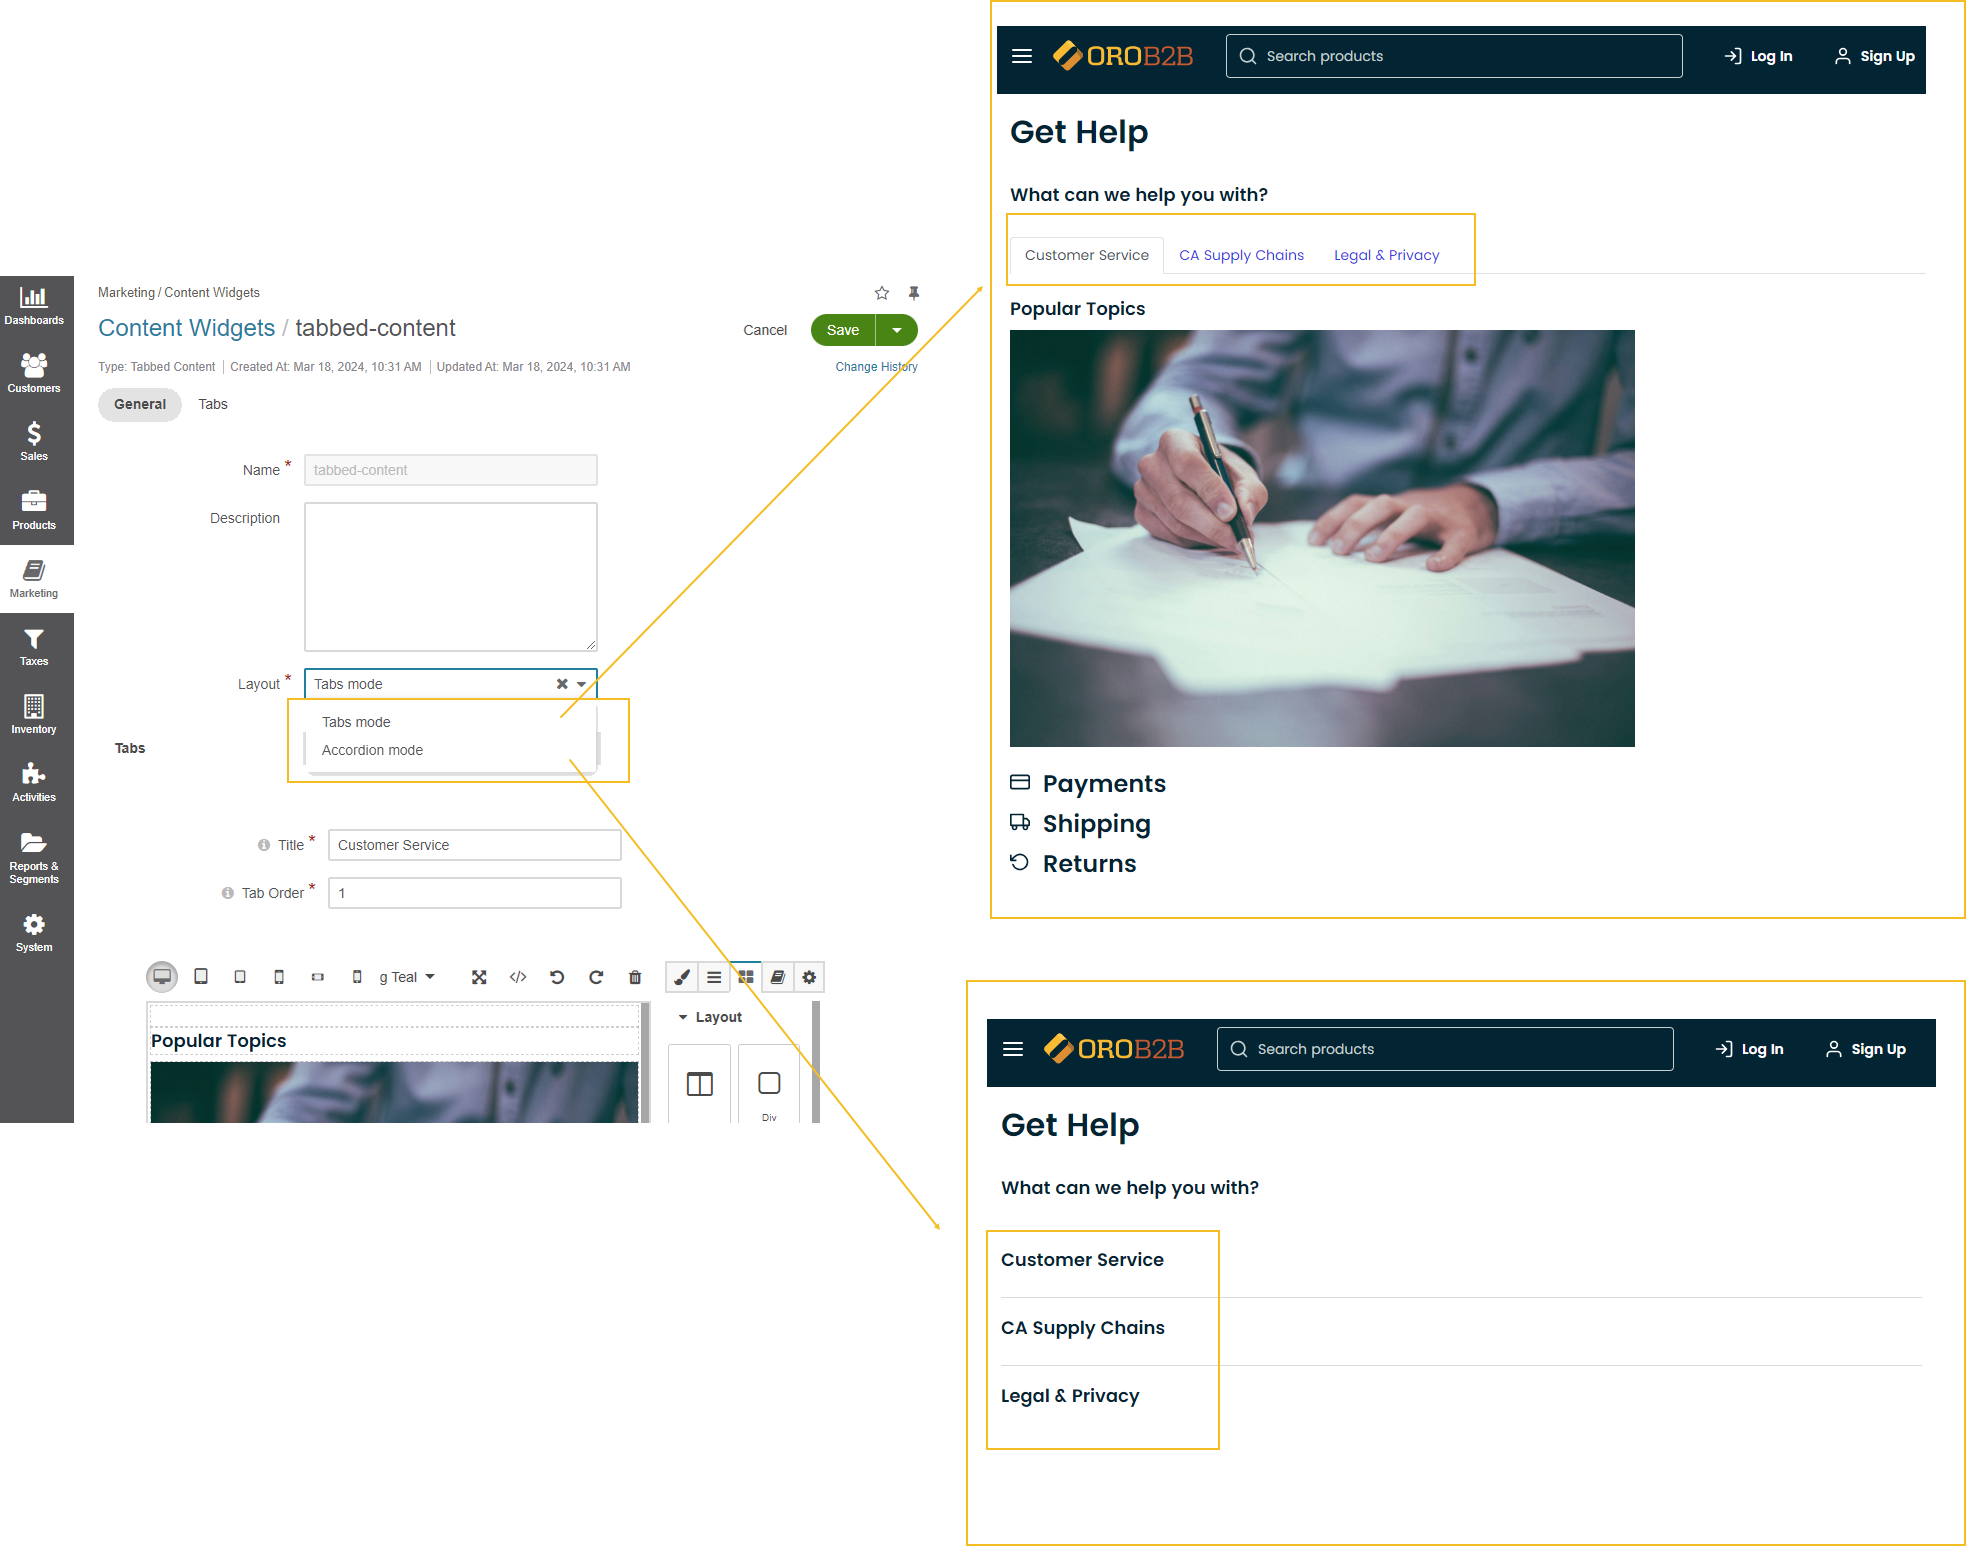
Tabbed content widget uses the WYSIWYG editor which enables you to inject other content widget(s), such as a contact us form, into your current tabbed content widget.
Customer Dashboard DataGrid — Enables you to add a structured, table-style (datagrid) widget to the customer user’s Dashboard page in the My Account section. Each widget presents up to five of the latest records and allows customers to navigate to a dedicated page for full details. You can configure the datagrid widget to display data from one of the following entities:
Latest Orders – Lists the most recent orders placed by the current customer user, including order number, total amount, status, and last update.
Open Quotes – Lists open quotes associated with the current customer, including quote number, PO number, and expiration date. Depending on the customer user’s permissions, they may or may not see quotes from other users within their organization.
My Checkouts – Lists ongoing checkout sessions of the current customer user, including the number of items, subtotal, and last update. Customers can proceed to checkout directly from this widget.
Requests for Quote – Lists the most recent RFQs submitted by the current customer, including RFQ number, PO number, status, and last update. Depending on the customer user’s permissions, they may or may not see RFQs from other users within their organization.
My Shopping Lists – Shows the shopping lists of the current customer user, including the shopping list name, the number of items, subtotal, and last update. Users can either edit or view the list based on their permissions.
Once the widget is saved, add it to the Customer Dashboard Content Widget field in the theme configuration.
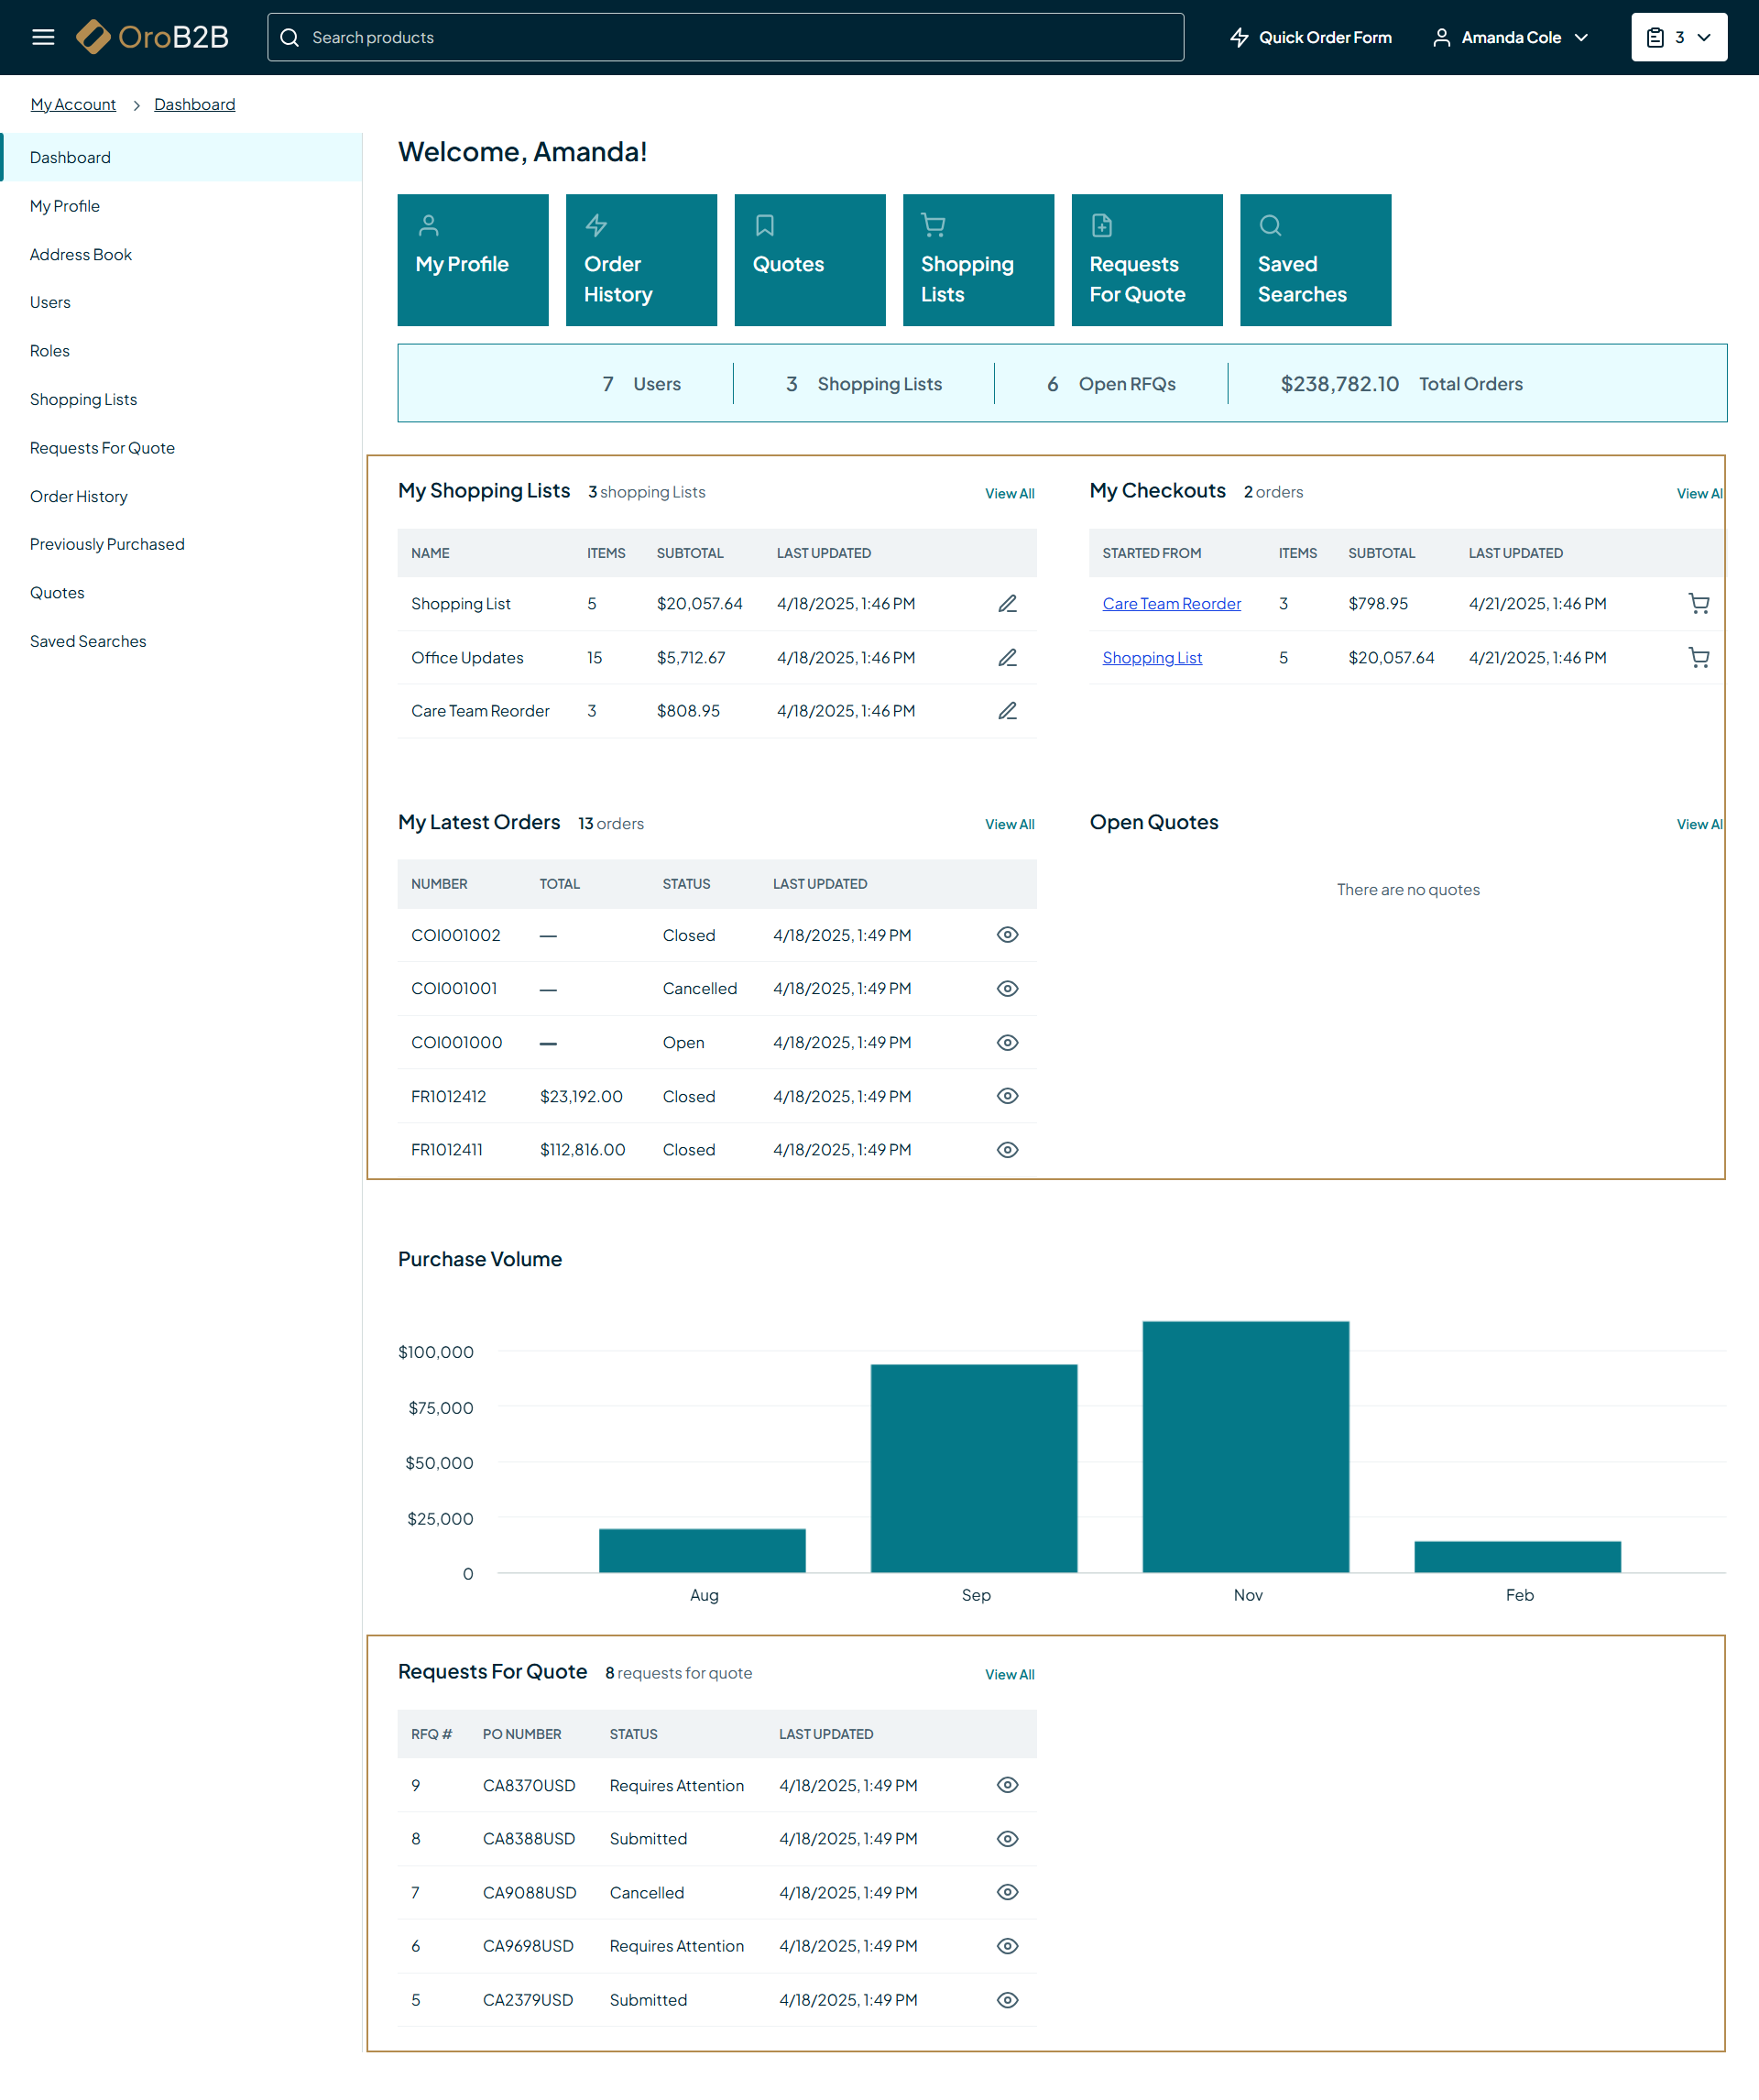
Scorecard — Enables you to add a block of key business metrics in a compact, easy-to-read format to the customer user’s Dashboard page in the My Account section. The scorecard is shown only if the current customer user has appropriate View permissions for the corresponding entity. If the customer user has View – None permission, the respective scorecard will not be displayed. Scorecards represent the following metrics:
Users – Displays the total number of customer users under the current customer, including all customer users on lower hierarchy levels (e.g., divisions or sub-accounts). The block visibility is based on the View permission on the Customer User entity.
Shopping Lists – Shows the number of shopping lists available to the current customer user. The block visibility is based on the View permission on the Shopping List entity.
Open RFQs – Shows the number of open Requests for Quote (RFQs), excluding those that are cancelled. The block visibility is based on the View permission on the Request for Quote entity.
Total Orders – Shows the cumulative total value of all orders that the current customer user has access to, excluding those that are cancelled. The block visibility is based on the View permission on the Order entity.
Once the widget is saved, add it to the Customer Dashboard Scorecard field in the theme configuration.

Once you have provided all widget-specific details, click Save and Close.
Hint
Each content widget may have various representations in the form of layouts. Developers define layouts using the existing layout update functionality, which enables you to alternate between the pre-configured designs for each widget in the back-office.
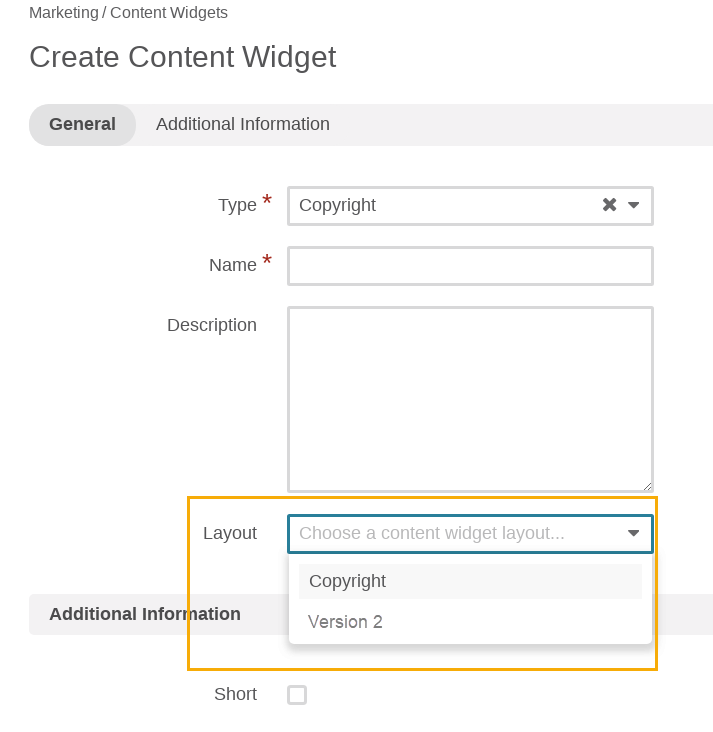
Please be aware that layouts are theme-specific. For more information, please refer to the CMS bundle documentation.