Important
You are browsing upcoming documentation for version 7.1 of OroCommerce, scheduled for release in 2027. Read the documentation for the latest LTS version to get up-to-date information.
See our Release Process documentation for more information on the currently supported and upcoming releases.
Create a Task
In the Oro application, you can create tasks in several ways. In the following sections, you will learn how to:
Add a New Task Manually
To add a task manually:
Navigate to Activities > Tasks in the main menu.
Click Create Task on the top right.
On the Create Task page, fill in the required information:
Subject — The name that summarizes what the task is about.
Description — Detailed statement of what work is to be done in relation to the task. Use the embedded editor to format text, add images, links, etc.
Important
Whether the embedded editor is available is specified in the configuration. If you have access to the system configuration, see the WYSIWYG settings section of the Display Settings description.
If you do not have access to the page, contact your administrator who can enable the editor at the organization level.
If you are an administrator, see the WYSIWYG settings section of the System Display Settings description.
Due Date — The day and time when the task must be completed. Click on the day field to select a day in the calendar dialog and on the time field to select a time from the list. Alternatively, type in the date and time values.
Status — The phase of work on the task (open, in progress or closed).
Important
If the Task Flow is enabled, you cannot set the task status.
Priority — Set the order in which the task should be managed. Can be High, Normal, or Low. Higher-priority tasks should be managed first.
Assigned To — The user who is responsible for doing the work related to the task. The task appears in the calendar of the assignee.
Note
By default, a person who creates a task is selected as its assignee. Change the assignee if required. Select another user from the list. You may use the search field to find the required user quickly: start typing the user’s name and, when suggestions appear, click the required name. Alternatively, you may click the hamburger menu next to the field and select the owner in the Select Assigned To dialog.
Reminders — A notification about the upcoming task’s due date. Click +Add to configure when and how the Oro application reminds the participants about the task:
Specify the type of notification: whether to show a flash message in the Oro application or send the notification email.
Select the time units in which the time lag between a reminder and the task’s due date is measured: minutes, hours, days, or weeks.
Enter what number of selected time intervals the time lag between a reminder and the task’s due date comprises.
Click the x icon next to it to remove a reminder.
Note
In Oro applications, the due date and time of the task are displayed according to the recipient’s timezone settings both in the notification emails and flash messages. For instance, if the due time of a task is displayed as 7 a.m. to a user in New York, the due time displayed in the reminder to a user in Tokio is 8 p.m.
Context — Select a record that has a meaningful relation to the task. Start entering a record name, and when the list of suggestions appears, click the required name to select it. The task becomes immediately linked to the selected item and is displayed in its Activity section.
Click Save and Close when you are finished.
Add a Task From the User Profile
You can create a task from a user profile and automatically assign it to the user.
To create a task from a user profile:
Open the profile of the user to whom you want to assign a task.
Click More Actions on the top right of the page and then click Assign Task.
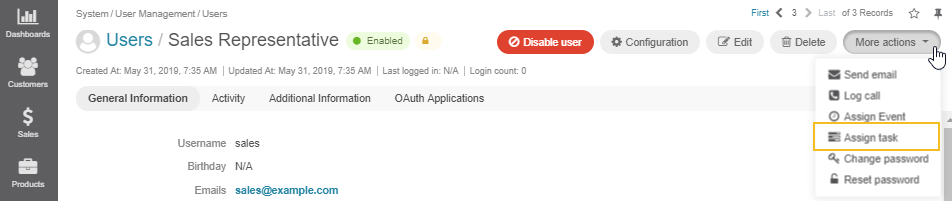
In the Assign Task To dialog, specify the required data. Fill in the required information as described in the Add a New Task Manually section.
Click Create Task. The task appears in the Tasks subsection Additional Information on the user profile page.
Note
An administrator may define that users can be specified as a context for a task. In this case, the More Actions list on the user’s profile page will have two similar options: Assign Task and Add Task. The difference between them is the following:
When you select Assign Task, the task that you create will be assigned to the user from which profile you perform this action.
When you select Add Task, the task you create can be assigned to any user. However, the user from whose profile you perform the action will appear as a context of the task.
Add a Task from the Page of a Related Record
To create a task when viewing the related record (e.g., opportunity, account, etc.):
On the page of a related record, click More Actions > Add Task on the top right of the page.

In the Add Task dialog, specify the required data, as described in the Add a New Task Manually section.
Click Create Task.
Note
If you create a task from the page of a related entity record, this entity record appears as a context of the task.