Important
You are browsing upcoming documentation for version 7.1 of OroCommerce, scheduled for release in 2027. Read the documentation for the latest LTS version to get up-to-date information.
See our Release Process documentation for more information on the currently supported and upcoming releases.
Theme Configuration
Theme configuration enables you to manage your website’s storefront look and feel, customize menus in the header, select the way the main navigation menu is displayed, choose the layout for the product page details, etc.
Note
To customize the storefront theme for 5.1 and earlier versions of OroCommerce, please refer to the theme system configuration settings.
To configure your current storefront theme:
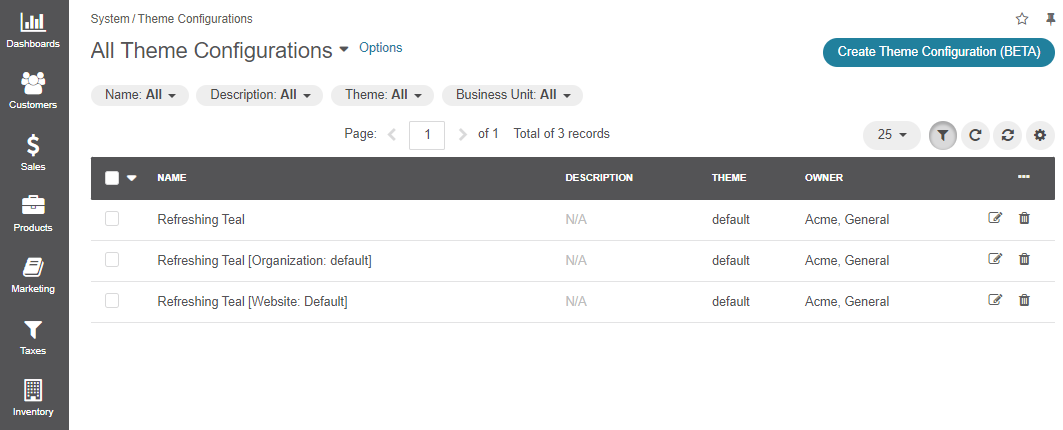
Navigate to System > Theme Configurations in the main menu.
There is a list of storefront themes configured by a developer for your website. By default, there is a new 6.1 Refreshing Teal theme, but there can also be your backup themes from the previous versions of OroCommerce.
You can create a new configuration of the existing theme by clicking Create Theme Configuration at the top right or edit any existing theme configuration by clicking to the right of the theme.
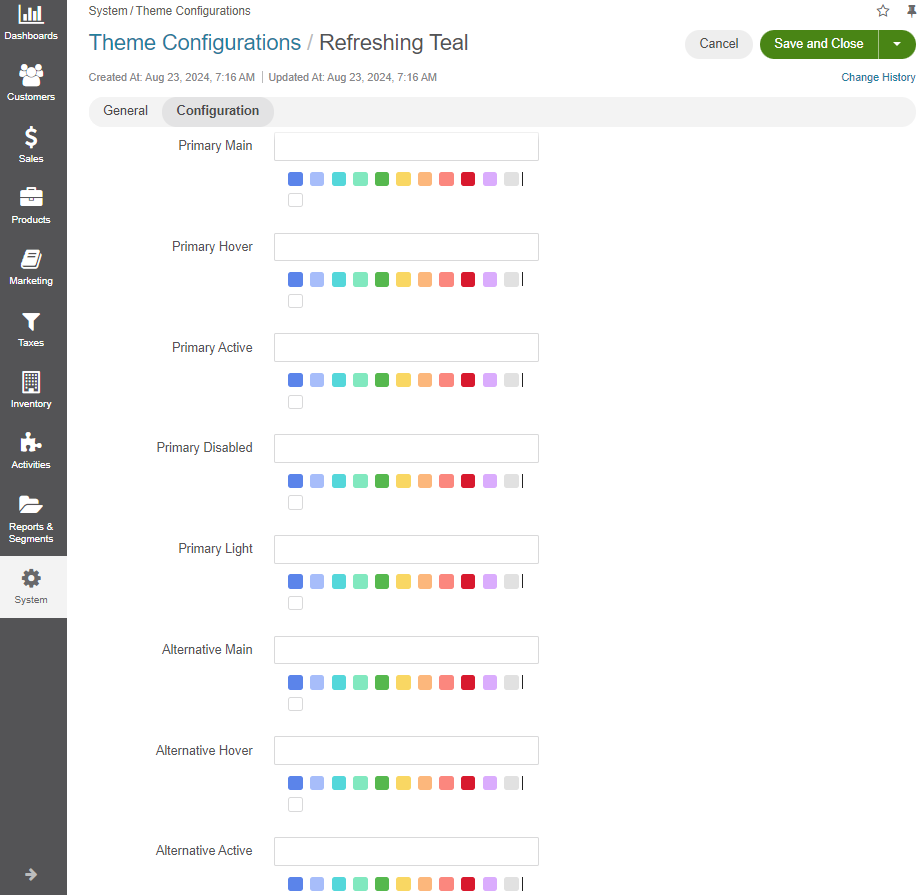
In the General section, configure the following options:
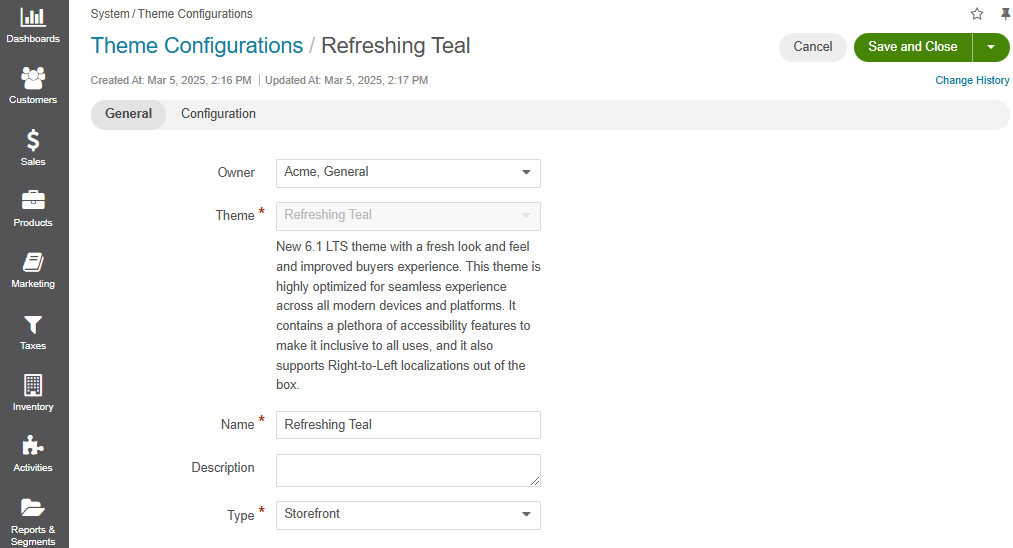
Owner — Select the owner responsible for the theme configuration.
Theme — Select the storefront theme from the list. The default themes starting from version 6.1 LTS are Refreshing Teal and Golden Carbon. However, if you select one of your backup themes from the previous OroCommerce LTS versions, the settings under the Configuration menu below will become disabled. You can still configure them under the theme system configuration settings.
Name — Specify the name for the theme to distinguish it from other themes.
Description — Type a short but meaningful description that can help you and other users understand the specifics of the theme.
Type — Select the theme type. Currently, only storefront themes are available for configuration.
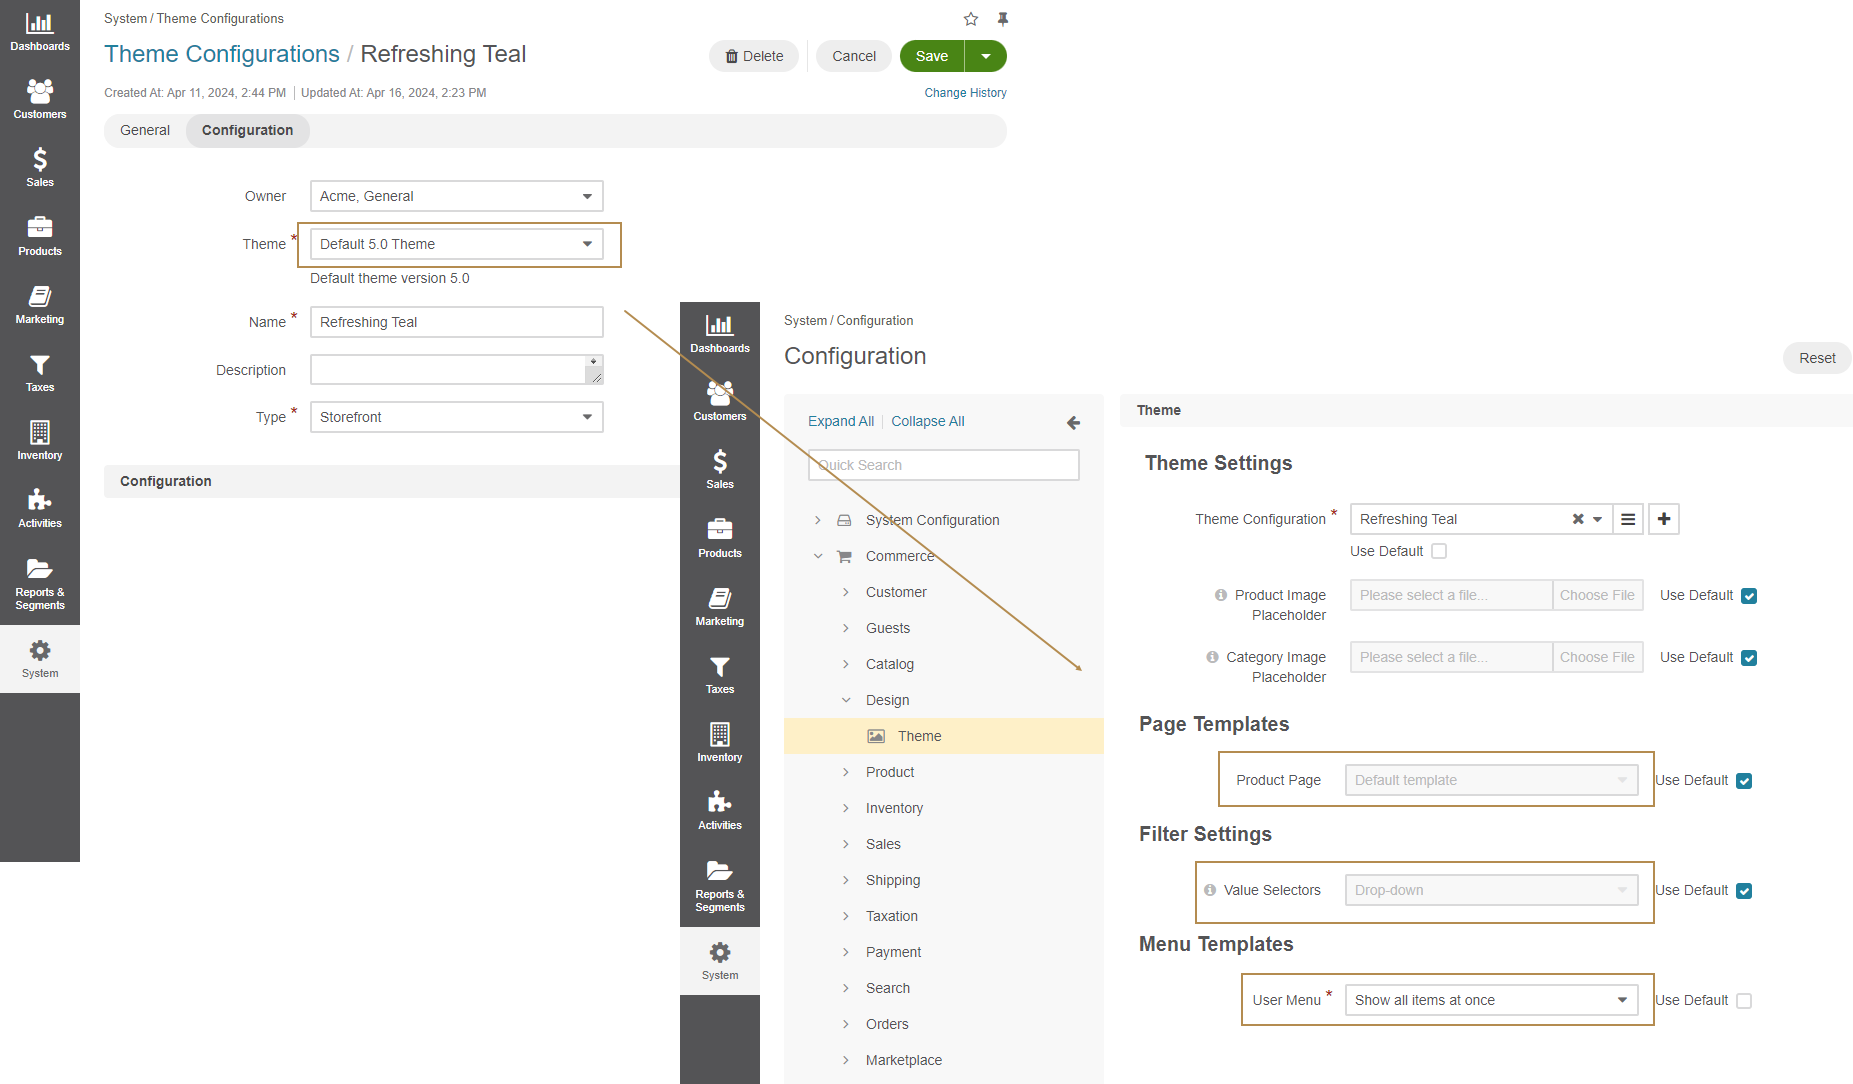
In the Configuration section, customize the following options. You can preview several menu configuration settings to visualize what the option does and where the selected storefront menu will be positioned.
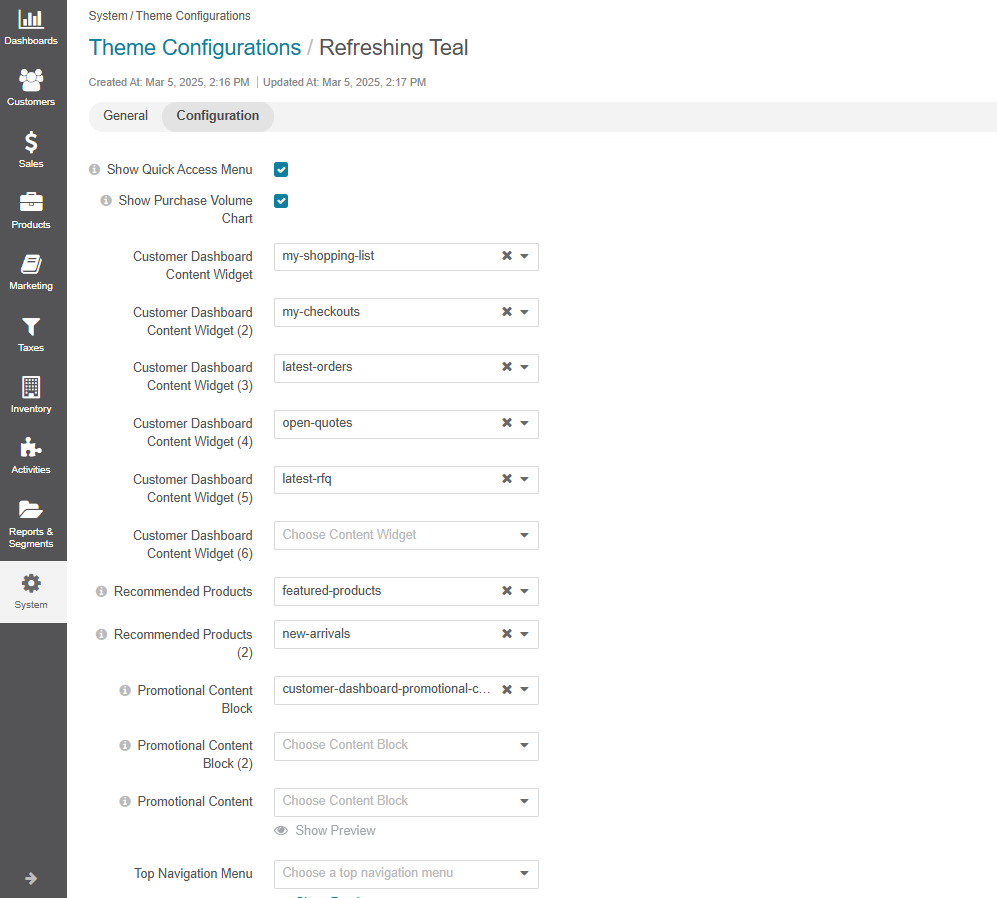
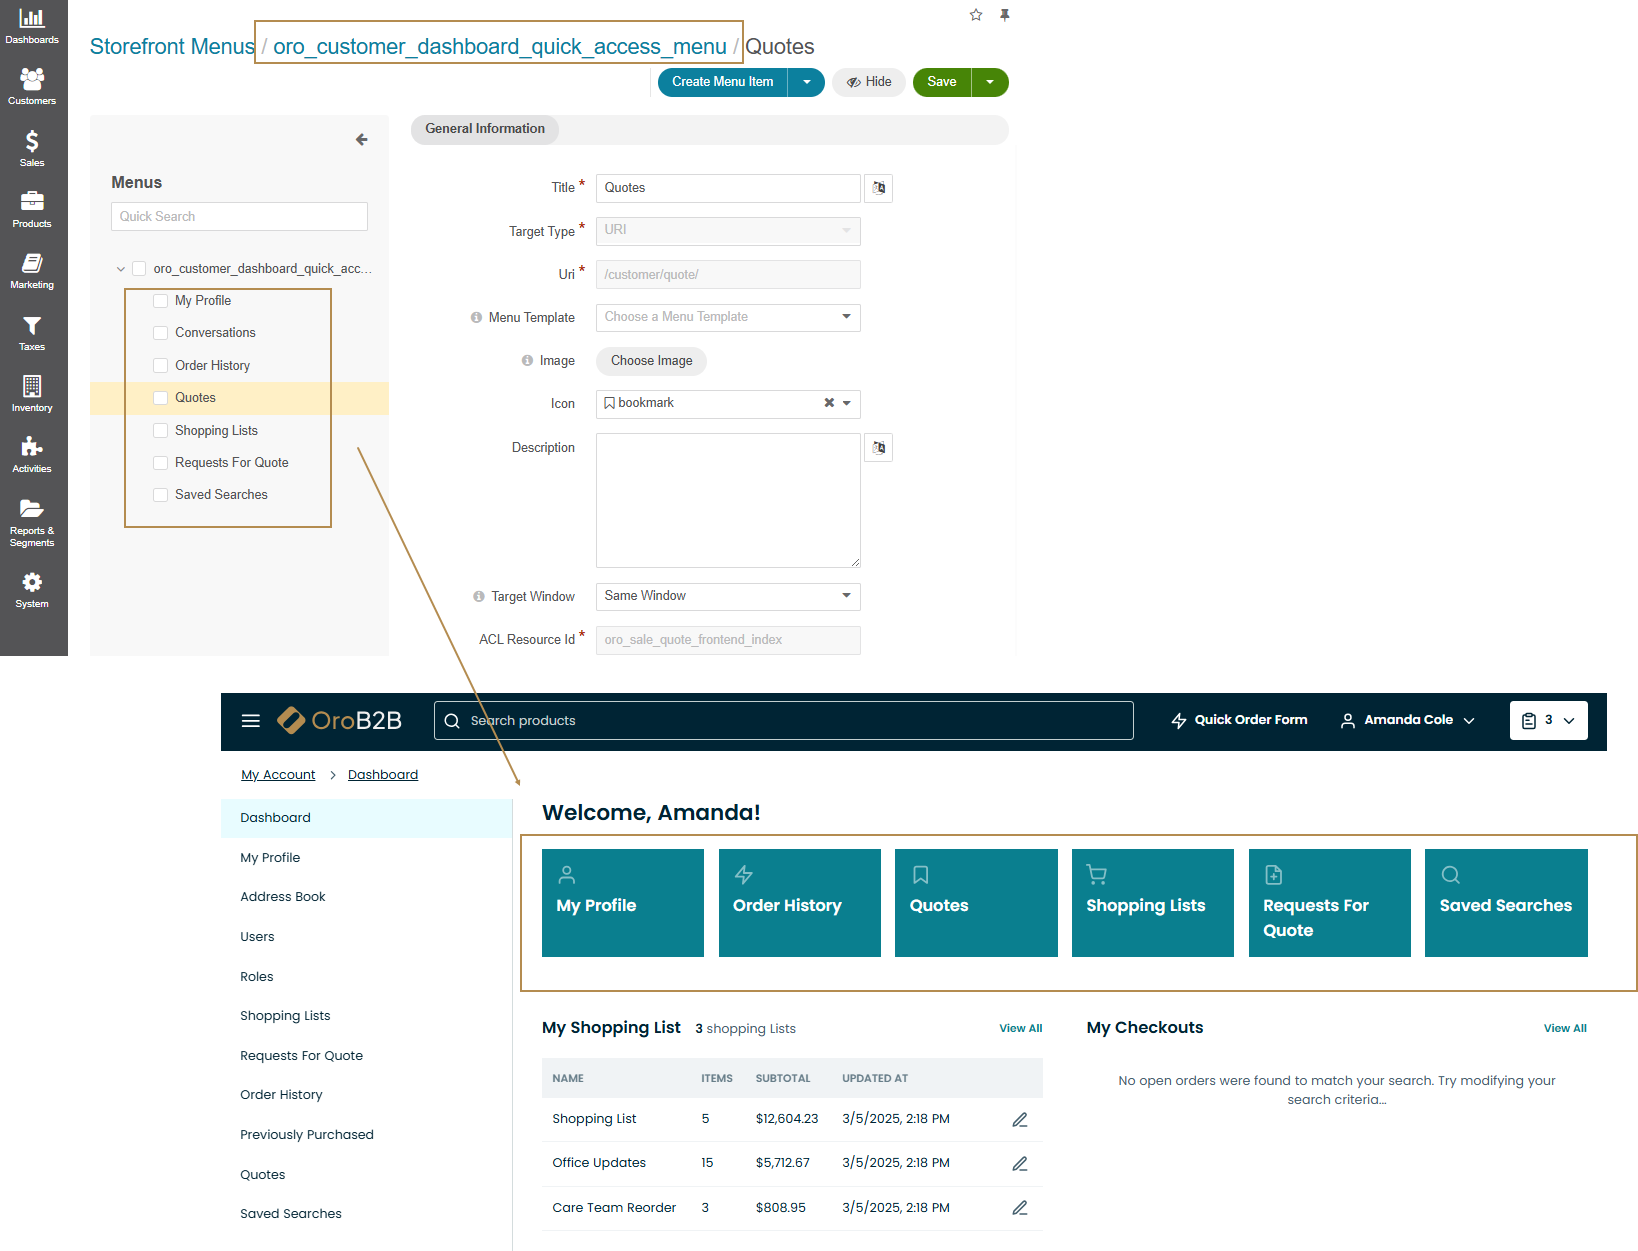
Show Quick Access Menu — Enable a storefront quick access menu (oro_customer_dashboard_quick_access_menu) on the customer user’s Dashboard page. You can edit this menu under System > Storefront Menus to include shortcuts to key sections.
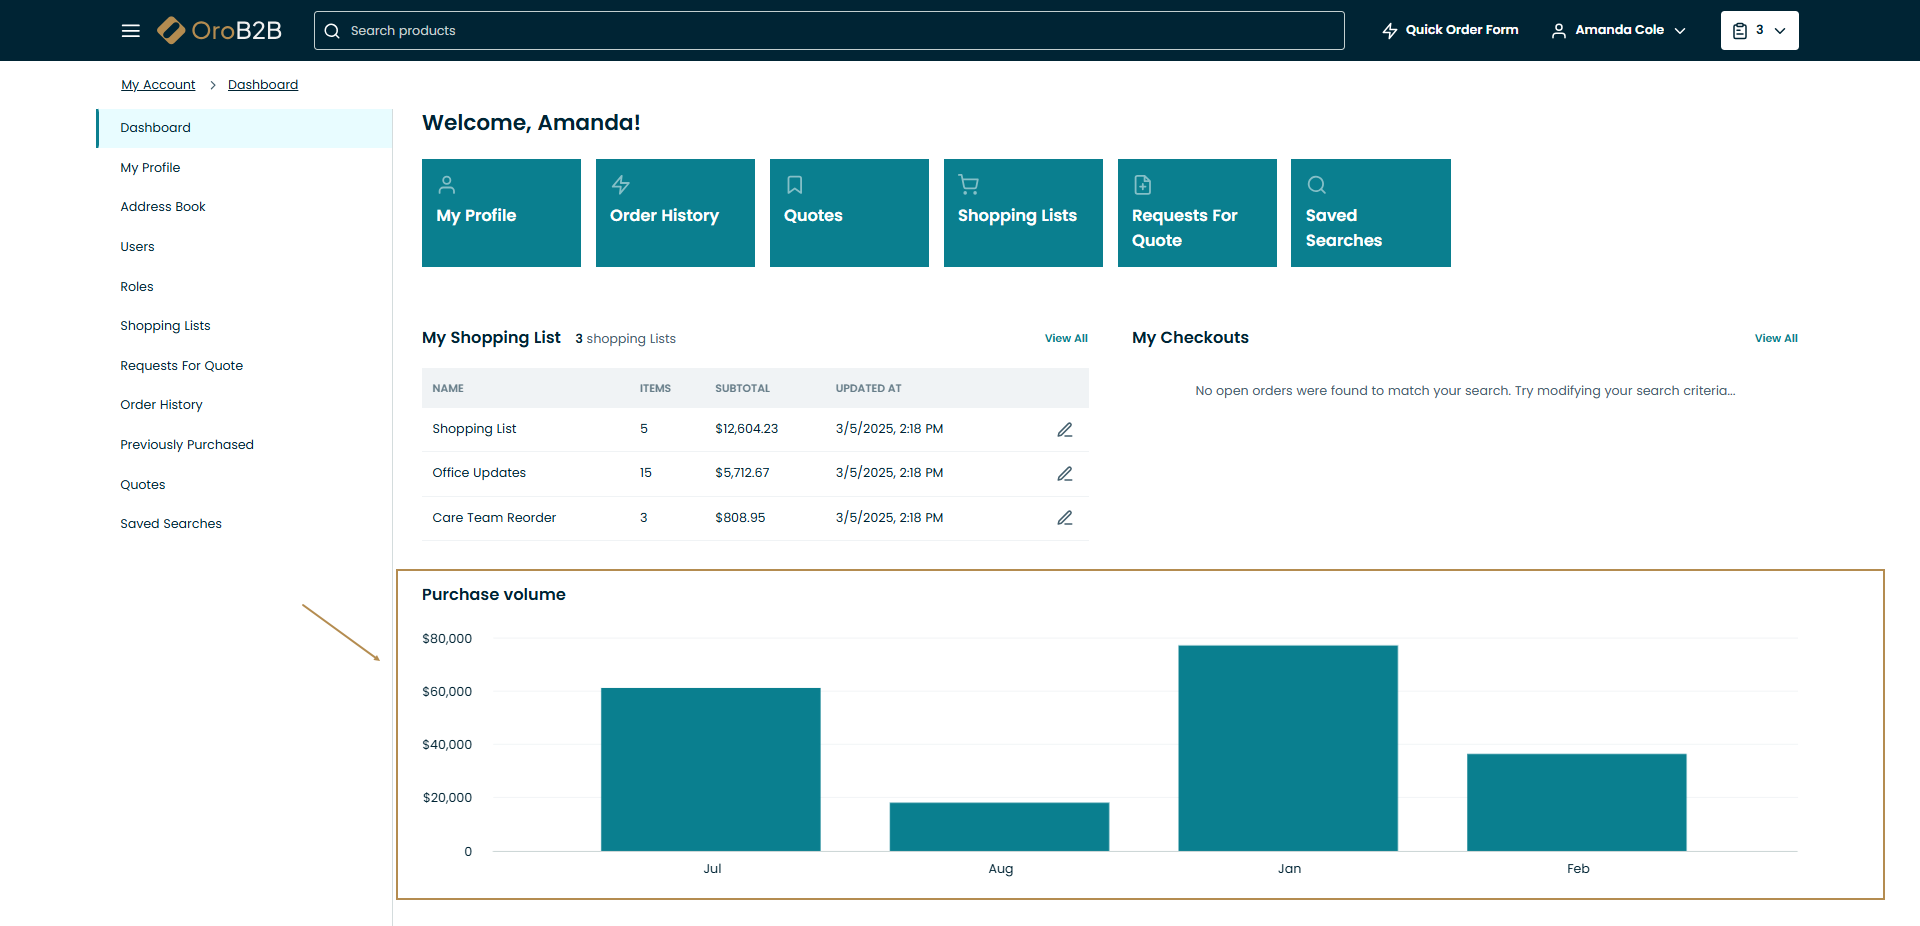
Show Purchase Volume Chart — Enable a bar chart to show the customer user’s total purchase volume over the past 12 months on the customer user’s Dashboard page. The total purchase volume is the sum of all orders placed by or for this customer user (excluding sub-orders and canceled orders).
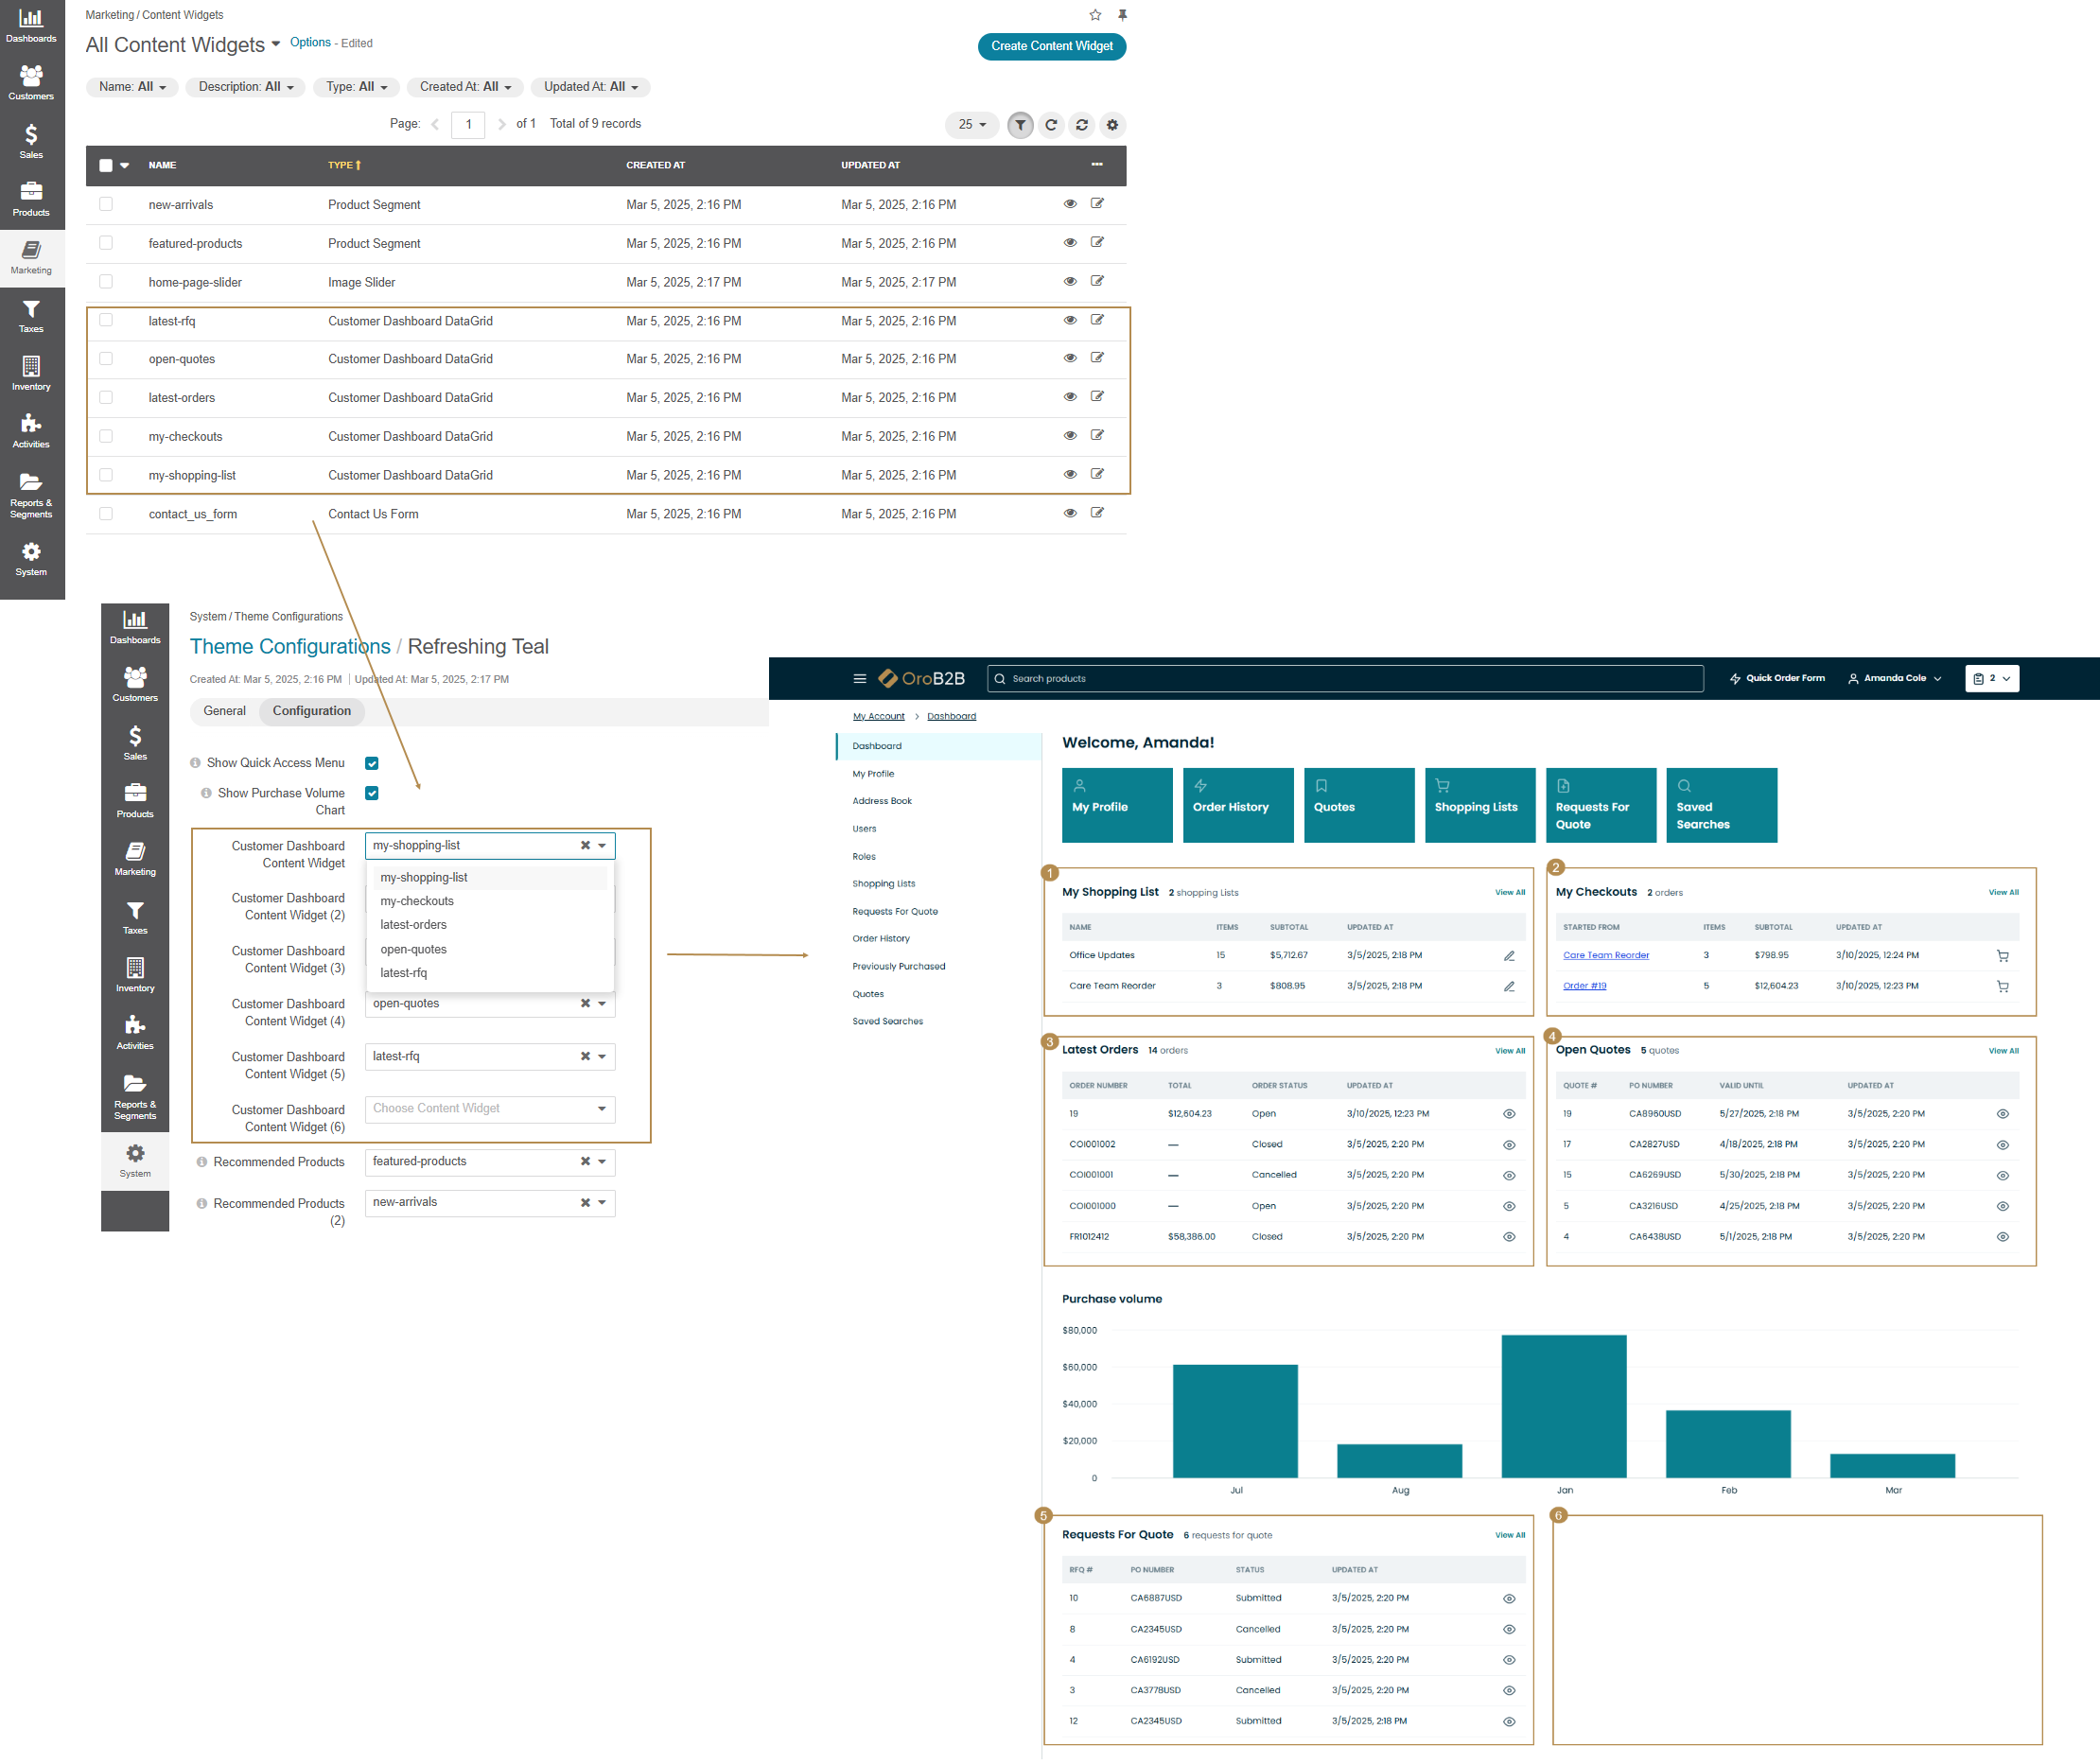
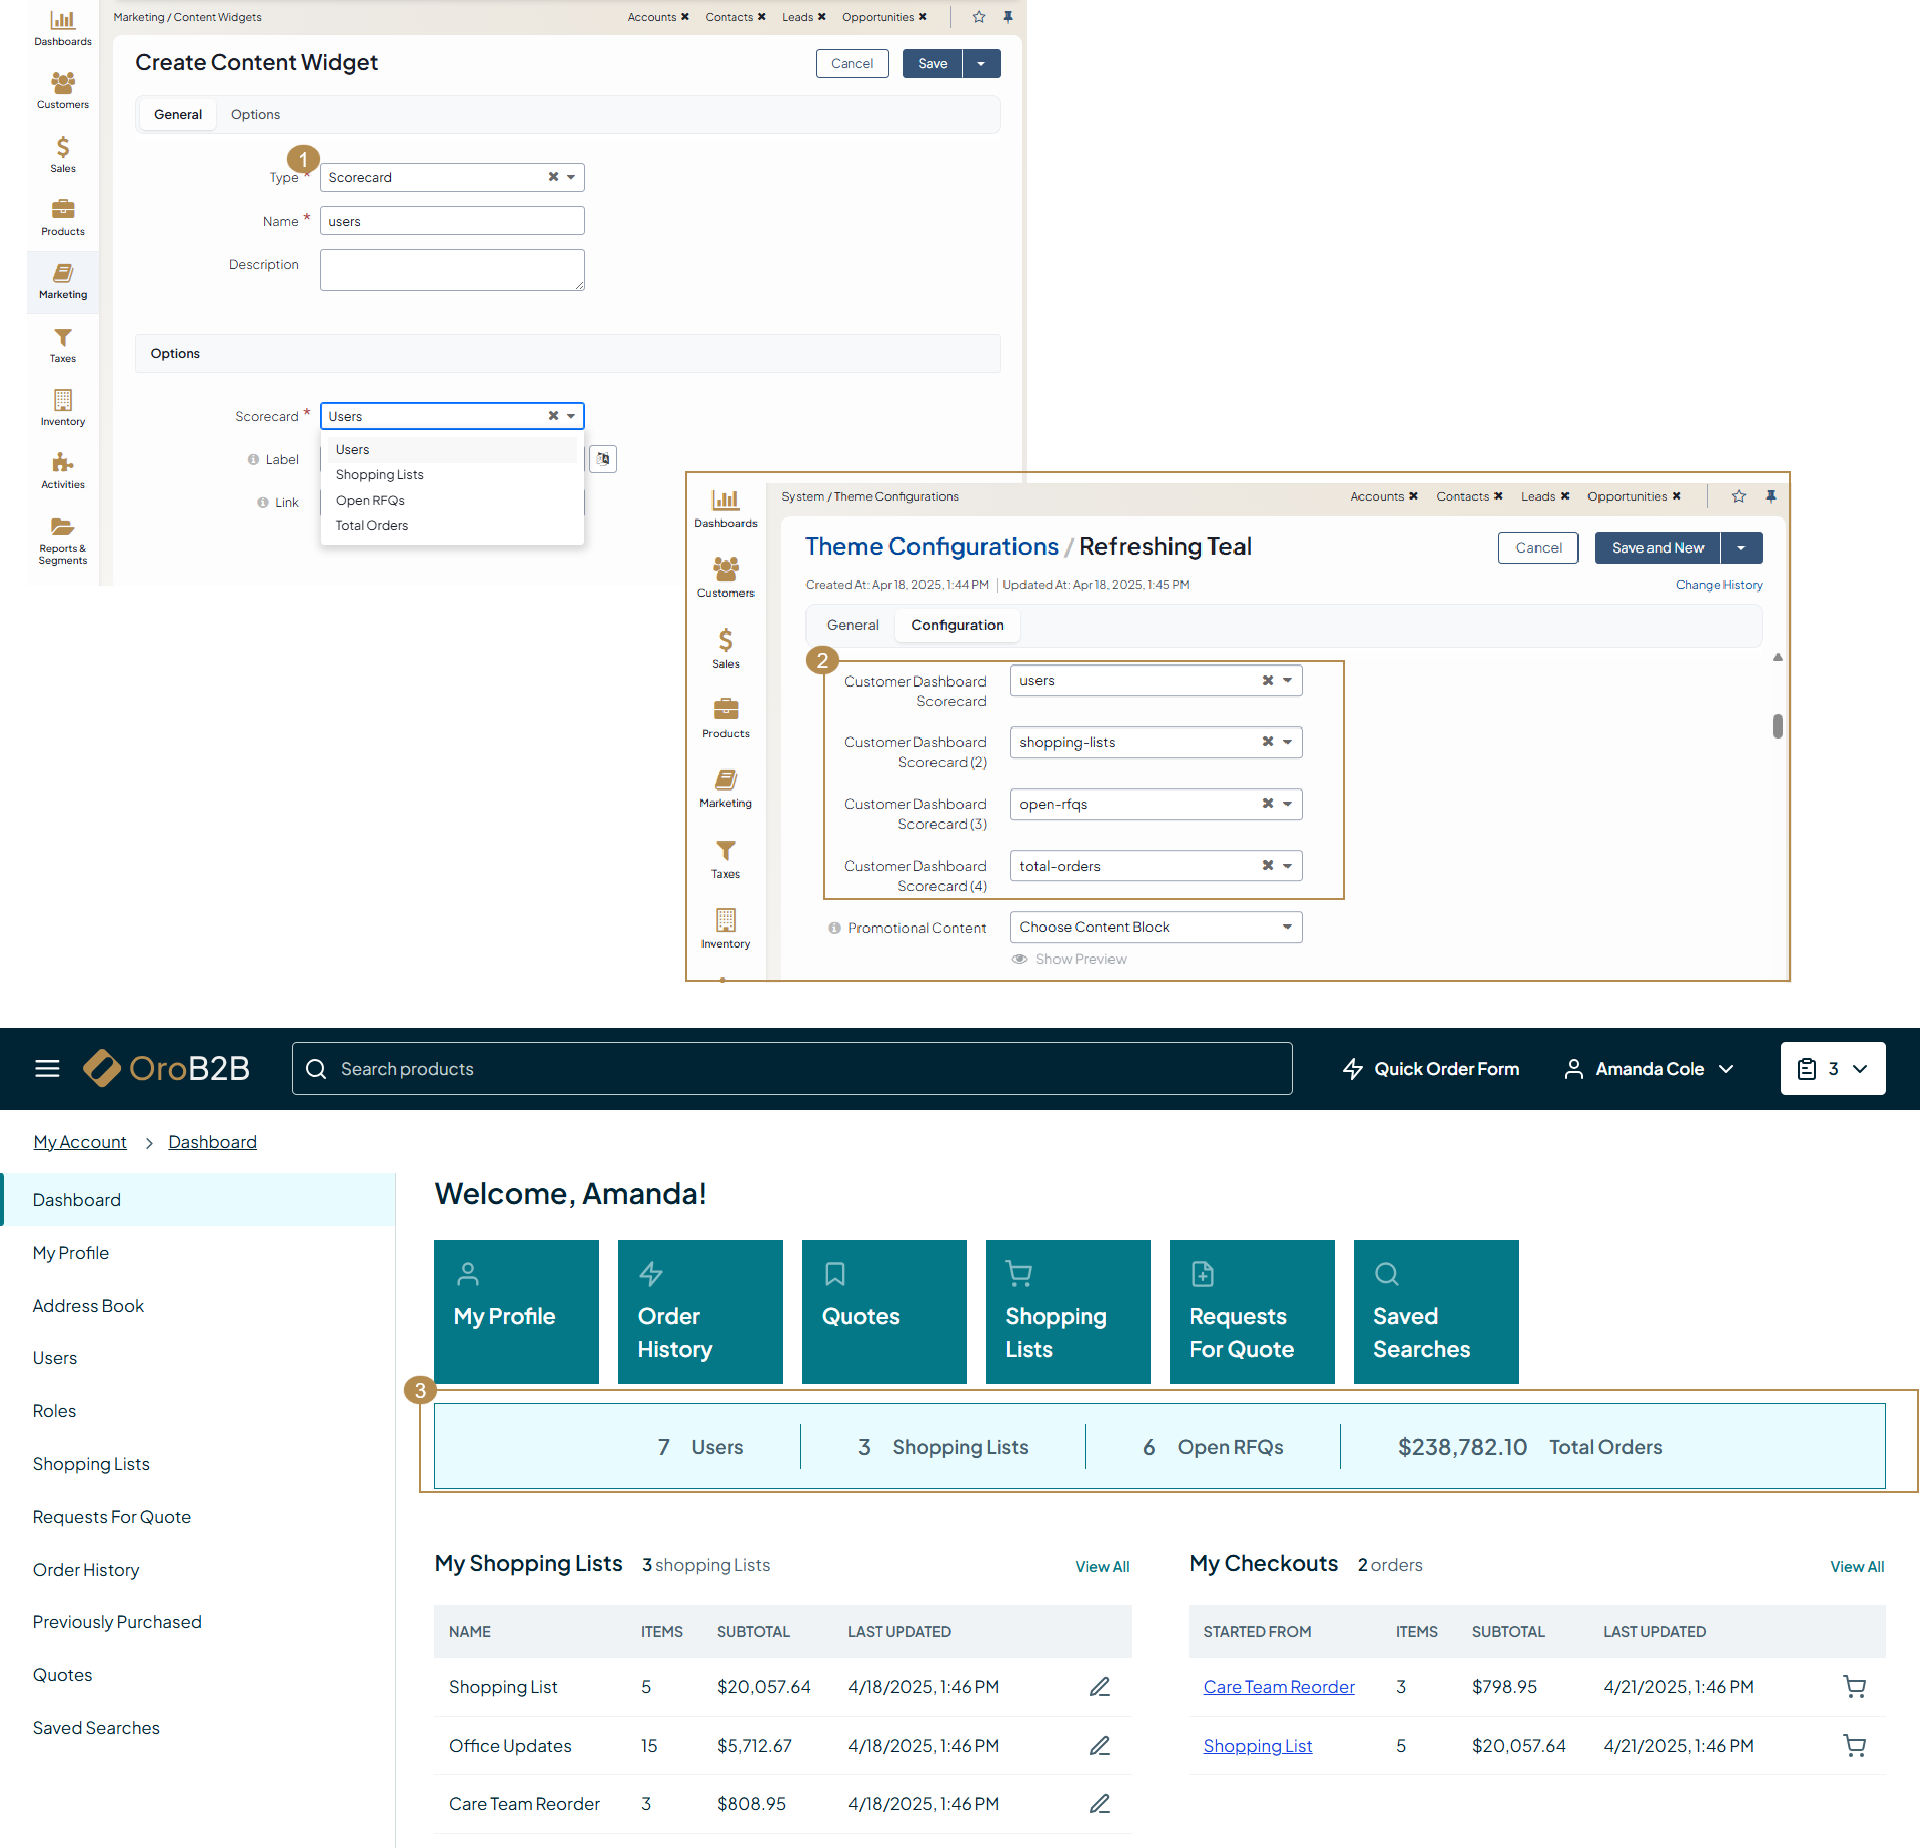
Customer Dashboard Content Widget (1-6) — Select a datagrid content widget from the list of predefined widgets to display on the customer user’s Dashboard page. You can select up to six content widgets. Only the widgets of the Customer Dashboard DataGrid type are displayed in the drop-down list. Each widget presents up to five of the latest records in a grid format, with an option to view all other records on a dedicated page.
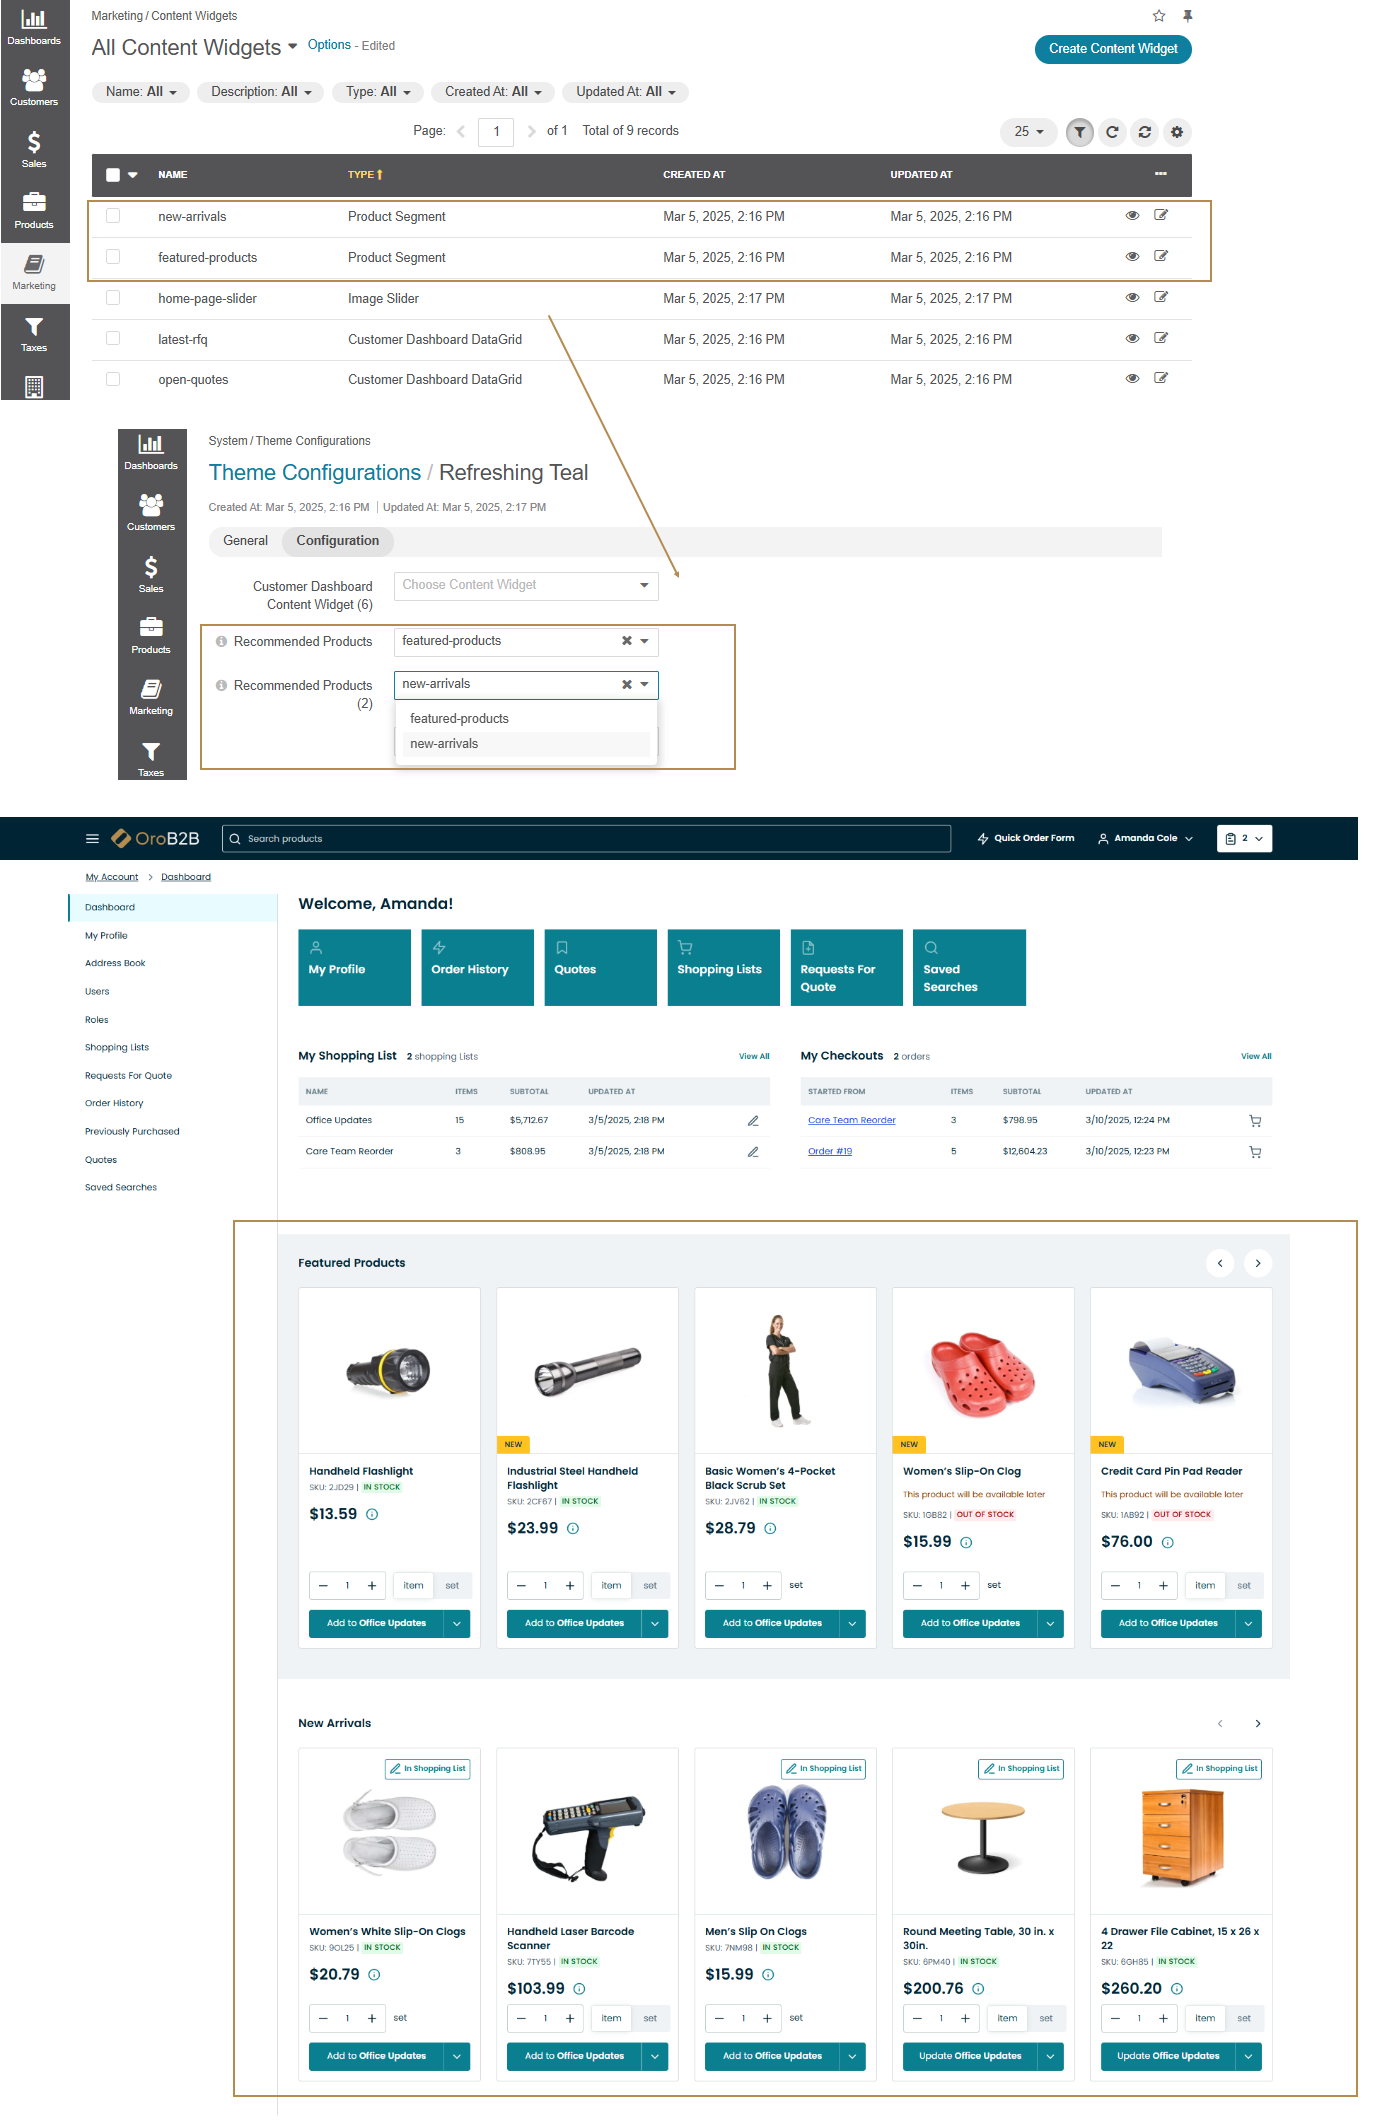
Recommended Products (1-2) — Select a product segment content widget from the list of predefined widgets to display on the customer user’s Dashboard page. You can select up to two content widgets. Only the widgets of the Product Segment type are displayed in the drop-down list. This widget highlights specific product segments for the customer user.
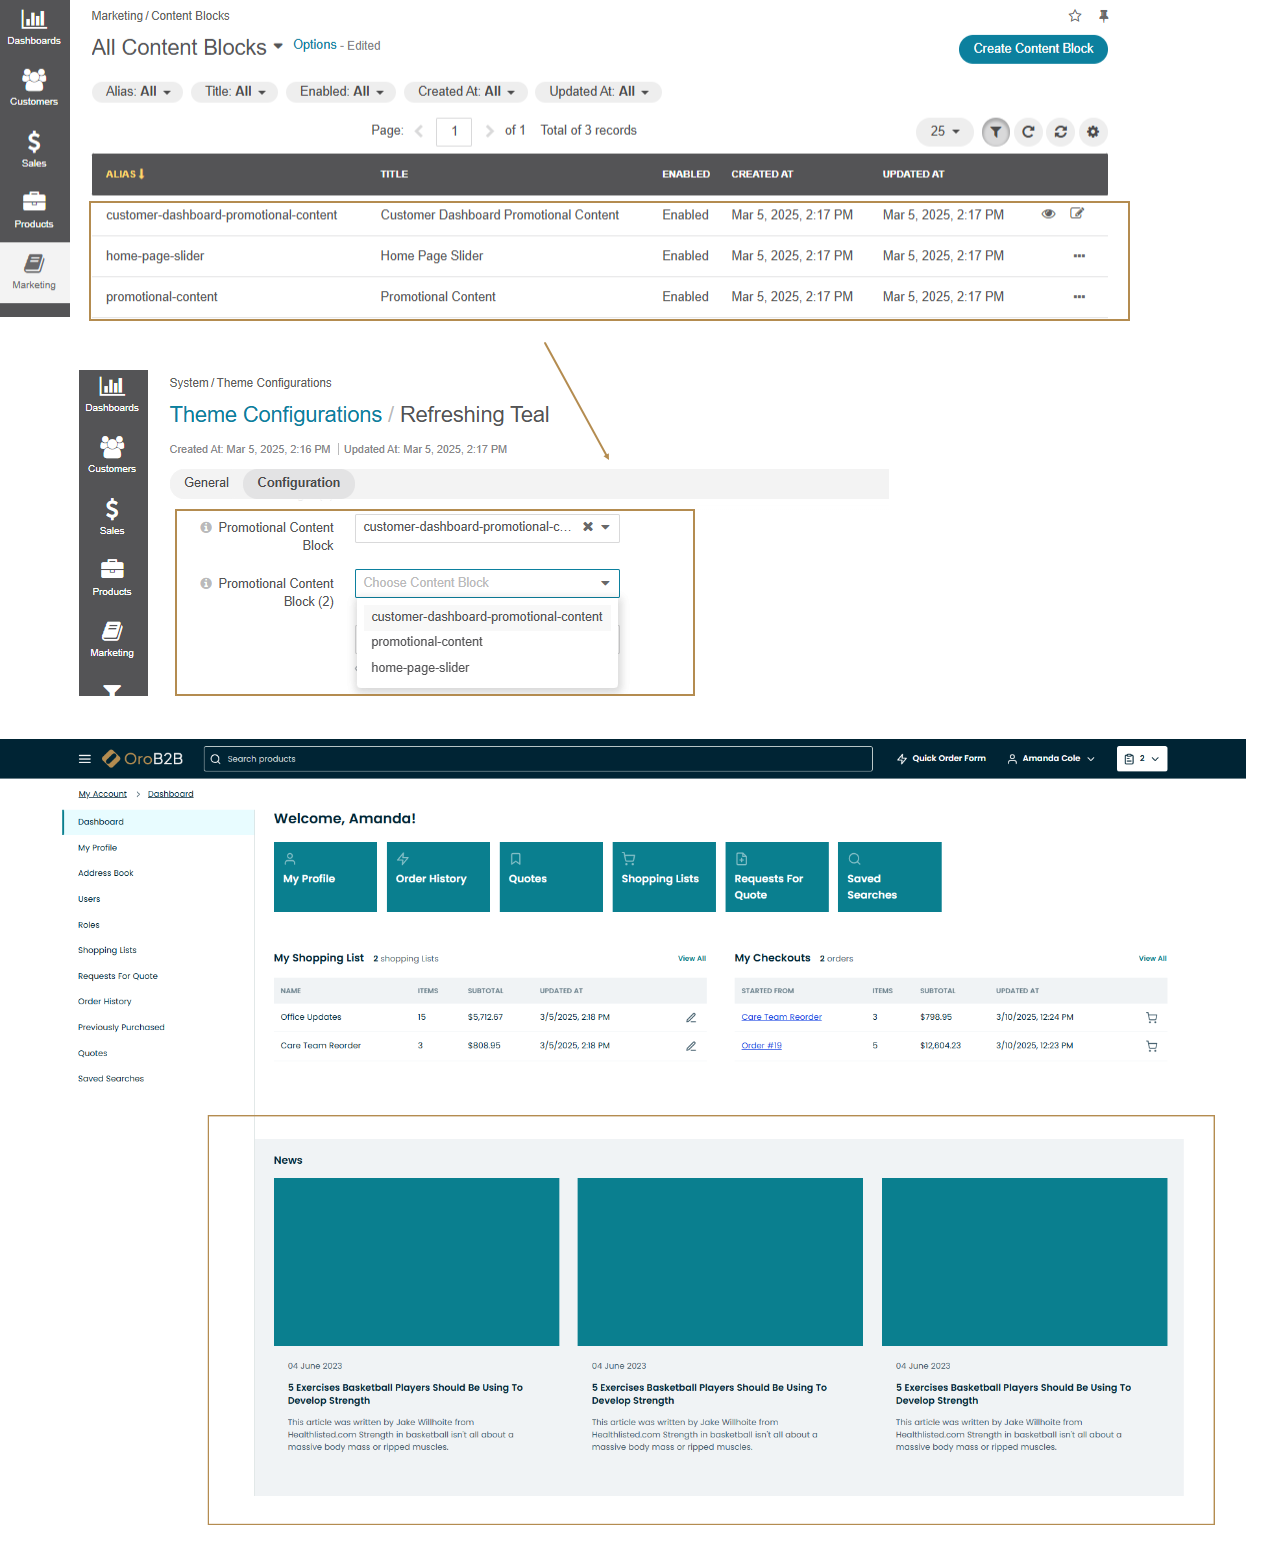
Promotional Content Block (1-2) — Select a content block from the drop-down list to display on the customer user’s Dashboard page. You can select up to two content blocks. This section can include important information such as news, blog posts, or other relevant content.
Customer Dashboard Scorecard (1-4) — Select a scorecard content widget from the list of predefined widgets to display on the customer user’s Dashboard page. You can select up to four content widgets. Only the widgets of the Scorecard type are displayed in the drop-down list. The scorecards represent the information about the total number of customer users under the current customer, the number of shopping lists, open Requests for Quote (excluding cancelled ones), and the total value of all non-cancelled orders.
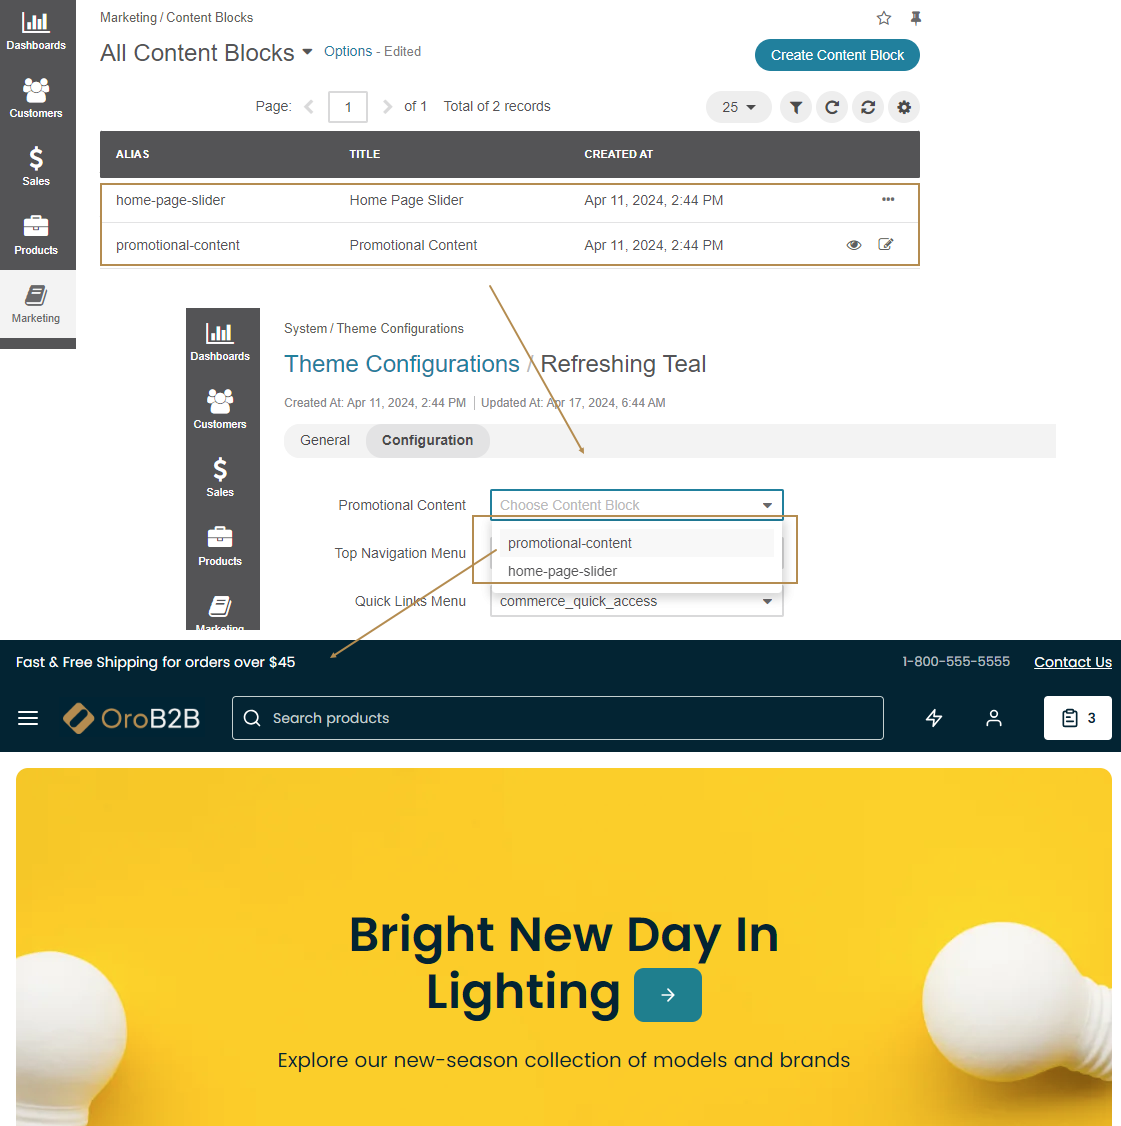
Promotional Content — Select a content block from the drop-down list to display it at the top of the storefront header.
Top Navigation Menu — Select a storefront menu that will be rendered above the header. Please see the concept guide on storefront menu items to learn more about each menu.
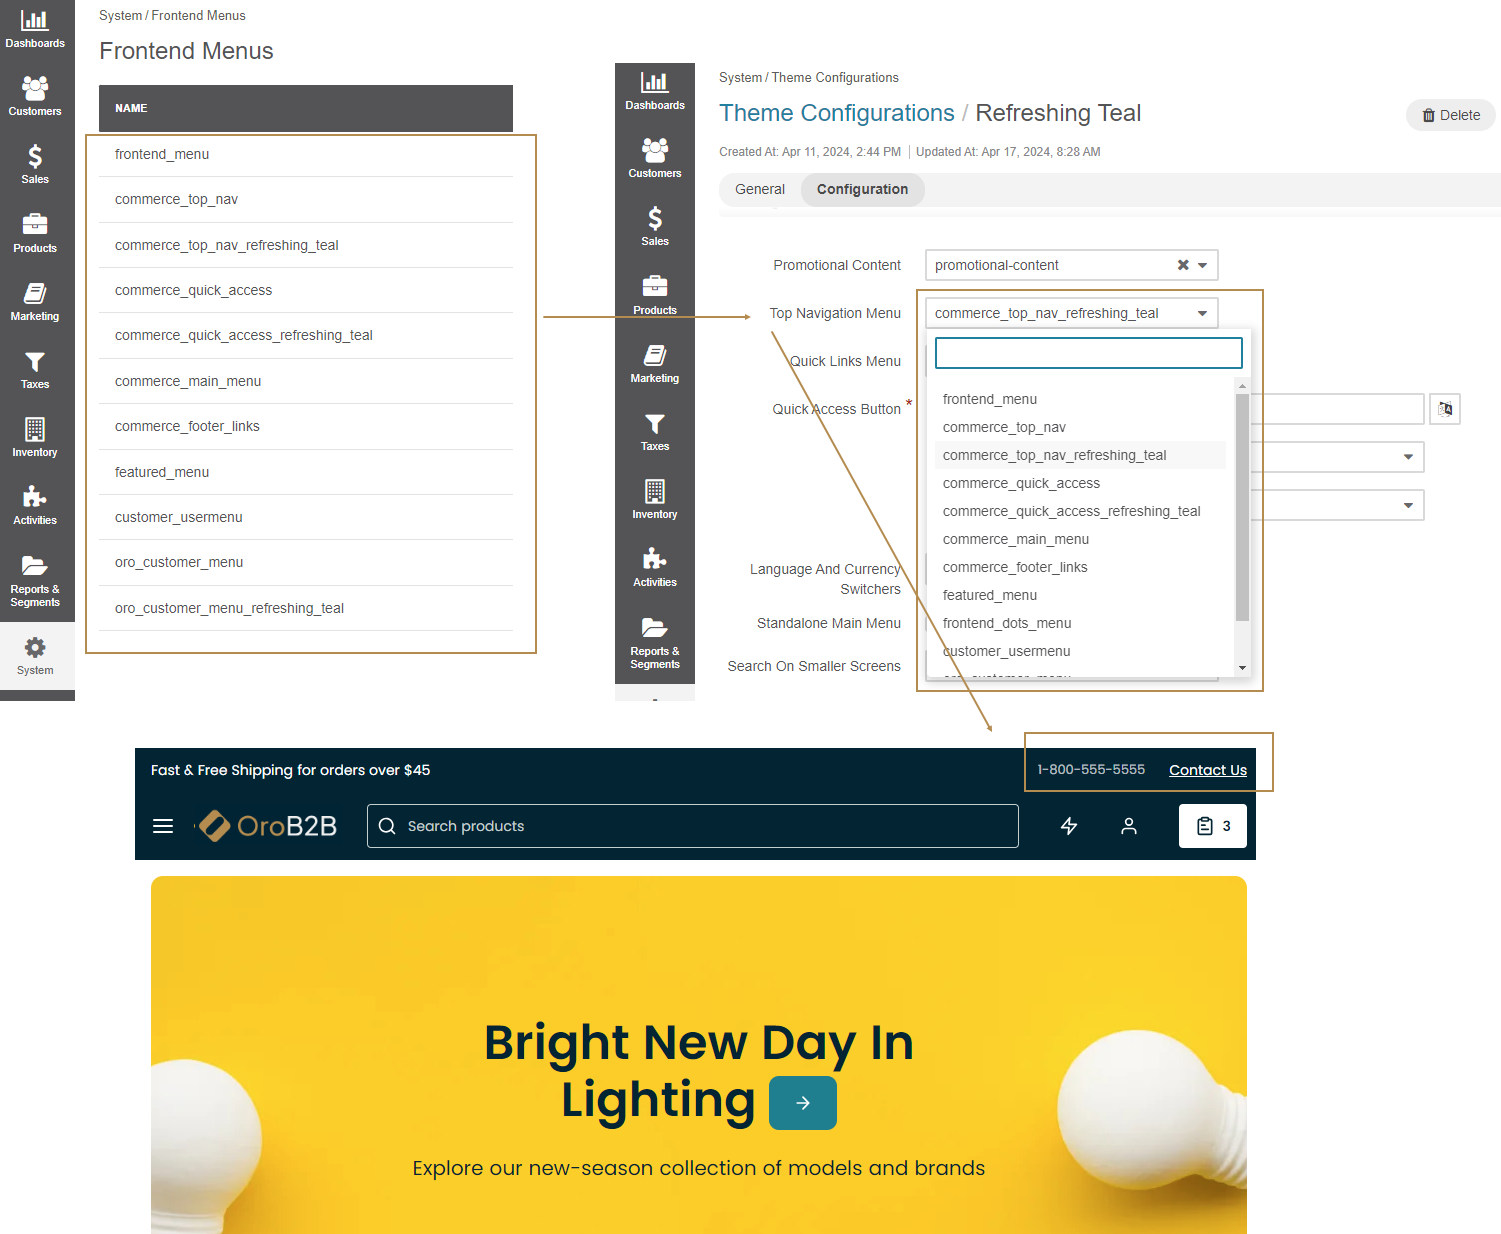
Quick Links Menu — The top level items from the selected storefront menu will be added to the header to provide quick access to the most frequently used pages. Please see the concept guide on storefront menu items to learn more about each menu.
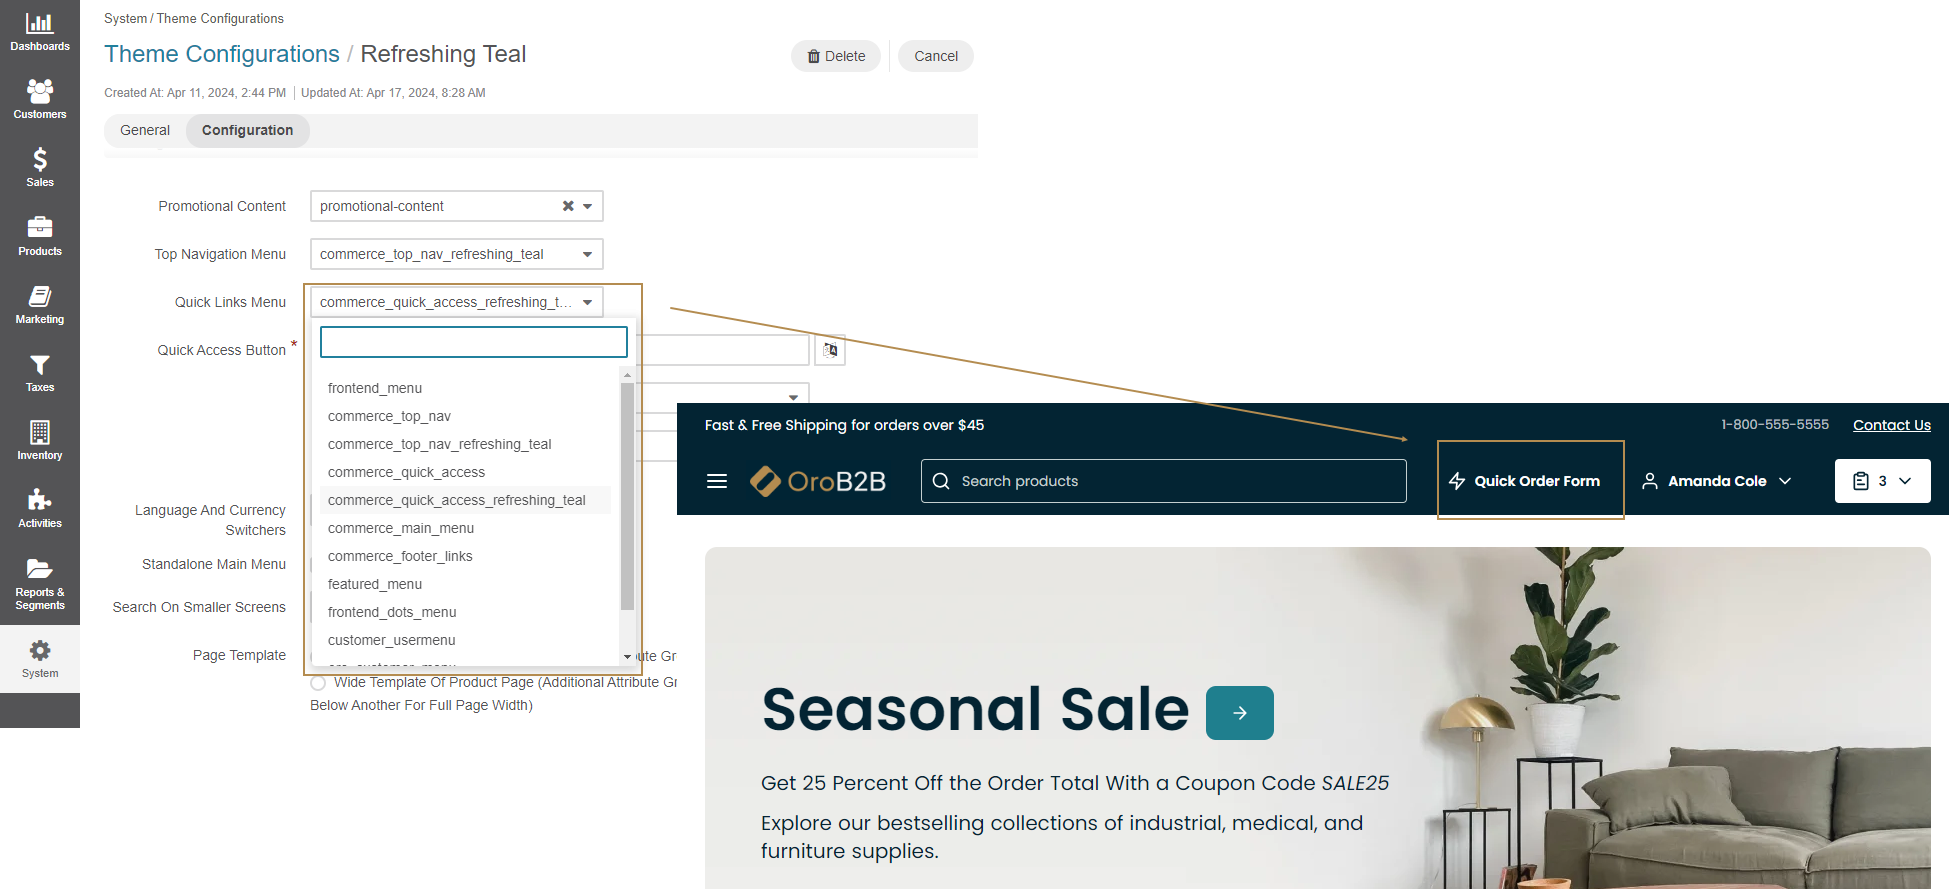
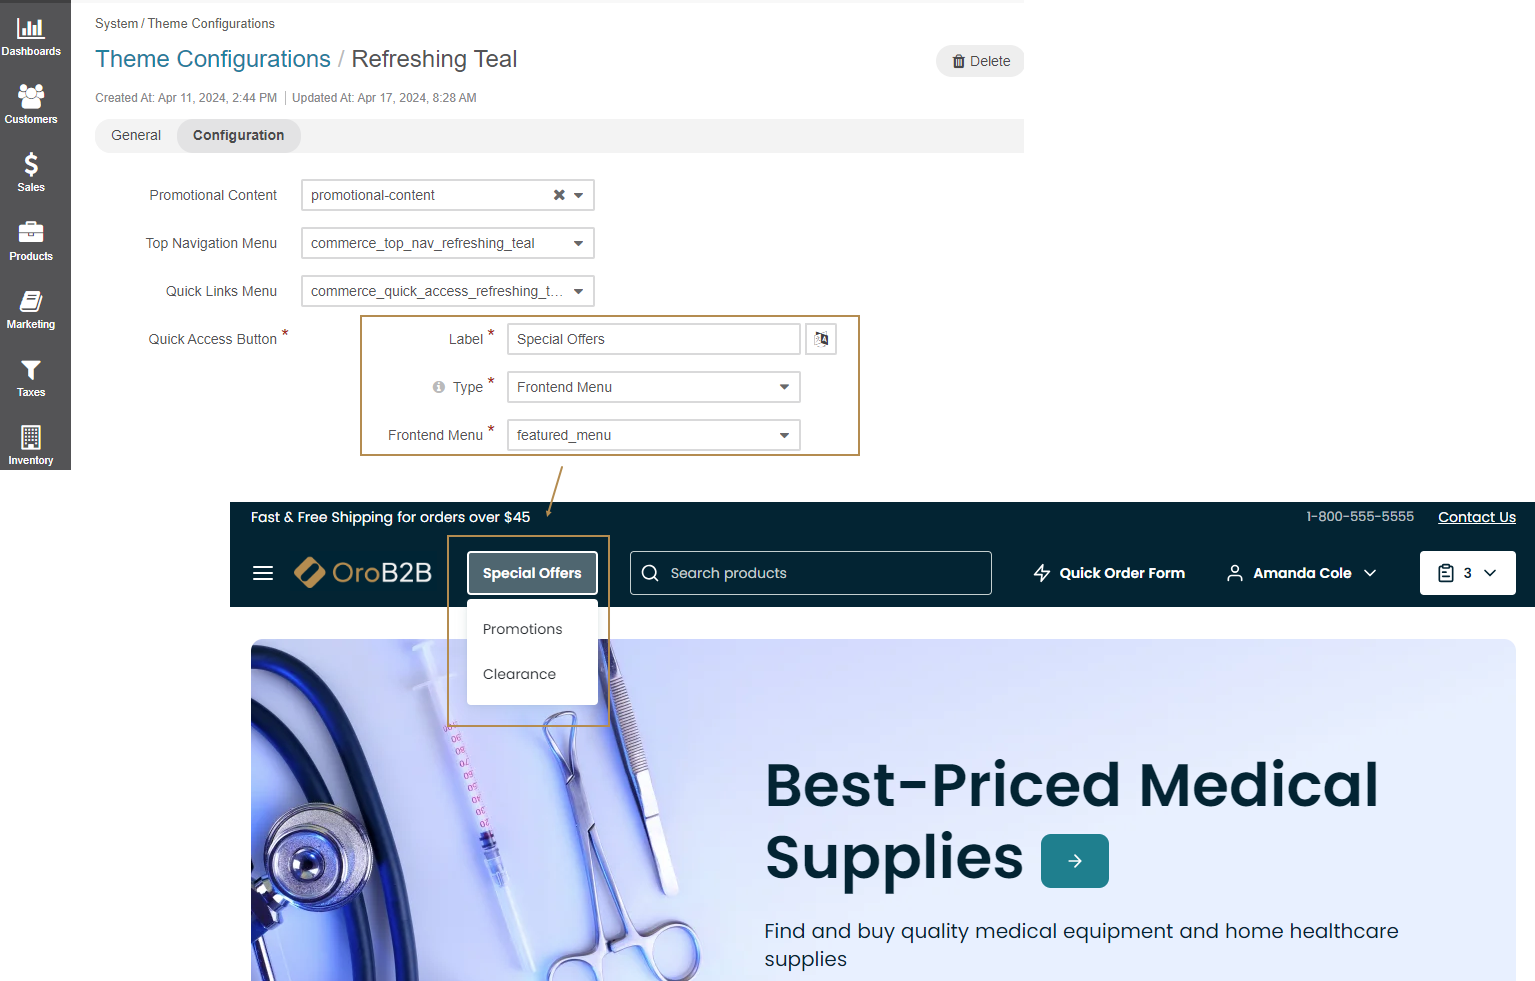
Quick Access Button — The quick access button can either open an additional storefront menu, be a direct shortcut to the product catalog, or another important section of the website. Select the type of the quick access button and specify the name to display it in the storefront header.
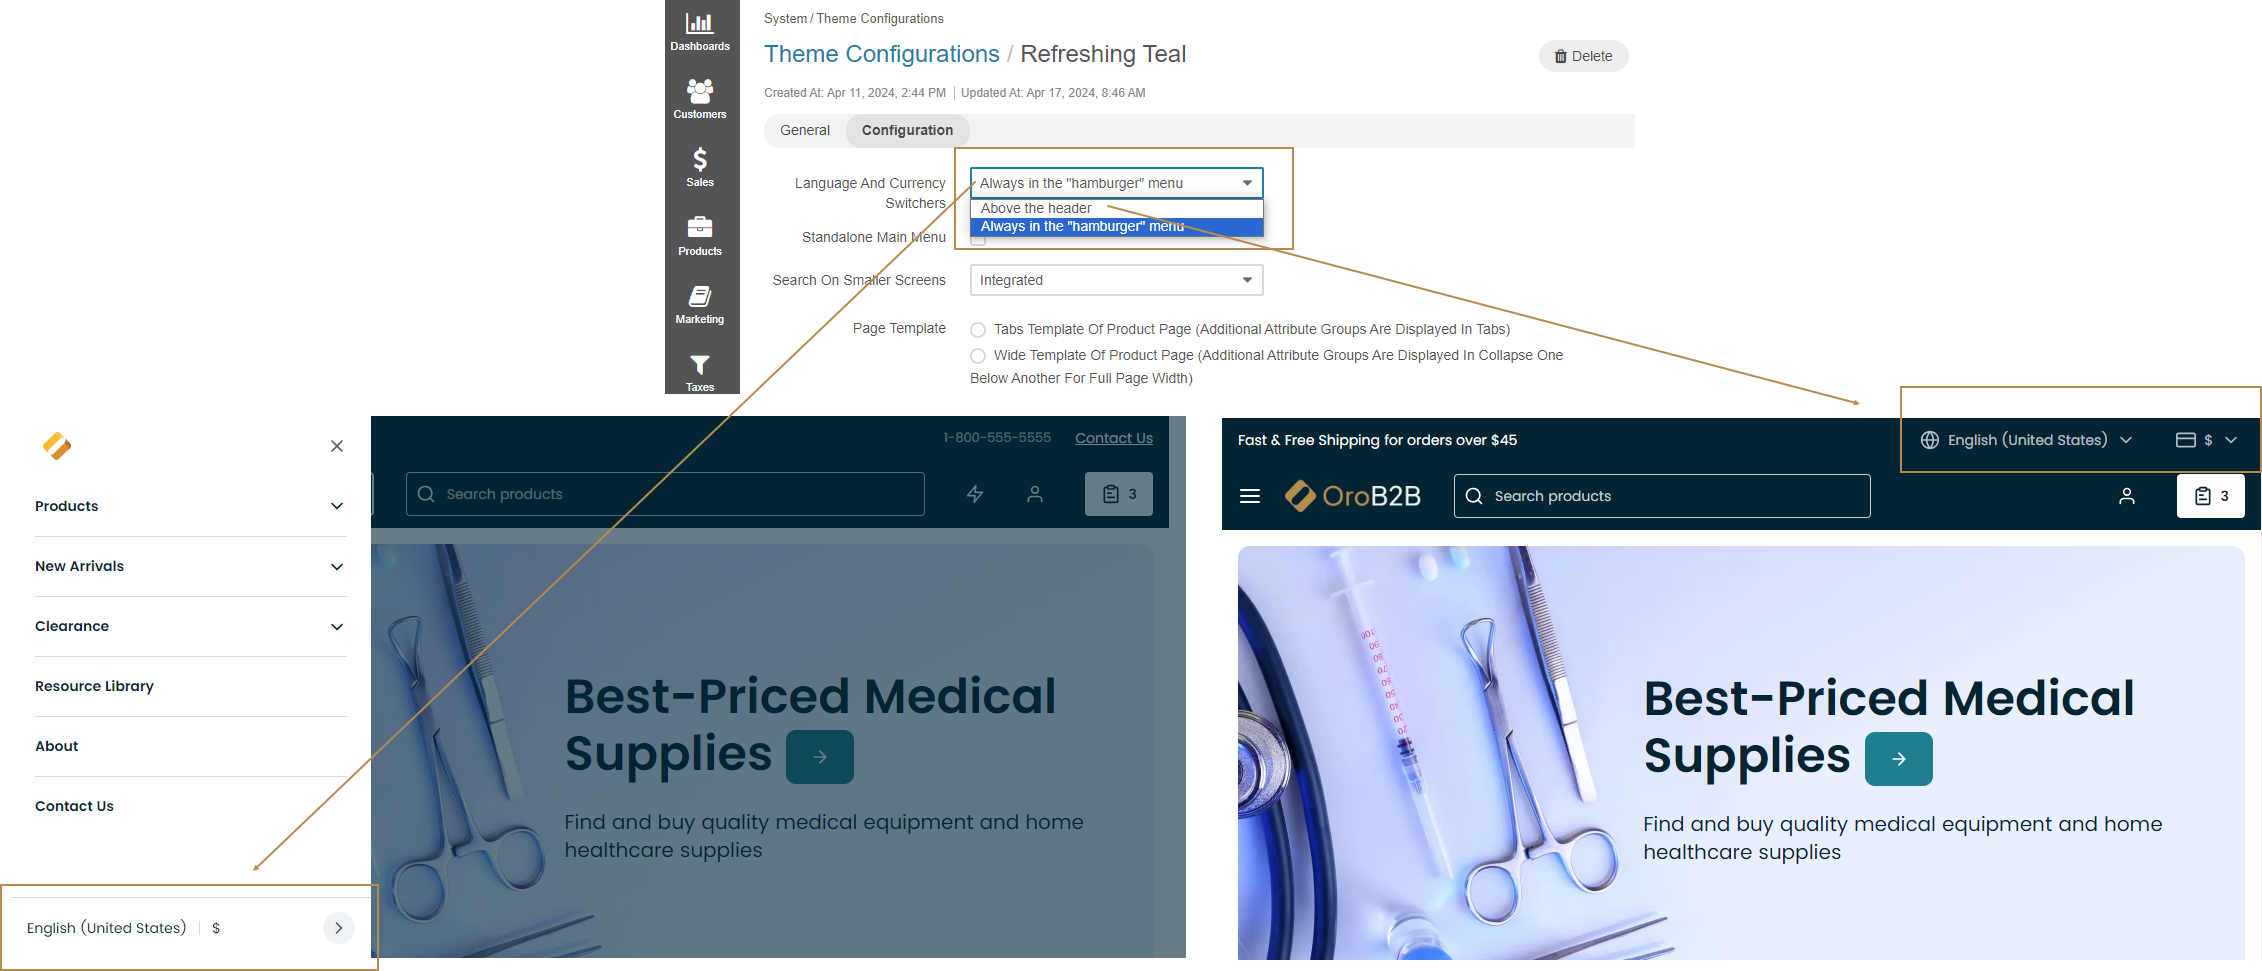
Language And Currency Switchers — Select where you want to place the language and currency switcher. When Above the header option is selected, the language and currency switchers are rendered above the header on the devices with the sufficient screen width. On smaller screens the language/currency switchers will be placed inside the “hamburger” menu (product catalog).
Standalone Main Menu — Enable the setting to let the main menu be rendered separately and to provide access to its top level items on the devices with sufficient screen width. On smaller screens the main menu will be placed inside the “hamburger” menu.
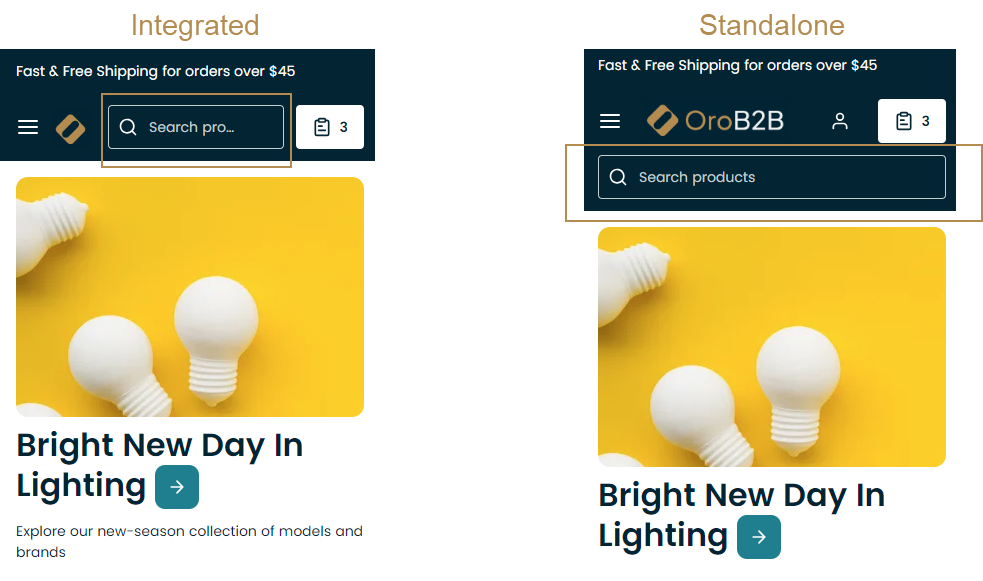
Search on Smaller Screens — Select the way the search is going to be represented on devices with small screens. The search input can either be rendered in its own row to provide access to global search (standalone), or in line with the shopping list item (integrated).
Use Pagination Input if Number of Pages Exceeds — Set the threshold for a number of pages, at which a pagination input field will appear. If the total number of pages exceeds this specified number, the system will display a pagination input, allowing users to directly enter a page number and quickly navigate to it, rather than clicking through each page individually.
CSS Variables Configuration — This option includes all the CSS variables that frontend developers use to define the theme in the storefront. These variables are made available here for easier access, allowing administrators to fine-tune the website’s storefront appearance directly. Currently, all variables are rendered as text inputs, and basic validation is in place. However, future updates will enhance validation to ensure that values entered match the allowed CSS properties. The list of supported CSS variables includes: css_background, css_border_radius, css_box_shadow, css_color, css_font_size, css_gap, css_length, css_line_height, css_min_height, css_outline, css_padding, and more.
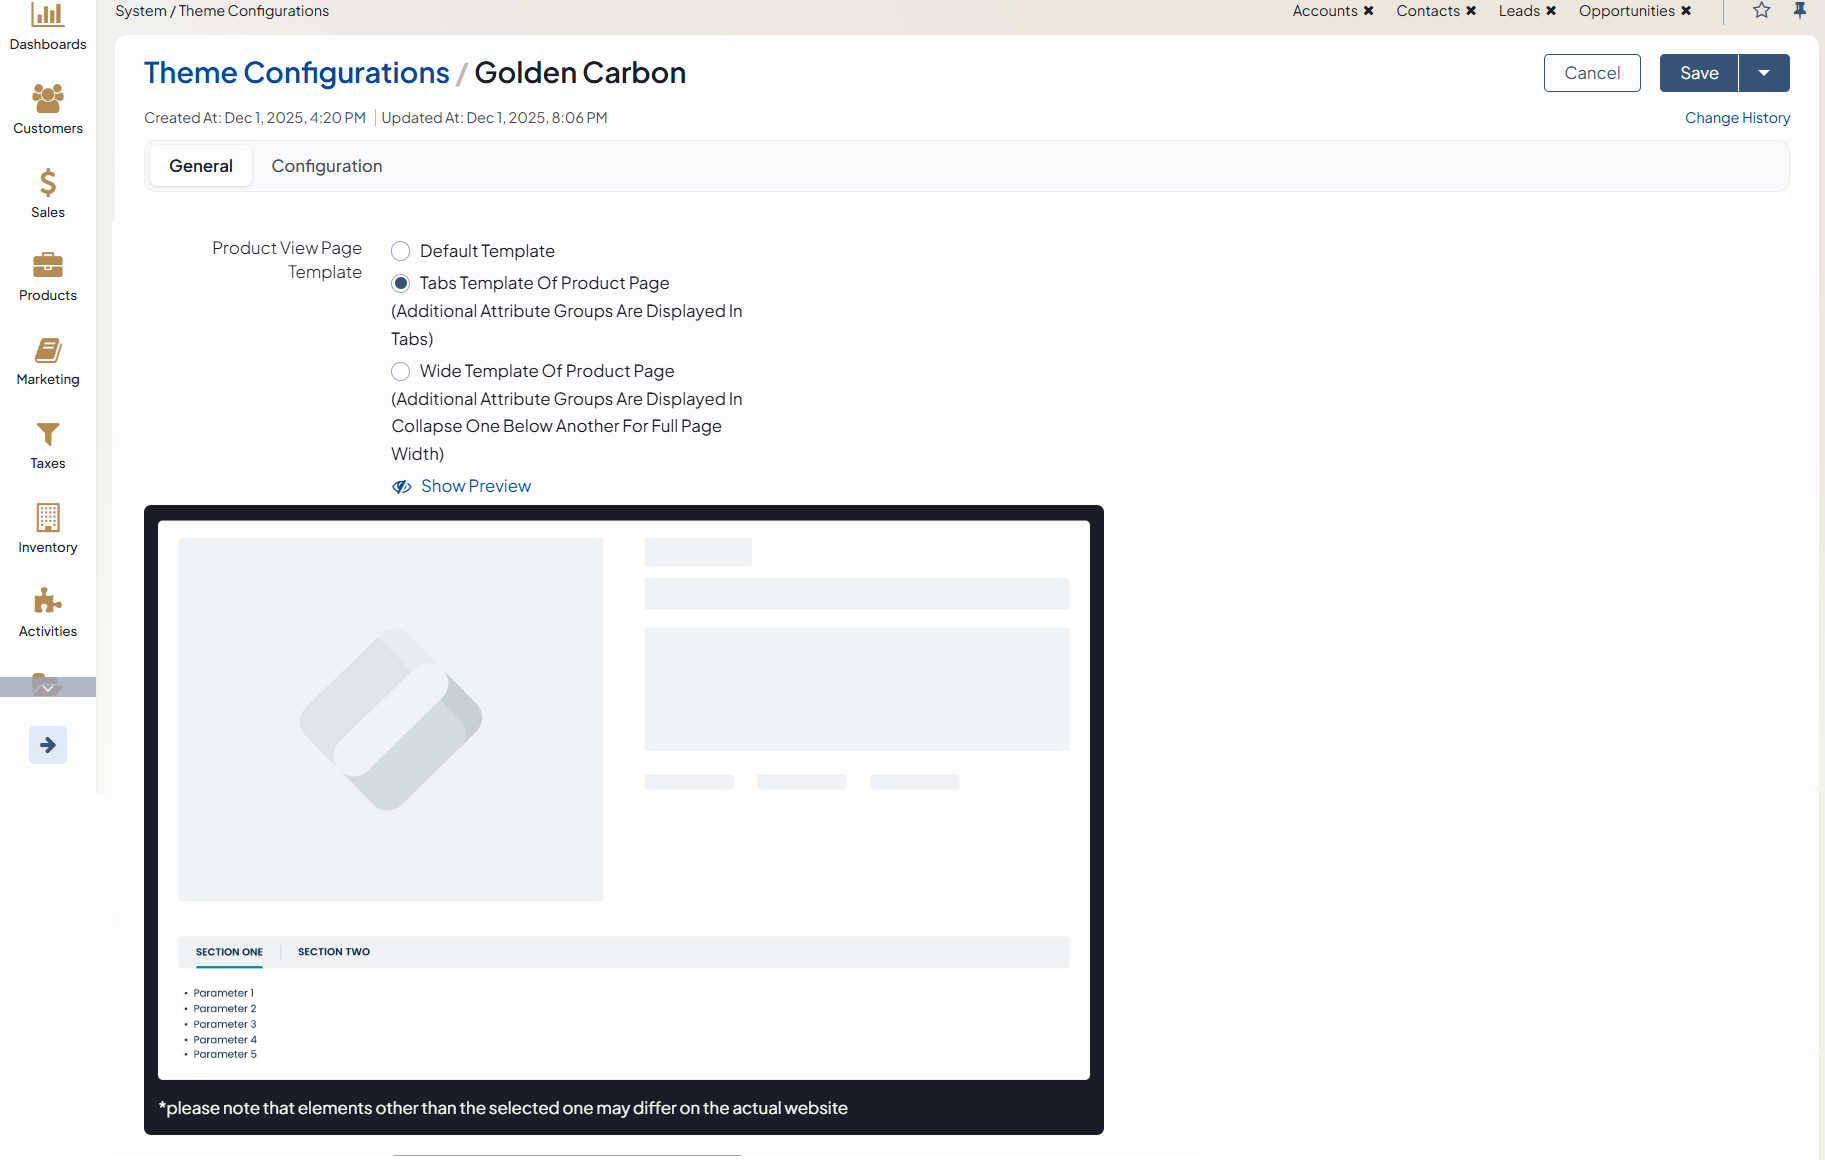
Product View Page Template — Select the product page template from the list. A page template is used to render the product page in the storefront by default, unless the template is overridden in the product details. Available options are Default, Tabs (additional attribute groups are displayed in tabs), and Wide (additional attribute groups are displayed in collapse one below another for full page width).
Display Price Tiers As — Select a multi or single unit table. A multi-unit table shows price tiers for all product units in the same table, which might not work well for products with many units or when quantity tiers are not aligned between units. Single-unit table shows price tiers only for the currently selected unit.
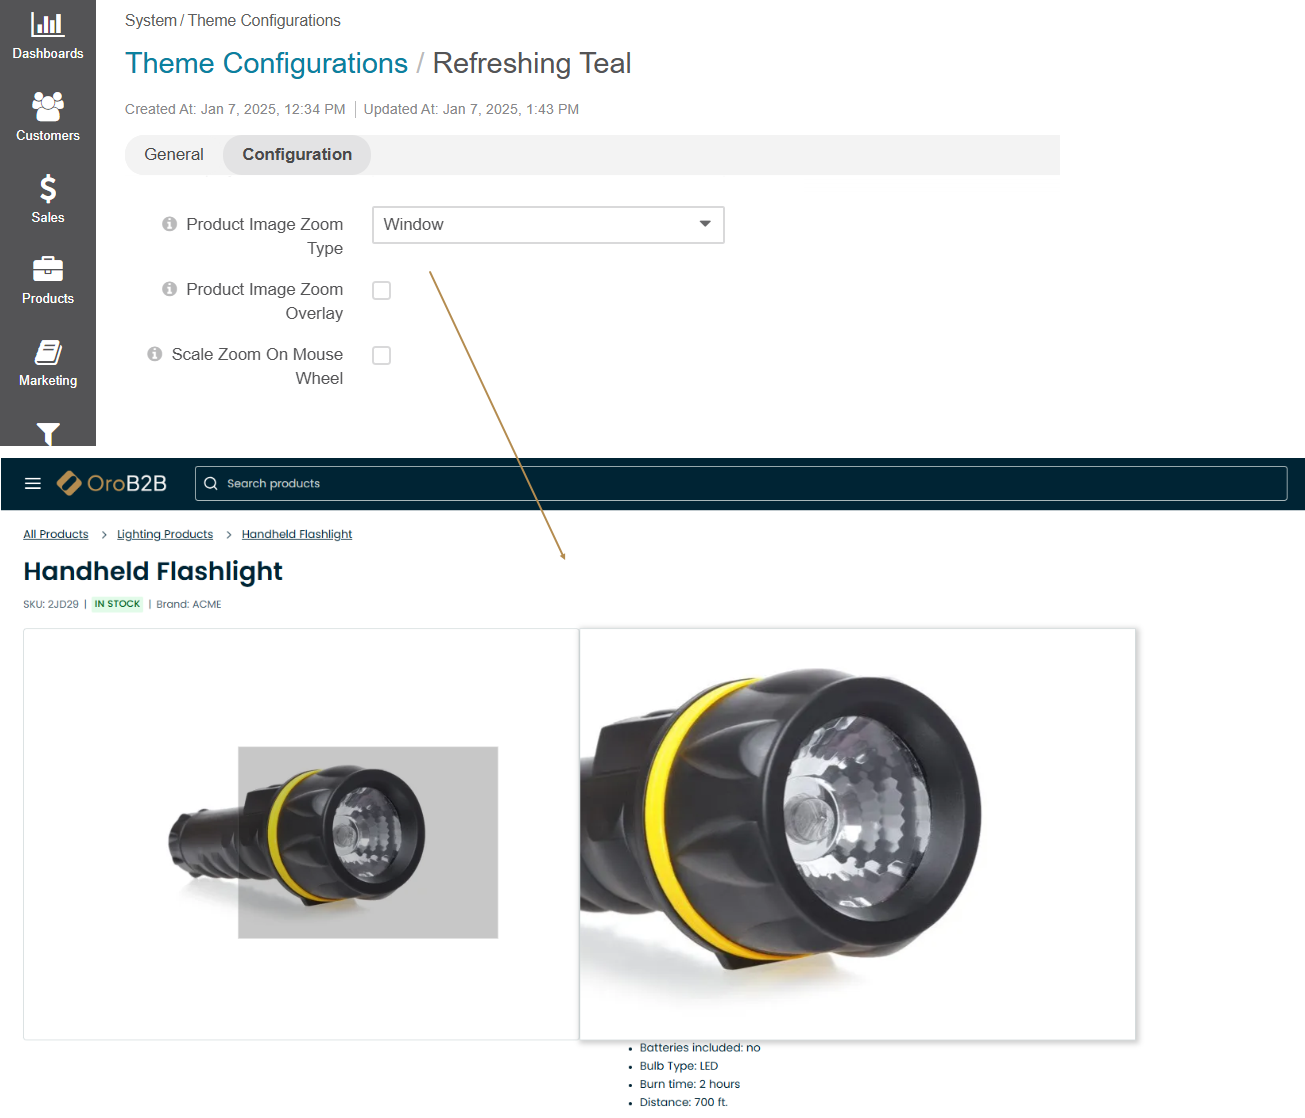
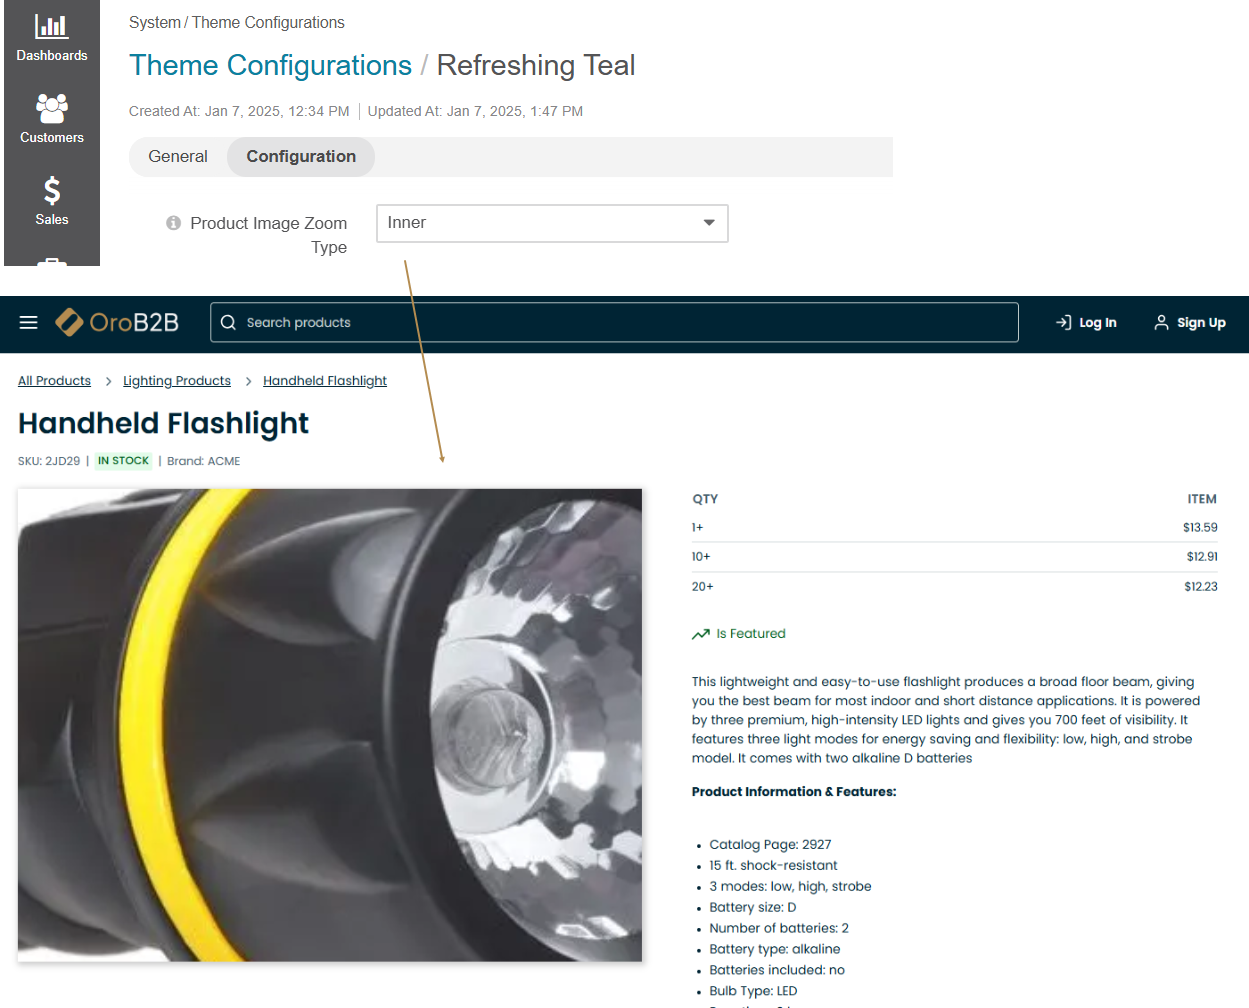
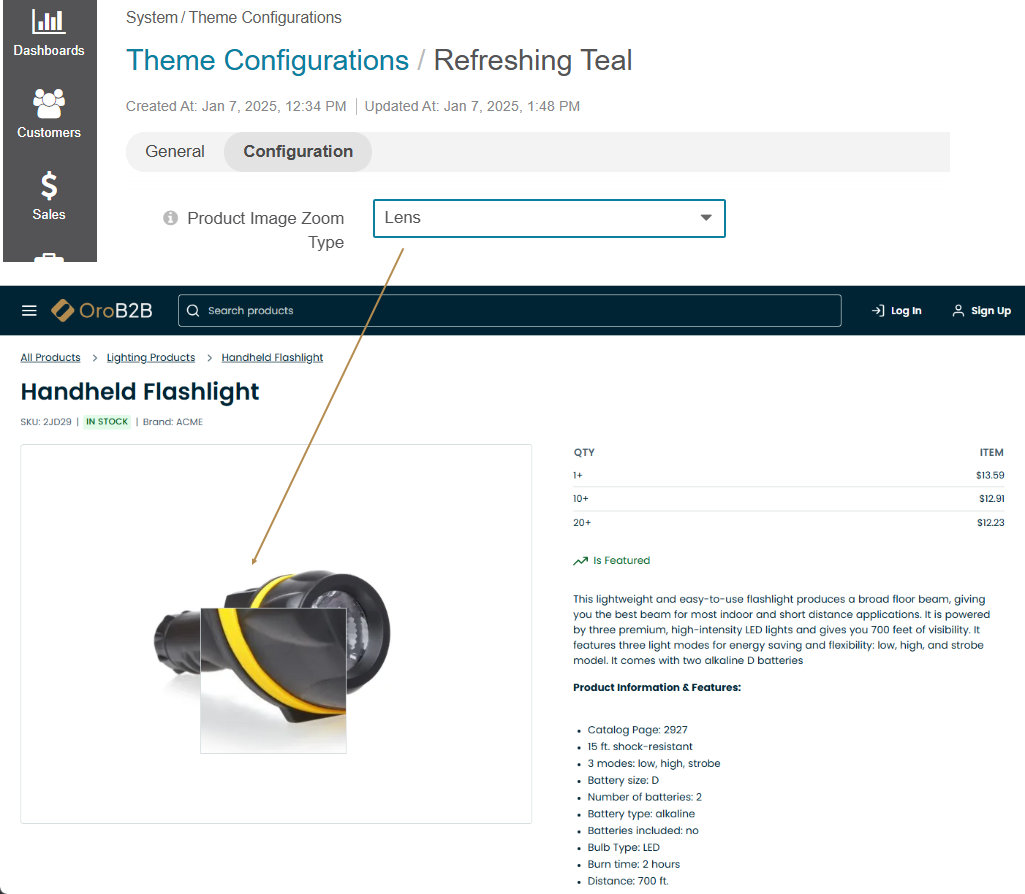
Product Image Zoom Type — Select the zoom effect for product images on the product details page. Available options:
Window: Displays a zoomed portion of the image in a separate window near the product image.
Inner: Zooms in directly inside the product image area.
Lens: Displays a square lens effect for zooming.
Disabled: Disables the zoom effect for product images on the product details page.
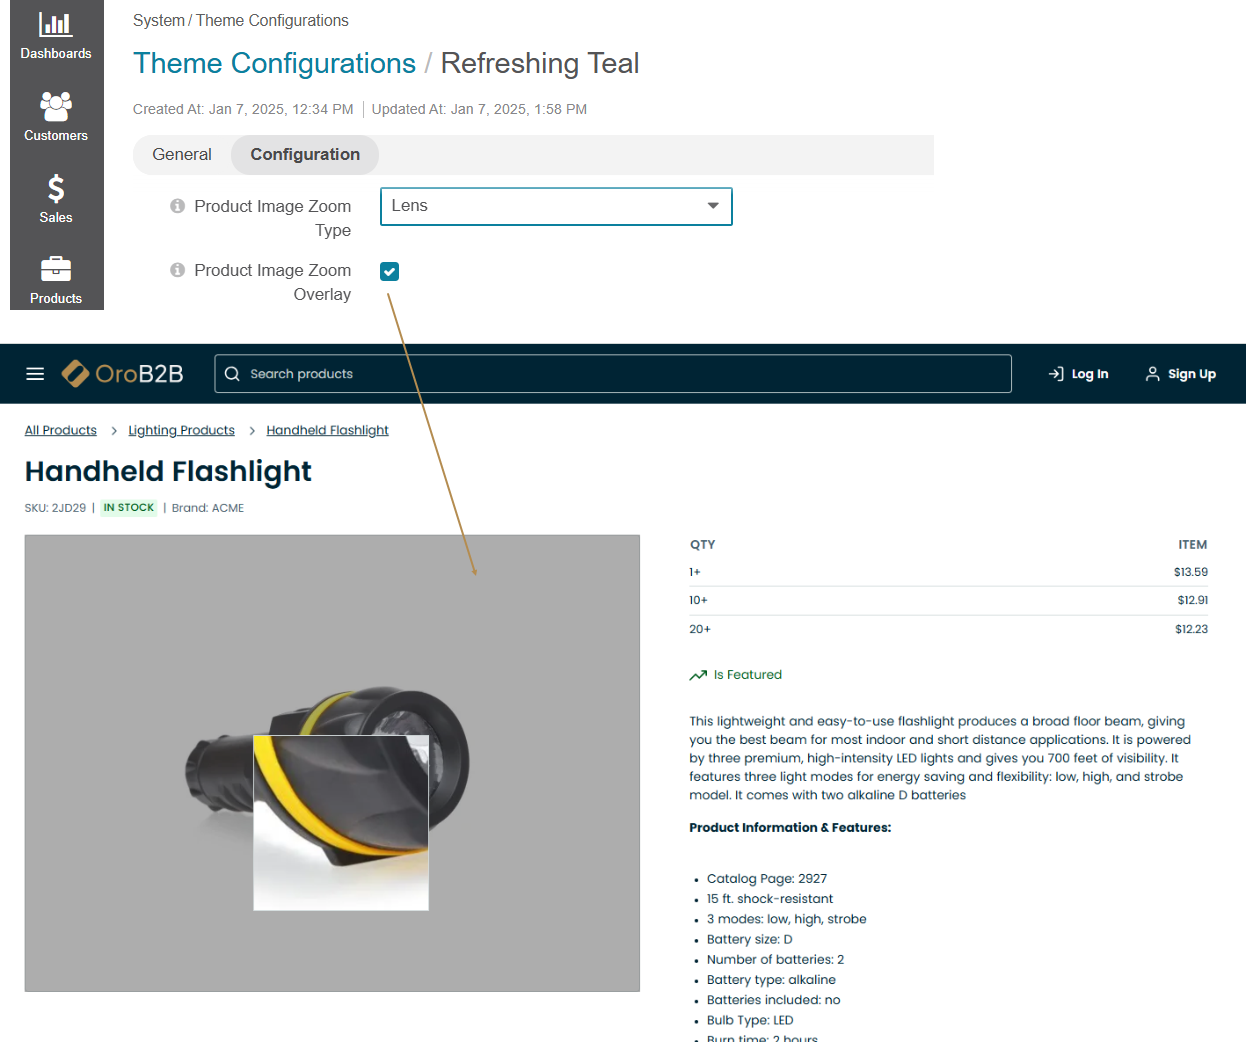
Product Image Zoom Overlay — Enable or disable an overlay above the product image when zoom is activated. This option works only with the Window or Lens zoom types.
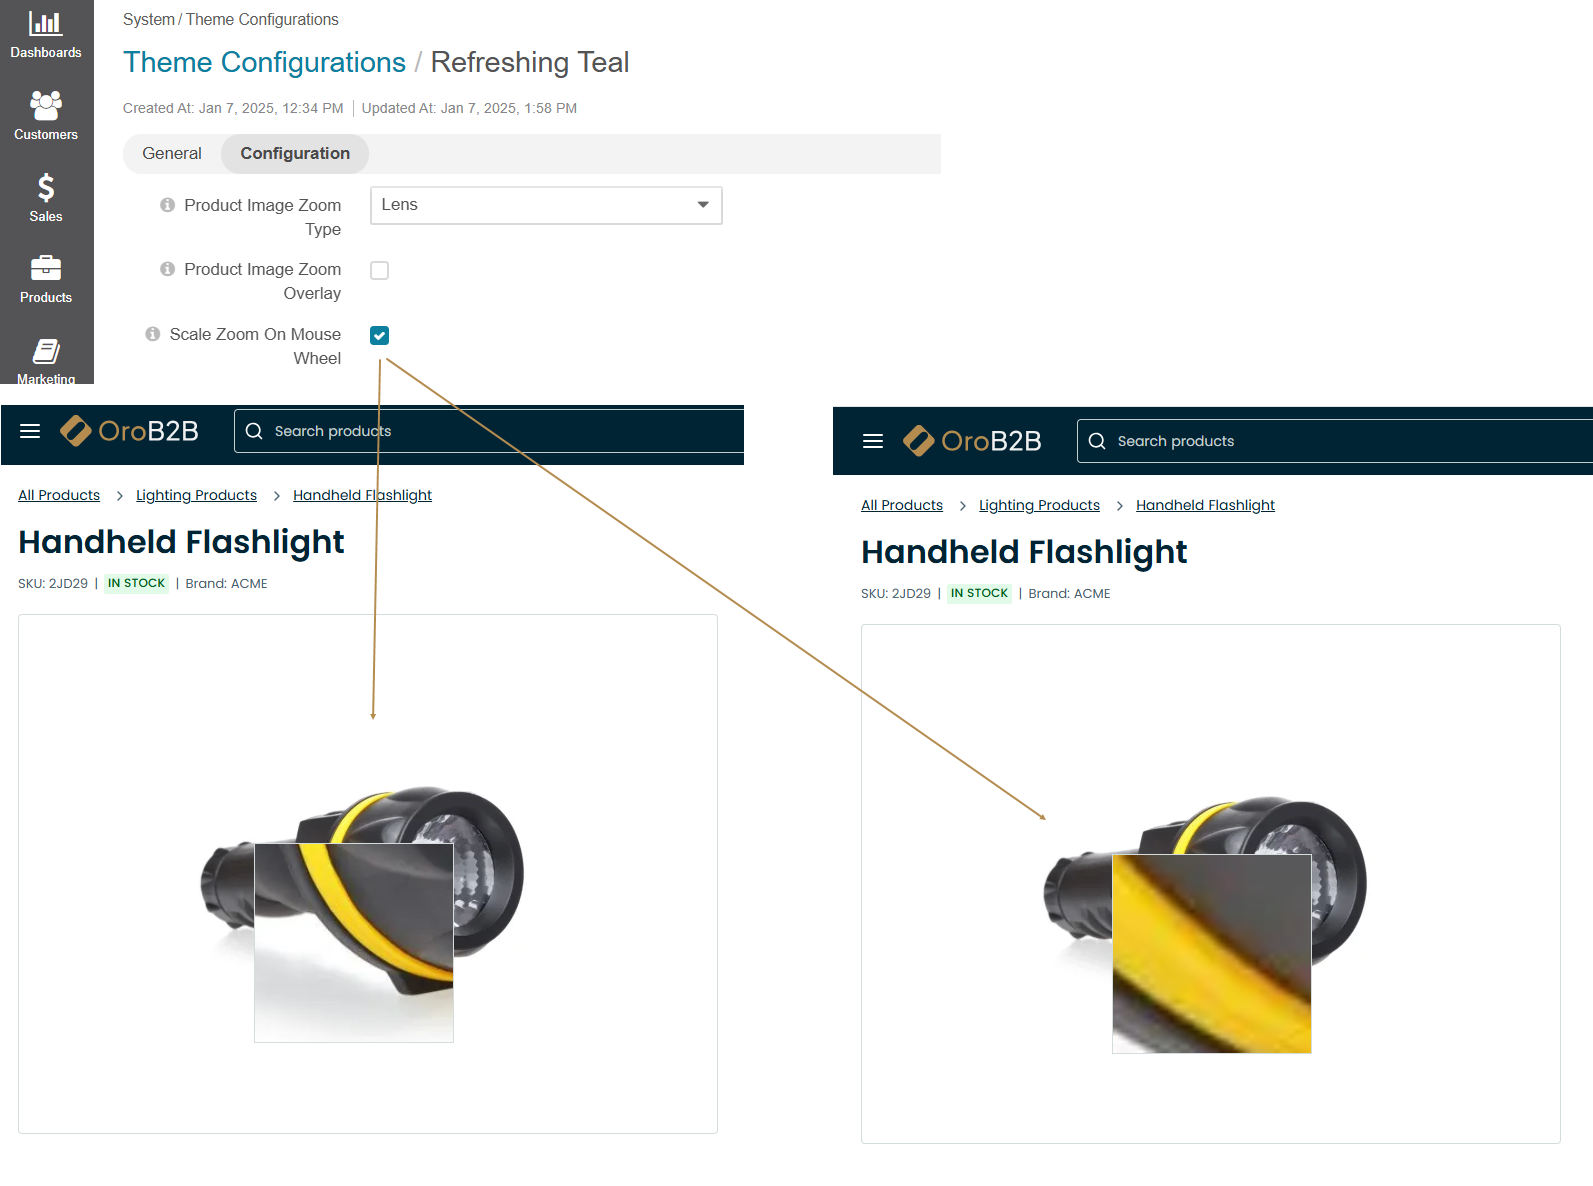
Scale Zoom On Mouse Wheel — Enable or disable the ability to adjust the zoom level using the mouse wheel while hovering over the product image. When enabled, users can zoom in or out for a closer look.
Product View Images Display Mode — Select how additional product images are displayed on the product details page. Available options are Horizontal (thumbnails are displayed in a horizontal row below the main product image) and Vertical (thumbnails are displayed in a vertical column beside the main product image).
Filter Panel Position — Specify where the filter panel should be represented in the storefront. Available options are Top, Sidebar and Overlay.

Hint
To specify how to display the multi-select filter options, refer to the theme-related settings.
To control whether to hide or disable product attributes within filters, refer to the filters and sorting settings documentation.
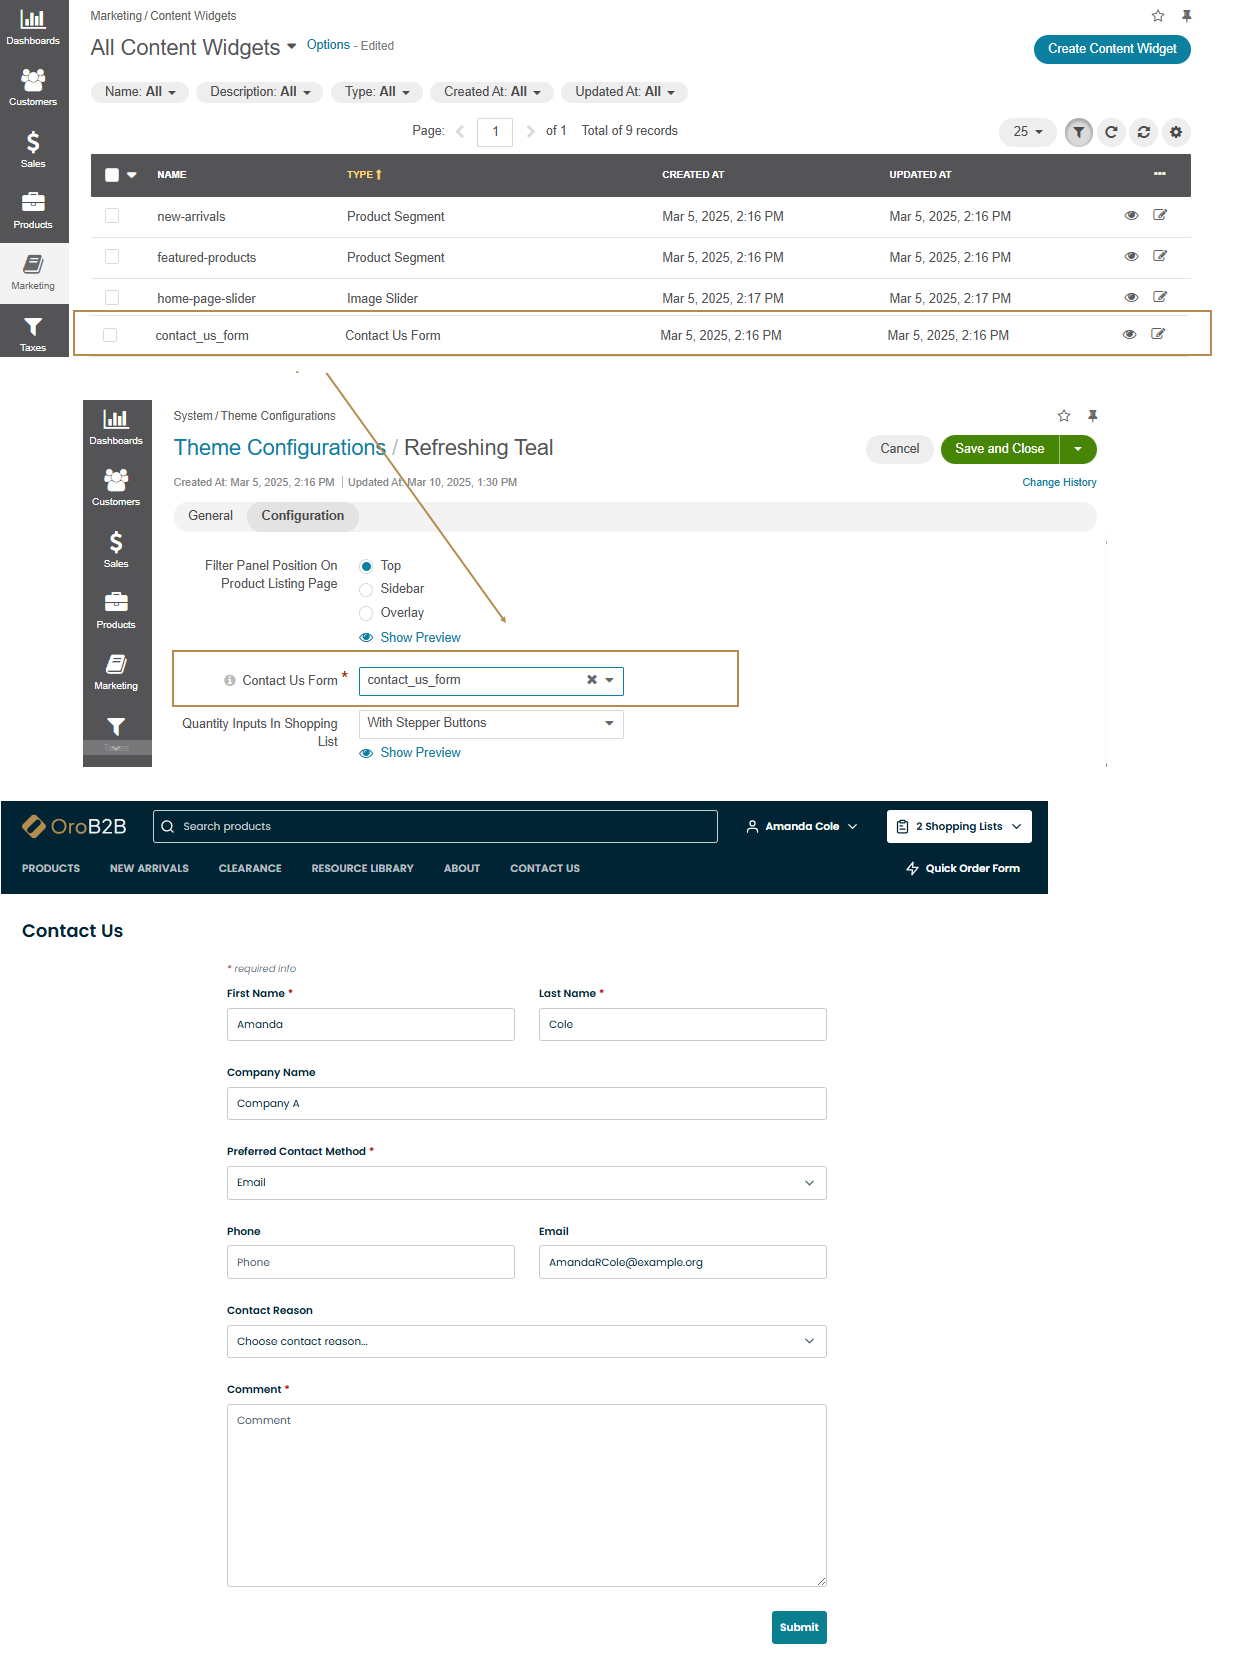
Contact Us Form — Select a contact us content widget from the drop-down list of predefined widgets to display on the Contact Us page. Only the widgets of the Contact Us Form type are displayed in the drop-down list.
Quantity Inputs in Shopping List — Choose how quantity inputs are displayed in the shopping list. Available options are Plain (displays a simple input field where users can type the desired quantity manually) and With Stepper Buttons (adds
+and-buttons next to the input field, allowing users to adjust the quantity incrementally).
Click Save Settings.
Once saved, you can now enable your theme configuration under the theme system settings on the required level: globally, per organization or website.