Important
You are browsing upcoming documentation for version 7.1 of OroCommerce, scheduled for release in 2027. Read the documentation for the latest LTS version to get up-to-date information.
See our Release Process documentation for more information on the currently supported and upcoming releases.
Configure Check/Money Order Service Integration in the Back-Office
Hint
This section is part of the Payment Configuration topic that provides a general understanding of the payment concept in OroCommerce.
Money order is a paper document similar to check that is prepaid for certain amount. It does not require a check account and may be issued by banks, post, money transfer companies, etc.
To create a check/money order:
Configure Check/Money Order Integration under System > Integrations > Manage Integrations to enable check/money order as a payment method in the system.
Create a payment rule under System > Payment Rules and add your integration to it to display this method to the customers at the checkout.
Enable Check/Money Order Payment Integration
To enable check/money order payments, complete the following steps:
Navigate to System > Integrations > Manage Integrations in the main menu.
On the Manage Integrations page, click Create Integration.
The following page is displayed:
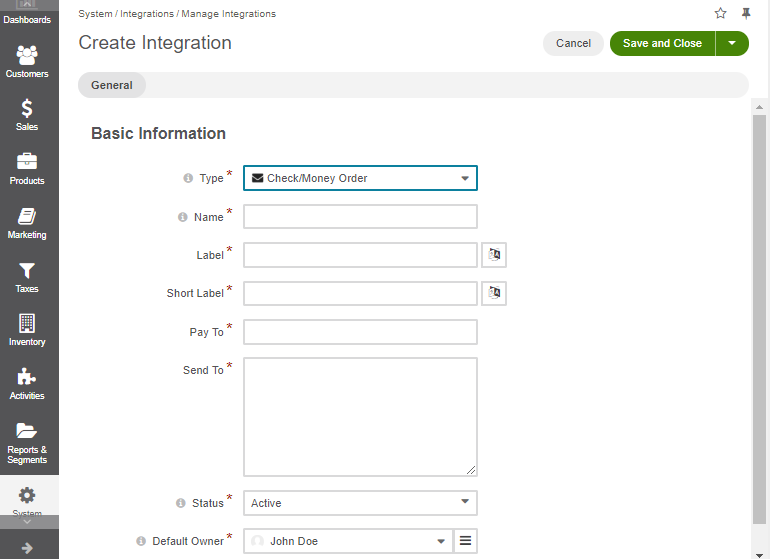
In the Basic Integration Details section, provide the following details:
Type – -Select Check/Money Order for Type.
Name — The payment method name that is shown as an option for payment configuration in the OroCommerce back-office.
Label — The payment method name/label displayed as a payment option for the buyer in the OroCommerce storefront during the checkout. To translate the label into other languages, click on the icon next to the field.
Note
It doesn’t have to include the payment processor name if you want to hide it from the buyers. For example, you can enter ‘Credit Card Payments’ if you have a single payment method configured for processing credit cards.
Short label — The payment method name/label that is shown in the order details in the OroCommerce back-office and storefront after the order is submitted. To translate the label into other languages, click on the icon next to the field.
Pay To — Provide the name of the company or a person to file the payment to.
Send To — Provide directions and the address to send the check or money order to.
This information is shared with the customer together with other payment instructions at checkout.
Status — Set the status to Active to enable the integration.
Note
In the Synchronization Settings section, select the Log Warnings checkbox if you want all synchronization errors to be written into the application log.
Click Save and Close.
Next, set up a payment rule that enables this payment method for all or some customer orders via the Payment Rules Configuration page.
Related Topics