Important
You are browsing upcoming documentation for version 7.1 of OroCommerce, scheduled for release in 2027. Read the documentation for the latest LTS version to get up-to-date information.
See our Release Process documentation for more information on the currently supported and upcoming releases.
Basic Entity Field Properties
Note
This topic is part of the section on Creating Entity Fields, and describes the initial stage of creating a new entity field.
The first step of creating a new entity field is providing information on its basic properties in the General Information section:
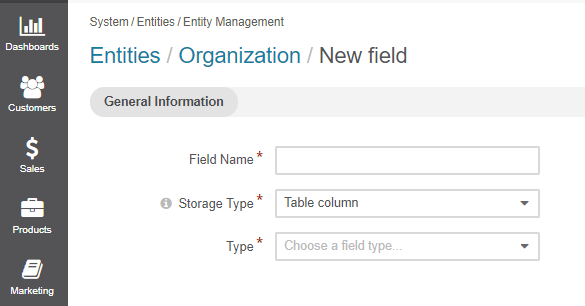
Field Name — Provide a name of the field that will be used to refer to it in the system. This name must be unique within an entity and it can be neither a reserved SQL word nor a reserved PHP word.
Storage Type — Select how the field is stored in the system:
Table Column — Use this storage type to store field values in a database table. If this option is selected, the field can be used without the limitations applicable to a serialized field. For this type of fields, schema update is required.
Serialized field — Use this storage type for simple fields that keep information necessary for a single entity. The field will appear in the system as soon as it has been added, and no schema update is required. Serialized fields cannot be used for grid filters, report and chart generation, data audit, creation of segments and relations (many to many, one to many, many to one). In addition, they cannot be used for files, multi-selects or option sets.
Type — Select a field type from the list.
Fields:
BigInt — Select this type if the values of this field must be very big positive or negative whole numbers like 111222333444555. Save range is from -999,999,999,999,999 to 999,999,999,999,999.
Boolean — Select this type if you need a simple list with two values: ‘Yes’ and ‘No.’
Money — Select this type if this field is used to store monetary values. The symbol of the applicable currency will appear near this field in the entity records. The value in the field will have 2 decimal positions.
Date — Select this type if you need to save dates. The field will have a built-in calendar picker.
DateTime — Select this type if you need fields to save date and time values. There will be two fields in the interface under common title: one is for storing date values with a built-in calendar picker, the other is a list of time values in half-hour increments.
Decimal — Select this type if the values of your custom field represent decimal fractions like 1.25, 0.5, -8.4 and you need high precision.
Note
The same fractions can be represented using the float type. The main difference between the decimal and float data types is that decimal values are represented in the system exactly while for float values are represented using the special formula. This means that when you work with float numbers you may get approximate results instead of exact. Thus, use the decimal data type for the data where precision is of high significance and when it is important to avoid rounding errors, e.g., financial data.
Float — Select this type if the values of your custom field represent decimal fractions like 1.25, 0.5, -8.4 and their processing speed is of more importance than precision.
Note
The same fractions can be represented using the decimal type. The main difference between the decimal and float data types is that decimal values are represented in the system exactly while for float values are represented using the special formula. This means that when you work with float numbers you may get approximate results instead of exact. However, the system processes the float values much faster, which is important if you need to process big amounts of data.
Integer — Select this type if the values of this field can be relatively big positive or negative whole numbers like 1, 250000, -20. The allowed range is from -2,147,483,648 to 2,147,483,647 (4-bytes integer).
Percent — Select this type if this field is used to store monetary values. The percent symbol will appear near this field in the entity records.
SmallInt — Select this type if the values of this field must be positive or negative whole numbers like 1, 150, -20. The allowed range is from -32,768 to 32,767 (2-bytes integer).
String — Select this type if the values of your custom field represent sequence of characters like ‘Gerry&Webb,’ ‘Freshtax,’ ‘John Doe.’
Text — Select this type if you are going to use this field to store text of any length.
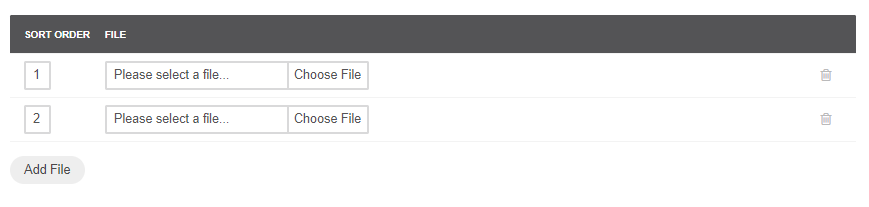
File — Select this type if you are going to use this field to store files. If you need to store image files with .gif, .jpeg or .png file extensions, consider the Image file type instead.
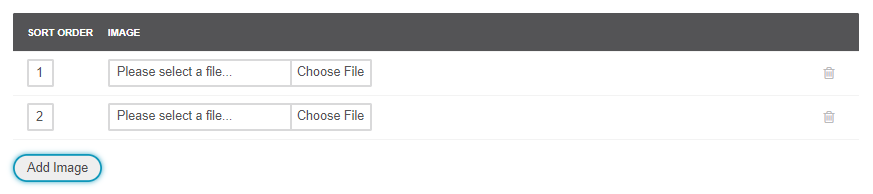
Image — Select this type if you are going to use this field to store images (e.g., photos). The thumbnail of the uploaded image will be displayed in the entity record. You will be able to download the full image by clicking this thumbnail.
Select — Use this type if you want your field to be a list that enables users to select one value at a time. For example, the ‘Grade Service’ list that contains values from 1 to 5.
Multi-Select — Use this type if you want your field to be a set of checkboxes. Users will be able to select several values at a time. For example, the ‘Working Days’ list that contains days of week.
Multiple Images — Select this type if you want to add the ability to upload more than one image to an entity.
Multiple Files — Select this type if you want to add the ability to upload more than one files to an entity.
WYSIWYG — Use this type if you want to add the WYSIWYG text editor to your entity. The editor enables you to customize the content of the selected entity the way you desire. You will be able to add images and videos, link buttons and external websites, insert a content widget or a source code, and modify these elements by navigating from tab to tab in the WYSIWYG editor’s manager panel. For more details on WYSIWYG management, see the WYSIWYG Editor topic.
Relations:
Note
Relation is a field that enables users to tie record(s) of one entity to record(s) of another entity.
Many to many — Select this relation if any amount of the entity records can be assigned to any amount of the related entity records. For example any amount of customers may take part in an advertisement campaign and, moreover, the same customer may take part in several advertisement campaigns.
One to many — Select this relation if one and only one entity record can be assigned to many records of another entity. For example, one account may be assigned many customers. Another example: we have created a field Friends that relates to contacts of potential clients recommended by a specific business customer. This is a ‘one to many’ relation, as one business customer may advise many friends.
Many to one — Select this relation if any amount the entity records can be assigned to one and only one record of another entity. For example, any amount of customers may be assigned to an account, but a customer cannot be assigned to more than one account.
Once you have provided the basic entity properties, click Continue to move on to the next step and specify the advanced entity properties.