Important
You are browsing upcoming documentation for version 6.1 of OroCommerce, scheduled for release in 2025. Read the documentation for version 6.0 (the latest LTS version) to get up-to-date information.
See our Release Process documentation for more information on the currently supported and upcoming releases.
Create Promotions
You can set up a shipping promotion, line item promotion or buy X get Y promotion using the process described below.
To create a new promotion:
Navigate to Marketing > Promotions > Promotions in the main menu.

In the All Promotions grid, you can click any promotion to view its details, hover over the More Options menu to the right of the required promotion to duplicate, view, edit, or delete it from the system.
To create a new promotion, click Create Promotion in the top right corner.
In the General section, complete the following fields:
Owner — Select the user responsible for the promotion from the list, or click to load the list of users to choose from. By default, the current user in predefined as the promotion owner.
Name — Specify the promotion name to distinguish it from other promotions.
Sort Order — Enter the sort order to set the priority compared to other available promotions. The lower is the number, the higher is the priority.
Enabled — Enable the checkbox to activate the promotion. To deactivate it, clear the checkbox.
Stop Further Rule Processing — Select this option if you wish to prevent applying other promotions with lower priority.
For instance, if there are three promotions for the same products with sort orders 1, 2 and 3 respectively, and the promotion with sort order 2 has Stop Further Rule Processing enabled, then when the turn reaches such promotion, the queue stops and promotion with sort order 3 is not applied.
Triggered by — Select Coupons and Conditions if the promotion is going to use coupons, and Conditions only if it is not.
In the Discount Options section, configure the discount calculation.
In the Discount list, select the level that the discount targets:
Order Total — The discount applies to the total order amount,
Order Line Item — The discount applies to the line item total,
Buy X Get Y (Same Product) — The price of certain quantity of the line items (up to Y) may be discounted when they are ordered in bulk (more than X), or
Shipping — The discount applies to shipping.
In the Type list, select whether the discount type should be represented by a fixed amount (e.g. - 10USD) or a certain percent (5%) off the item price.
Note
Please note that when a fixed discount is used, the promotion applies to the order in the selected currency only.
In the Discount Value, provide the required discount amount and select the currency (if possible).
Note
Please note that Oro Application Community version supports one currency. You can set up multiple currencies that would be available for selection in the Discount Value field only in the Enterprise version of the application.
Depending on the discount type, the remaining fields in the Discount Options section will differ. See the following sections for their detailed description:
In the Schedules section, specify the following dates:
Active at — Schedule the date and time when the promotion should trigger.
Deactivate at — Schedule the date and time when the promotion should end.
Note
To add more schedules, click +Add.
In the Conditions section, provide the following information:
Restrictions — Set visibility restrictions to promotions. By default, promotions are displayed for any customer or customer group. Only one field must be chosen at a time, either a customer group and a customer.
Expression — Specify the expression that describes the conditions when the promotion should be applied. You can also use expressions to evaluate customers by a particular attribute, such as free shipping only if the customer purchases a qualifying amount of product, or a particular item is in their cart.
In the Items To Discount section, add, filter or reset the product that the promotion should apply to:
Reset Products — Click Reset Products next to the tabs to clear all filters and reset the product collection to the default state.
Add — Click Add to add the selected products manually. This can be used in cases when you have few products to be added and there is no need to set up a complicated filter, or when you need to add specific products that may be out of the filter’s scope. Manually added items will appear both in the Manually Added and All Added tabs.
Note
To ensure that specific items are excluded from the list of the product collection and will not be included automatically or manually, click Add in the Excluded tab. All removed products will move to the Excluded tab automatically. Make sure that you have not previously excluded the item that you want to add to the promotion, as excluded products do not appear on the list.
Advanced Filter — Add a product via a filter to limit the product list and include only the necessary products. Advanced filter is hidden by default. Click Preview Results to check whether the products found via the filter match your criteria, or to exclude unnecessary items from the list.
Note
You may use filter on the top of the dialog to limit the scope of the products and make it fit into the visible area.
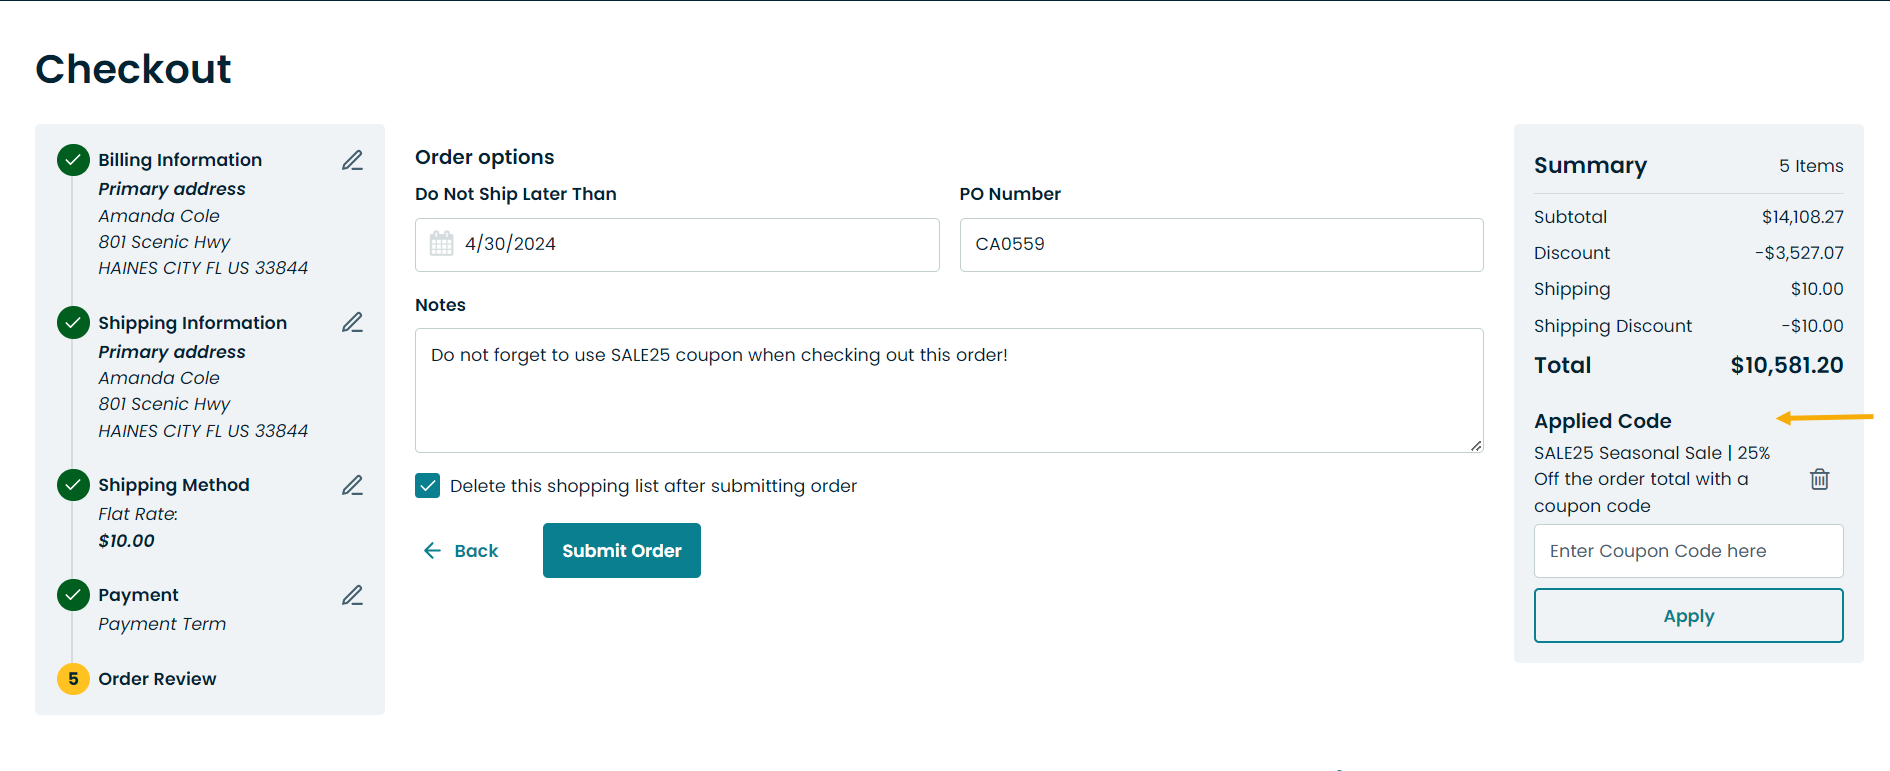
In the Store Frontend section, you can specify the label (e.g. the promotion name) in the Labels field that will be displayed in the Order Summary section of the checkout in the storefront (illustrated below) alongside the coupon code. If left blank, the name of the promotion linked to the coupons will be used as the label.
Discount Options for Order Line Item
You can create a line item promotion that will discount each line item.
Note
You can check out a video on how to create a line item promotion in our media library.
For the line items discount, provide the following information:
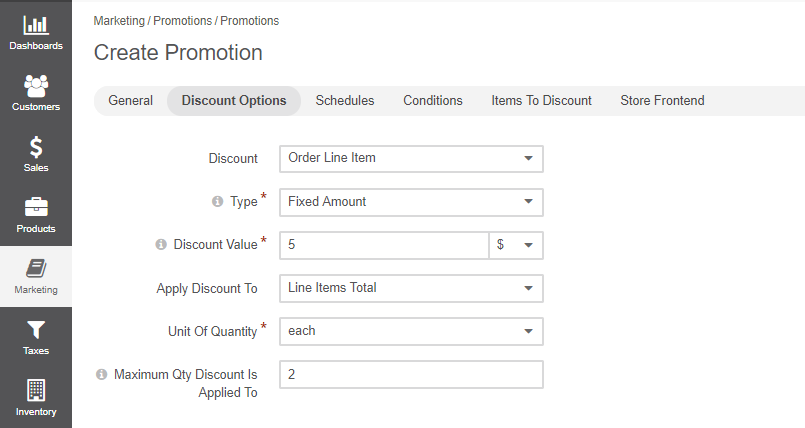
Unit of Quantity — Select the necessary unit type from the list (e.g. each, item, set.). Note that the discount will only apply to the product with a specified unit type.
Apply Discount to — Select whether to apply discount to each of the items on sale or for the line items total.
For instance, if there are 10 items in the shopping list that qualify for a discount and the discount is $1 per item, then the discount will constitute $10. If in the same scenario the promotion should apply to the line items total, then the total discount will constitute $1.
Maximum Qty Discount is Applied to — Enter the maximum quantity of products of the same type eligible for discount in a line item/order. For example, when the limit is set to 10 and a buyer orders 100 items, they will be charged the discounted price for 10 items out of 100, and will pay the full price for the remaining 90 items.
Note
Please note that the Maximum Quantity Discount is Applied to field can only be applied if the Apply Discount to field is set to Each Item.
Discount Options for Buy X Get Y (Same Product)
Buy X Get Y promotions mean that the buyer purchases qualifying X products and receives a discount off the same products. For instance, buy one get one free, or buy one get one 5$ off.
Note
You can check out a video on how to create the Buy X Get Y (Same Product) promotion in our media library.
For the Buy X Get Y (Same Product) discount, provide the following information:
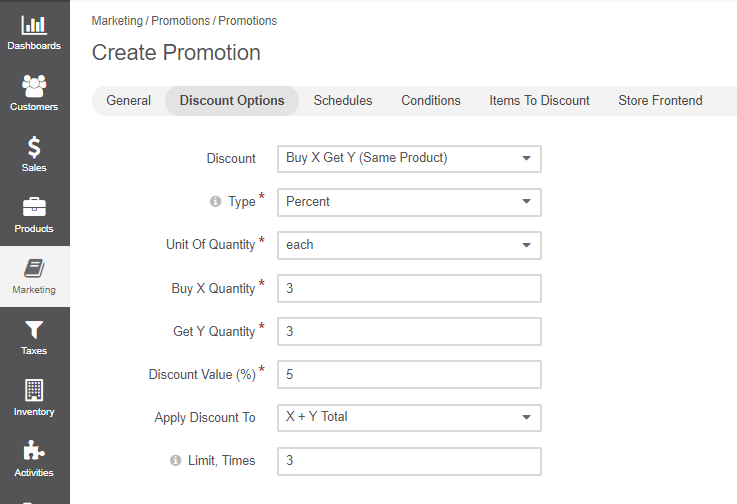
Buy X Quantity — Enter the quantity of X products the customer needs to purchase to be eligible for the discount.
Get Y Quantity — Enter the quantity of Y products which the customer will get a discount for when purchases a number of X products.
Unit of Quantity — Select the necessary unit type from the list (e.g. each, item, set). Note that the discount will only apply to the product with the specified unit type.
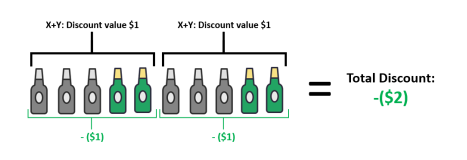
Apply Discount to — Select one of the options, Each Y Item Separately (the discount will apply to Y items only) or X+Y Total (the discount will apply to the total of X and Y items).
For instance, if:
There are 10 items in the shopping list that qualify for a promotion.
Buy X is set to 3.
Get Y is set to 2.
The discount is $1 per each
Then:
The discount for Each Y Item Separately will equal $4 ($1 for each of 4 Y items).
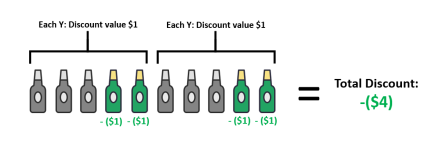
The discount for X+Y Total will equal $2 ($1 for each bundle of 5).
Limit, Times — Provide the quantity of discounted groups (X+Y) of the same type eligible for a discount in a line item/order. For example, when the limit is set to 2 and a buyer orders 3 groups of 3+2 items (15 in total), they will be charged the discounted price for 2 groups out of 3 and will pay the full price for the remaining one group.
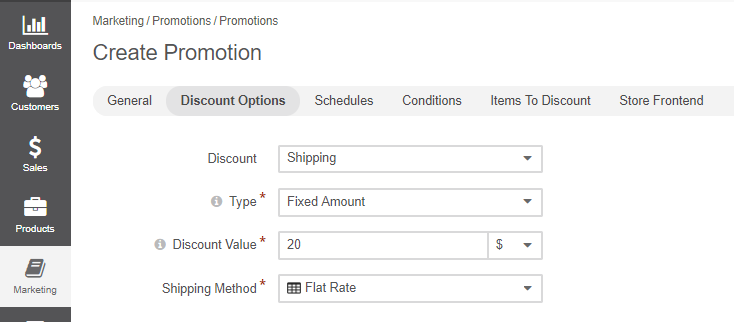
Discount Options for Shipping
Shipping promotions allow you to set a discount for any shipping options configured under shipping method integrations. OroCommerce sellers can add a shipping promotion which can be automatically deducted at checkout.
Note
You can check out the video on how to create a shipping promotion in our media library.
For the shipping discount, select the necessary shipping method from the list. The methods you see on the list reflect the ones configured in your application.
Related Topics