Important
You are browsing upcoming documentation for version 6.1 of OroCommerce, scheduled for release in 2025. Read the documentation for version 6.0 (the latest LTS version) to get up-to-date information.
See our Release Process documentation for more information on the currently supported and upcoming releases.
Import Product Information
Hint
This section is part of the Data Import concept guide topic that provides guidelines on import operations in Oro applications.
The Import File option helps import a large bulk of product information into the product catalog using the .csv file.
Import Products
Example of a product bulk import template
sku |
attributeFamily.code |
status |
type |
inventory_status.id |
primaryUnitPrecision.unit.code |
primaryUnitPrecision.precision |
primaryUnitPrecision.conversionRate |
primaryUnitPrecision.sell |
additionalUnitPrecisions:0:unit:code |
additionalUnitPrecisions:0:precision |
additionalUnitPrecisions:0:conversionRate |
additionalUnitPrecisions:0:sell |
names.default.value |
shortDescriptions.default.value |
descriptions.default.value |
featured |
metaDescriptions.default.value |
slugPrototypes.default.value |
category.default.title |
Kit Items |
|---|---|---|---|---|---|---|---|---|---|---|---|---|---|---|---|---|---|---|---|---|
sku_001 |
default_family |
enabled |
simple |
in_stock |
kg |
3 |
1 |
1 |
item |
0 |
5 |
1 |
Product Name |
Product Short Description |
system |
1 |
defaultMetaDescription |
lumen-item |
Category Name |
|
sku_002 |
default_family |
enabled |
kit |
out_of_stock |
set |
3 |
1 |
1 |
set |
0 |
5 |
1 |
Product Name |
Product Short Description |
system |
1 |
defaultMetaDescription |
touchscreen-pos-system |
Category Name |
id=,label=“Additional Unit”,optional=false,products=sku_001,min_qty=,max_qty=,unit=item id=,label=“Base Unit”,optional=true,products=sku_001|sku_002,min_qty=1,max_qty=2,unit=item |
To import a bulk of product information:
In the main menu, navigate to Products > Products. The product list opens.
Click Import File on the top right.
Prepare data for import: Create your bulk information in the .csv format. Once your file is ready, click Choose File, select the prepared comma-separated values (.csv) file, and click Import File.
Note
Ensure that your .csv file is saved in the Unicode (UTF-8) encoding. Otherwise, the content of the file can be rendered improperly.

Validate import results: Click Validate to check your import results. If there are any Records with errors, fix them in the .csv file before starting the import.
Launch import: After successful validation, click Import File.
Click Cancel to decline the import.
Important
Interactive status messages inform about the import progress, and once the import is complete, the changes are reflected in the list upon refresh. An email message with the import status is also delivered to your mailbox.
Product Kit Data
The following formats of kitItems are possible (with or without the ID parameter):
id=43,label=“Barcode Scanner”,optional=false,products=6VC22|4PJ19|7TY55,min_qty=1,max_qty=1,unit=item
label=“Receipt Printer(s)”,optional=true,products=8DO33,min_qty=1,max_qty=,unit=item
If any additional custom parameters are added, a validation error will occur.
Depending on the ID and whether the product already exists in the Oro application, different logic may be required to import products from kitItems.
A new product and kitItems with empty IDs will create a new product with new kitItems.
A new product and kitItems with IDs will create a new product with new kitItems (ignoring kitItems IDs).
An existing product in Oro and kitItems with empty IDs will update the product and replace the entire kitItems collection.
An existing product in Oro and kitItems with IDs belonging to this product will update the product with kitItems.
An existing product in Oro and kitItems with IDs that do not belong to this product will result in a validation error.
The type of data that can be used as value for the provided parameters:
ID is optional. Allowed values are empty or integer.
label is a mandatory field. Allowed values are non-empty string. It is recommended to use double quotes (e.g., “Base unit”). Although it is not mandatory for a simple label, using quotes is preferable to ensure correct functionality. If special characters like quotes are required in the label, you must use quotes and escape, e.g., label=”,My, =Escaped= "Kit" 'Item'”.
optional is optional. The default value is false. Allowed values are true, false, yes, no, 1, 0.
products is mandatory. SKU of products should be listed separated by a delimiter |.
min_qty, max_qty are optional. The default value is empty (null). Allowed values are expected empty value or float (1, 0, 1.0, 0.0). Integer values are converted to float. Float must use a dot as a decimal separator, as using a comma will result in an error.
unit is mandatory. A validation error will occur if no unit code is provided.
Import Product Images
Make sure to upload the image files for the related products to the appropriate location according to the configuration
of the import_product_images Gaufrette filesystem. By default, it is configured to use the {PROJECT}/var/data/import_files
local directory as storage.
Then, fill the table with the name of the image file, the SKU name of the product, and a place for the image to be displayed, where 1 is display and 0 is do not display.
If you are running your application on OroCloud, please be aware that before proceeding with the product images upload via the UI (the process which assigns images to products and makes them available in the asset library), you need to:
Upload all your images to OroCloud using FTP/SFTP.
Follow the step outlined in the Media Upload cloud documentation to move the uploaded images to the appropriate folder before starting product images import.
Example of a product images import template
SKU |
Name |
Main |
Listing |
Additional |
|---|---|---|---|---|
sku_001 |
001.jpg |
1 |
0 |
1 |
To import a bulk of product images:
In the main menu, navigate to Products > Products. The product list opens.
Click Import File on the top right.
In the Import dialog, select the Product Images tab.
Click Choose File and select the .csv file you prepared.
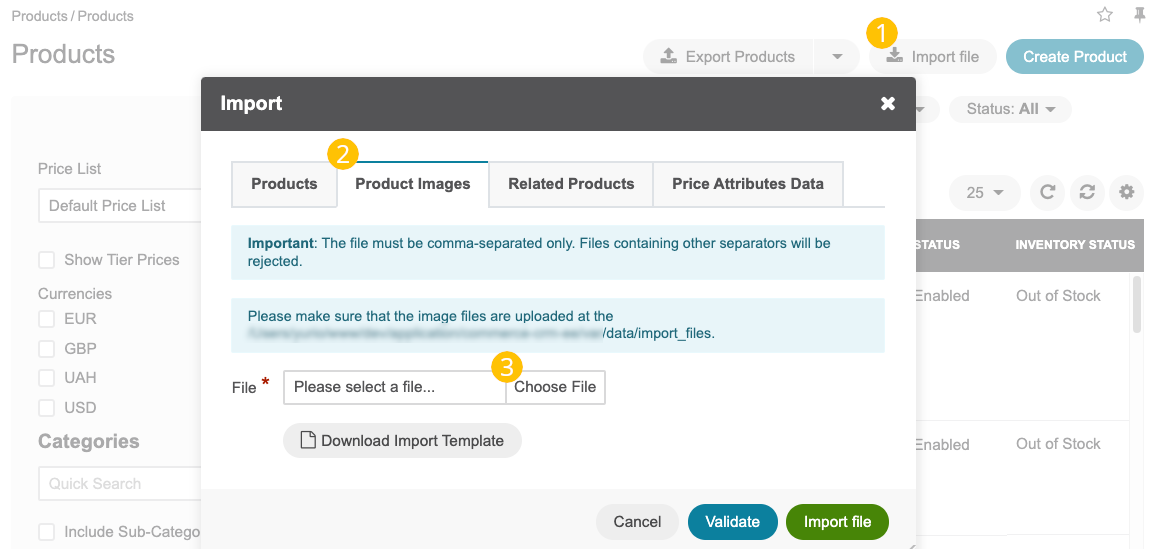
Click Download Import Template to download a sample .csv file with the necessary headers.
Prepare data for import: Create your bulk information in the .csv format based on the downloaded file.
Once your file is ready, click Choose File and select the prepared comma-separated values (.csv) file.
Validate import results: Click Validate to check your import results. If there are any Records with errors, fix them in the .csv file before starting the import.
Launch import: After successful validation, click Import File.
Click Cancel to decline the import.
Import Related Products
The Import Related Products option enables you to import SKUs of related products.
Example of related products data import template
SKU |
Related SKUs |
|---|---|
sku-1 |
sku-2,sku-3 |
To import a bulk of related products:
In the main menu, navigate to Products > Products. The product list opens.
Click Import File on the top right.
In the Import dialog, select the Related Products tab.
Click Choose File and select the .csv file you prepared.
Note
Ensure that your .csv file is saved in the Unicode (UTF-8) encoding. Otherwise, the content of the file can be rendered improperly.
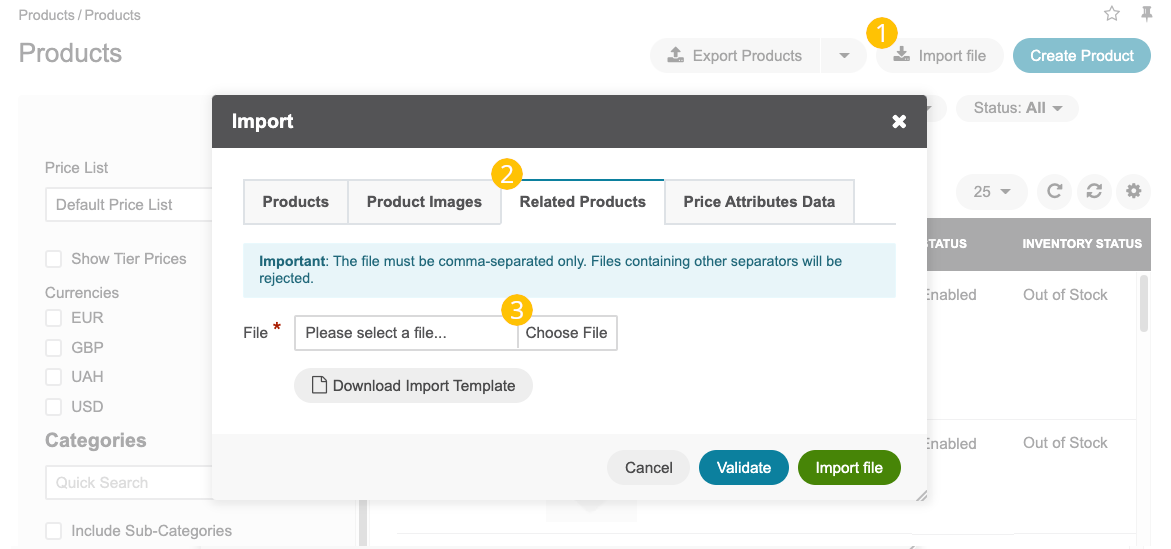
Click Download Import Template to download a sample .csv file with the necessary headers.
Prepare data for import: Based on the downloaded file, create your bulk information in the .csv format. Once your file is ready, click Choose File and select the prepared comma-separated values (.csv) file.
Validate import results: Click Validate to check your import results. If there are any Records with errors, fix them in the .csv file before starting the import.
Launch import: After successful validation, click Import File.
Click Cancel to decline the import.
Important
Interactive status messages inform about the import progress, and once the import is complete, the changes are reflected in the list upon refresh. An email message with the import status is also delivered to your mailbox.
Import Product Price Attributes Data
Example of a product price attributes data import template
Product SKU |
Price Attribute |
Unit Code |
Currency |
Price |
|---|---|---|---|---|
sku_001 |
MSRP/MAP |
item |
USD |
20 |
To import a bulk of product price attributes:
In the main menu, navigate to Products > Products. The product list opens.
Click Import File on the top right.
In the Import dialog, select the Price Attributes Data tab.
Click Choose File and select the .csv file you prepared.
Note
Ensure that your .csv file is saved in the Unicode (UTF-8) encoding. Otherwise, the content of the file can be rendered improperly.
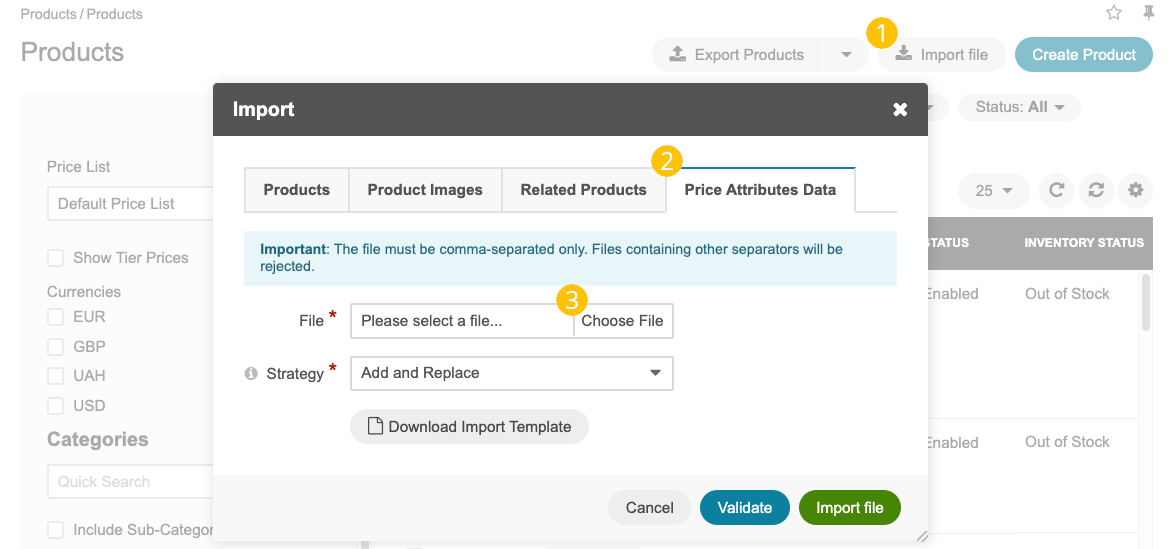
Click Download Import Template to download a sample .csv file with the necessary headers.
Prepare data for import: Create your bulk information in the .csv format based on the downloaded file. Once your file is ready, click Choose File and select the prepared comma-separated values (.csv) file.
Select the strategy for uploading the file:
Add and Replace strategy overrides the existing price attribute data (MAP/MSRP/etc.) with the one mentioned in the file for the corresponding product item. Also, it adds the price attribute data to the products with empty values.
Reset and Add strategy removes the existing price attribute values for all the products (regardless of the currency) if the price attribute is listed in the file. For example, if an MSRP value is provided for Product A, all the MSRP values in all the currencies are removed for all the products. If MAP is not mentioned in the file, the MAP values remain intact.
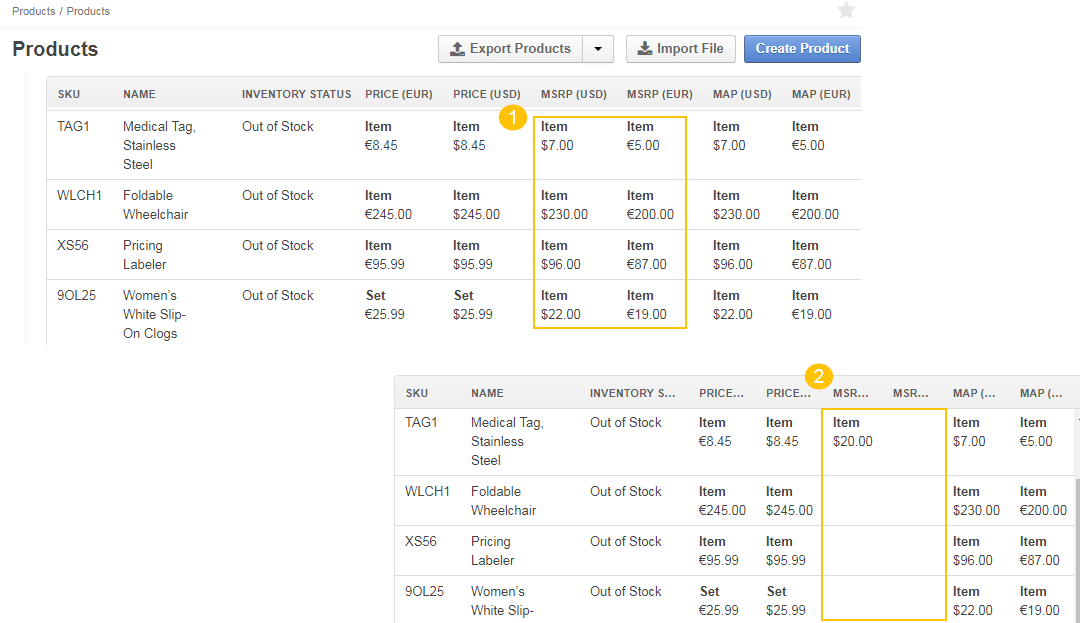
As an illustration, let us fill the table with the following information:
Product SKU
Price Attribute
Unit Code
Currency
Price
TAG1
MSRP
item
USD
20
Initially, the TAG1 item and all other items on the Product page have some MSRP attribute price.
Once we imported the .csv file, all the MSRP attribute prices were deleted, and the TAG1 item acquired a new MSRP price of 20 USD instead of the previous 7 USD.
Validate import results: Click Validate to check your import results. If there are any Records with errors, fix them in the .csv file before starting the import.
Launch import: After successful validation, click Import File.
Click Cancel to decline the import.
Important
Interactive status messages inform about the import progress, and once the import is complete, the changes are reflected in the list upon refresh. An email message with the import status is also delivered to your mailbox.