Important
You are browsing upcoming documentation for version 7.1 of OroCommerce, scheduled for release in 2027. Read the documentation for the latest LTS version to get up-to-date information.
See our Release Process documentation for more information on the currently supported and upcoming releases.
Configure PayPal Payflow Gateway / PayPal Payment Pro Payment Methods Integration in the Back-Office
This section describes the steps that are necessary to expose either PayPal Payflow Gateway and PayPal Payflow Gateway Express Checkout or PayPal Payments Pro and PayPal Payments Pro Express Checkout as payment methods for OroCommerce orders and quotes.
Note
Integration steps for PayPal Payments Pro and PayPal Payflow Gateway are exactly the same. The only difference is the integration type that indicates the way OroCommerce treats the integration.
Note
Before you begin, see PayPal Services Overview and learn about PayPal Integration Prerequisites - the preparation steps that should be performed on the PayPal service side.
To enable PayPal Payflow Gateway or PayPal Payment Pro payments:
Navigate to System > Integrations > Manage Integrations in the main menu.
Click Create Integration.
In the Basic Information section, provide the following information:
Type — Select either PayPal Payflow Gateway or PayPal Payment Pro as integration type.
Name — The payment method name that is shown as an option for payment configuration in the OroCommerce back-office.
In the Display Options provide the following information:
Label — The payment method name/label displayed as a payment option for the buyer in the OroCommerce storefront during the checkout. To translate the label into other languages, click on the icon next to the field.
Note
It doesn’t have to include the payment processor name if you want to hide it from the buyers. For example, you can enter ‘Credit Card Payments’ if you have a single payment method configured for processing credit cards.
Short label — The payment method name/label that is shown in the order details in the OroCommerce back-office and storefront after the order is submitted. To translate the label into other languages, click on the icon next to the field.
Allowed Credit Card Types — Select one or more items from the list of the credit card types. Supported types are Visa, Mastercard, Discover, American Express. Press and hold the Ctrl or Shift key and click on the items to select multiple card types.
In the Integration section, provide the following details:
Partner — PayPal payment partner (usually, a PayPal).
Vendor — Your company ID (Business Name) provided to the PayPal in the Register a PayPal Payflow Gateway Account step (see Prerequisites for PayPal Services Integration for more information).
User –– PayPal API Integration user name. See the Create an API Transaction User section in the Prerequisites for PayPal Services Integration.
Password –– PayPal API Integration user password. See the Create an API Transaction User section in the Prerequisites for PayPal Services Integration.
Test mode –– Ann option that enables calling PayPal API in the test mode.
In the Advanced Settings section, provide the following details:
Payment Action — Select Authorize or Authorize and Charge. See the Payment Actions (Authorize or Authorize and Charge) topic for details.
Debug Mode — When enabled, PayPal includes more detailed information in the response. This mode may be helpful when troubleshooting payment-related issues.
Require CVV Entry — When enabled, the buyer is prompted to enter their credit card CVV. When enabled, the CVV is verified during payment authorization by the payment processor.
Zero Amount Authorization — Enables Zero Amount authorization request which is a transaction that authorizes further payment with the same payment details. When enabled, the buyer can reuse this payment information for the further orders.
Authorization for Required Amount — Enables blocking the required amount on the buyer’s credit card to ensure that they have sufficient balance to be charged for the order later. This option is valid only when Zero Amount Authorization is enabled and only when Authorize payment action is selected.
In the Connection Options section, provide the following details:
Use Proxy — When enabled, any request to the PayPal will be routed through the proxy server using Proxy Host and Proxy Port values provided in the following parameters.
Proxy Host –– The host name or the IP address of the proxy server that routes the requests to and from OroCommerce.
Proxy Port –– The port that is used by the proxy server that routes the requests to and from OroCommerce.
Enable SSL Verification — When enabled, OroCommerce validates the PayPal certificate in the responses from the PayPal API to secure from the man-in-the-middle attack. If the certificate is not valid, the response is ignored and payment processing fails. It is recommended to keep this option enabled for production and most test deployments. You might need to disable the SSL verification for OroCommerce internal tests with no real PayPal integration (e.g. when you are testing checkout workflow customization).
In the Express Checkout section, provide the name, label, short label and select the payment action.
In the Other section, provide the following information:
Status — Set the status to Active to enable the integration.
Default Owner — A user who is responsible for this integration and manages it.
Note
In the Synchronization Settings section, select the Log Warnings checkbox if you want all synchronization errors to be written into the application log.
Click Save and Close.
Next, set up a payment rule that enables these payment methods (PayPal Payflow Gateway and PayPal Payflow Gateway Express Checkout and/or PayPal Payment Pro and PayPal Payment Pro Express Checkout) for all or some customer orders via the Payment Rules Configuration page.
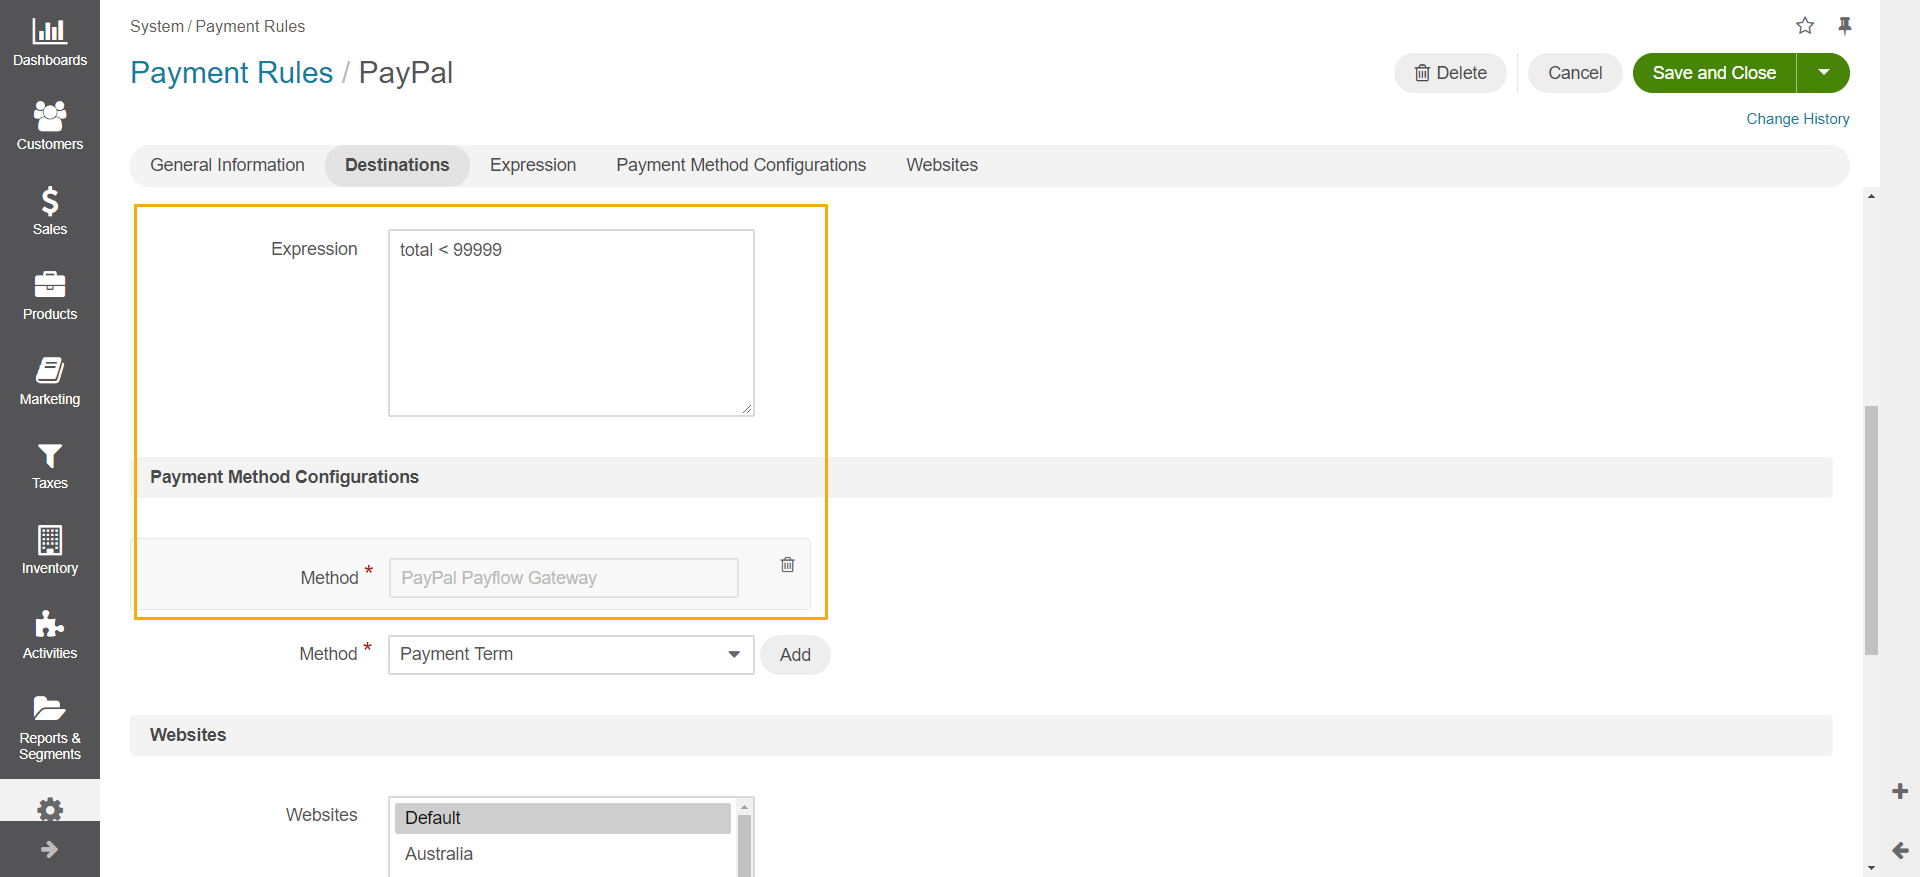
Important
Please be aware that PayPal Payflow Gateway cannot be used if the order total at checkout exceeds 99,999.99. To ensure thatPayPal Gateway payment method is hidden at Payment Step of the checkout when the order total exceeds the stated amount, please add the following expression to the payment rule linked to your active PayPal Payflow Gateway method: total < 99999.