Configure Content Variants for the Content Node
This section provides an overview of the content node types and guidance on their setup.
Note
The first content variant added to the node is marked as the default variant. Specify the restrictions next to the content variant details when adding more content variants. These restrictions will limit the use of this content variant only to specific cases.
Add a System Page
The system page is one of the standard pre-designed pages of the OroCommerce storefront (e.g., Requests for Quotes, Open Orders).
To add a system page to the menu in the OroCommerce storefront:
Select the Add System Page in the Content Variants list.
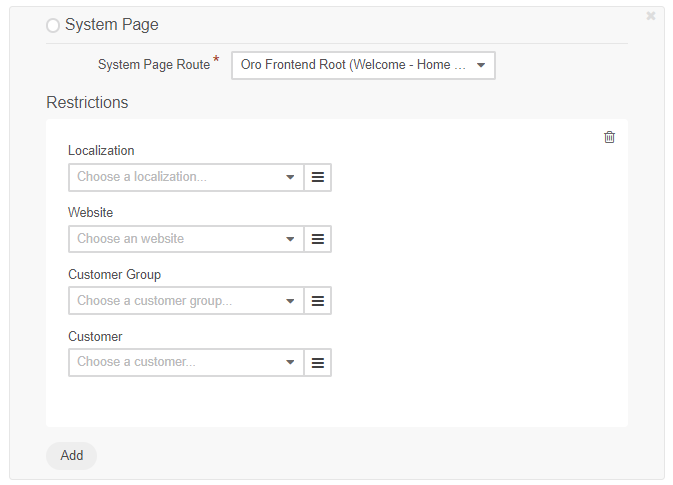
Select the system page from the list.
This step applies only to the content nodes with more than one content variant.
When your system page is not selected as a default variant for the content node, you can define the condition when the system page overrides the default content variant. See the Configure Content Visibility section for more information.
Click Save when you have filled in the web catalog content node or keep adding the content variants.
Add a Product Page
The product page node is a direct link to the product details in the OroCommerce storefront.
To add a product page node to the menu in the OroCommerce storefront:
Select the Add Product Page in the Content Variants list.
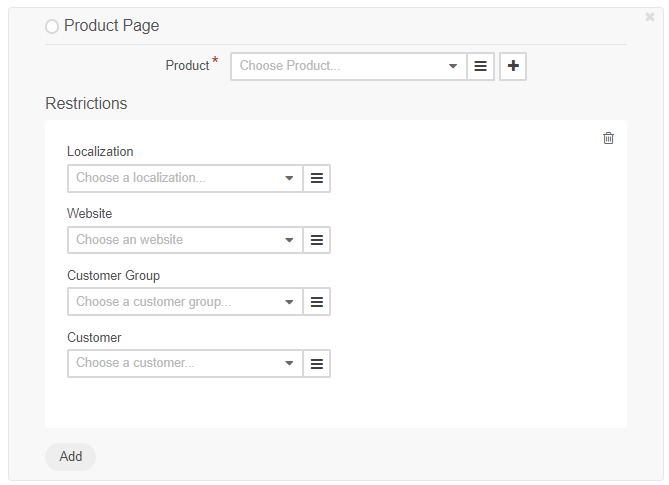
Select the product from the list. To use search, start typing the product name or SKU in the box. To use filtering, click on the bars, and select the filtering conditions in the Manage filters section.
This step applies only to the content nodes with more than one content variant.
When your product page is not selected as a default variant for the content node, you can define the condition when the product details override the default content variant in the Restrictions section beneath the selected product. See Configure Content Visibility section for more information.
Click Save when you have filled in the web catalog content node or continue to add the content variants.
Add All Products Page to Web Catalog
Once the All Products page has been enabled in the system configuration globally or per website, you can add it as part of your web catalog.
Note
We recommend enabling the All Products page exclusively for small catalogs with no more than a few hundred products, otherwise browser performance might be affected.
Navigate to Marketing > Web Catalogs in the main menu.
For the necessary web catalog, hover over the more actions menu to the right and click to start editing the catalog content tree.
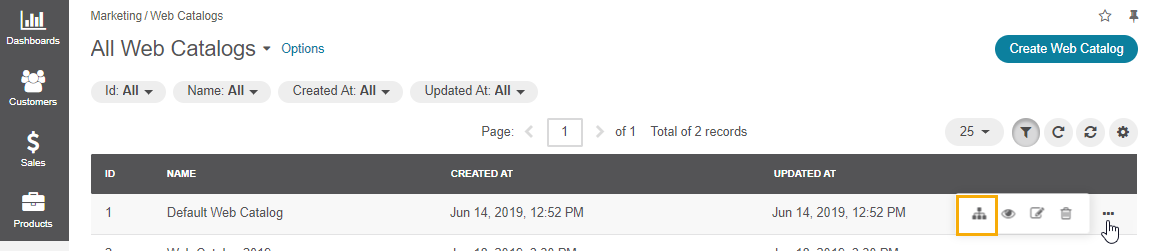
In the Content Nodes menu on the left, click on the node to select the one you want to add the All Products page to.
Click Create Content Node at the top right of the page.
Complete the required fields to configure the web catalog node.
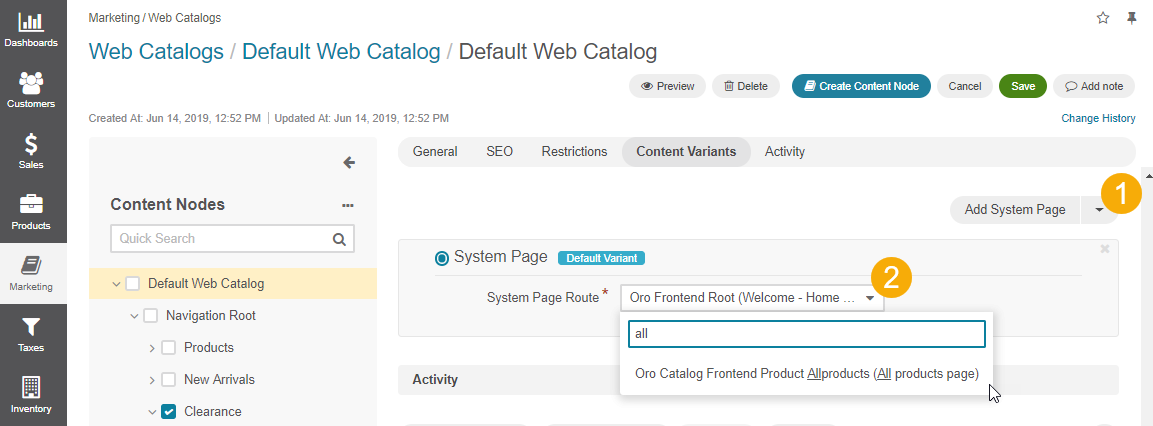
In the Content Variants section, make sure to add the All Products as the system page. To do this:
Click Add System Page.
From a System Page Route list, select the Oro Catalog Frontend Product Allproducts (All Products page).
Note
See Content Variants topic for more information on using content variants. See System Page topic for more information on this content variant type.
Once all the details have been provided, click Save at the top right of the page.
Add a Category
A category node is a direct link to the product category with the list of products in the OroCommerce storefront.
To add a category node to the menu in the OroCommerce storefront:
Select Add Category in the Content Variants list.
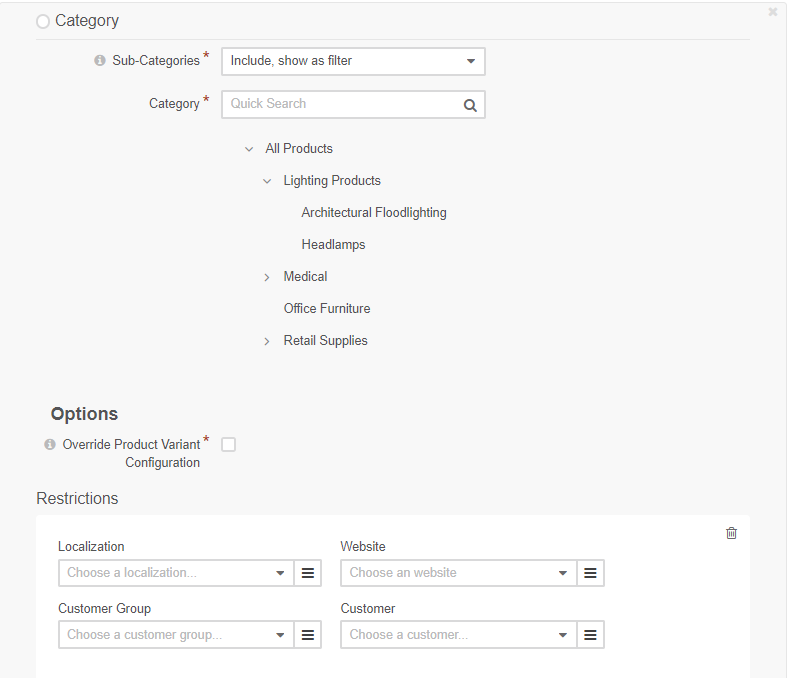
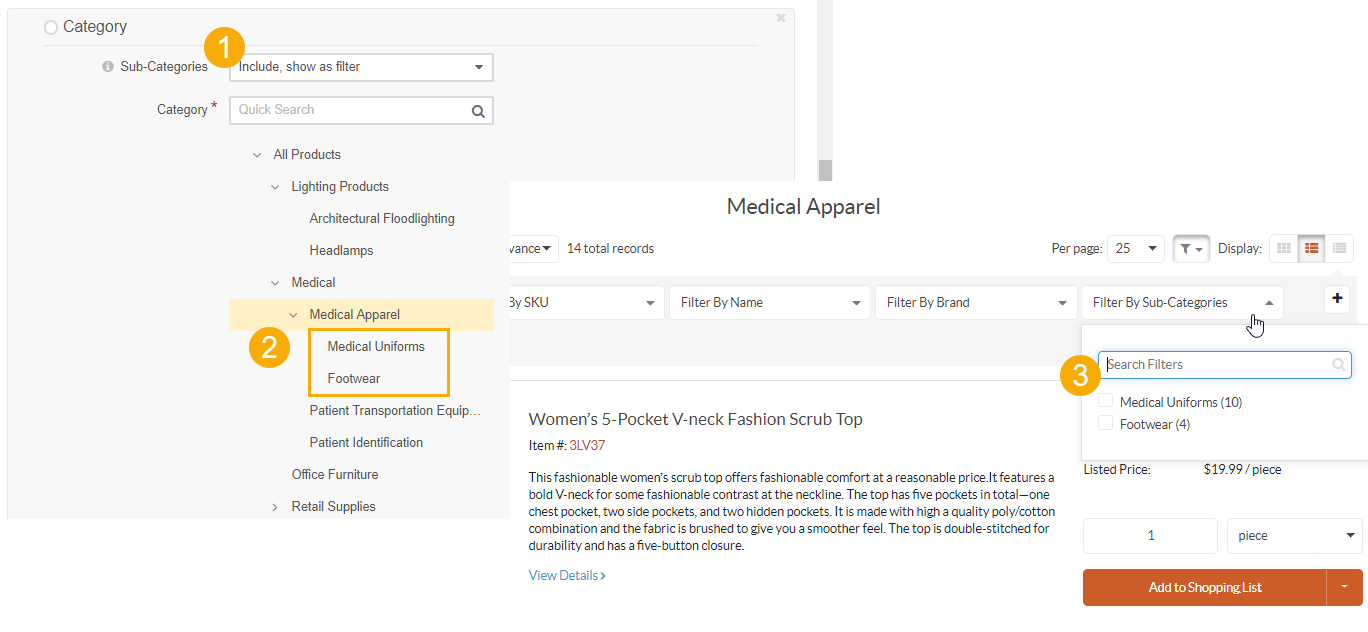
Click next to Sub-Categories to select the required option from the list.
The available options are:
Include, show as filter — Used to include all the products assigned to the subcategories of the selected category and the products already assigned directly. The subcategories of the first level with at least one product will be displayed as a category filter in the OroCommerce storefront.
Do not include — Used to include the products assigned only to the selected category. If the category has a subcategory, its product items will not be displayed.
Select the category from the product catalog tree. To use search, start typing the category name in the box. Use > and v to expand/collapse the tree node.

This step applies only to the content nodes with more than one content variant.
When your category is not selected as a default variant for the content node, you can define the condition when the selected category overrides the default content variant in the Restrictions section beneath the categories tree. See Configure Content Visibility section for more information.
Click Save when you have filled in the web catalog content node or keep adding the content variants.
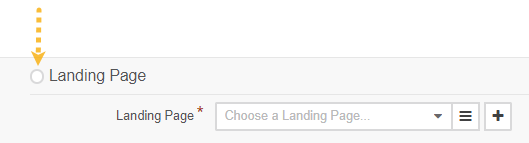
Add a Landing Page
Landing Page node is a link to the custom content page created in the Marketing > Landing Pages section.
To add a landing page node to the menu in the OroCommerce storefront:
Select the Add Landing Page in the Content Variants list.
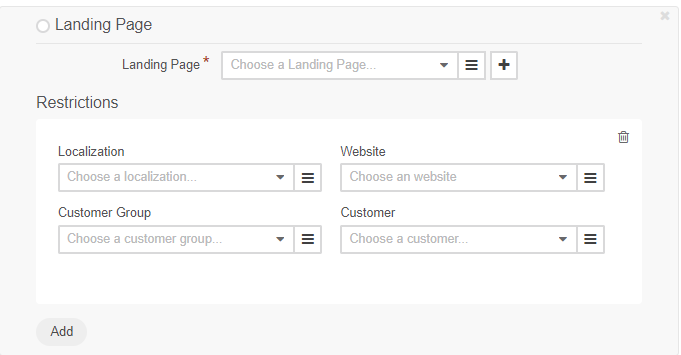
Select the existing landing page from the list. To use search, start typing the keywords in the box to search for the necessary page. To use filtering, click on the bars, and select the filtering conditions in the Manage filters section. Alternatively, you can create a new landing page:
To create a new landing page, click + to the right from the Landing page list.
Fill in the landing page details and contents as described here.
Enable the Do Not Render Title option if you do not want the title of the landing page to be displayed in the storefront.
This step applies only to the content nodes with more than one content variant.
When your landing page is not selected as a default variant for the content node, you can define the condition when the landing page overrides the default content variant in the Restrictions section beneath the selected landing page. See Configure Content Visibility section for more information.
Click Save when you are done filling in the web catalog content node or keep adding the content variants.
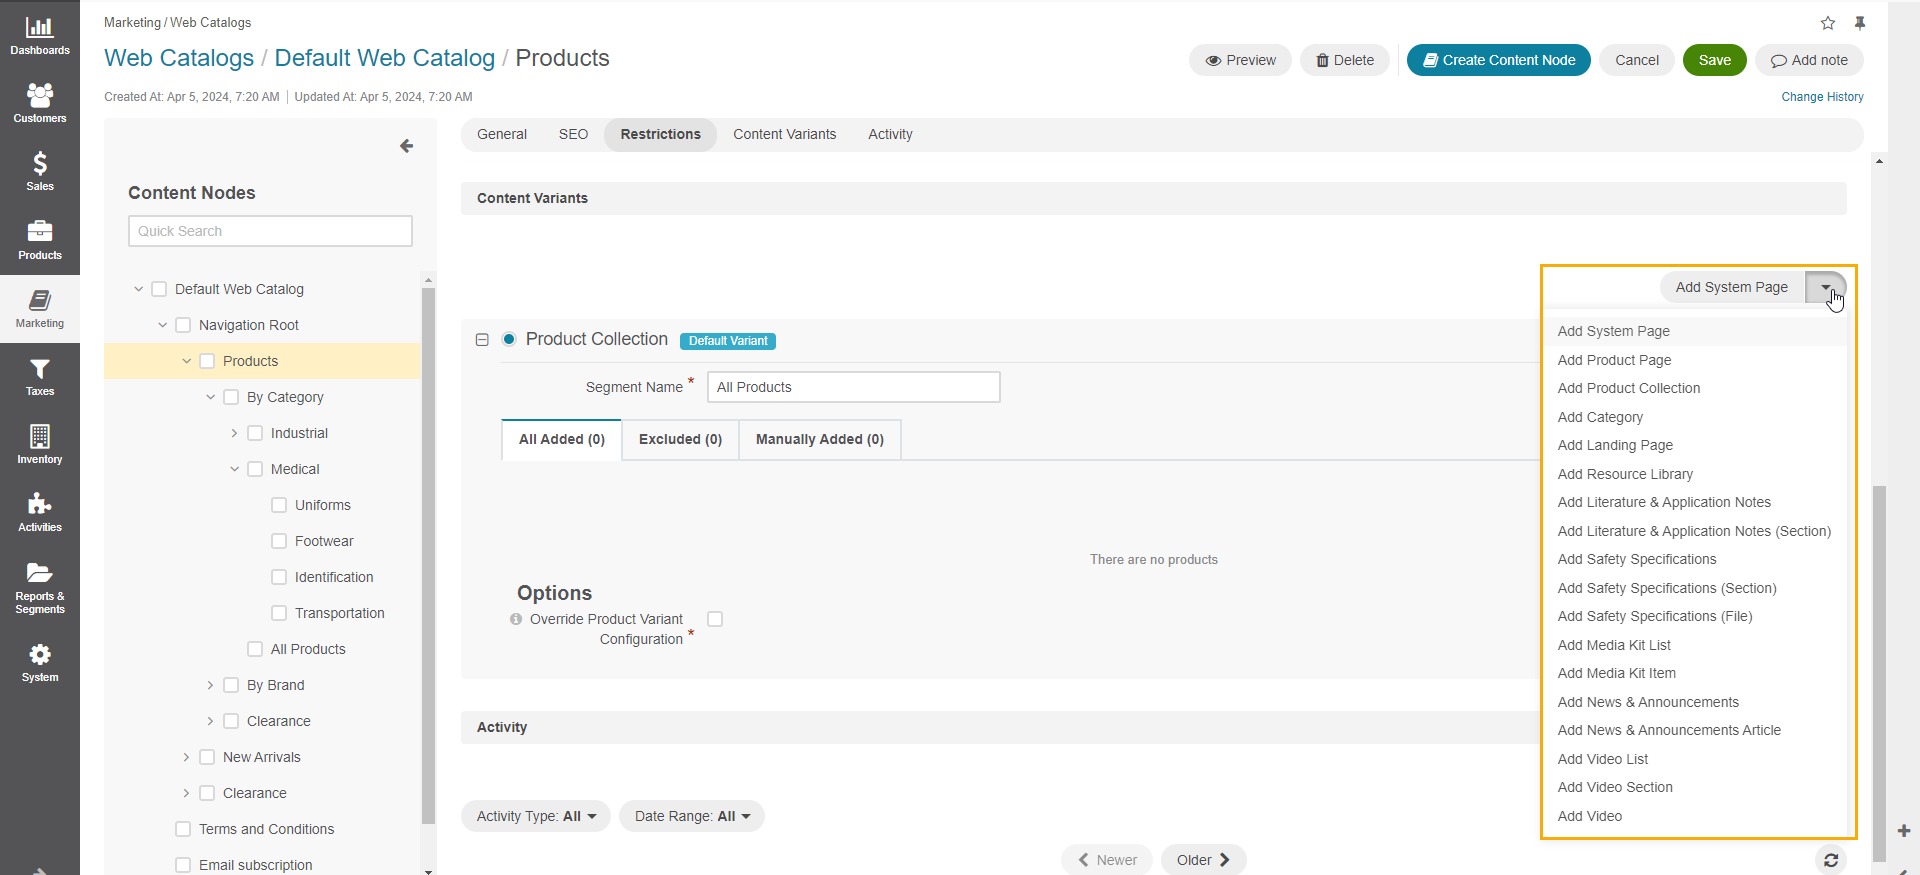
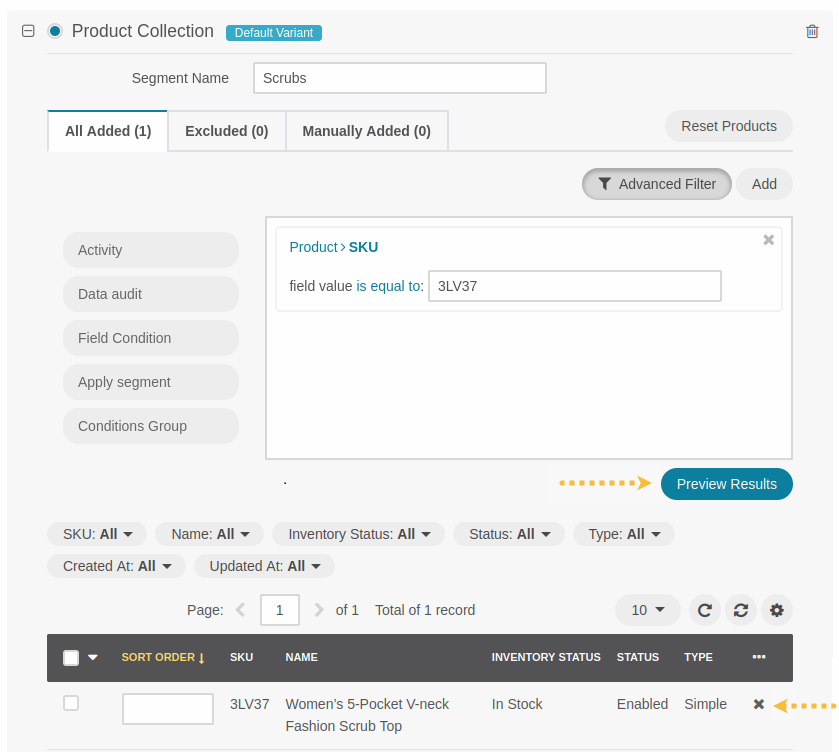
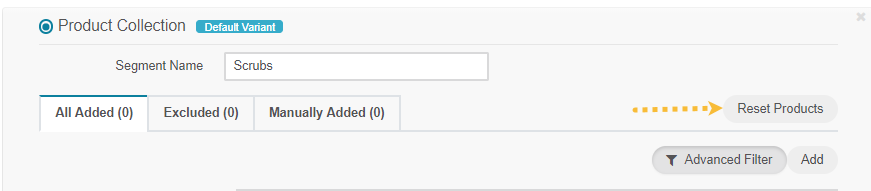
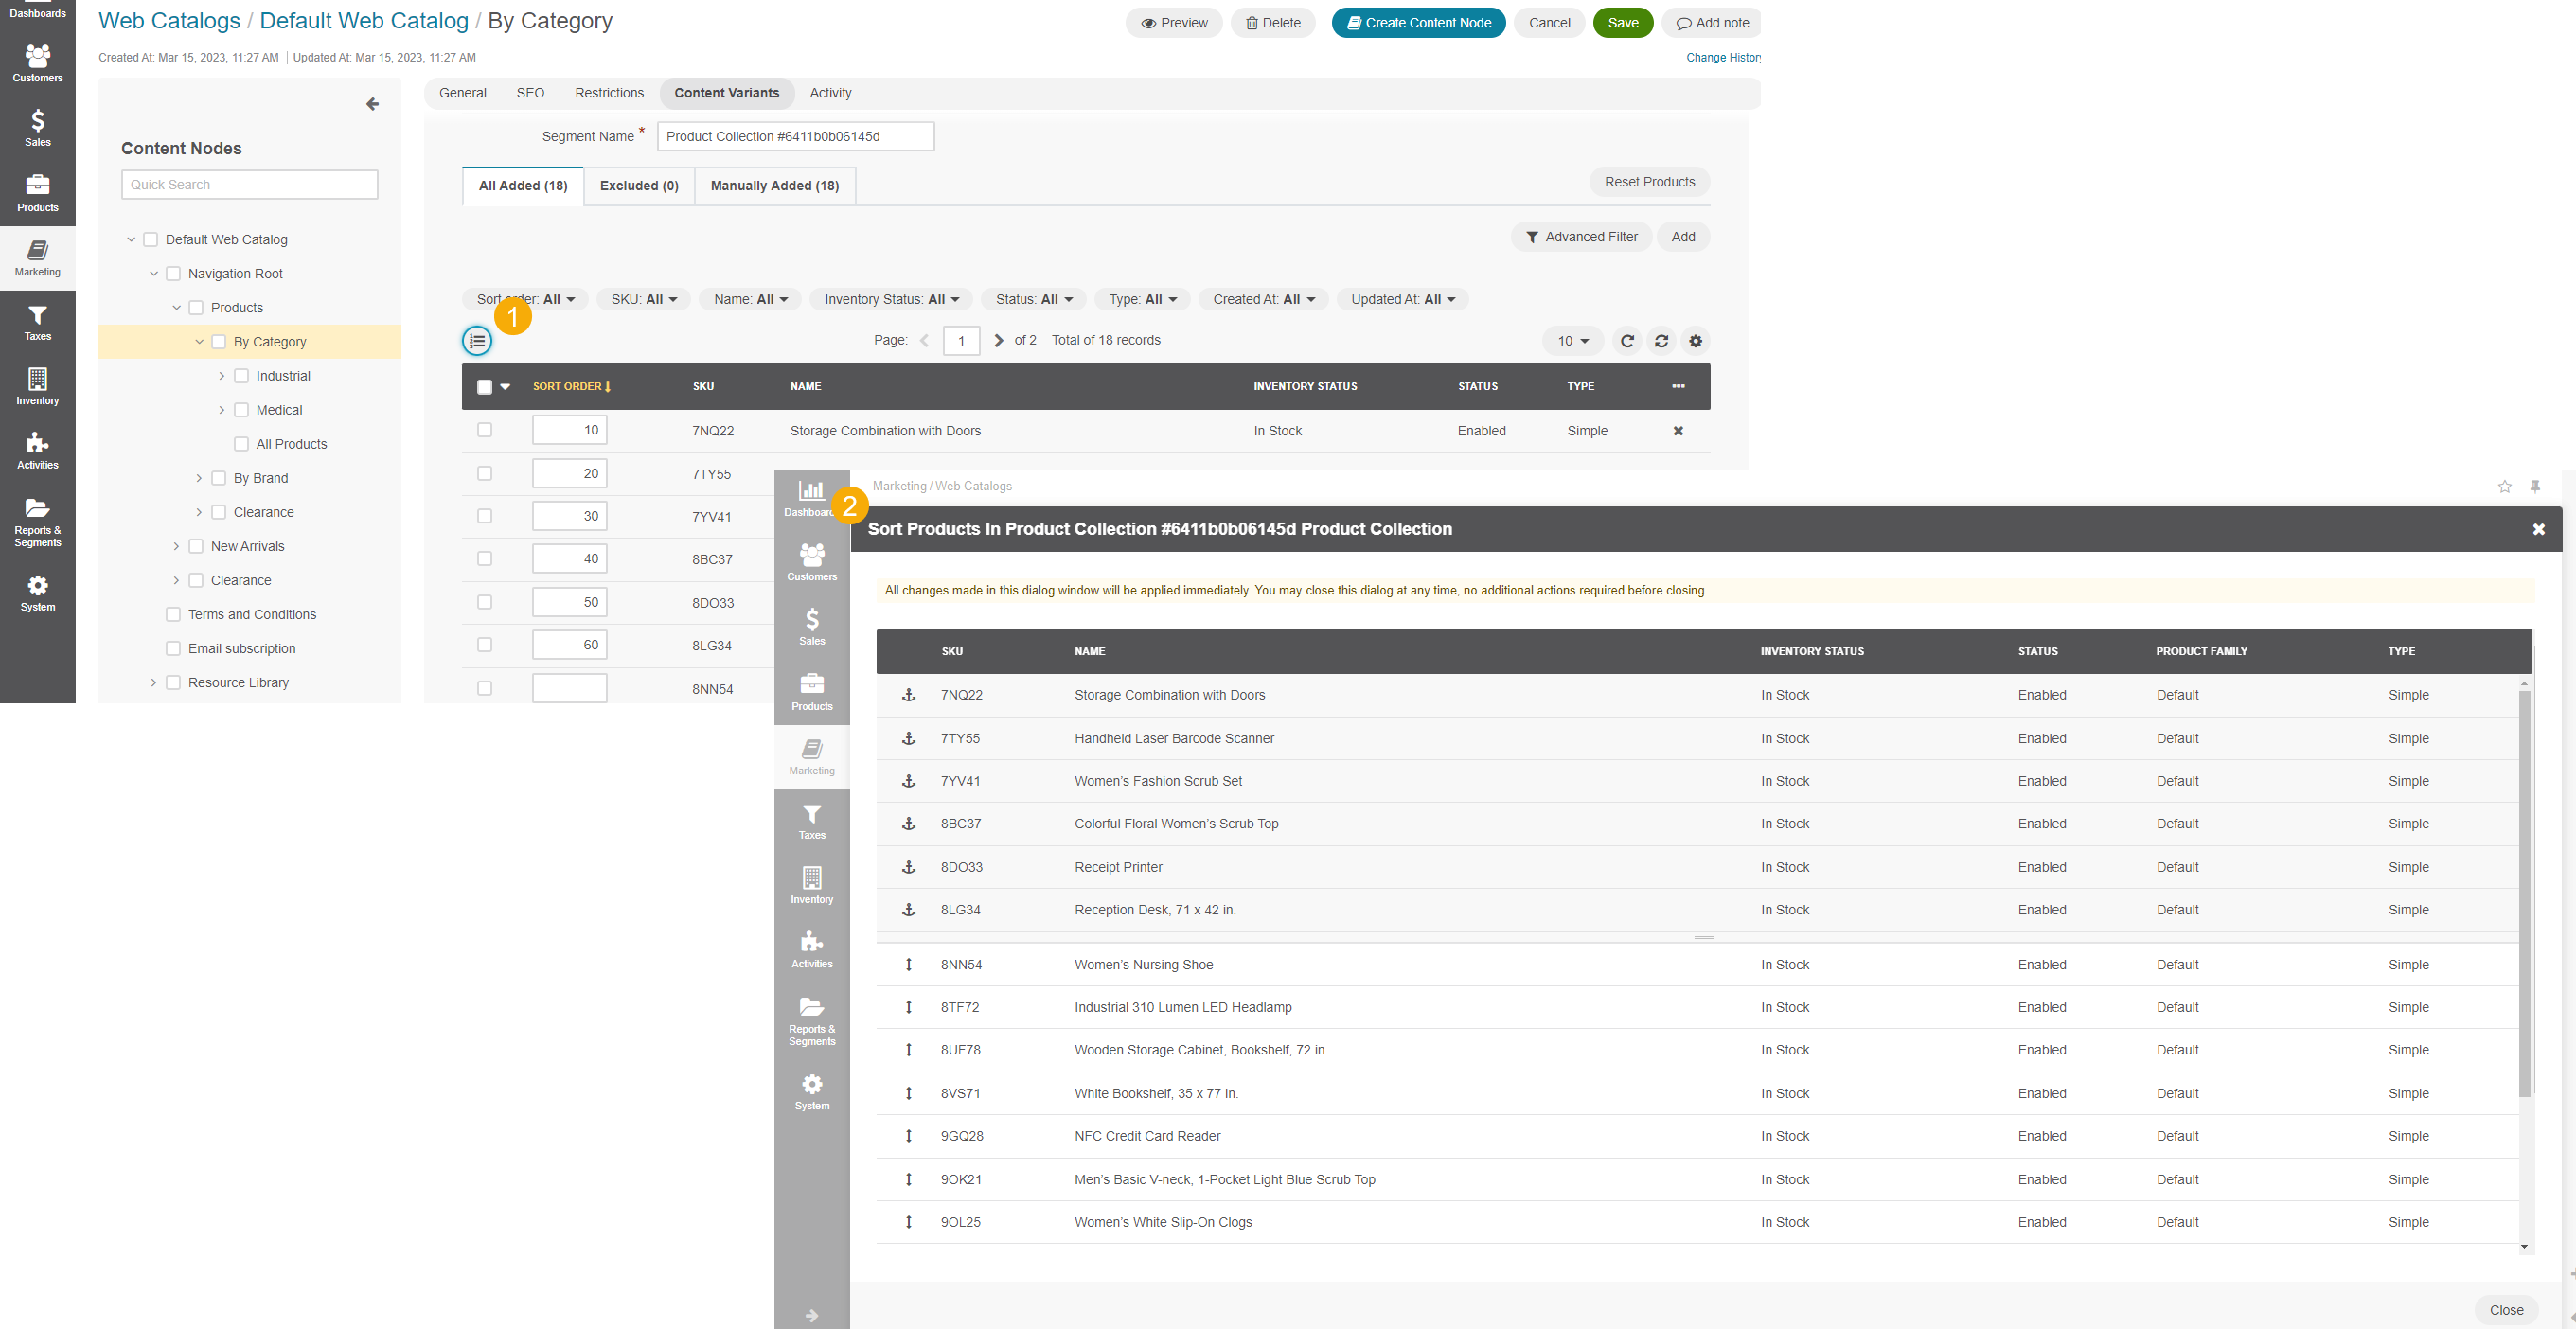
Add a Product Collection
Product Collection is a filter-based segment that helps you display a custom and dynamic set of products in the web catalog similarly to the category contents.
Note
You can control the frequency of the product collections indexation. By default, product collections are indexed every hour. See the Product Collections Configuration guide for the details on how to change the default indexation frequency.
To add a product collection node to the menu in the OroCommerce storefront:
Select the Add Product Collection in the Content Variants list.
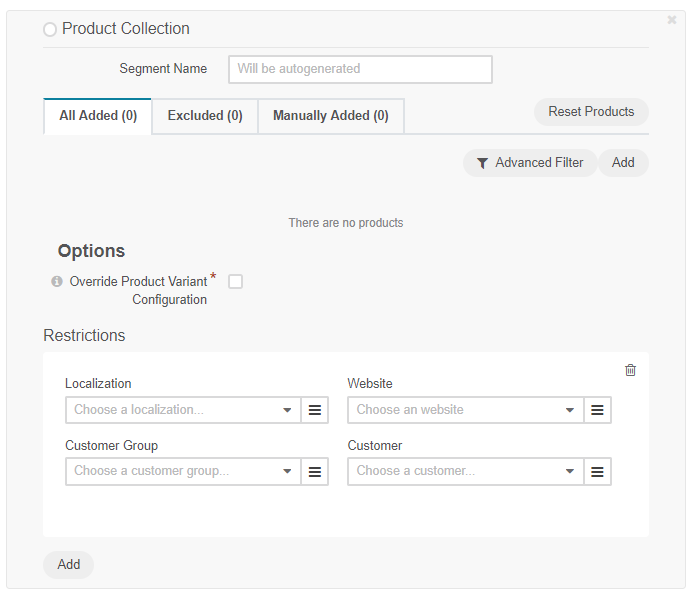
To name a segment of the product collection:
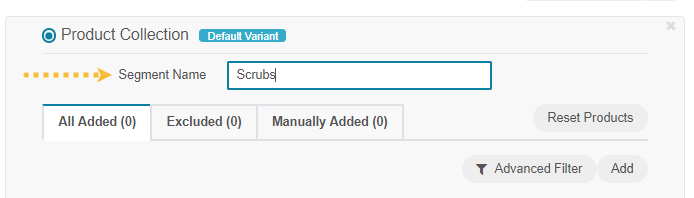
Enter the segment name for the product collection in the provided field.
To add a product to the collection via filter:
In the All Added tab, click Advanced Filter to set up a filter that will limit the products list and include only the necessary products.
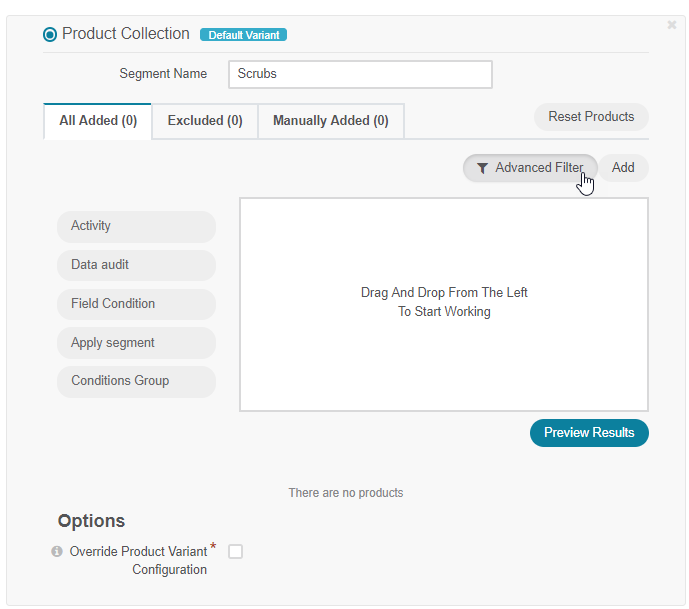
Note
Advanced Filter is hidden by default.
Click Preview Results to check whether the products found via the filter match your criteria or to exclude unnecessary items from the list.
Note
To manage the columns displayed Within the products grid, click .
To add a product to the collection manually:
Click Add next to Advanced Filter to add the selected products manually. This can be used when you have a few products to be added, and there is no need to set up a complicated filter, or when you need to add specific products that may be out of the filter’s scope.
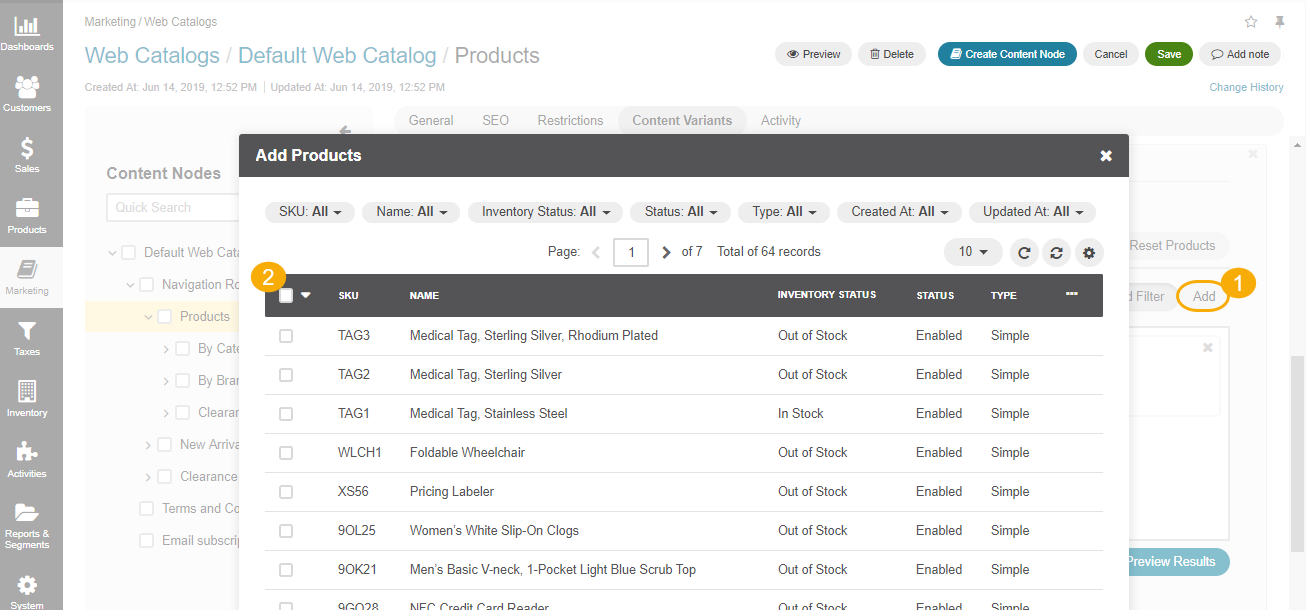
Manually added items will appear both in the Manually Added and All Added tabs.
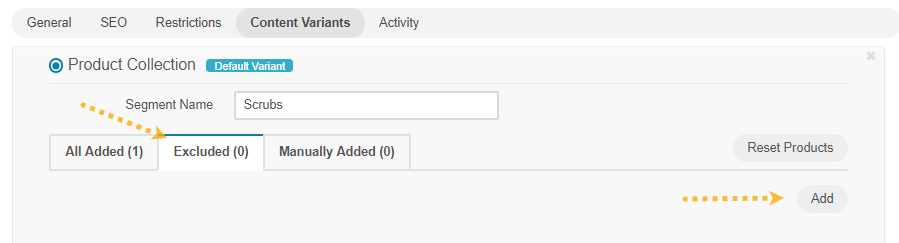
To exclude items from the collection:
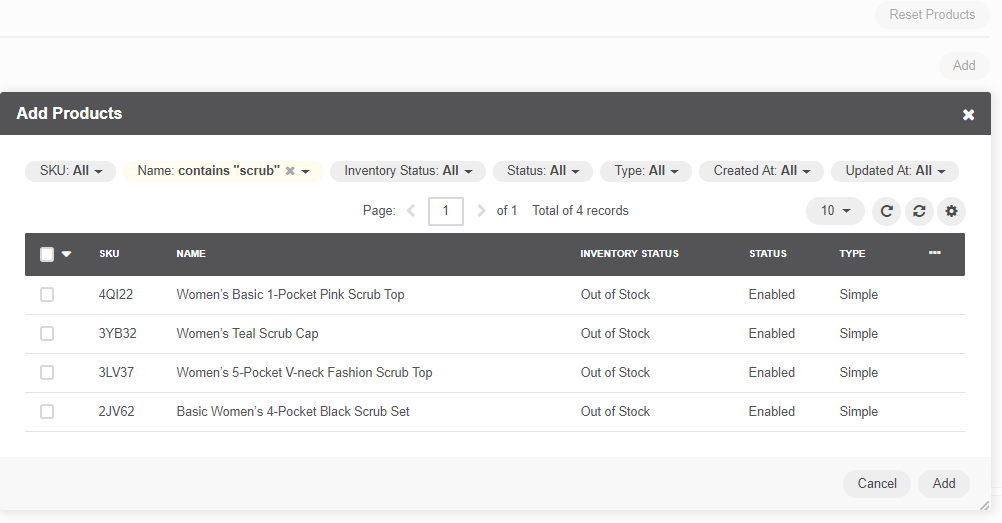
To ensure that specific items are excluded from the list of the product collection and will not be included automatically or manually, click Add in the Excluded tab:
Tick the Selected box to the left of the necessary products, and click Add.
Note
You can use the filter at the top of the dialog to limit the scope of the products and make them fit into the visible area.
To reset products:
To clear all filters and reset the product collection to the default state, click Reset Products next to the tabs.
To define a sort order for products:
Each product selected in the All Added grid can have a sort order associated with it that will define the default order in which the product will appear in the storefront. 0 is the highest priority, and you can input any positive decimal number. Empty values will be sorted last. You can also click on the Manage Sort Order button to be able to manage the sort order of products in the product collection in a separate pop-up window. Products with grey background have sorting number assigned. Product with white background have no sorting order. You can drag and drop the horizontal background separator up and down to apply or clear the sorting order. All changes made to the sorting order in this dialog window will be applied immediately.
This step applies only to the content nodes with more than one content variant.
When your collection is not selected as a default variant for the content node, you can define the condition when the product collection overrides the default content variant in the Restrictions section beneath the product collection preview. See Configure Content Visibility section for more information.
Click Save when you have filled in the web catalog content node or keep adding the content variants.
Set a Default Content Variant
The first content variant added to the node is marked as the default variant.
When adding more content variants, they have a dedicated restrictions section next to the content variant details. These restrictions will limit the use of this content variant only to specific cases; the default option is used in any other case.
Select the radio at the top left of its type to set up a newly added content variant as default.