Configure Email Templates in the Back-Office
With the Oro applications, you can easily send numerous personalized emails using one template. For example, you can make a single template that welcomes {username}, assign it to an email campaign, and each of your subscribers will get a mail sent specifically to them.
Create a New Email Template
Navigate to System > Emails > Templates.
Click Create Template.
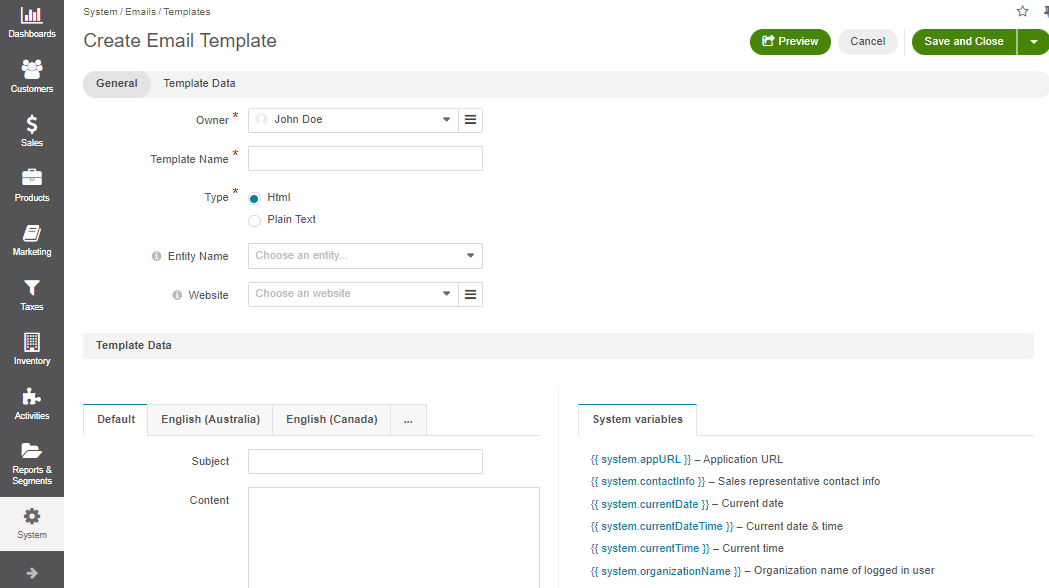
Define the general settings for the template.
The following fields are mandatory and must be defined:
Owner — Limits the list of users that can manage the template, subject to the access and permission settings.
Template Name — Name used to refer to the template in the system.
Type — Use html or plain text.
Entity Name — The field is optional and is used to define an entity, variables whereof can be used in the template. If no entity name is defined, only system variables are available.
Important
If you want to use the template for autoresponses, the Entity Name field value should be Email.
Website — Choose a website for which this template applies, or leave it blank if the template should be applicable to all websites. To apply this template customization to a different website, clone the template and define the necessary website. Ensure the original template name remains unchanged for the template to work correctly.
Under Template Data, define the email template.
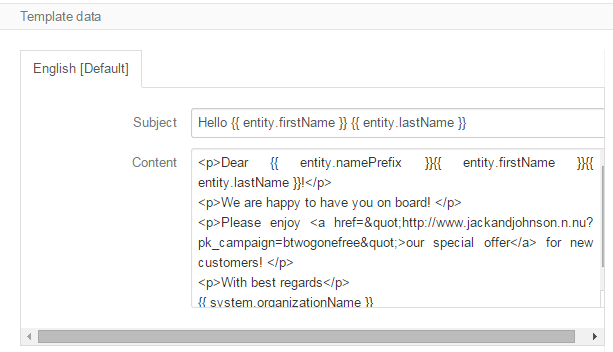
Subject — Provide the subject for the email template. Click on the necessary system or entity variable from the right to add it to the text box.
Content — Provide the content for the email template. Click on the necessary system or entity variable from the right to add it to the text box.
Note
If you prefer working with email templates via the WYSIWYG editor, you can enable it globally or per organization. However, remember that the WYSIWYG editor is incompatible with the default base email template. Enabling it may break existing email templates and prevent them from being saved. Therefore, it is disabled by default.
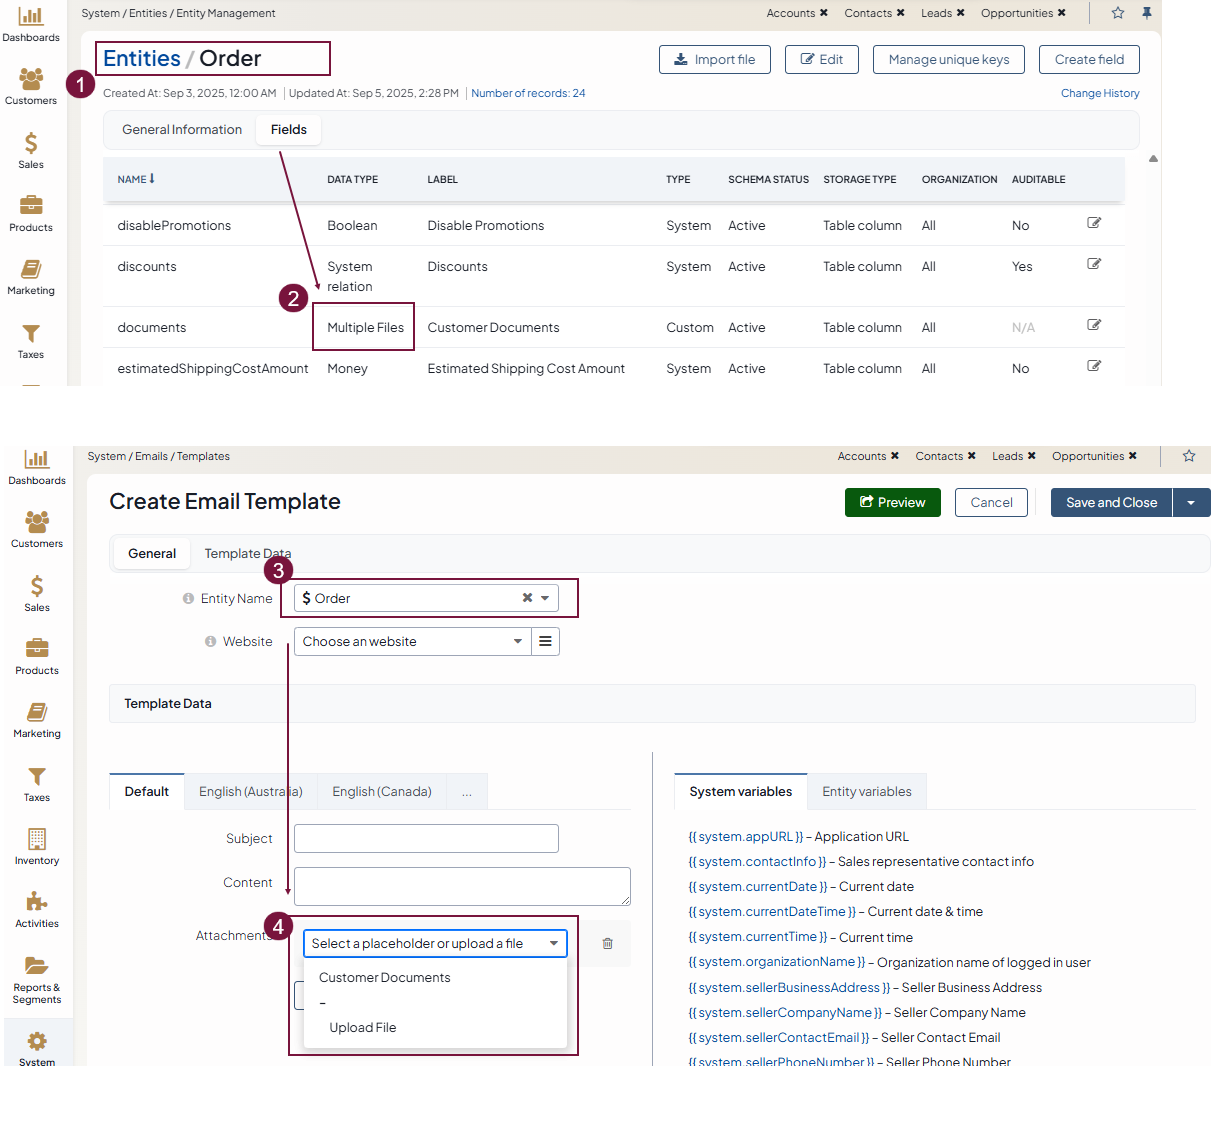
Attachments — The field enables you to include files or images in email templates. The ability to add these files or images depends on the entity you select when creating the template (e.g., Order, User, Quote, etc). The selected entity must contain one of the following entity field types: File, Image, Multiple Files, Multiple Images.
If the entity already has predefined files or images, you can select them directly from the Attachments field. If several files or images are uploaded into the entity field and you select it in the Attachments field, then all the uploaded files will be attached to the email.
If there are no predefined files, you can upload your own file or image manually to be sent with the email template.
Once the email template is ready, move from tab to tab to localize the template by setting the required fallback option. You can select whether to fall back to the default value, parent localization, or provide a custom template per localization. To create a custom template, uncheck the checkbox and enter the new details for the template.
Click Save and Close to apply the changes.
You can delete
 , edit , and clone email templates on the page of all templates.
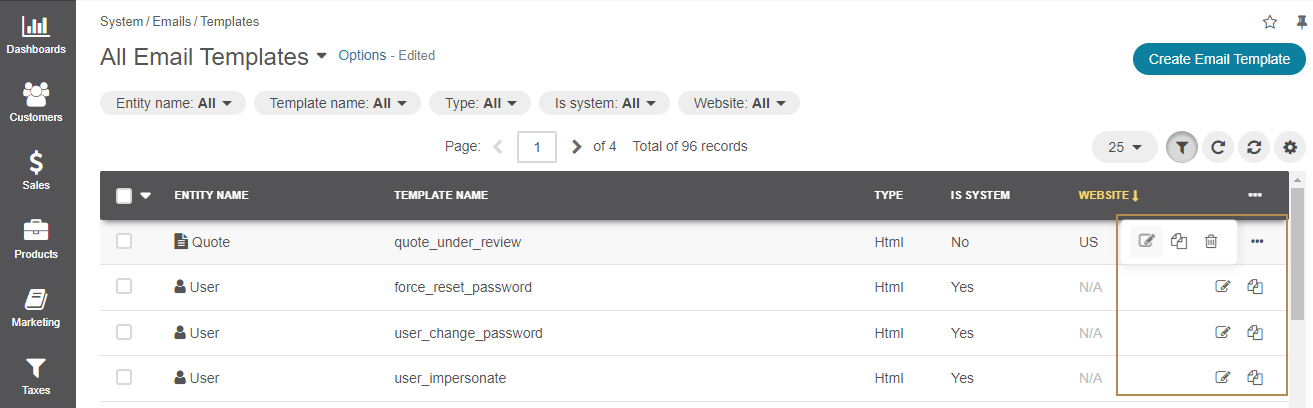
Important
Keep in mind that the ability to view, edit, clone, or delete email templates depends on specific roles and permissions defined in the system configuration. For more information about available access levels and permissions, see the Understand Roles and Permissions guide.
Inherit Base Email Template
Email template inheritance allows developers to maintain common styles and foundational markup in a single base template, which can then be extended or modified for different email types without repetitive copying and pasting. This base template includes common styles, headers, footers, and foundational markup, ensuring consistency across different emails. Users or frontend developers can manage the base template; the system will first search for it by name among user-managed templates, and if not found, will check the storefront theme.
You can have multiple base templates with different designs within the system, specified through a special markup tag, for instance:
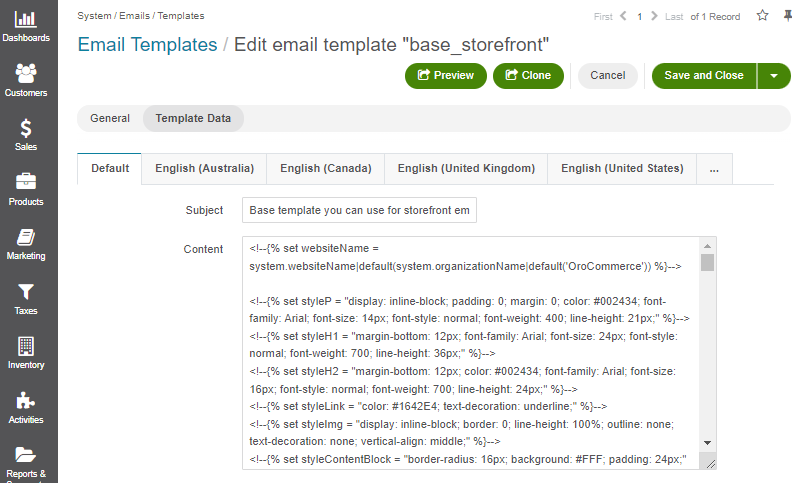
{% extends oro_get_email_template('base_storefront') %}
where base_storefront is a name of the base email template whose styles and markup you want to re-use.
Here is the OroCommerce’s default base_storefront email template that contains a common markup.
Several existing templates already use this inheritance principle with the mentioned code block:
{% extends oro_get_email_template('base_storefront') %}
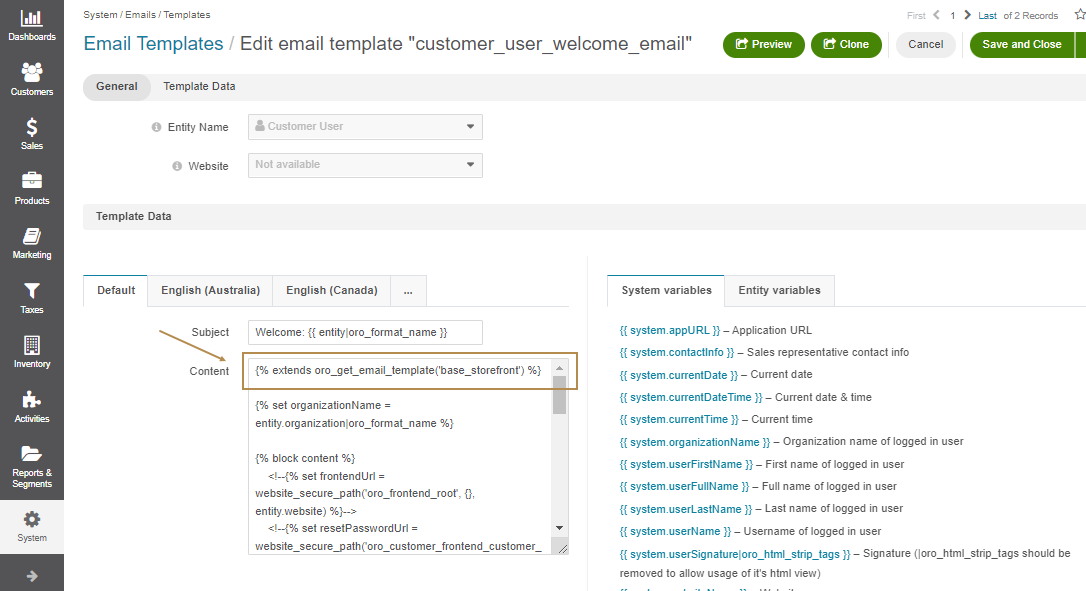
The website from which the request is sent is detected automatically from the related entity of an email template. If you need to specify the website, you can use the additional context argument:
{% extends oro_get_email_template('base', { website: entity.website }) %}
While using inheritance, the text or HTML should only be within the blocks defined in the parent template, for example:
{% extends oro_get_email_template('base_storefront') %}
No tags or text are allowed

{% block content %}
Any text or code is allowed
{% endblock %}

No tags, text or code are allowed
Note
The WYSIWYG editor is incompatible with the inherited email templates. Enabling it may break existing email templates and prevent them from being saved. Therefore, it is disabled by default.
View Available Template Variables and Functions
For the security reasons, the only available variables are currently the ones listed on the Email Templates edit page in the back-office. However, there are a few exceptions. These are several Twig functions enabled in email templates that can be used to obtain some specific data in email templates.
The full list of these functions is the following:
Important
Keep in mind that when editing HTML email templates, you pass them to the WYSIWYG editor. WYSIWYG automatically tries to modify the given HTML template against the HTML specifications. Therefore, the text and tags that violate the HTML specifications should be wrapped up in the HTML comment. For example, there should not be any other tags or text between the <table></table> tags except thead, tbody, tfoot, th, tr, td.
Examples:
Invalid template:
<table>
    <thead>
        <tr>
            <th><strong>Acme</strong></th>
        </tr>
    </thead>
    {% for item in collection %}
    <tbody>
        {% for subItem in item %}
        <tr>
            {% if loop.first %}
            <td>{{ subItem.key }}</td>
            <td>{{ subItem.value }}</td>
            {% endif %}
        </tr>
        {% endfor %}
    </tbody>
    {% endfor %}
</table>
Valid template:
<table>
    <thead>
        <tr>
            <th><strong>Acme</strong></th>
        </tr>
    </thead>
    <!--{% for item in collection %}-->
    <tbody>
        <!--{% for subItem in item %}-->
        <tr>
            <!--{% if loop.first %}-->
            <td>{{ subItem.key }}</td>
            <td>{{ subItem.value }}</td>
            <!--{% endif %}-->
        </tr>
        <!--{% endfor %}-->
    </tbody>
    <!--{% endfor %}-->
</table>
Functions
date
date()
Description: Converts an argument into a date to allow date comparison.
Example: See the Twig doc
oro_config_value
oro_config_value(string $configSettingName)
Description: Returns the Oro config setting value.
Returns: string
calendar_date_range
calendar_date_range(
    \DateTime $startDate = null,
    \DateTime $endDate = null,
    $skipTime = false,
    $dateType = null, \\IntlDateFormatter constant or it's string name
    $timeType = null, \\IntlDateFormatter constant or it's string name
    $locale = null,
    $timeZone = null
)
Description: Returns a string that represents a range between $startDate and $endDate, formatted according the given parameters.
Returns: string
- $endDate is not specified
Thu Oct 17, 2013 - when $skipTime = true
Thu Oct 17, 2013 5:30pm - when $skipTime = false
- $startDate equals to $endDate
Thu Oct 17, 2013 - when $skipTime = true
Thu Oct 17, 2013 5:30pm - when $skipTime = false
- $startDate and $endDate are the same day
Thu Oct 17, 2013 - when $skipTime = true
Thu Oct 17, 2013 5:00pm – 5:30pm - when $skipTime = false
- $startDate and $endDate are different days
Thu Oct 17, 2013 5:00pm – Thu Oct 18, 2013 5:00pm - when $skipTime = false
Thu Oct 17, 2013 – Thu Oct 18, 2013 - when $skipTime = true
Example:
calendar_date_range(entity.start, entity.end, entity.allDay, 'F j, Y', 1)
calendar_date_range_organization
calendar_date_range_organization(
    \DateTime $startDate = null,
    \DateTime $endDate = null,
    $skipTime = false,
    $dateType = null, \\IntlDateFormatter constant or it's string name
    $timeType = null, \\IntlDateFormatter constant or it's string name
    $locale = null,
    $timeZone = null,
    OrganizationInterface $organization = null
)
Description: The same as ‘calendar_date_range’ but for a specific organization.
Returns: string
get_event_recurrence_pattern
get_event_recurrence_pattern(Entity\CalendarEvent $event)
Description: This method is aimed at showing text description of a recurring event in email invitations.
Returns: string
Example:
<!--{% if get_event_recurrence_pattern(entity) %}-->
    <tr>
        <td style="width: 65pt; padding: 0 5pt 0 9pt; line-height: 1.3em; font-family: Arial, Helvetica, sans-serif; font-size: 10pt; vertical-align: top"><strong>Repeats:</strong></td>
        <td style="padding: 0 9pt 0 0; line-height: 1.3em; font-family: Arial, Helvetica, sans-serif; font-size: 10pt; vertical-align: top">{{ get_event_recurrence_pattern(entity) }}</td>
    </tr>
<!--{% endif %}-->
website_path
website_path(string $route, array $routeParams, Website|null $website = null)
Description: Returns the absolute path for a specific route and parameters.
Returns: string
Example:
<p>Please follow this link to confirm your email address: <a href="{{ website_path('oro_customer_frontend_customer_user_confirmation', {'username': entity.username, 'token': token}, entity.website) }}">Confirm</a></p>
website_secure_path
website_secure_path()
Description: The same as ‘website_path’ but returns Secure (HTTPS) URL.
url
url()
Description: Returns the absolute URL (with scheme and host) for the given route.
Example: See the Symfony Twig Extensions (URL)
path
path()
Description: Returns the relative URL (without the scheme and host) for the given route.
Example: See the Symfony Twig Extensions (Path)
get_payment_methods (OroCommerce Only)
get_payment_methods(Order $entity)
Description: Returns the allowed payment methods for orders.
Returns: array of Oro\Bundle\PaymentBundle\Twig\DTO\PaymentMethodObject objests with payment method label and options (can be used as array of strings thanks to PaymentMethodObject::__toString method)
Example:
{% set payment_methods = get_payment_methods(entity) %}

<!--{% if  payment_methods|length == 1 %}-->
    <h4>Payment Method:</h4>
    <!--{{ payment_methods[0] }}-->
<!--{% elseif payment_methods|length > 1 %}-->
    <h4>Payment Methods:</h4>
    <!--{{ payment_methods|join(', ') }}-->
<!--{% endif %}-->
Alternative example:
{% set payment_methods = get_payment_methods(entity) %}
{% if  payment_methods|length == 1 %}
    <strong>Payment Method: </strong>
{% elseif payment_methods|length > 1 %}
    <strong>Payment Methods: </strong>
{% endif %}
{% for payment_method in payment_methods %}
    {{ payment_method.label }}
    {% if payment_method.options|length > 0 %}
        {{- ' (' ~ payment_method.options|join(', ') ~ ')' -}}
    {% endif %}
    <br/>
{% endfor %}
get_payment_status_label (OroCommerce only)
get_payment_status_label(Order $entity)
Description: Returns the translated label for the payment status.
See the \Oro\Bundle\PaymentBundle\Formatter\PaymentStatusLabelFormatter::formatPaymentStatusLabel method for details.
Returns: string
Example: See an example for the get_payment_status (OroCommerce only) method.
get_payment_status (OroCommerce only)
get_payment_status(Order $entity)
Description: Returns the payment status for requested order.
Returns: string, one of Oro\Bundle\PaymentBundle\PaymentStatus\PaymentStatuses class statuses (‘full’, ‘partially’, ‘invoiced’, ‘authorized’, ‘declined’, ‘pending’)
Example:
<strong>Payment Status: </strong>{{ get_payment_status_label(get_payment_status(entity)) }}
oro_order_shipping_method_label (OroCommerce only)
oro_order_shipping_method_label(?string $shippingMethod, ?string $shippingMethodType, ?Organization $organization = null)
Description: Returns the translated label of the order`s shipping method.
Returns: string
Example:
{% set shipping_method = oro_order_shipping_method_label(entity.shippingMethod, entity.shippingMethodType, entity.organization) %}
<strong>Shipping Method: </strong>{{ shipping_method }}<br/>
rfp_products (OroCommerce Only)
rfp_products(Oro\Bundle\RFPBundle\Entity\Request $entity)
Description: Returns a list of products requested by a buyer in this request for quote.
Returns:
array: [
    345 => [ \\Product ID
        'name' => 'Yarn', \\ string, Product name
        'sku' => 'YRN345erer', \\ string, Product SKU
        'comment' => 'Most interesting product for us', \\ string, Comment in RFP for this product
        'items' => [ \\array, Requested product items
            38473 => [ \\Product Item ID
                'quantity' => 49.86, \\ float, Product Item quantity
                'price' => $price, \\ \Oro\Bundle\CurrencyBundle\Entity\Price object, Product Item price
                'unit' => 'ft', \\ string, Product Item unit
            ],
            139473 => [ \\Product Item ID
                'quantity' => 21.98, \\ float, Product Item quantity
                'price' => $price, \\ \Oro\Bundle\CurrencyBundle\Entity\Price object, Product Item price
                'unit' => 'item', \\ string, Product Item unit
            ],
            ...
        ],
    ],
    ...
]
Example:
{% set products = rfp_products(entity) %}
{% if products|length %}
    <table style="border: 1px solid black;margin-top: 10px">
        <thead>
            <tr>
                <th><strong>SKU</strong></th>
                <th><strong>Product</strong></th>
                <th><strong>Quantity</strong></th>
                <th><strong>Target Price</strong></th>
                <th><strong>Comment</strong></th>
            </tr>
        </thead>
        <!--{% for product in products %}-->
            <!--{% set numItems = product.items|length %}-->
            <tbody>
                <!--{% for item in product.items %}-->
                    <tr>
                        <!--{% if loop.first %}-->
                            <td rowspan="{{ numItems }}">{{ product.sku }}</td>
                            <td rowspan="{{ numItems }}">{{ product.name }}</td>
                        <!--{% endif %}-->

                        <td>{{ item.quantity }} {{ item.unit }}</td>
                        <td>{{ item.price ? item.price|oro_format_price : '' }}</td>

                        <!--{% if loop.first %}-->
                            <td rowspan="{{ numItems }}">{{ product.comment }}</td>
                        <!--{% endif %}-->
                    </tr>
                <!--{% endfor %}-->
            </tbody>
        <!--{% endfor %}-->
    </table>
{% endif %}
line_items_discounts (OroCommerce only)
line_items_discounts(Order $entity)
Description: Returns array of discount total sum for every order line item.
Returns: array
array: [
    '123123' => [ // Line Item ID
        'value' => 15.065, \\ float, total sum of discount for the line item
        'currency' => 'USD', \\ string, Currency of discount
    ],
    ...
]
Example: See an example for order_line_items (OroCommerce only) method.
order_line_items (OroCommerce only)
order_line_items(\Oro\Bundle\OrderBundle\Entity\Order $entity)
Description: Returns order line items.
Returns:
array: [
    'lineItems' => [
        [
            'product_name' => 'Boat', \\ string, Product name
            'product_sku' => 'BO1BIG', \\ string, Product SKU
            'quantity' => 1.00, \\ float, Product quantity
            'unit' => 'item', \\ string, Product unit
            'price' => $price, \\ \Oro\Bundle\CurrencyBundle\Entity\Price object, Product price
            'comment' => 'Comment for this line Item', string
            'ship_by' => $price, \\ \DateTime, Line item ship by field
            'id' => $id, \\ int|string, Line item identifier value
            'subtotal' => $price, \\\Oro\Bundle\CurrencyBundle\Entity\Price object, Line Item subtotal
        ],
        ...
    ],
    'subtotals' => [
        [
            'label' => 'Shipping', \\ string, Subtotal name
            'totalPrice' => $price, \\\Oro\Bundle\CurrencyBundle\Entity\Price object, Subtotal Price
        ],
        ...
    ],
    'total' => [
        'label' => 'Total', \\ string, label for Total
        'totalPrice' => $price, \\\Oro\Bundle\CurrencyBundle\Entity\Price object, Total sum Price for all order line items
    ],
]
Example:
<table style="border: 1px solid black;margin-top: 10px">
    <thead>
    <tr>
        <th><strong>Item</strong></th>
        <th><strong>Quantity</strong></th>
        <th><strong>Price</strong></th>
        <th><strong>Subtotal</strong></th>
        <th><strong>Ship By</strong></th>
        <th><strong>Notes</strong></th>
    </tr>
    </thead>
    <tbody>
    <!--{% set data = order_line_items(entity) %}-->
    <!--{% set lineItemDiscounts = line_items_discounts(entity) %}-->
    <!--{% for item in data.lineItems %}-->
        <tr>
            <td>
                {{ item.product_name }}
                <br>
                SKU #: {{ item.product_sku }}
                <br>
            </td>
            <td>{{ item.quantity|oro_format_short_product_unit_value(item.unit) }}</td>
            <td>{{ item.price|oro_format_price }}</td>
            <td>
                {{ item.subtotal|oro_format_price }}
                {% set matchedDiscount = lineItemDiscounts[item.id] %}
                {% if matchedDiscount is not null and matchedDiscount.value > 0 %}
                    <br/>{{ (-matchedDiscount.value)|oro_format_currency({'currency': matchedDiscount.currency}) }}
                {% endif %}
            </td>
            <td>{{ item.ship_by }}</td>
            <td>{{ item.comment }}</td>
        </tr>
    <!--{% endfor %}-->
    </tbody>
</table>
Note
If none of these Twig functions cover your cases, you can create a custom Twig function that returns the desired data that you can use in email templates. Please, see OroEmailBundle documentation for details.
Filters
On top of functions, you can use filters in email templates. The full set of these filters is the following:
oro_format_datetime_organization
Localize Email Templates
To create email templates for different localizations, even the inactive ones, move from tab to tab and create the desired content for required localizations.
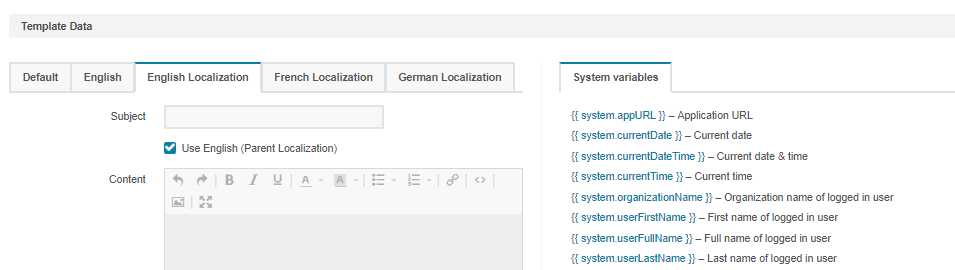
To enable the email template fallback to the parent localization, select the Use <localization> (Parent Localization) checkbox. If the localization does not have a parent, you can enable fallback to the default template value.
Business Tip
Interested in learning more about B2B eCommerce and how it differs from B2C? Read our in-depth information on the subject.