Create a Configurable Product
Hint
This section is part of the Product Management topic that provides a general understanding of the product concept in OroCommerce.
See a short demo on how to create a configurable product, or keep reading the step-by-step guidance below.
Checklist
Before creating a configurable product, ensure that you have performed the following steps:
Created attributes.
A configurable attribute is one of the product attributes that are used to distinguish product variants of the same configurable product. At least one configurable attribute should be specified for the configurable product to enable a customer to select product variants.
Created a product family.
As a configurable product and all of its variants share the same attributes, they should also share the product family.
Created product variants (simple products).
A configurable product may group several simple products or configurable product variants whose information mostly overlaps except for several product attributes. It means you must create a simple product for each variant you want to add to the configurable product.
Note
Make sure the configurable product you are creating has the same product unit as its product variants.
Note
Product variants for configurable products in the storefront are displayed only when either customer users are logged in or guest shopping lists are enabled in the system configuration.
Flow
To add a new configurable product and make it available in the master catalog (for internal product management) and for purchase in the storefront:
Navigate to Products > Products using the main menu.
Click Create Product.
From the Type list, select Configurable to enable product variants.
Select the product family to define the product options and details that will be filled in the following steps.
Note
Ensure that the product attributes that store product variant options are created and included in the product’s product family.
Place the product under the necessary category in the master catalog by clicking on the category. Use the search to filter the list of categories.
Click Continue. The product details page appears.
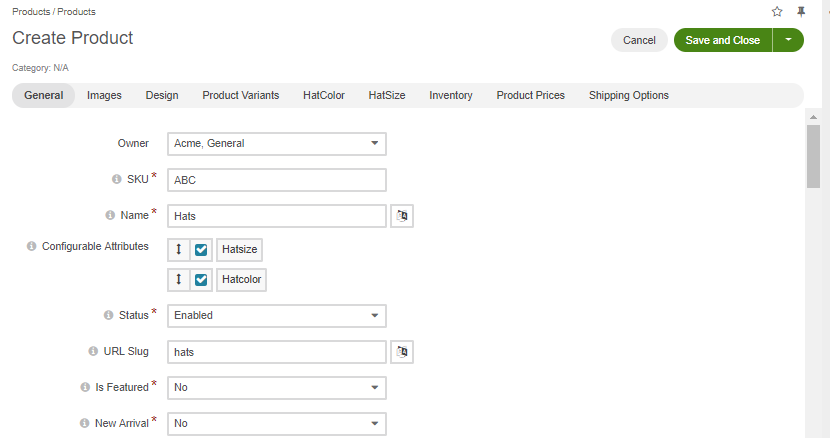
In the General section, provide the following information:
Field
Description
Owner
Limits the list of users who can manage the product.
SKU
Enter the product SKU number. The field is mandatory.
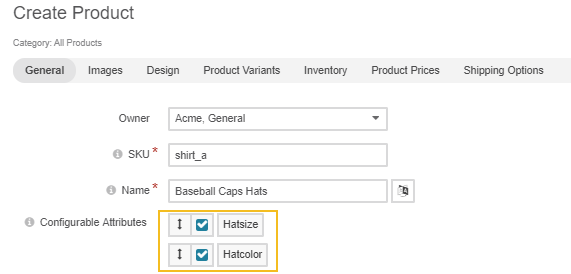
Name
Enter the name of the product. The field is mandatory.
Configurable Attributes
Define the configurable attributes that distinguish product variants by selecting the checkboxes next to them.
Note
A configurable product should contain at least one configurable attribute of select or boolean type.
Status
Select the product status (e.g., Enabled/Disabled). When disabled, the product is not included in the catalog and is considered to be a draft. The field is mandatory.
URL Slug
Enter a URL slug used to build a human-readable URL for the product page in the storefront. If left blank, the slug will be autogenerated.
Is Featured
Select whether the product is featured. The field is mandatory. To add the featured products block with all the products marked as featured to the website’s storefront, please refer to the featured products documentation.
New Arrival
Select whether the product is a new arrival. When set to Yes, the product is highlighted in the storefront. The field is mandatory.
Brand
Choose the product brand, if available. Click to select the brand from the full list.
Unit of Quantity
Select the main product unit that is shown by default when you view the product details in the storefront. Available options: each, item, kilogram, piece, set. In the Precision field, set the acceptable precision (number of digits after the decimal point) for the quantity that a user may order or add into the shopping list. Items and sets are usually whole numbers, and units like kilograms may get precision of 2 to allow buying a custom volume (e.g., 0.5 kg).
Additional Units
Add more than one unit of quantity if needed. For every additional unit, provide precision and conversion rate compared to the main unit of quantity. Select the Sell checkbox to enable selling the product in these units. Unless Sell is selected, the unit is considered a draft.
Also, specify the value of your configurable attributes and define any other custom attributes if required.
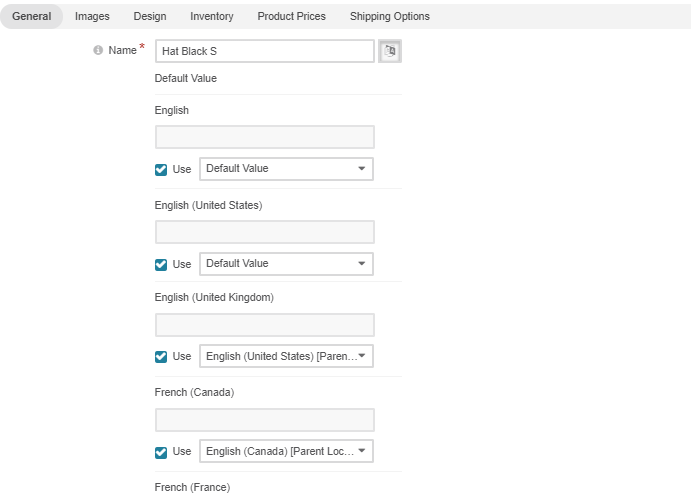
In the Short Description section, provide a short but meaningful default description that best positions the product for your target audience and will appear in the catalog listing. Move from tab to tab to localize the description by setting the required fallback option. You can select whether to fall back to the default value, parent localization, or a custom value from the dropdown. When selecting the custom value, provide the localized version of the short description in the text field.
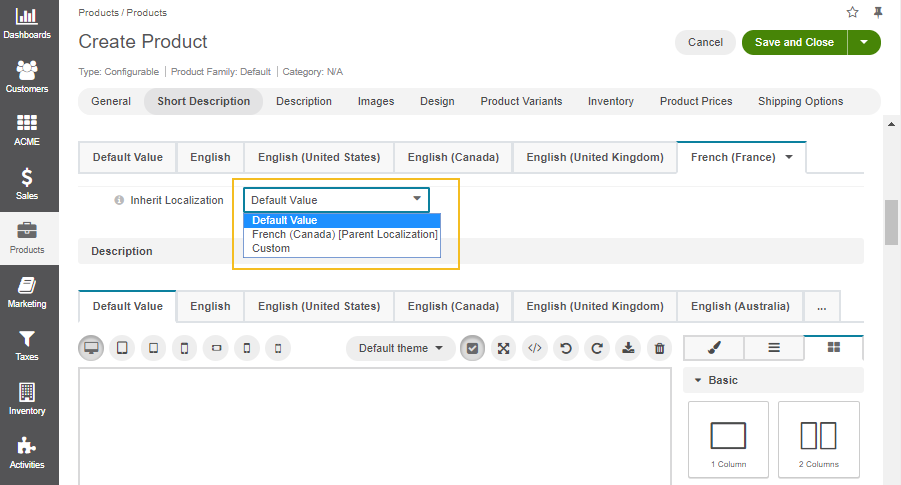
In the Description section, provide a long default product description that will appear on the product view page. Move from tab to tab to localize the description by setting the required fallback option. You can select whether to fall back to the default value, parent localization, or a custom value from the dropdown. When selecting the custom value, provide the localized version of the long description in the WYSIWYG field. For more details on WYSIWYG management, see the WYSIWYG Editor topic.
In the Image section, add a new image to the product by clicking +Add Image and then Choose Image. You can either upload a new image or select the required one from the list of available digital assets records.
Then, select whether to show the image as main (the image is used in the product details view), listing (the image is shown in the catalog listing), or additional (additional product pictures). All three categories can be selected at the same time. To remove an image, click next to it.
In the Design section, select the page template from the list. A page template is used to render the product page in the storefront. Available options are Default, Tabs, and Wide. To override the template configuration set in the theme configuration menu, deselect Use and choose the required option from the list.

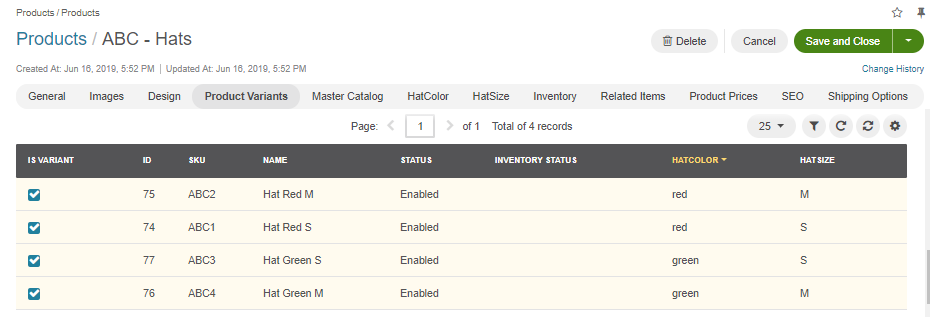
In the Product Variants section, select the configurable product variants by ticking the Is Variant checkbox next to the product. Ensure the configurable product has the same product unit as its product variants.
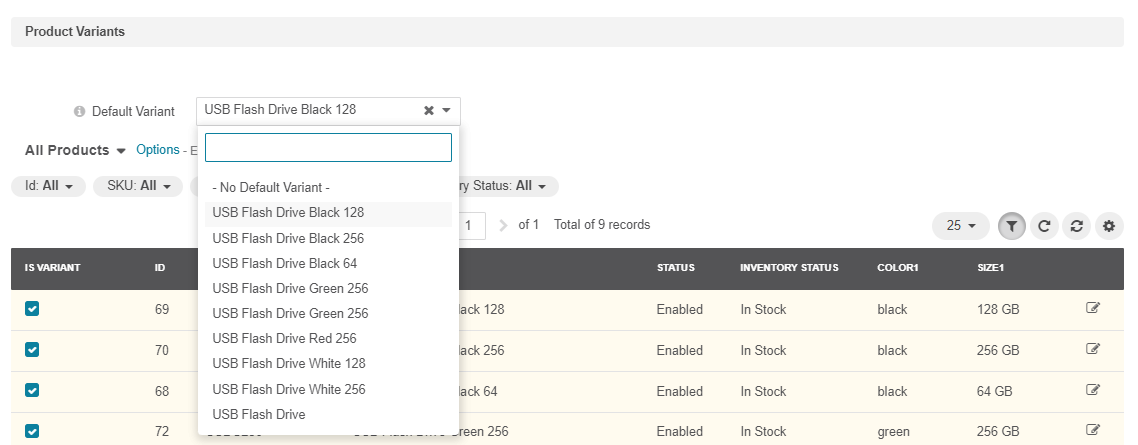
Once all variants are selected, you can choose the default variant to be displayed in the storefront.
The default variant is only possible if No Matrix Form is selected for configurable products in the system configuration.
In the SEO section, specify the required attributes:
Field
Description
Meta Keywords
Enter meta keywords for the product. A meta keyword is a specific type of meta tag that appears in the HTML code of a web page and helps search engines understand the page’s topic.
Meta Title
Enter a meta title for the product. A meta title is what is seen by search engine users and helps a search engine to index the page.
Meta Description
Enter a meta description for the product. A meta description summarizes the page content. Search engines show a meta description in search results when the searched phrase is found in the description.
And any other custom attributes if defined.
Review translation rules for a product name, URL slug, long description, and short description.
To manually enter a translation, click , clear the Use <parent translation> checkbox next to the required language, and provide your translation version.
Click Save to save your configurable product.
Once the core product information is saved, you may add related products and up-sell products to display them in the Related Items section in the product details in the back-office and in the Related Products and Up-sell Products blocks next to the product details in the storefront. See the Add Related Items for more details.
Create a Configurable Product (Example)
The sample flow below shows all the steps required to create a configurable product.
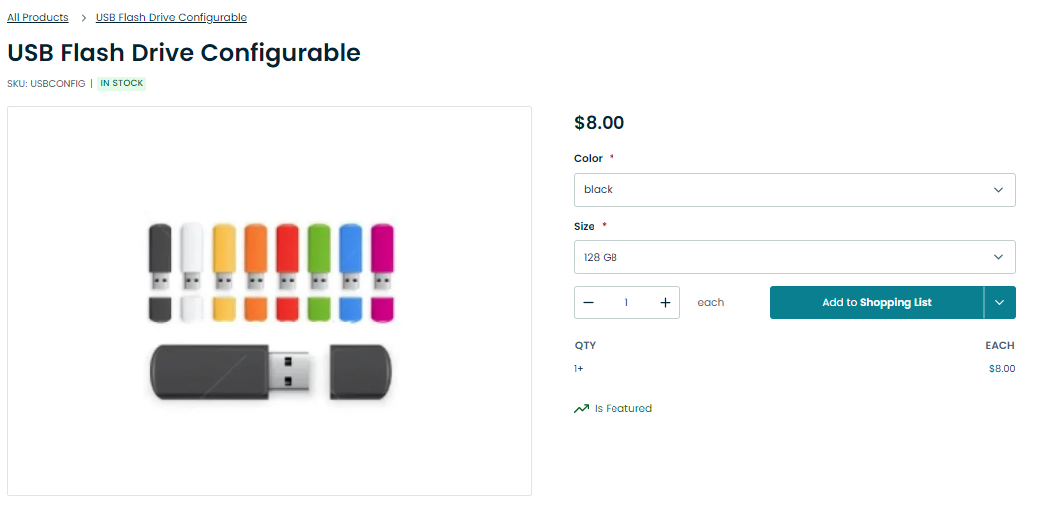
Product: External Hard Drive, memory capacity 1 TB and 2 TB.
Step 1. Create Attributes.
Navigate to Products > Product Attributes in the main menu.
Click Create Attribute on the top right, and proceed to creating attribute memory.
Choose select as the attribute type.
Important
The only attribute types available for configurable attributes are Select and Boolean.
Click Add to provide attribute options 1 TB and 2 TB.
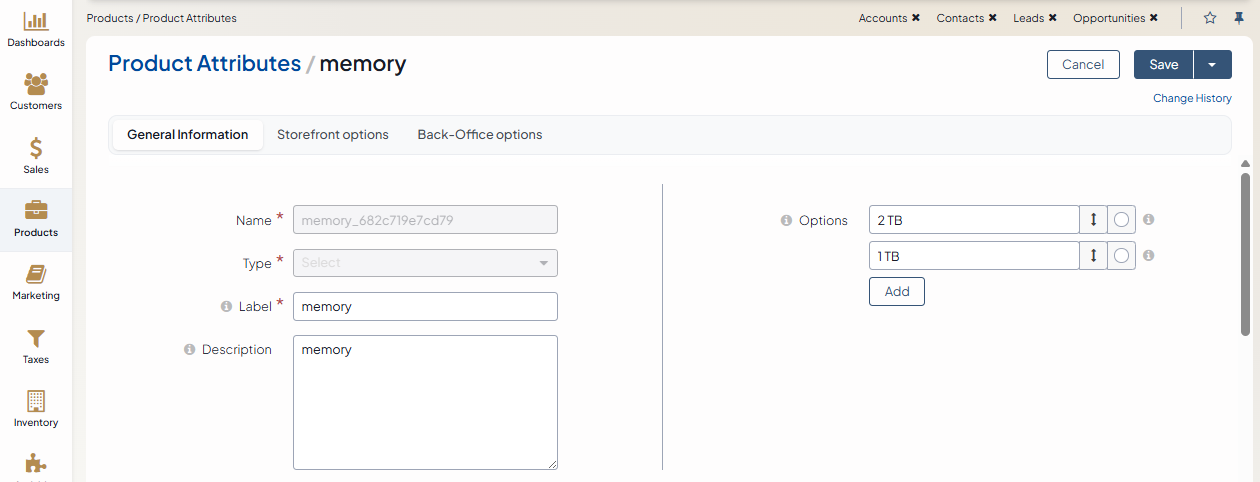
Click Save.
Step 2. Create a Product Family.
Navigate to Products > Product Families in the main menu.
Click Create Product Family in the top right corner.
Fill in the required information for the product family (e.g., name Tech).
Click Add to create a new attribute group (e.g., Memory Capacity) and add attribute memory to it.
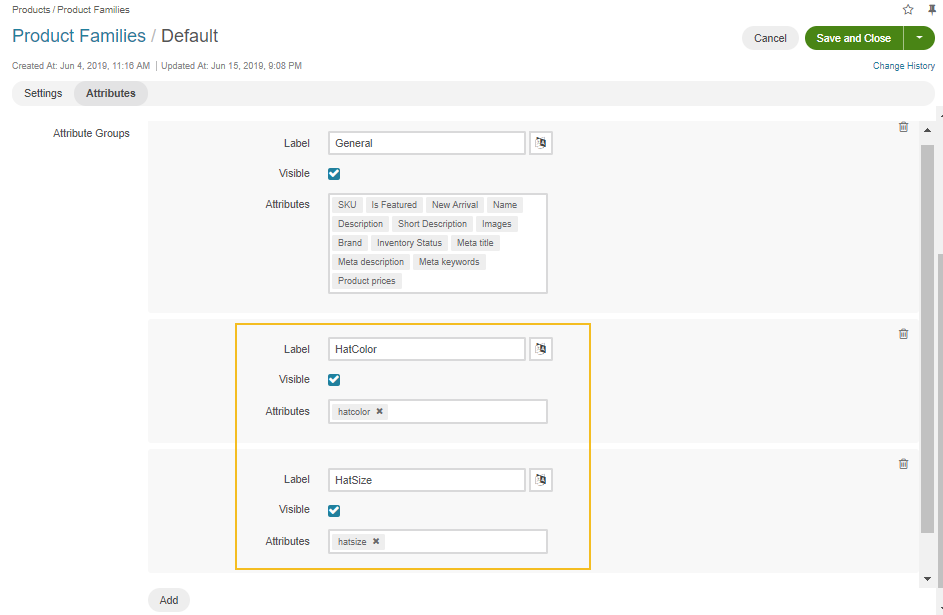
Click Save to save the product family.
Step 3. Create Configurable Product Variants.
Next, create two simple products, Hard Drive 1 TB and Hard Drive 2 TB, and select the corresponding memory attribute to each. These simple products will subsequently be added to the configurable product as its product variants.
Navigate to Products > Products in the main menu.
Click Create Product in the top right corner.
Set the product type to Simple, select the new product family (Tech).
Fill in the required information and add the attributes required for this particular product.
Note
Make sure that the simple product is enabled.
Click Save.
Repeat step 3 and 4 for the second product.
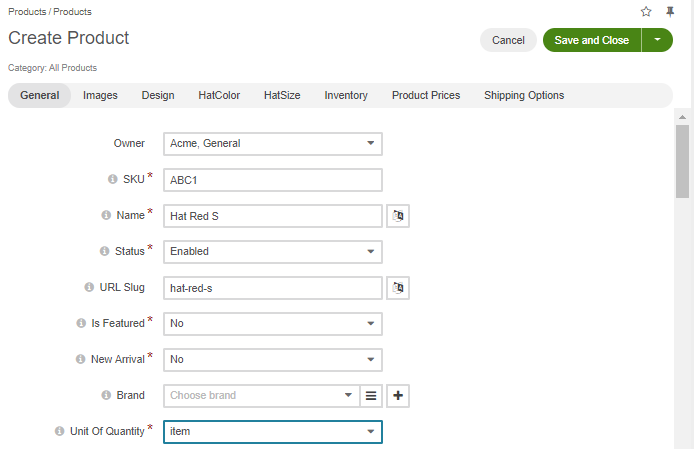
Step 4. Create a Configurable Product.
Navigate to Products > Products in the main menu.
Click Create Product.
Set the product type to Configurable.
Select the category.
Note
Choosing a category is mandatory at this stage, as it determines whether the product is available on the website.
Choose the ‘Hats’ product family.
Add ‘HatSize’ and ‘HatColor’ attributes to the product.
Fill in the required information and add the created product variants for this configurable product.
Note
You might want to save the product at this point to make sure that product variants are available in the Product Variants section of the product you are creating.
Click Save.
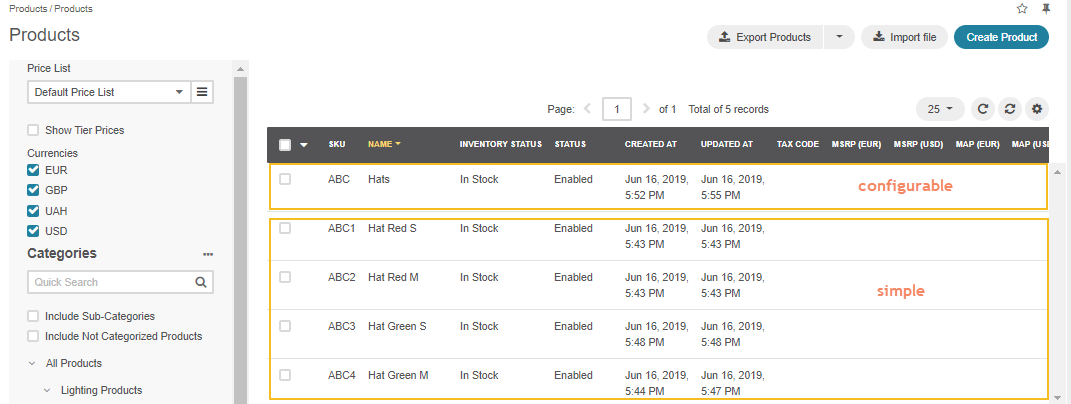
The product should now be available on the website in the category we previously assigned it to.