Configure Global User Settings
Note
You can configure user settings globally or per specific organization.
To apply user-related settings, such as enabling sharing records or user provisioning, in your Oro application instance:
Navigate to System > Configuration in the main menu.
Click System Configuration > General Setup > User Settings.
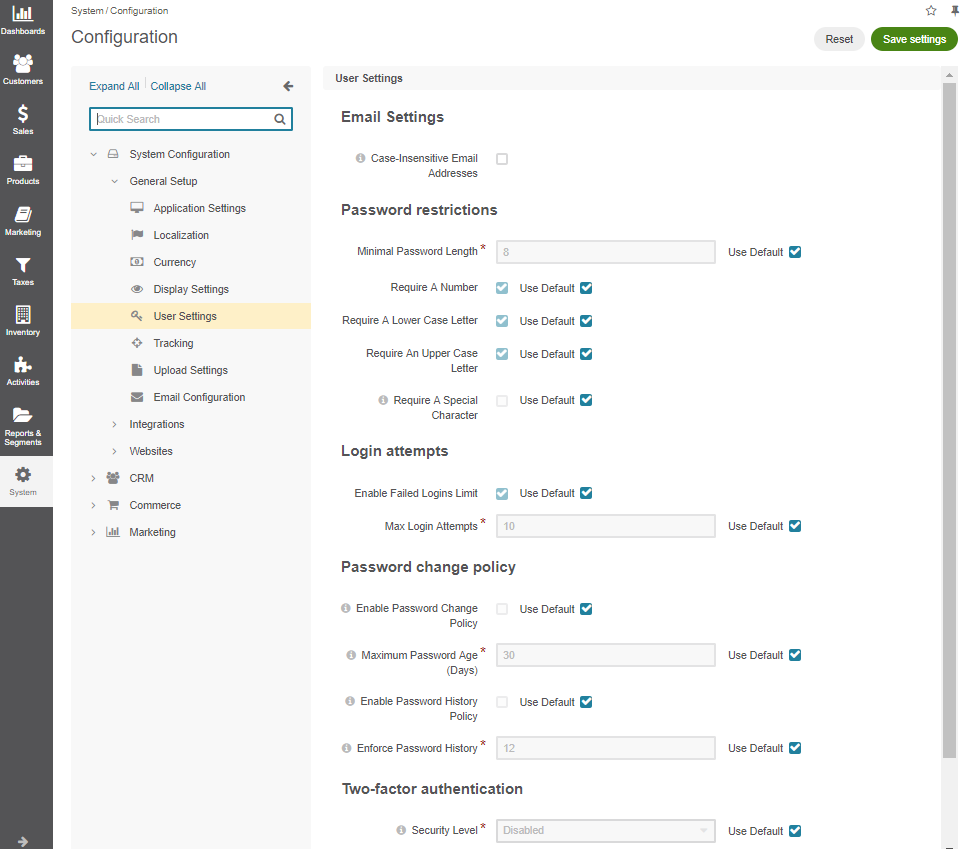
Email Settings
Under Email Settings, configure the following:
Case-Insensitive Email Addresses — If this option is enabled, the letter case is ignored when comparing email addresses. For example, john.doe@example.com and John.Doe@example.com are treated equally. By default, the option is disabled. Please note that the setting only applies to back-office users. The identical option for customer users is managed here.
User Provisioning
Hint
This section is part of the Identity Management Concept Guide topic that provides a general understanding of external identity systems supported by OroCommerce.
Note
The SCIM synchronization is only available in the Enterprise edition.
Under User Provisioning, configure the SCIM (System for Cross-domain Identity Management) protocol in the Oro application. This setup allows you to import and synchronize users from external identity systems, such as Microsoft Entra ID or Okta, into Oro. Once imported, these users can log into Oro via Microsoft Entra Single Sign-On or Okta Single Sign-On.
Enable SCIM Synchronization
To enable and control SCIM synchronization, set the following options:
Enable SCIM — Enable or disable the SCIM integration on the global level.
Default Access to Organization Business Units — Select the organizations and business units that will be automatically assigned to newly synchronized users.
Default Roles — Select the user roles that new users will receive upon synchronization.
Important
At least one organization business unit and user role should be configured in order to allow login of imported users.
Extra Fields Handling — Choose how the system should handle cases when the identity provider sends extra fields. The available options are:
Return error (default) — If selected, and the identity provider sends extra fields to Oro, the system will return an error.
Ignore extra fields — If selected, and the identity provider sends extra fields to Oro, the system will ignore these fields.
Empty Name Values Handling — Choose how the system should handle cases when the identity provider does not send first or last name values. The available options are:
Leave as is and expect validation errors — If selected, and the identity provider sends no first or last name to Oro, the system will return an error without generating any replacement values.
Generate based on user name (default) — If selected, the first and last name values will be copied from the username field.
Use random string — If selected, the first and last name values will be automatically generated as random strings.
Configure Okta Provisioning Service
OroCommerce side
To configure the user provisioning via Okta provisioning service and allow importing of users from Okta to Oro, make sure you have:
Configured the SCIM synchronization globally or per required organization.
Important
At least one organization business unit and user role should be configured in order to allow login of imported users.
Created Authorization Code OAuth application as described in the Create an OAuth Application topic.
Note
You can find the redirect URL in the Okta SCIM API authentication documentation which provides example URLs to use. These URLs include an identifier
{appName}generated after you create your app integration in Okta. If the Okta application is already created, use the generated URL. Otherwise, you can temporarily specify a placeholder (fake) URL and update it later once the application is created.
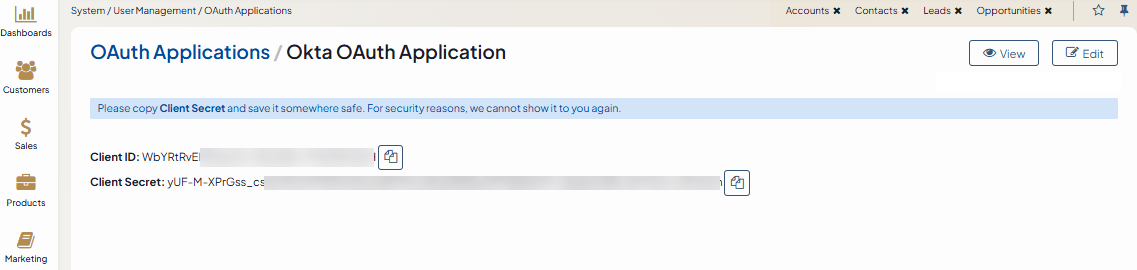
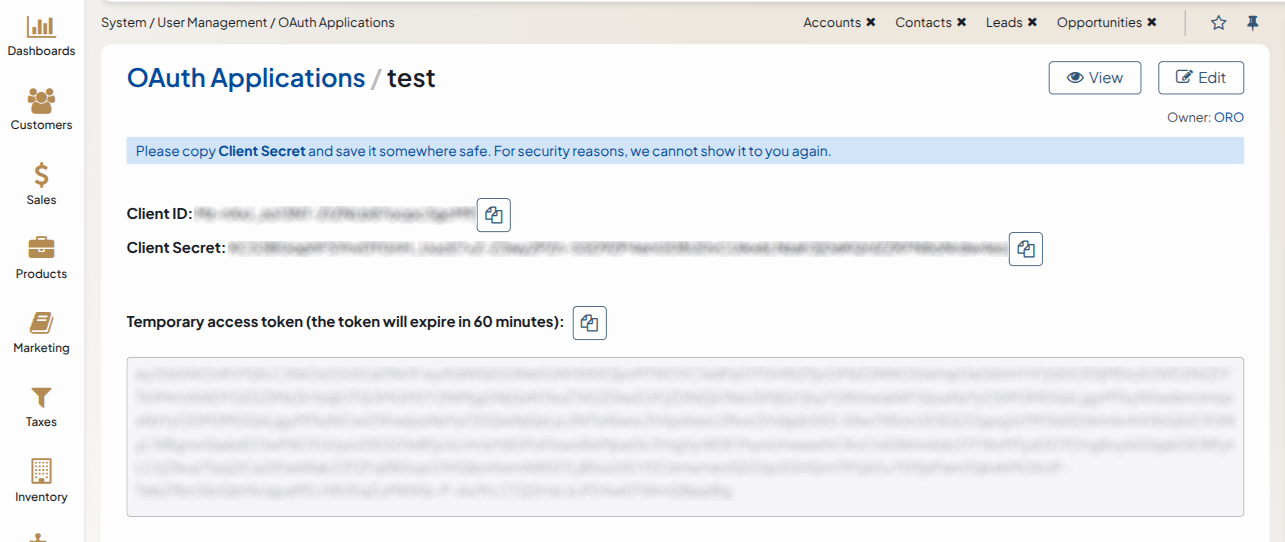
Copied Client ID and Client secret. For security reasons, the Client Secret is displayed only once – immediately after you have created a new application. You cannot view the Client Secret anywhere in the application once you leave a page with the created application information, so make sure you save it somewhere safe so you can access it later.
Okta side
Create an Okta app instance
Log into your Okta Admin Console.
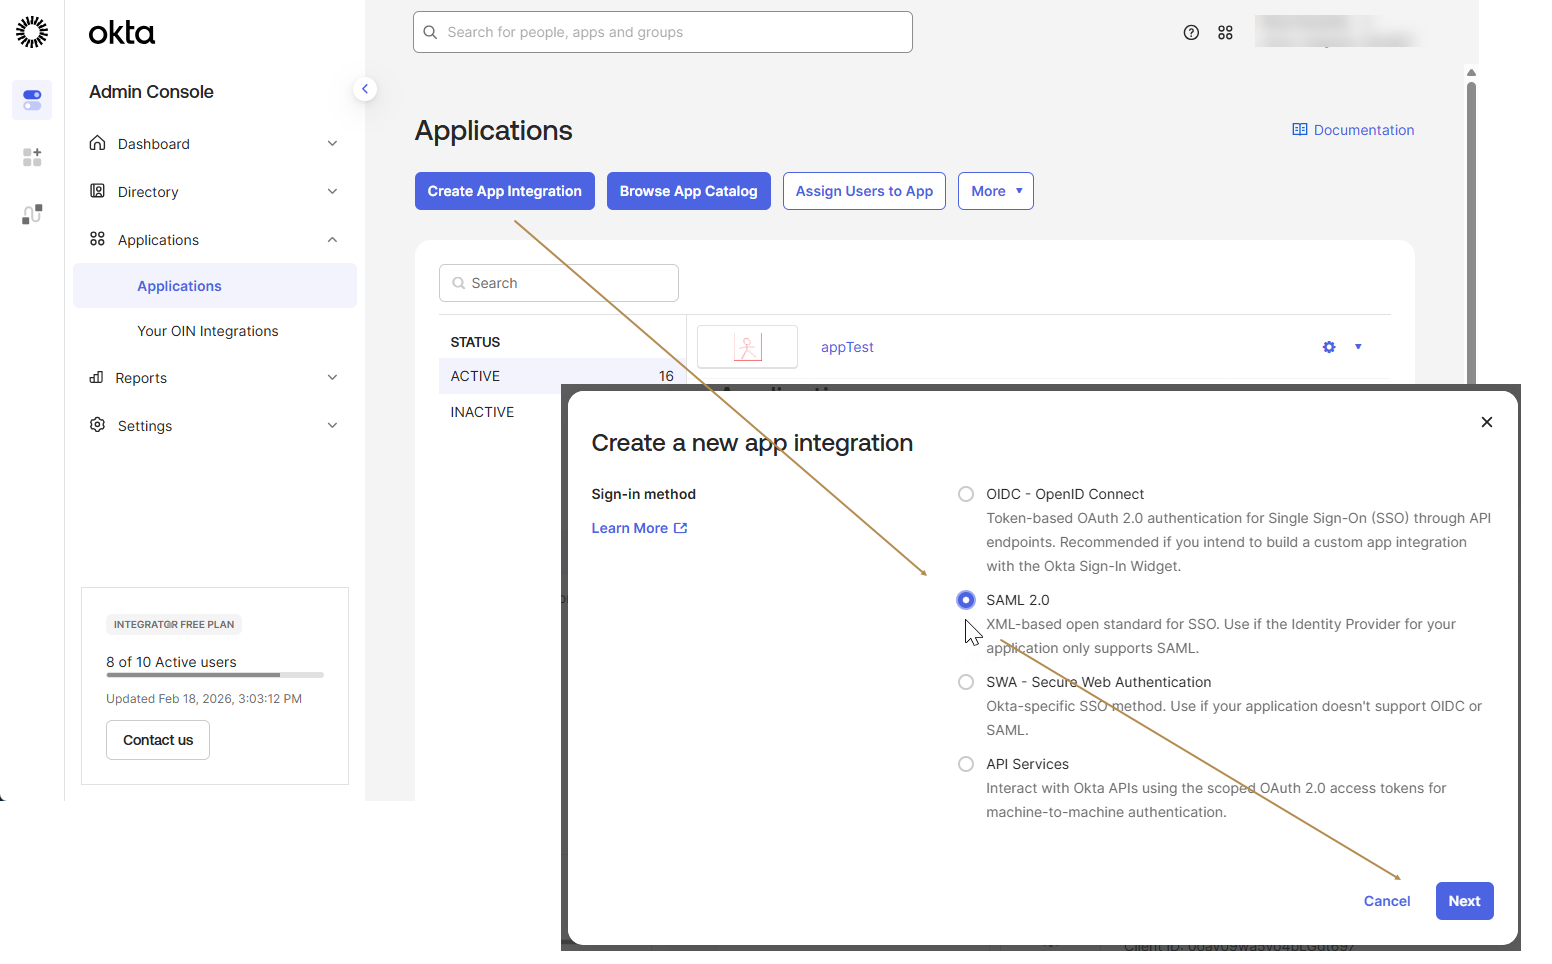
Navigate to Applications > Applications.
Click Create App Integration.
Choose SAML 2.0 sign-in method and click Next.
Provide a name and a logo for the new application and click Next.
Fill in the form with the following data and click Next:
Single sign-on URL:
https://yourapplicationAudience URI (SP Entity ID):
https://yourapplication
Specify options that will help Okta Support understand how you configured this application and click Finish.
Get Redirect URL
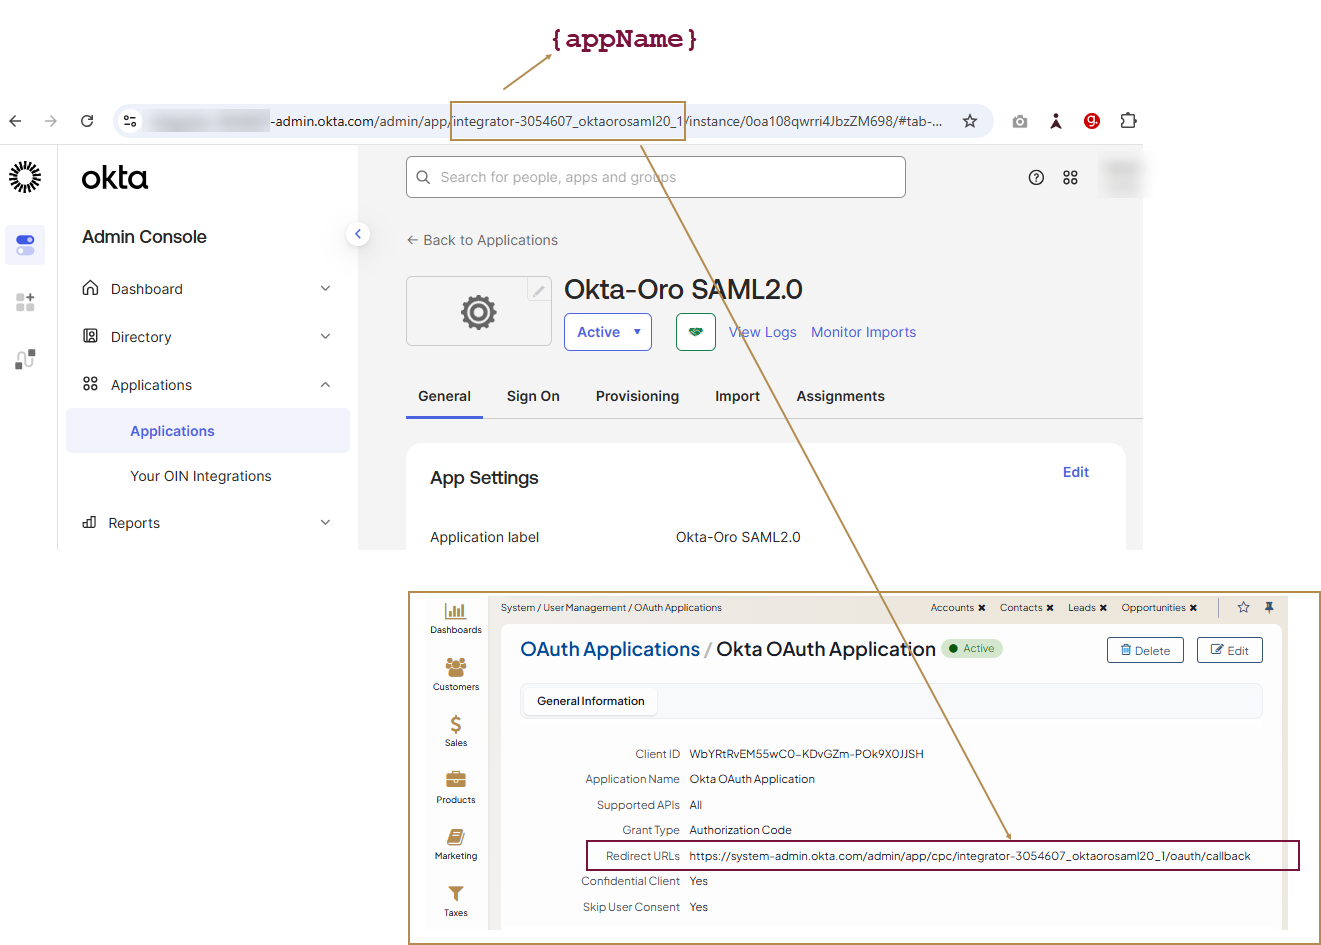
As the Okta application has been successfully created, you can now add the Redirect URL to the OroCommerce OAuth application. You can find the redirect URL example in the Okta SCIM API authentication documentation.
Note
Okta requires the Redirect URL to follow this format:
https://system-admin.okta.com/admin/app/cpc/{appName}/oauth/callbackThe
{appName}value is generated when you create your app integration in Okta. You can obtain it from the Admin Console URL after navigating to Applications > Applications > your app instance.The Admin Console URL has the following format:
https://{orgSubDomain}-admin.{oktaEnvironment}.com/admin/app/{appName}/instance/{instanceID}/#tab-generalThe
{appName}is the string between/app/and/instance/in the URL.
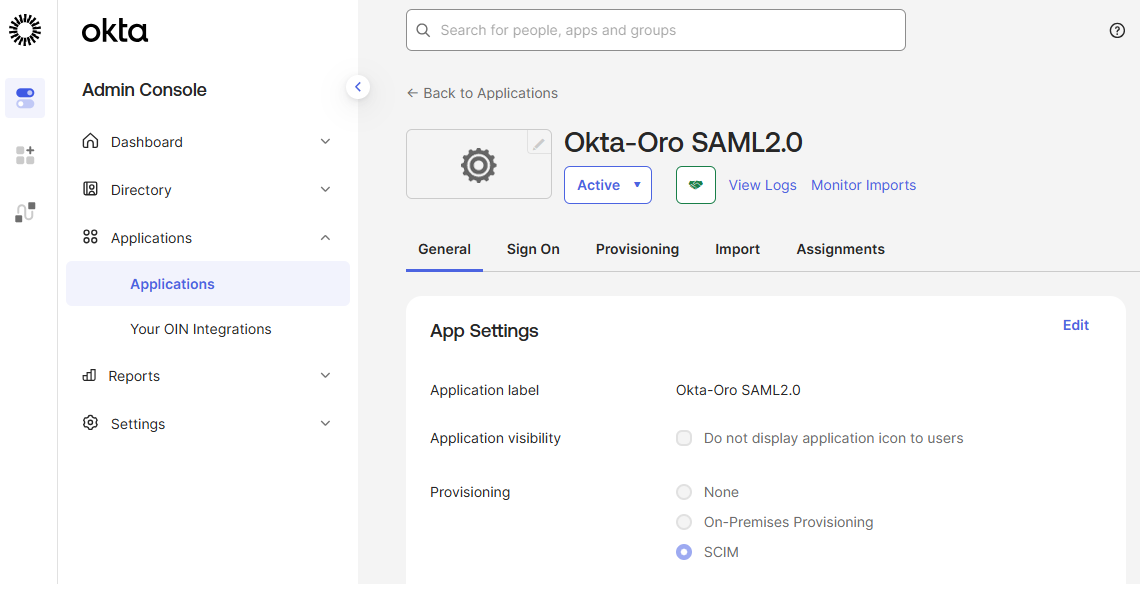
Edit Okta app instance
On the application details page, navigate to the General tab and click Edit in App Settings.
Choose SCIM provisioning method and click Save.
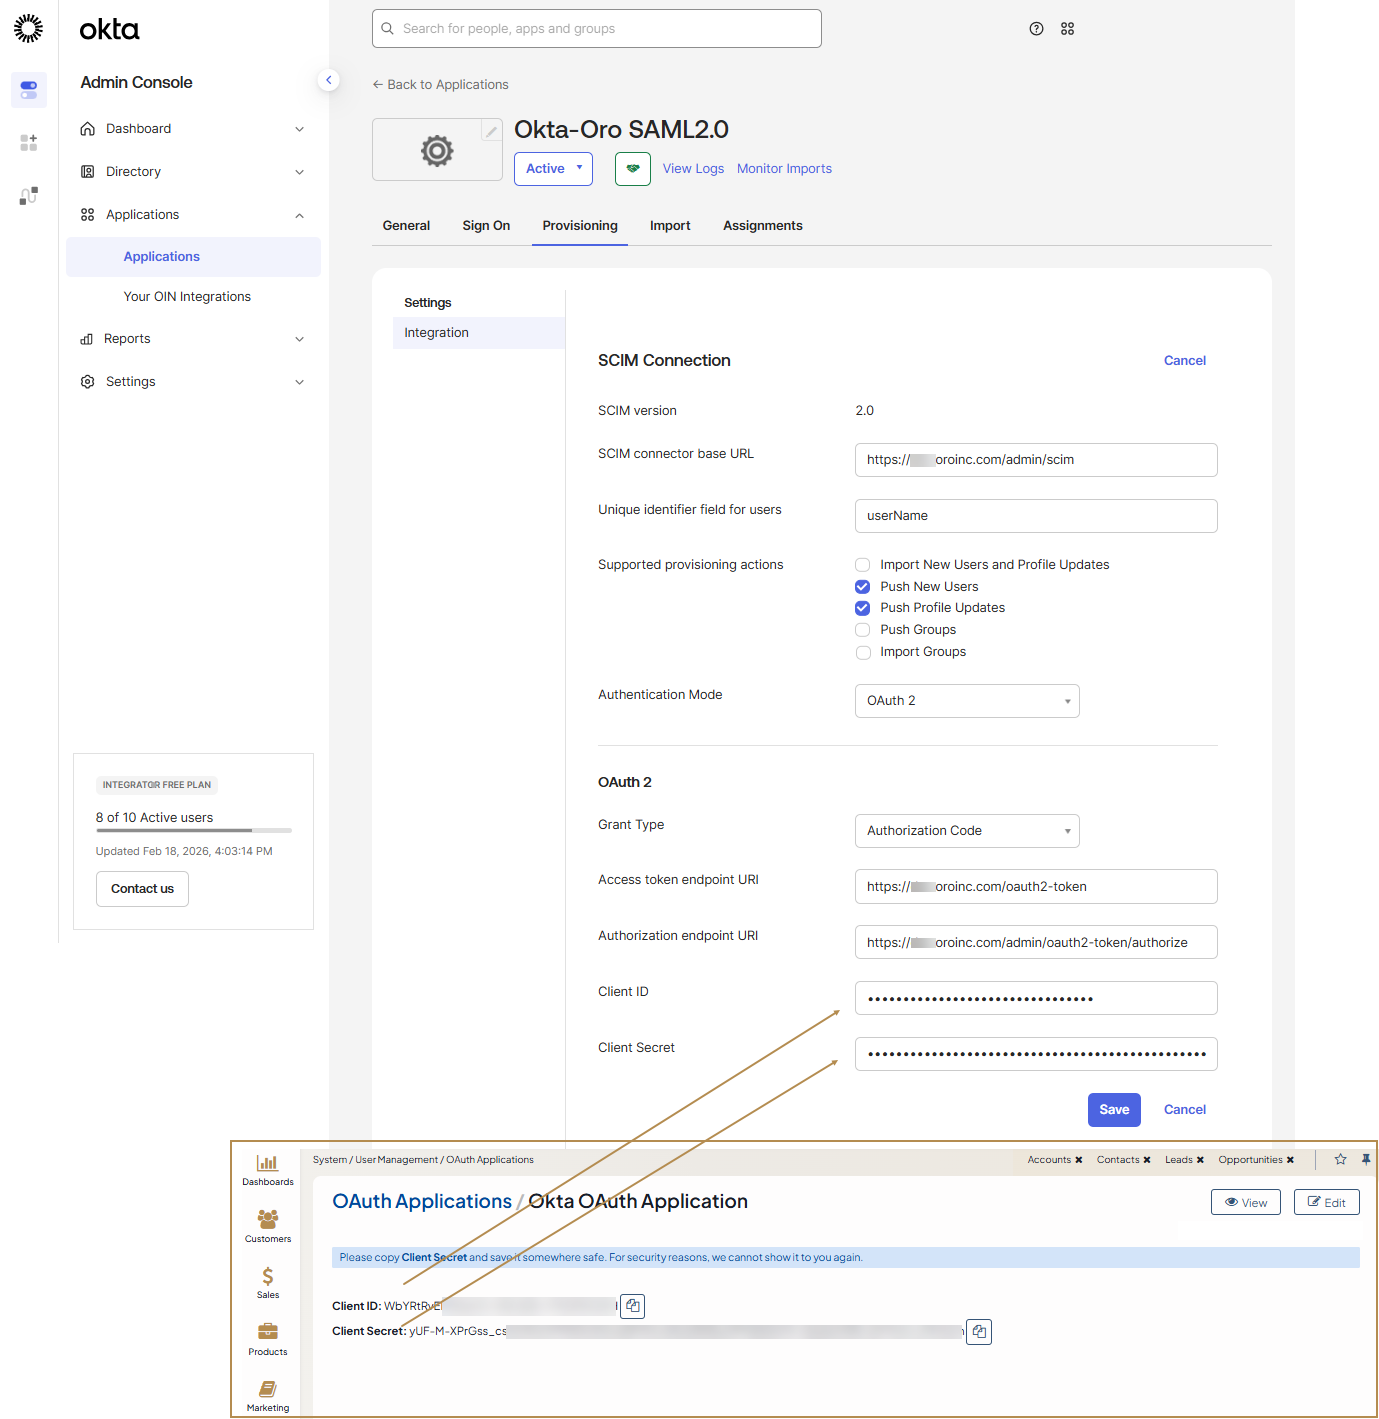
Navigate to the Provisioning tab and click Edit in SCIM Connection.
Fill in the form with the following data and click Save:
SCIM connector base URL:
https://yourapplication/{backend_prefix}/scimUnique identifier field for users:
userNameSupported provisioning actions:
Push New UsersandPush Profile UpdatesAuthentication Mode:
OAuth 2Access token endpoint URI:
https://yourapplication/oauth2-tokenAuthorization endpoint URI:
https://yourapplication/{backend_prefix}/oauth2-token/authorizeClient ID: The Client ID value of the OAuth 2 application
Client Secret: The client secret of the OAuth 2 application
Click Authorize with {your application} and grant access to your application to Okta.
Navigate to the Provisioning tab, click To App in the left menu and click Edit in Provisioning to App.
Fill in the form with the following data and click Save:
Create Users: Enable
Update User Attributes: Enable
Deactivate Users: Enable
Configure user mapping with the following attributes:
Attribute
Attribute Type
Value
userName
Personal
givenName
Personal
user.firstName
familyName
Personal
user.lastName
middleName
Personal
user.middleName
honorificPrefix
Personal
user.honorificPrefix
honorificSuffix
Personal
user.firstName
email
Personal
user.email
emailType
Personal
(user.email != null && user.email != ‘’) ? ‘work’ : ‘’
title
Personal
user.title
primaryPhone
Personal
user.primaryPhone
primaryPhoneType
Personal
(user.primaryPhone != null && user.primaryPhone != ‘’) ? ‘work’ : ‘’
Navigate to the Assignments tab and configure the user to be provisioned.
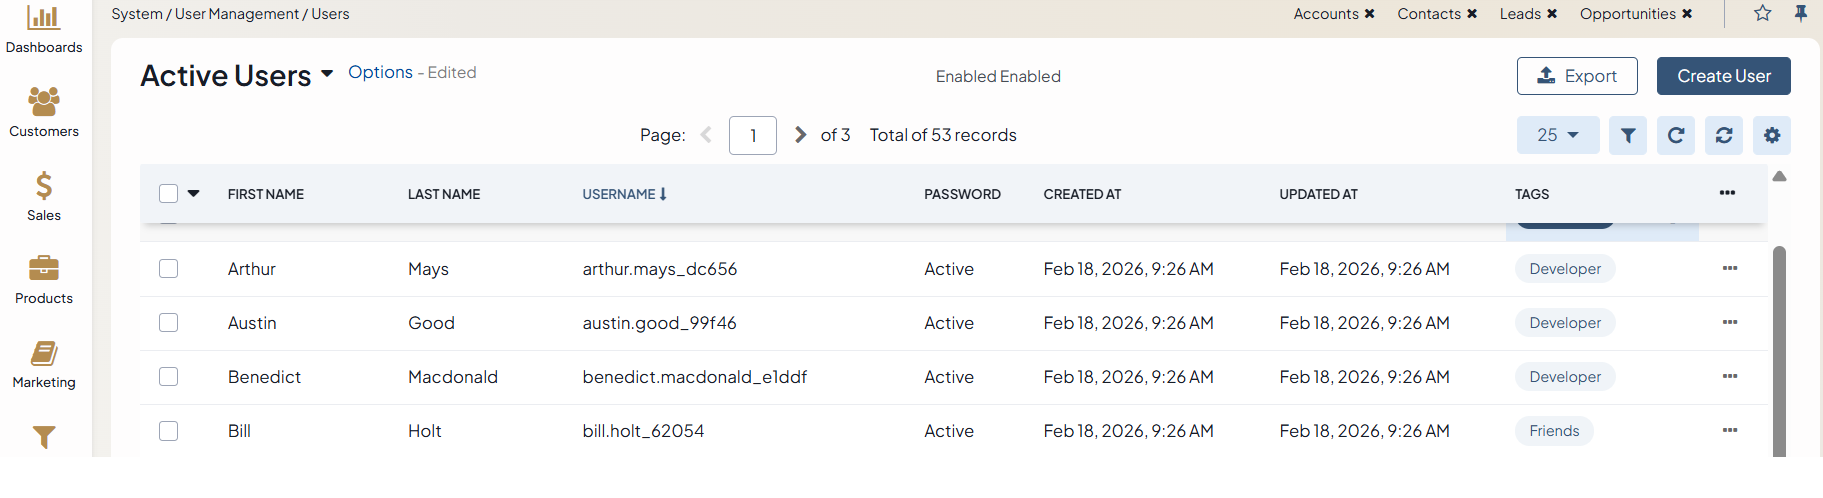
Once the provision is established, the users that are/will be registered within this Okta app instance will be synced to Oro. Their details will appear under System > User Management > Users in the OroCommerce back-office.
Important
The next step is to configure the Okta OpenID Connect integration under System > Manage Integrations menu in the back-office to enable synced users to log into Oro via OIDC SSO.

Configure Microsoft Entra Provisioning Service
OroCommerce side
To configure the user provisioning via Microsoft Entra provisioning service, make sure you have:
Configured the SCIM synchronization globally or per required organization.
Important
At least one organization business unit and user role should be configured in order to allow login of imported users.
Created Client Credentials OAuth application as described in the Create an OAuth Application topic.
Copied Client ID and Client secret. For security reasons, the Client Secret is displayed only once – immediately after you have created a new application. You cannot view the Client Secret anywhere in the application once you leave a page with the created application information, so make sure you save it somewhere safe so you can access it later.
Microsoft Entra side
Log in to the Microsoft Entra admin center with an account that has at least Application Administrator permissions.
Navigate to Entra ID > Enterprise apps.
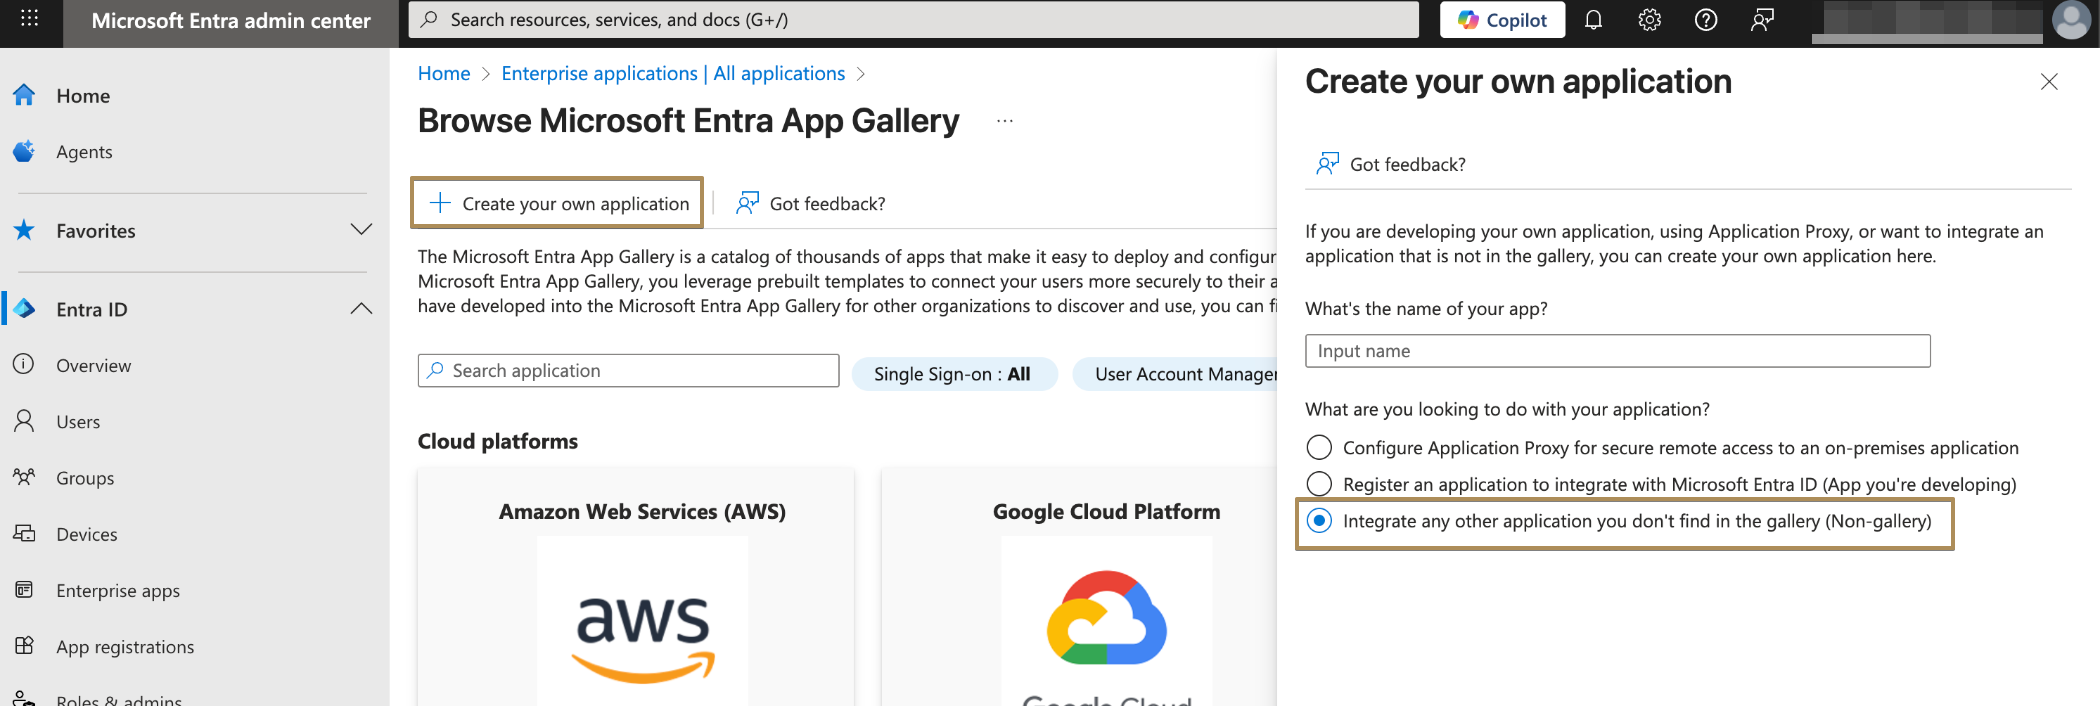
Click +New application > +Create your own application.
Provide a name for the new app, select the Integrate any other application you don’t find in the gallery option, and then click Add to create an application object. The newly created app will appear in the list of enterprise applications and will open its management page.
On the application management page, navigate to Provisioning in the menu to the left.
Click +New configuration.
Fill in the form with the following data:
Select authentication method: OAuth2 client credentials grant
Tenant URL: the SCIM endpoint URL of your application, for example:
https://yourapplication/scim/, orhttps://yourapplication/{backend_prefix}/scim/if Commerce application is installed.Token endpoint:
https://yourapplication/oauth2-tokenClient identifier: The Client ID value of the OAuth 2 application
Client Secret: The client secret of the OAuth 2 application
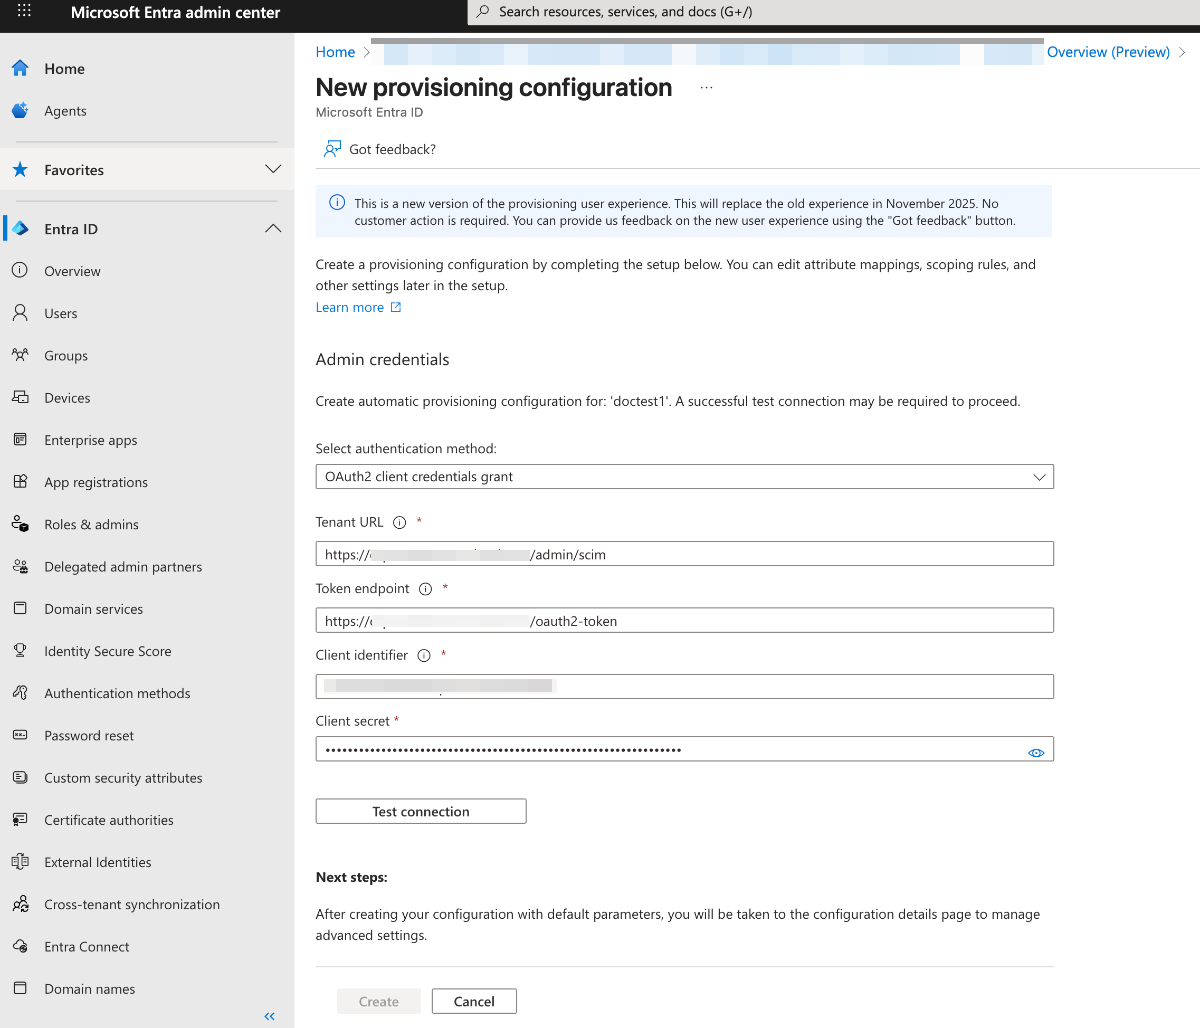
Click Test Connection to verify that Microsoft Entra ID can successfully connect to the SCIM endpoint. If the connection fails, an error message with details will appear.
If the connection is successful, click Create to set up the provisioning job.
To synchronize only specific users or groups (recommended), open the Users and groups tab and assign the users or groups you want to include in the synchronization.
In the left menu, go to Attribute mapping. You will see two mapping configurations — one for users and one for groups.
Disable group synchronization by turning off the Provision Microsoft Entra ID Groups mapping
Configure Provision Microsoft Entra ID Users with the following mapping settings:
customappsso Attribute
Microsoft Entra ID Attribute
Matching precedence
userName
userPrincipalName
1
active
Switch([IsSoftDeleted], , “False”, “True”, “True”, “False”)
title
jobTitle
emails[type eq “work”].value
mail
name.givenName
givenName
name.familyName
surname
phoneNumbers[type eq “work”].value
telephoneNumber
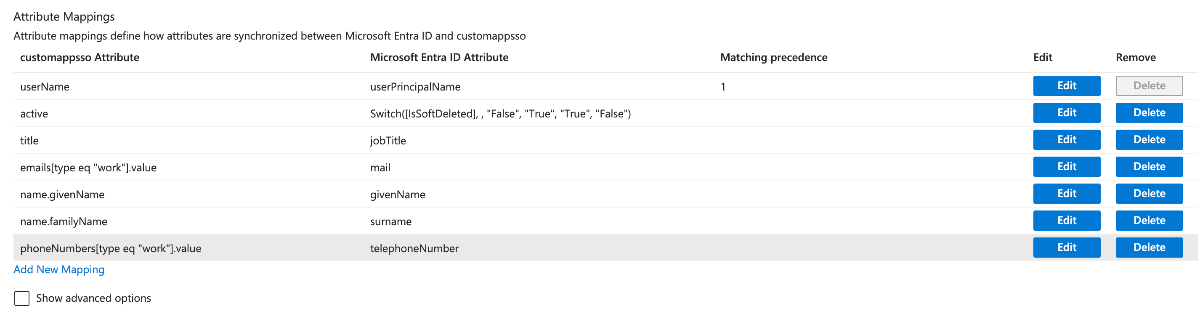
Click Save to apply any changes.
Then, navigate to Provision on-demand in the left menu. Search for a user within the provisioning scope and trigger manual provisioning. Repeat this process with other users to test synchronization.
Once the setup is finished, open Overview in the left menu.
Select Properties, then click the pencil icon to edit them. Enable notification emails, enter the address to receive quarantine alerts, and turn on accidental deletion prevention. Click Apply to save your updates.
Select Start provisioning to launch the Microsoft Entra provisioning service.
After the initial provisioning cycle begins, go to Provisioning logs in the left menu to track its progress. This section displays all the actions performed by the provisioning service for your application.
Once the provision is established, the users that are/will be registered within this Okta app instance will be synced to Oro. Their details will appear under System > User Management > Users in the OroCommerce back-office.
Important
The next step is to configure the Microsoft OpenID Connect integration under System > Manage Integrations menu in the back-office to enable synced users to log into Oro via OIDC SSO.

Related Articles